
🧠 What is OCR?
Explains OCR and diffusion models with intuitive examples, internal workings, and modern deep-learning pipelines.
What this file does
Explains OCR and diffusion models with intuitive examples, internal workings, and modern deep-learning pipelines.
When to use it
- Learning OCR fundamentals and modern approaches
- Understanding diffusion models for generative AI
- Comparing traditional vs deep learning OCR methods
- Getting a high-level overview of OCR pipeline steps
<============== Explain everything about OCR ! With intuitive examples! and also explain the internal working of OCR! ============>
Below is a complete, intuitive, end-to-end deep explanation of OCR (Optical Character Recognition)—what it is, how it works internally, different approaches, examples, common pitfalls, modern deep-learning pipelines, and practical intuition.
🧠 What is OCR?
OCR (Optical Character Recognition) is the process of converting an image of text into machine-readable text.
Examples:
- Scanning a printed PDF → extracting its text
- Taking a photo of a signboard → getting the words
- Reading handwriting from a form
- Reading numbers from meter readings, invoices, IDs, license plates
⭐ Intuitive Example
Imagine you take a photo of this:
Hello World
123
To a computer, the image is just a big grid of pixels: Example:
- Bright pixels = white
- Dark pixels = black
OCR must figure out:
- Where are characters?
- What each character is?
- What order they appear in?
This is similar to how humans read:
- Detect lines
- Detect words
- Recognize shapes of letters
- Interpret meaning (optionally)
🧩 Two Eras of OCR
1. Traditional OCR (before Deep Learning)
Uses:
- Thresholding
- Contour detection
- Character segmentation
- Hand-crafted features (HOG, SIFT)
- Template matching
- Classical ML classifiers (SVM, KNN)
2. Modern OCR (Deep Learning-based)
Uses:
- CNNs for feature extraction
- Transformers or RNNs for sequence modeling
- CTC loss for predicting character sequences
- End-to-end systems like Tesseract 4+, Google Vision OCR, EasyOCR
Modern OCR is significantly more accurate because:
- It can handle noisy images
- It doesn’t require perfect segmentation
- It learns features automatically
🚀 High-Level Pipeline (Intuitive)
Here is what a complete OCR system does internally.
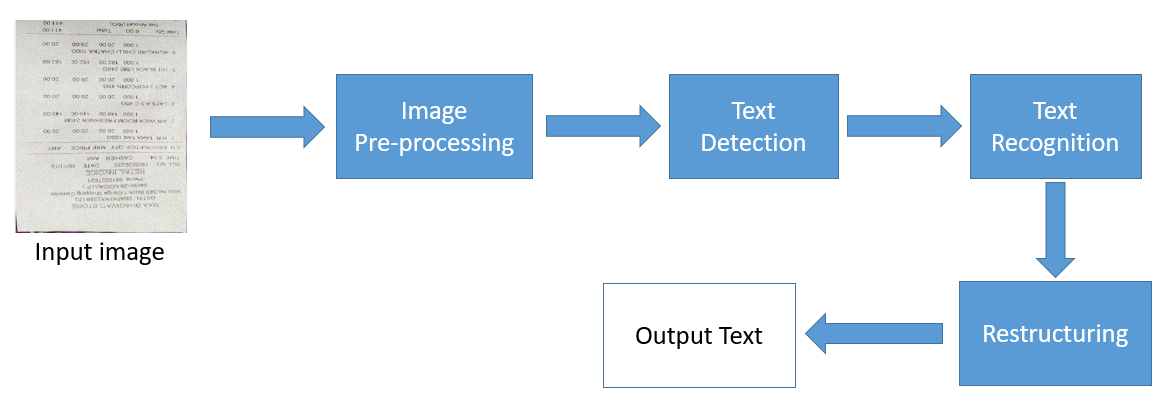
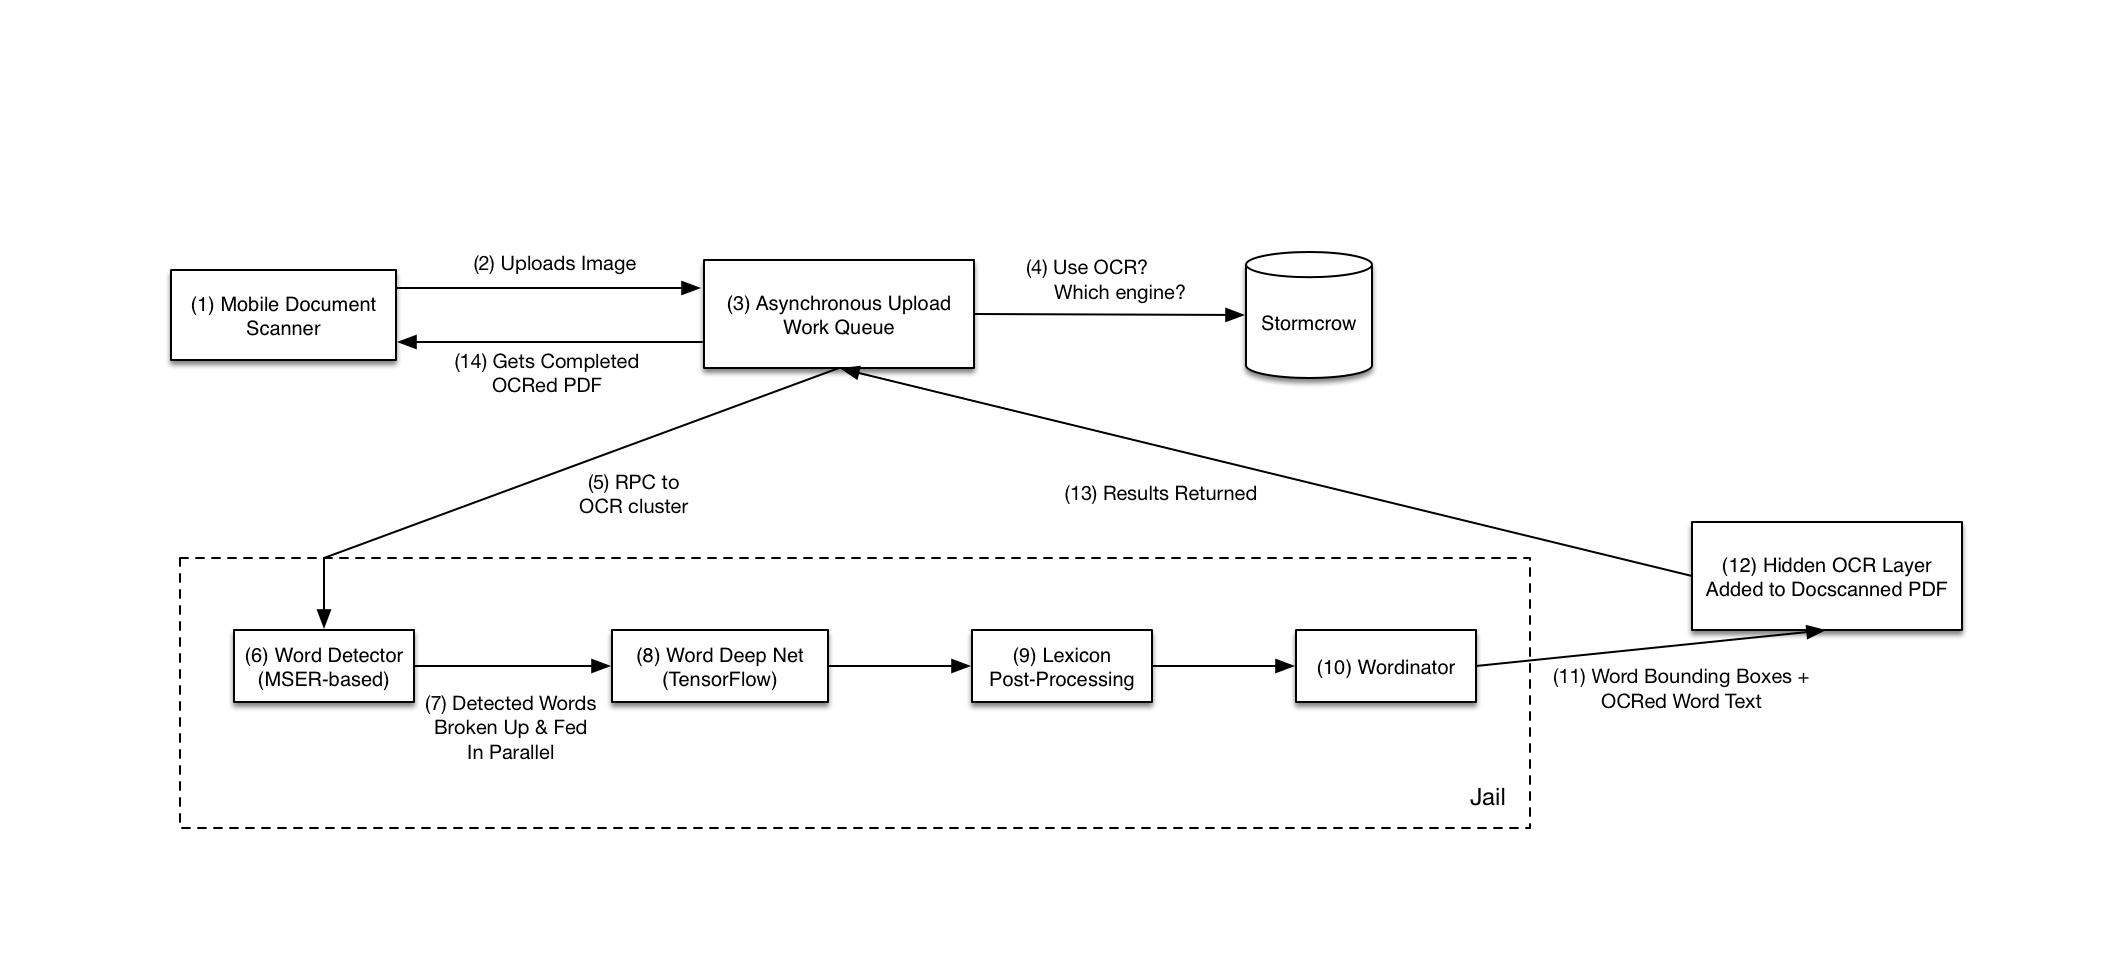
🥽 STEP 1 — Image Preprocessing
Goal: Clean the image so text becomes easier to recognize.
Intuition:
Like cleaning smudges on spectacles before reading a book.
Common preprocessing steps:
- Grayscale conversion
- Noise removal
- Binarization (black vs white using Otsu threshold)
- Deskewing (fix rotated page)
- Cropping margins
- Sharpening text edges
Example: Original image → skewed + dark After preprocessing → clean, contrast-enhanced, aligned text
🔍 STEP 2 — Text Detection (Where is the text?)
Before reading characters, OCR must find text regions.
Modern text detectors include:
- EAST
- CRAFT
- DB Detector (Differentiable Binarization)
These models return bounding boxes for:
- Lines
- Words
- Sometimes characters
Example Output:
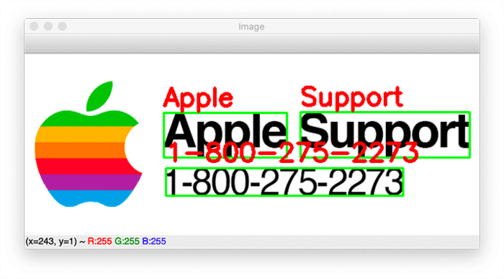
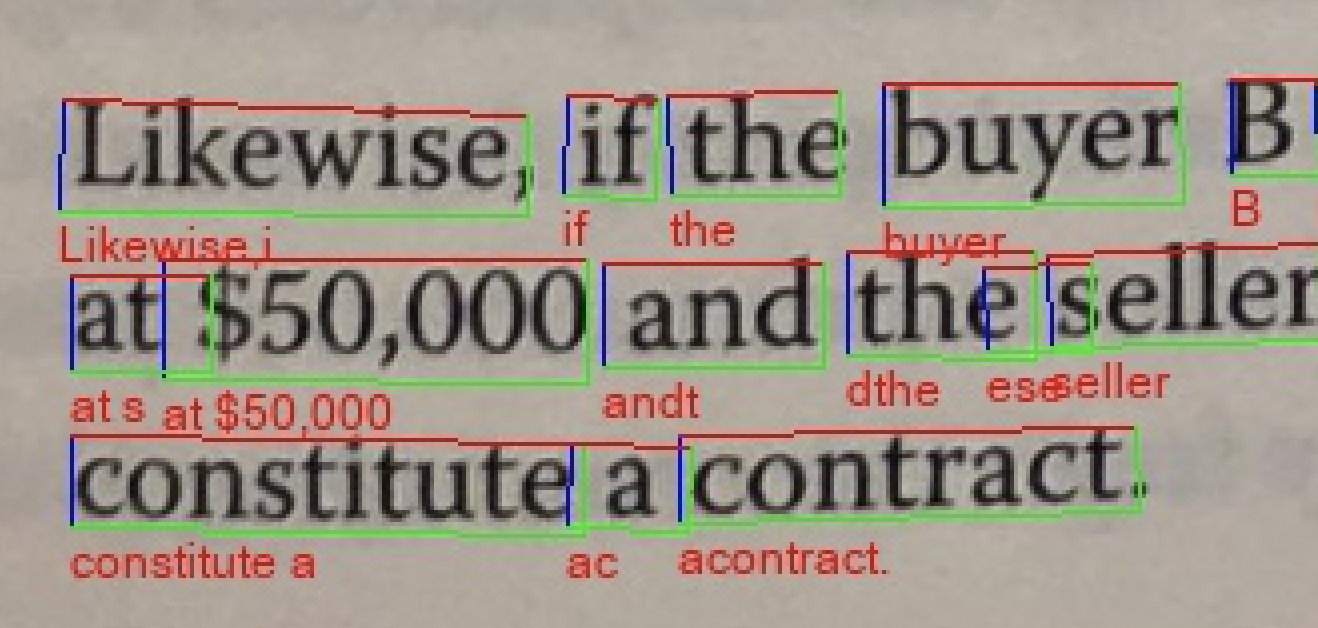
These boxes tell the recognizer where to extract text.
✂️ STEP 3 — Text Segmentation (Traditional OCR only)
Old OCR systems first cut the image into individual characters.
Example:
H e l l o
Problem: This fails for connected letters, cursive handwriting, distorted fonts.
Modern OCR skips segmentation by treating the text line as a whole sequence.
🔠 STEP 4 — Text Recognition (The core of OCR)
This is where the system decides what characters are present in the image.
Traditional OCR
- Extract features (edges, strokes, HOG)
- Compare with templates (“Does this shape match a printed 'A'?”)
- Output character
Intuition:
Like matching a child’s drawing of ’A’ with known shapes.
🧬 Modern Deep Learning OCR — Internal Working
Modern OCR uses a pipeline known as:
CNN → Sequence Model (RNN/Transformer) → CTC Decoder
Let's break it down.
🧱 (a) CNN Feature Extraction
A Convolutional Neural Network converts the word image into a feature map.
Intuition: The CNN learns:
- Vertical stroke patterns
- Round shapes
- Edges
- Curvature
- Thickness
Example:
Input: "Hello" image
Output: a sequence of feature vectors representing strokes of characters.
🔗 (b) Sequence Modeling (LSTM/Transformer)
This step reads the image left to right like a human.
- LSTM or GRU → sequential understanding
- Transformer → global attention over the word
The model now knows:
- Which characters follow each other
- Word patterns (“ing”, “tion”)
- Contextual corrections
🎯 (c) CTC (Connectionist Temporal Classification) Decoder
CTC solves the “alignment problem”.
The model outputs something like:
h he he l l lo o o
CTC removes:
- Repeated characters
- Blank tokens
Final result:
→ "hello"
This avoids manual segmentation.
📦 STEP 5 — Post-processing
Now we refine the raw output.
May include:
- Spell checking
- Dictionary lookup
- Language modeling
- Removing stray symbols
- Fixing “0” vs “O”, “1” vs “l”
Example:
Raw OCR: "He11o W0r1d"
Post-processed: "Hello World"
✍️ Handwriting OCR — Special Case
Handwriting has:
- Irregular spacing
- Variable stroke widths
- Connected characters
Modern approaches:
- CNN + BiLSTM + CTC
- Transformers (Google Vision, Microsoft Azure OCR)
- Diffusion-based handwriting transcription
🧪 Intuitive Example: OCR on a Noisy Image
Consider this photo:


Pipeline:
- Denoise
- Increase contrast
- Text detection finds boxes
- Recognition model interprets shapes
- Language model fixes context
🧰 Common OCR Libraries
| Library | Uses | Strength |
|---|---|---|
| Tesseract 4+ | Open-source OCR | Good for printed text |
| EasyOCR | Deep learning OCR | Multilingual, robust |
| PaddleOCR | SOTA open-source | Best accuracy in open models |
| Google Cloud Vision OCR | Paid API | Very high accuracy |
| AWS Textract | Form/table OCR | Great for structured data |
| Microsoft Read API | Handwriting + layout | Very powerful |
🧨 Challenges & Why OCR Sometimes Fails
- Low resolution
- Blurry camera
- Lighting glare
- Angled perspective
- Stylized fonts
- Handwriting inconsistencies
- Text overlapping images
🔥 Modern Advances: End-to-End OCR
State-of-the-art systems now combine:
1. Text detection
2. Recognition
3. Layout understanding
4. Document structure reconstruction
Example systems:
- Donut (OCR-free document understanding)
- LayoutLMv3
- TrOCR
These models read entire documents like humans → even without explicit OCR.
📚 Summary
| Step | What Happens |
|---|---|
| Preprocess | Clean image |
| Text detection | Find where text is |
| Recognition | Convert image → characters |
| Postprocessing | Fix mistakes |
| Output | Clean text |
Modern OCR = deep learning + language models → highly accurate.
🙋 Want to go deeper?
I can also explain:
- CTC mathematics with diagrams
- How Tesseract works internally
- Difference between OCR and ICR
- Layout analysis (tables, forms)
- How to build your own OCR model from scratch
- Code examples using Python (OpenCV, pytesseract, EasyOCR, PaddleOCR)
Just tell me what direction you want to explore!
<============= what is diffusion based model ? ============>
A diffusion-based model (or diffusion model) is a type of generative model used to create images, audio, video, 3D shapes, or text by gradually denoising random noise. It is now one of the most powerful model families, used in Stable Diffusion, DALL·E 3/4, Midjourney, Imagen, etc.
Let’s explain it intuitively and then formally.
🧠 Intuition: Diffusion Models = “Reverse Noise Process”
Imagine this process:
1. Take a clean image
A cat
2. Add a little noise
Like sprinkling dust.
3. Add more noise
The image becomes blurry.
4. Add noise again and again
Eventually the image becomes pure random noise.
That’s the forward diffusion process.
Now here's the magic:
If a model learns how to undo each step of noise addition…
→ It can start from pure noise → and reverse the process step-by-step → to generate a completely new, realistic image.
So a diffusion model literally imagines an image emerging from noise.

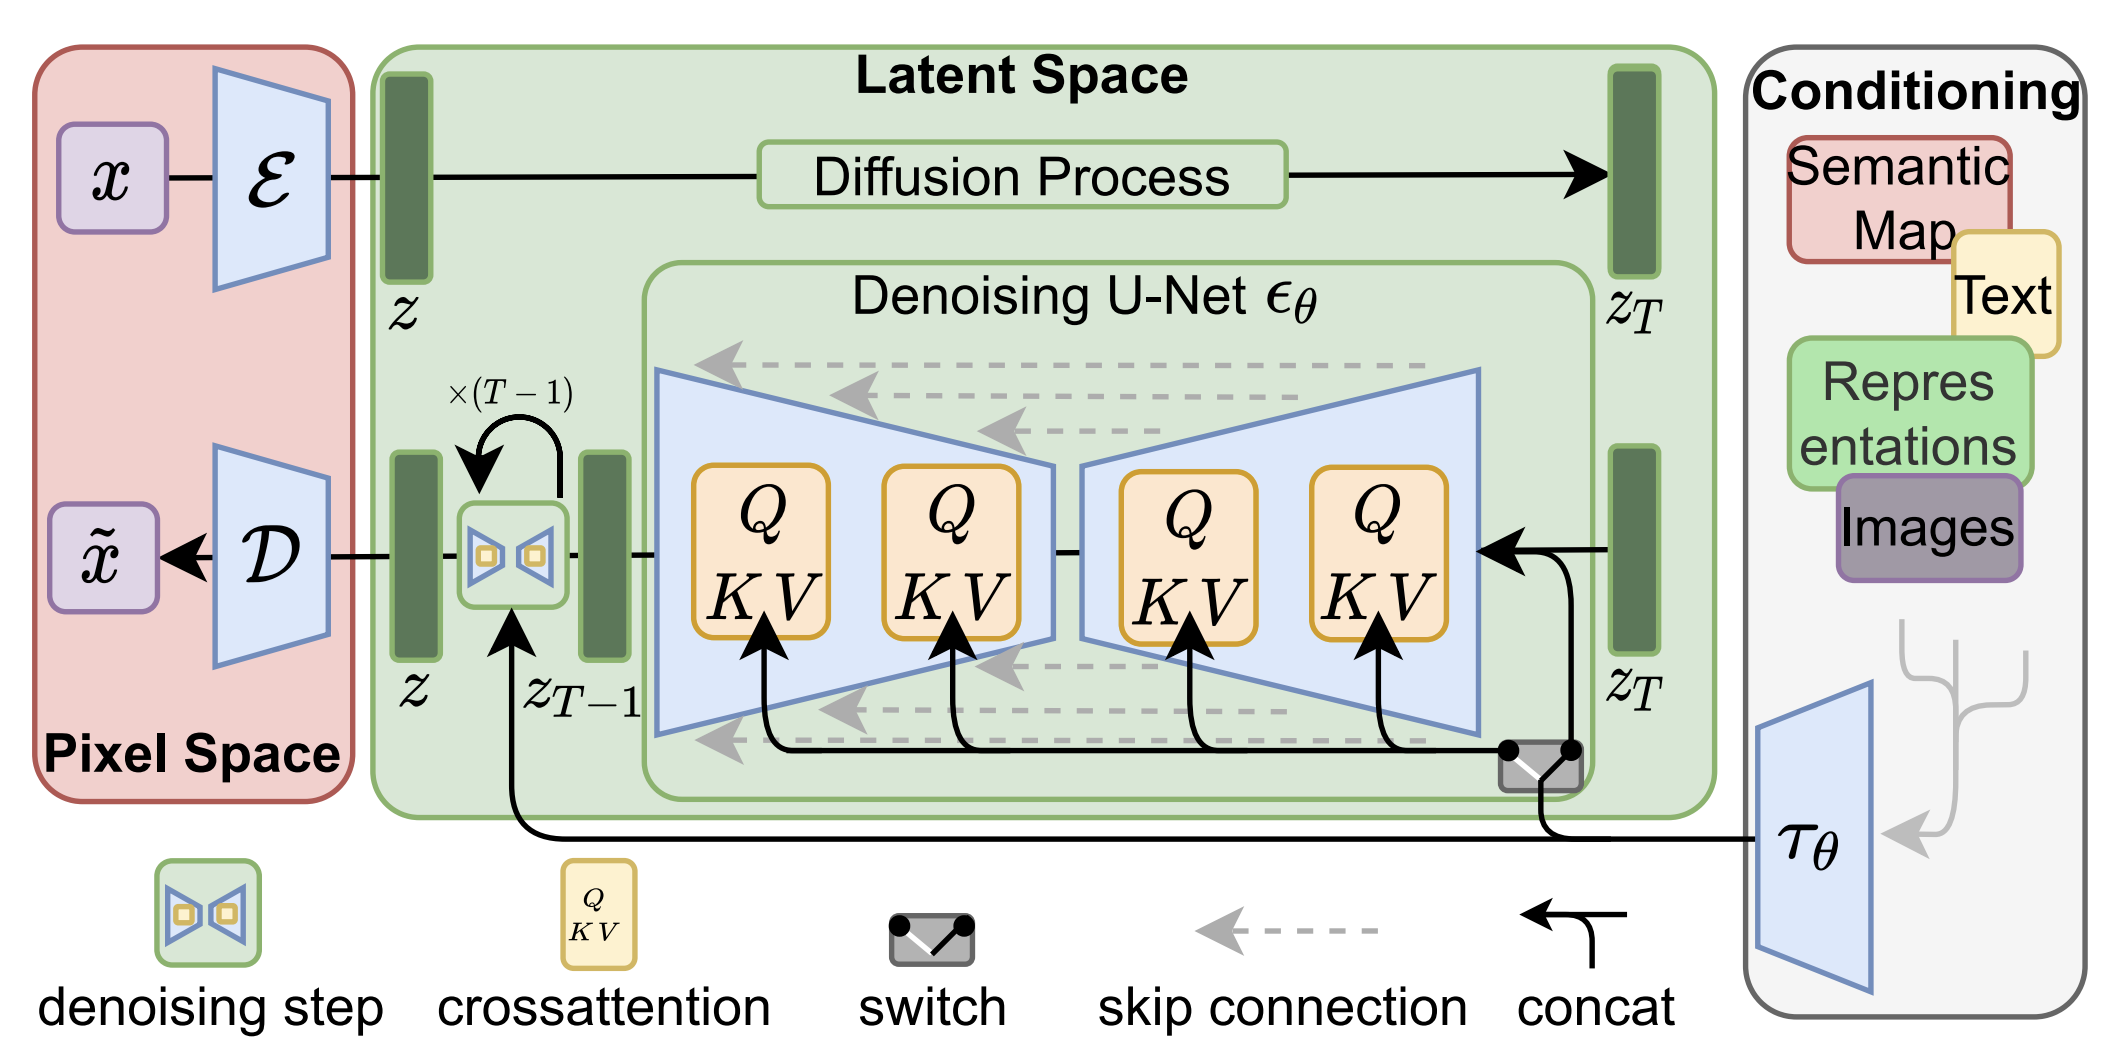
🧩 Mathematically: Two Processes
## 1️⃣ Forward Process (Diffusion)
Add tiny Gaussian noise step-by-step:
[ x_0 \rightarrow x_1 \rightarrow x_2 \rightarrow \ldots \rightarrow x_T ]
Where:
- ( x_0 ) = original image
- ( x_T ) = almost pure noise
The model does not need to learn this part—it's fixed.
## 2️⃣ Reverse Process (Denoising)
The model learns to predict: [ x_{t-1} \text{ from } x_t ]
At each step, it tries to:
- Identify structure inside noisy image
- Remove a bit of noise
- Add a bit of detail
After repeating ~20–1000 steps, a crisp image emerges.
🎨 Why Diffusion Models Became So Popular
Compared to GANs and VAEs, they are:
| Property | GANs | VAEs | Diffusion Models |
|---|---|---|---|
| Stability | ❌ unstable | ⚠️ moderate | ✅ very stable |
| Image quality | ⭐⭐⭐⭐ | ⭐⭐ | ⭐⭐⭐⭐⭐ |
| Diversity | ⚠️ mode collapse | good | excellent |
| Training | hard | easy | easier |
| Text-to-image | poor | poor | exceptional |
Diffusion models outperform GANs in realism AND diversity without mode collapse.
🔮 Intuitive Explanation Using a Simple Story
Imagine a sculptor (diffusion model) with a block of clay (noise).
- Start with a random lump.
- Sculpt a bit → small details emerge.
- Sculpt more → shape becomes clearer.
- Continue iterating → full sculpture appears.
Each step applies small improvements. This is exactly how diffusion models generate images.
🖼️ Example: Generating “A Cat Playing Piano”
Prompt:
A fluffy cat playing the piano in a jazz bar, 4K
Steps:
- Start with pure noise
- Model predicts “this region might be fur”
- Another step: “these shapes resemble piano keys”
- Another step: adds lighting, shadows, coherence
- Final step: photorealistic image appears
DALL·E 3, Stable Diffusion, Midjourney all use versions of this idea.


⚙️ Key Components of Diffusion Models
1. Noise Scheduler
Controls how noise is added and removed.
2. U-Net Architecture
A special CNN that:
- Compresses noisy image → extracts meaning
- Expands image → reconstructs clean version
3. Text Encoder (for text→image)
- CLIP
- T5
- LLM embeddings
This ensures the generated image matches your prompt.
4. Sampler
Controls number of denoising steps:
- DDPM
- DDIM
- Euler
- Heun
- DPM++
More steps → better quality but slower.
📘 Simplest Intuition Formula
The reverse step is:
[ x_{t-1} = x_t - \text{noise predicted by model} ]
The model’s entire job is to predict the noise.
If it predicts noise perfectly → perfect image.
🔥 Where Diffusion Models Are Used
✔ Image generation
Stable Diffusion, DALL·E, Midjourney
✔ Super-resolution
Enhancing blurry images
✔ Inpainting
Filling missing image regions
✔ Video generation (Sora, Runway)
Same idea extended over time
✔ 3D generation
Gaussian splatting, NeRF extensions
✔ OCR & handwriting
Diffusion can "rewrite" text into clean form (used in research)
🎓 Summary
Diffusion-based models:
- Learn to reverse a noise process
- Generate data by iterative denoising
- Produce extremely realistic outputs
- Are stable and expressive
- Power most of today’s best generative AI systems
Want more?
I can explain:
- The math of DDPM (variance, KL loss, etc.)
- The architecture of U-Net in Stable Diffusion
- How prompting works internally
- How diffusion models differ from transformers/GANs
- Build-your-own diffusion model with PyTorch code
Just say what direction you want!
What's inside
Two major sections: OCR (5 pipeline steps, 7 libraries, challenges) and diffusion models (2 processes, key components, applications).
Change this for your project
- Replace image URLs like
https://theailearner.com/wp-content/uploads/2020/12/OCR_pipeline.png?utm_source=chatgpt.comwith your own hosted images - Replace image URLs like
https://dropbox.tech/cms/content/dam/dropbox/tech-blog/en-us/2020/01/12-s_a5d57ee03480ad99adf37089497274a382beafcaac54e1a98f6d51e323e2fc30_1491598157110_ocr_system_diagram.png?utm_source=chatgpt.comwith your own hosted images
Where it goes
A standard operating procedure. Keep where the team or agent running the process will find it.
Worth borrowing
- Using a step-by-step pipeline breakdown (preprocess → detect → recognize → postprocess) to teach complex systems
- Pairing intuitive analogies (sculptor, cleaning spectacles) with technical details for better comprehension
Related Documents
Comprehensive AI Assistant Tools Reference
Lists 80+ tools with MCP server associations, bulk support, parallel capability, resource impact, and execution type for AI agent workflows.
iOS Deployment Guide
Walks through setting up an iOS development environment, building a Tauri app for iOS, and publishing to the App Store or alternative channels.
How to Add Resources to Your FastMCP Server
Teaches how to add static and dynamic MCP resources to a FastMCP server, with six ready-to-copy examples for a GitHub crawler.
PCI Compliance Guide
Explains PCI DSS compliance via tokenization, lists forbidden and allowed data, and provides code examples for BigCommerce and Stripe.