Back to Blog githubcopilot
 gemma
gemma community
 ai
ai ai
ai githubactions
 ai
ai
Steer GitHub Copilot CLI Sessions Remotely from Any Device
Marcel.L April 15, 2026
0 views
Start a Copilot CLI session on your workstation, then monitor and steer it from the browser or your phone.
title: Steer GitHub Copilot CLI Sessions Remotely from Any Device published: true description: 'Start a Copilot CLI session on your workstation, then monitor and steer it from the browser or your phone.' tags: 'githubcopilot, ai, tutorial, devops' cover_image: 'https://raw.githubusercontent.com/Pwd9000-ML/blog-devto/main/posts/2026/GitHub-Copilot-CLI-Remote-Access/assets/main.png' canonical_url: null id: 3505628 series: GitHub Copilot - CLI date: '2026-04-15T14:27:00Z'
Steer GitHub Copilot CLI Sessions Remotely from Any Device
You kick off a complex refactoring task in Copilot CLI, then realise you need to leave your desk. Maybe it is time for lunch, a meeting just started, or you simply want to keep an eye on progress from your phone while you are on the couch. Until now, walking away from your terminal meant walking away from your session.
That changed on 13 April 2026 when GitHub shipped remote access for Copilot CLI sessions in public preview. You can now start a session on your workstation and pick it up, monitor it, and steer it from GitHub.com or GitHub Mobile, all in real time.
If you have been following the GitHub Copilot series, you will know we have covered the CLI in depth in the Copilot CLI Practical DevOps Guide. This post focuses entirely on the new remote access capability, how to enable it, what you can do with it, and how to make it work smoothly for everyday developer workflows.
What Is Copilot CLI Remote Access?
In a nutshell, remote access lets you stream a running Copilot CLI session to GitHub so you can interact with it from any browser or from the GitHub Mobile app.
| Aspect | Detail |
|---|---|
| Status | Public preview (April 2026) |
| Available on | GitHub.com, GitHub Mobile (iOS beta via TestFlight, Android beta via Google Play) |
| Who can use it | Copilot Individual, Business, and Enterprise users (policy must be enabled for org/enterprise seats) |
| Session privacy | Only the account that started the session can view or interact remotely |
| Output limit | 60 MB of session output streamed to the remote interface |
The local CLI session continues to run on your machine. Remote access simply gives you a window into that session from another device. All shell commands, file operations, and tool executions remain local.
Prerequisites
Before you can use remote access, make sure you have the following in place.
1. Latest Copilot CLI version
Make sure you are running the latest version of Copilot CLI. Inside an interactive session, use the /update slash command:
/update
2. A GitHub repository
Your working directory must contain a Git repository hosted on GitHub.com. If you try to enable remote access outside a GitHub repository, the CLI will display:
Remote session disabled: not in a GitHub repository
3. Policy enabled (organisation and enterprise users)
For users with a Copilot seat from an organisation, the Remote Control policy must be enabled by an enterprise or organisation owner. This policy is off by default.
Note: Individual Copilot subscribers (Pro, Pro+) can use remote access without any additional policy configuration.
Organisation owners can enable the policy under:
Organisation Settings > Copilot > Policies > Remote Control
For enterprise-level policy management, see the GitHub docs on administering Copilot CLI.
4. An interactive session
Remote access is only available for interactive sessions. It is not available when you use the CLI programmatically with the --prompt command-line option, for example when using the CLI in a script.
5. Machine must stay online
The CLI session must be actively running on a machine with an internet connection. If the machine goes to sleep or loses connectivity, remote access is unavailable until it comes back online. We will cover how to handle this with the /keep-alive command later in this post.
How to Enable Remote Access
There are three ways to enable remote access, depending on your workflow preference.
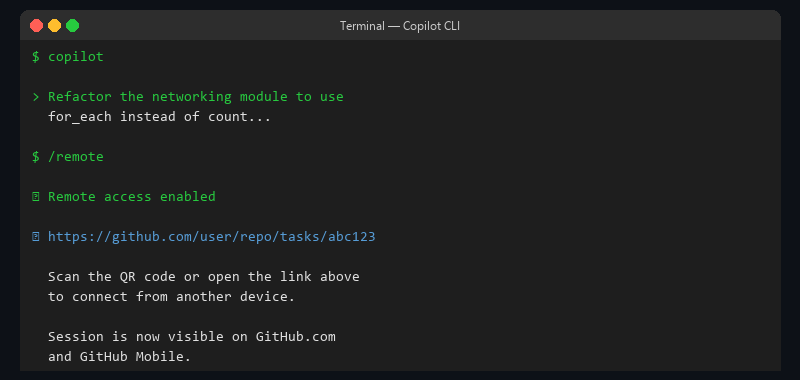
Option A: The /remote slash command (mid-session)
Already in an interactive session? Simply type:
/remote
The CLI connects to GitHub.com and displays:
- A URL in the format
https://github.com/OWNER/REPO/tasks/TASK_IDthat you can open in any browser. - A QR code you can scan with your phone to jump straight into GitHub Mobile.
Option B: The --remote flag (at startup)
If you know ahead of time that you want remote access, start your session with the flag:
copilot --remote
Remote access details are displayed as soon as the interactive session starts. You can redisplay them at any time by typing /remote.
Option C: Always-on configuration
If you always want remote access enabled, add this to your Copilot configuration file (typically ~/.copilot/config.json):
{
  "remoteSessions": true
}
Every interactive session will now start with remote access enabled automatically. To override for a specific session, use:
copilot --no-remote
Tip: The command-line options
--remoteand--no-remotealways take precedence over theremoteSessionssetting in the configuration file.
Accessing Your Session from GitHub.com
Once remote access is enabled, you have two ways to reach the session on the web.
Use the direct link
The CLI displays a URL when remote access is enabled. Open it in any browser and sign in with the same GitHub account that started the session.
Use the Copilot sidebar
- Click the hamburger menu (top-left corner) on GitHub.com.
- Click Copilot.
- Under Recent agent sessions, find and click your CLI session.
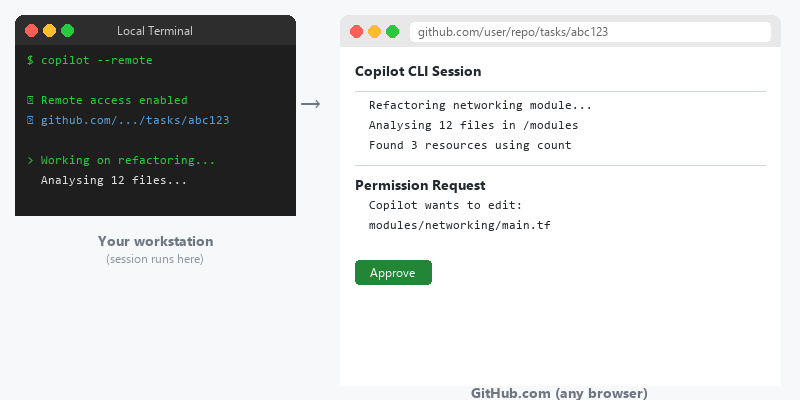
The web interface shows the full session history in real time. You can scroll through output, read Copilot's responses, and interact exactly as you would in the terminal.
Accessing Your Session from GitHub Mobile
Remote sessions also appear in the GitHub Mobile app. This is particularly useful for quick check-ins and approving permission requests while you are away from your desk.
Finding your session
- Open GitHub Mobile.
- Tap the Copilot button in the bottom-right corner.
- Your session appears under Agent sessions. Tap it to open.
Using a QR code for quick access
If you are at your terminal and want to quickly open the session on your phone:
- Type
/remotein the CLI to redisplay the session details. - Press Ctrl+E to toggle the QR code display.
- Scan the QR code with your phone's camera.
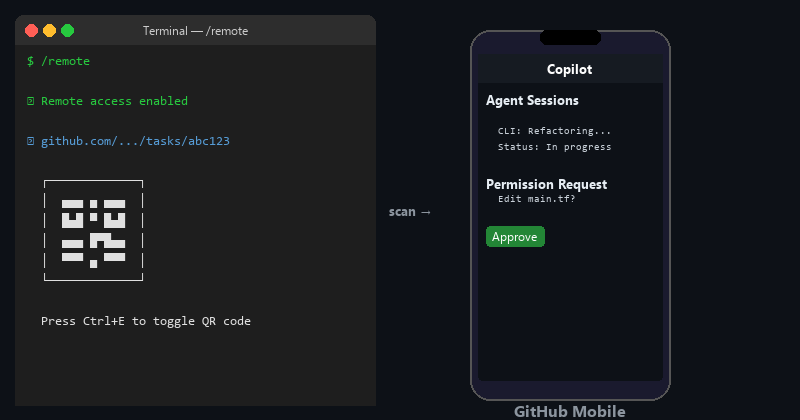
Note: Mobile access is currently only available in the latest beta release of GitHub Mobile. Join via Apple TestFlight for iOS or Google Play for Android.
What You Can Do Remotely
The remote interface is not a read-only dashboard. It is a full steering wheel. Here is what you can do from GitHub.com or GitHub Mobile:
| Action | Description |
|---|---|
| Respond to permission requests | Approve or deny tool, file path, and URL permission requests |
| Answer questions | Respond when Copilot asks for more information or a decision |
| Approve or reject plans | Respond to plan approval prompts in plan mode |
| Submit new prompts | Type new questions or instructions, just like in the terminal |
| Switch modes | Change between interactive, plan, and autopilot mode |
| Cancel work | End the agent's current operation |
Both the local terminal and the remote interface are active simultaneously. You can type in either, and Copilot uses whichever response arrives first.
Note: Slash commands such as
/allow-allare not currently available from the remote interface.
Keeping Your Machine Awake with /keep-alive
One of the most practical additions alongside remote access is the /keep-alive slash command. It prevents your machine from going to sleep while you are steering the session remotely.
Usage options
| Command | Behaviour |
|---|---|
/keep-alive on | Prevents sleep while the CLI session is active |
/keep-alive off | Allows normal sleep behaviour |
/keep-alive busy | Prevents sleep only while Copilot is actively working. Once the agent completes a task, the machine can sleep normally |
/keep-alive 30m | Prevents sleep for 30 minutes |
/keep-alive 8h | Prevents sleep for 8 hours |
/keep-alive 1d | Prevents sleep for 1 day |
/keep-alive | Displays the current keep-alive status |
The busy option is particularly useful. It keeps the machine awake while Copilot is processing but lets it sleep once Copilot finishes and is waiting for input.
Reconnection and Resuming Sessions
Temporary disconnections
If the network drops temporarily, the remote interface reconnects automatically once connectivity is restored. The local session is completely unaffected by network interruptions.
Resuming a closed session
If you close a CLI session that had remote access enabled, the CLI displays a resume command:
copilot --resume=SESSION_ID --remote
You can also resume the most recent session with:
copilot --continue --remote
If you have "remoteSessions": true in your configuration file, you can omit the --remote flag when resuming:
copilot --continue
Important: When you resume a session, you must re-enable remote access (either via the
--remoteflag or the configuration file setting). Remote access does not persist automatically across session restarts.
A Practical Walkthrough
Here is a real-world scenario that demonstrates how remote access fits into a developer workflow.
Step 1: Start a session with remote access
You are at your workstation and want to refactor a Terraform module. Start the session with remote access:
cd ~/repos/my-infra
copilot --remote
The CLI displays the session URL and QR code.
Step 2: Give Copilot the task
Refactor the networking module to use for_each instead of count for subnet
creation. Update all references in the root module and ensure the plan shows
no destructive changes.
Copilot starts analysing the codebase and building a plan.
Step 3: Leave your desk
You have a meeting in five minutes. Before leaving, type:
/keep-alive busy
This ensures the machine stays awake while Copilot is working.
Step 4: Monitor from your phone
During the meeting, open GitHub Mobile and tap into your session. You can see Copilot's progress in real time. When it asks for plan approval, tap Approve right from your phone.
Step 5: Steer from the browser
Back at your desk (or from any computer), open the session link in a browser. Copilot has finished the refactoring and is asking whether to run terraform plan. Type your approval in the web interface.
Step 6: Review the results
Check the output in the web interface or switch back to your terminal. Both show the same session state.
Security and Privacy
Remote access has been designed with security in mind. Here are the key points:
- Session-specific URLs. Each session gets a unique URL that only works for the authenticated user who started it.
- No direct machine access. Remote access does not grant any access to your machine beyond what the CLI agent can do within the session. All operations run through the Copilot CLI's existing permission model.
- Policy controls. Organisation and enterprise administrators can disable remote access entirely through the Remote Control policy.
- Events streamed, not stored. Session events (messages, tool executions, permission requests) are streamed from your machine to GitHub for the remote interface. The CLI continues to run locally.
Tips and Best Practices
Here are some practical tips for getting the most out of remote access.
-
Use
/keep-alive busyas your default. It prevents your machine from sleeping while Copilot works, but lets it rest once the agent is idle. This is the best balance between availability and power consumption. -
Start with
copilot --remoterather than adding it mid-session. This ensures the session is remotely accessible from the very first prompt, so you never miss a permission request. -
Set
remoteSessions: truein your config if you use this regularly. It removes the need to remember the flag, and you can always override with--no-remotefor local-only sessions. -
Bookmark the Copilot sidebar on GitHub.com. Navigate to the Copilot page and bookmark it. This gives you one-click access to all your recent sessions without needing to remember URLs.
-
Use the QR code for mobile. It is faster than searching for the session in the app, especially when you are in a hurry.
-
Be mindful of the 60 MB output limit. Very long-running sessions that generate large amounts of output may see reduced performance in the remote interface. The local terminal remains unaffected.
Conclusion
Remote access for Copilot CLI sessions solves a genuine pain point. Long-running tasks no longer tie you to your terminal. You can start a complex refactoring, infrastructure deployment, or code review task, walk away, and continue steering it from your browser or phone.
The feature is in public preview right now. Give it a try with copilot --remote and see how it fits into your workflow. If you are an organisation or enterprise user, ask your admin to enable the Remote Control policy so your team can start using it.
For more details, check the official documentation:
- About remote access to Copilot CLI sessions
- Steering a Copilot CLI session from another device
- GitHub changelog announcement
Author
{% user pwd9000 %}
Like, share, follow me on: :octopus: GitHub | :penguin: X | :space_invader: LinkedIn
Date: 15-04-2026
Comments
More Blog
View allgemmaFive Gemma-4 models, one accelerator: what porting E2B 31B to AWS Inferentia2 taught me
I ported the whole Gemma-4 family — E2B, E4B, 12B, 31B, and the 26B-A4B MoE — to run on...
X
xbillcommunityHey DEV, I'm Tobore. Let's actually connect.
Hey DEV, I'm Tobore. Let's actually connect. I've been on here for a while now, mostly writing and...
L
Laurina AyarahaiI burned through thousands of AI tokens. Then a friend did it for free
(yep, kinda clickbait, just for the funsies 😊) At the beginning of the year, I relaunched my...
P
Paulo HenriqueaiClaude might be saturating your machine
My laptop was sitting idle with the fan at full tilt. Nothing was running that I knew of. The culprit...
S
Sidhant PandagithubactionsAutomated GitHub Code Reviews Using Google Gemini
I Built a Thing! TL;DR — Google Gemini-based Pull Request reviews and Issue Triaging for...
D
Darren "Dazbo" LesteraiWhat is an "agentic harness," actually?
I've been hearing the word "harness" thrown around a lot lately. I assumed it just meant "the IDE" or...
T
Tilde A. ThuriumReady-made automations for this
Workflows from the Neura Market marketplace related to this CoPilot resource
- Automated HTTP Filter and Monitor for Stripe Checkout Sessionsn8n · $6.21 · Related topic
- Extract Text from Images & PDFs via Telegram with Mistral OCR to Markdownn8n · $24.99 · Related topic
- GitHub Automation Hub: Complete API Controls for AI Agentsn8n · $24.99 · Related topic
- Track GitHub Node Definitions and Export to Google Sheetsn8n · $14.99 · Related topic