Back to Blog speculativedecoding
 kubernetes
 ai
ai typescript
 showdev
 ai
ai agents
12B Gemma 4 Deployment with NVIDIA Blackwell 6000, QAT, MTP, and Antigravity CLI
xbill June 23, 2026
0 views
This article provides a step by step deployment guide for Gemma 4 to a Google Cloud Run hosted GPU...
---
title: 12B Gemma 4 Deployment with NVIDIA Blackwell 6000, QAT, MTP, and Antigravity CLI
published: true
series: Gemma4
date: 2026-06-23 03:39:55 UTC
tags: speculativedecoding,antigravitycli,qat,blackwell6000
canonical_url: https://xbill999.medium.com/12b-gemma-4-deployment-with-nvidia-blackwell-6000-qat-mtp-and-antigravity-cli-e55615392999
---
This article provides a step by step deployment guide for Gemma 4 to a Google Cloud Run hosted GPU enabled system,. A suite of Python MCP tools is built to simplify management of the vLLM hosted Gemma 4 deployment with Antigravity CLI.
#### What is this project trying to Do?
This project is a DevOps/SRE assistant that uses a Gemma 4 model hosted on Cloud Run with GPU. It provides tools to provision the Docker container and deploy the model, as well as for observability and performance testing.
This project is similar to a previous project that targeted GPU hosted Gemma4 instances on GCP:
[Gemma-SRE: Self-Hosted vLLM Infrastructure Agent](https://medium.com/google-cloud/gemma-sre-self-hosted-vllm-infrastructure-agent-afda000c0943)
#### Antigravity CLI
Antigravity CLI is the follow-on successor to Gemini CLI- the terminal driven, agent assisted coding tool.
Full details on installing Antigravity CLI are here:
[Getting Started with Antigravity CLI](https://medium.com/google-cloud/getting-started-with-antigravity-cli-26c5da90951f)
#### Testing the Antigravity CLI Environment
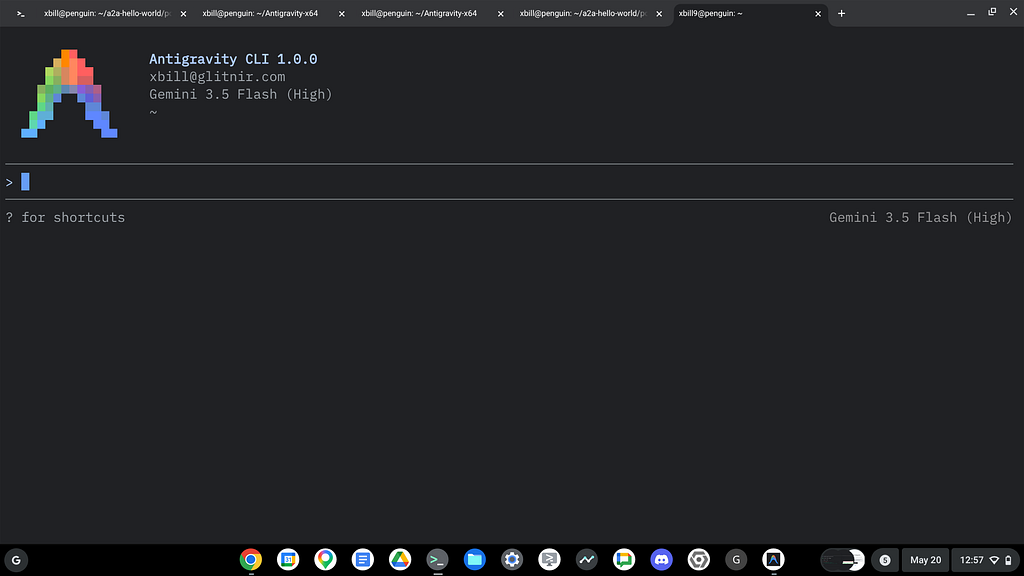
Once you have all the tools in place- you can test the startup of Antigravity CLI.
You will need to authenticate with a Google Cloud Project or your Google Account:
```plaintext
agy
```
This will start the interface:
#### Full Installation Instructions
The detailed installation instructions for Antigravity CLI are here:
[Getting Started with Antigravity CLI](https://medium.com/google-cloud/getting-started-with-antigravity-cli-26c5da90951f)
#### Python MCP Documentation
The official GitHub Repo provides samples and documentation for getting started:
[GitHub - modelcontextprotocol/python-sdk: The official Python SDK for Model Context Protocol servers and clients](https://github.com/modelcontextprotocol/python-sdk)
#### Where do I start?
The strategy for starting MCP development for model management is a incremental step by step approach.
First, the basic development environment is setup with the required system variables, and a working Antigravity CLI configuration.
Then, a minimal Python MCP Server is built with stdio transport. This server is validated with Antigravity CLI in the local environment.
This setup validates the connection from Antigravity CLI to the local server via MCP. The MCP client (Antigravity CLI) and the Python MCP server both run in the same local environment.
#### Setup the Basic Environment
At this point you should have a working Python environment and a working Antigravity CLI installation. The next step is to clone the GitHub samples repository with support scripts:
```shell
cd ~
git clone https://github.com/xbill9/gemma4-tips
```
Then run **init.sh** from the cloned directory.
The script will attempt to determine your shell environment and set the correct variables:
```plaintext
gpu-12B-qat-mtp-6000-devops-agent
source init.sh
```
If your session times out or you need to re-authenticate- you can run the **set\_env.sh** script to reset your environment variables:
```plaintext
gpu-12B-qat-mtp-6000-devops-agent
source set_env.sh
```
Variables like PROJECT\_ID need to be setup for use in the various build scripts- so the set\_env script can be used to reset the environment if you time-out.
#### Model Management Tool with MCP Stdio Transport
One of the key features that the standard MCP libraries provide is abstracting various transport methods.
The high level MCP tool implementation is the same no matter what low level transport channel/method that the MCP Client uses to connect to a MCP Server.
The simplest transport that the SDK supports is the stdio (stdio/stdout) transport — which connects a locally running process. Both the MCP client and MCP Server must be running in the same environment.
The connection over stdio will look similar to this:
```python
# Initialize FastMCP server
mcp = FastMCP("Self-Hosted vLLM DevOps Agent")
```
#### Running the Python Code
First- switch the directory with the Python version of the MCP sample code:
```plaintext
~/gemma4-tips/gpu-12B-qat-mtp-6000-devops-agent
```
Run the release version on the local system:
```make
make install
Processing ./.
```
The project can also be linted:
```shell
xbill@penguin:~/gemma4-tips/gpu-12B-qat-mtp-6000-devops-agent$ make lint
ruff check .
All checks passed!
ruff format --check .
6 files already formatted
mypy .
Success: no issues found in 6 source files
```
#### MCP stdio Transport
One of the key features that the MCP protocol provides is abstracting various transport methods.
The high level tool MCP implementation is the same no matter what low level transport channel/method that the MCP Client uses to connect to a MCP Server.
The simplest transport that the SDK supports is the stdio (stdio/stdout) transport — which connects a locally running process. Both the MCP client and MCP Server must be running in the same environment.
In this project Antigravity CLI is used as the MCP client to interact with the Python MCP server code.
#### Antigravity CLI mcp\_config.json
A sample MCP server file is provided in the .agents directory:
```json
{
"mcpServers": {
"gpu-devops-agent": {
"command": "python3",
"args": [
"/home/xbill/gemma4-tips/gpu-12B-qat-mtp-6000-devops-agent/server.py"
],
"env": {
"GOOGLE_CLOUD_PROJECT": "aisprint-491218",
"GOOGLE_CLOUD_LOCATION": "us-central1",
"VLLM_BASE_URL": "https://gpu-12b-qat-mtp-6000-devops-agent-289270257791.us-central1.run.app",
"MODEL_NAME": "/mnt/models/gemma-4-12B-it-qat-w4a16-ct"
}
}
}
}
```
#### Validation with Antigravity CLI
The final connection test uses Antigravity CLI as a MCP client with the Python code providing the MCP server:
```plaintext
MCP Servers
Plugins (~/.gemini/antigravity-cli/plugins)
> ✓ google-dev-knowledge Tools: search_documents, answer_query, get_documents
✓ gpu-devops-agent Tools: save_hf_token, get_vllm_endpoint, list_vertex_models, list_bucket_models,
analyze_cloud_logging, +19 more
```
#### Getting Started with Gemma 4 on GPU
The Official vLLM repo also has Gemma4 specific information:
[Releases · vllm-project/vllm](https://github.com/vllm-project/vllm/releases)
#### Model Lifecycle Management via MCP
The MCP tools provide a complete suite of agent-oriented operations for managing vLLM deployment on Cloud Run or a TPU.
The MCP server tools are used to deploy the model to Cloud Run with TPU:
```plaintext
deploy the model
```
#### Checking System status
The status can be checked with an MCP tool:
```markdown
### 🧩 Model Details
Endpoint URL: https://gpu-12b-qat-mtp-6000-devops-agent-289270257791.us-central1.run.app
Model Information ( /v1/models ):
[
{
"id": "gpu-12b-qat-mtp-6000-devops-agent",
"object": "model",
"owned_by": "vllm"
}
]
Health Status ( /health ):
• Status: Healthy ✅
```
#### Cross Check The Deployed Model
Once the model starts locally- the MCP tool allows for model verification:
```plaintext
✅ Model health check PASSED.
Model: gpu-12b-qat-mtp-6000-devops-agent
Response: 'Yes, the model is working! How can I help you...'
Latency: 3.51 seconds.
_
✅ Model health check PASSED.
• Model: gpu-12b-qat-mtp-6000-devops-agent (running QAT + MTP Speculative Decoding on RTX 6000)
• Latency: 3.51 seconds
• Response: 'Yes, the model is working! How can I help you...'
```
and status:
```plaintext
> get_system_details
Excellent! Everything is fully functional and the health checks are 100% green. Let's present the results.### 🖥️ System
Status Dashboard: gpu-12b-qat-mtp-6000-devops-agent
Inference Stack Health:
• vLLM Health: 🟢 Online (Healthy) ✅
• Service URL: https://gpu-12b-qat-mtp-6000-devops-agent-289270257791.us-central1.run.app
• Model Health Check: PASSED (Latency: 1.62 seconds)
• Active Model: gpu-12b-qat-mtp-6000-devops-agent
GCP Infrastructure Status:
• Region: us-central1
• Cloud Run Active Revision: gpu-12b-qat-mtp-6000-devops-agent-00002-zcr
• Ready State: Ready ( True )
• Scaling Configuration: Max: 1, Min: 1 (Active Instances: 1)
```
Check the Cloud Run deployment status:
```plaintext
show the cloud run docker status
● Bash(VLLM_BASE_URL="https://gpu-12b-qat-mtp-6000-devops-agent-289270257791.us-central1.run.app" GOOGL...) (ctrl+o to
expand)
The status of the Cloud Run Docker container remains fully healthy and operational:
### 🖥️ Active Container Status Dashboard
• vLLM Health: 🟢 Online (Healthy) ✅
• Endpoint URL: gpu-12b-qat-mtp-6000-devops-agent https://gpu-12b-qat-mtp-6000-devops-agent-289270257791.us-central1.
run.app
• Active Revision: gpu-12b-qat-mtp-6000-devops-agent-00002-zcr
• Cloud Run Status: Ready ( True )
• Scaling Limit: min=1 , max=1 (1 active instance)
• Runtime Environment: vLLM nightly with QAT ( compressed-tensors ) and MTP speculative decoding enabled.
```
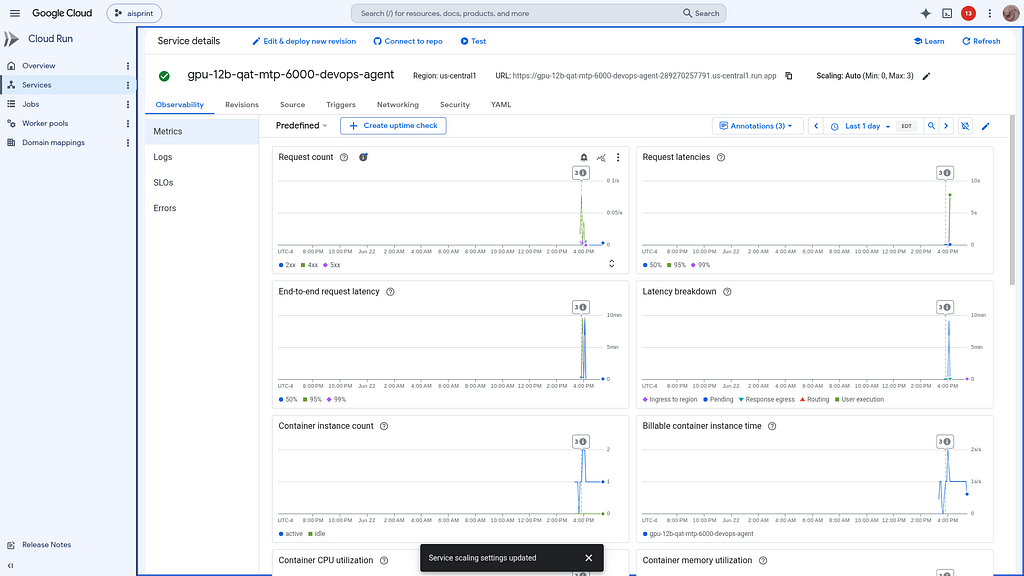
#### Check the Cloud Run Service
Once Deployed — the model is visible as a standard Cloud Run Service:
#### Review the Model
Check the model details:
```plaintext
> what are the model details?
● Bash(VLLM_BASE_URL="https://gpu-12b-qat-mtp-6000-devops-agent-289270257791.us-central1.run.app" GOOGL...) (ctrl+o to
expand)
Here are the model details retrieved directly from the active vLLM endpoint:
### 🧩 Active Model Configuration
• Endpoint URL: https://gpu-12b-qat-mtp-6000-devops-agent-289270257791.us-central1.run.app
• Model ID (served name): gpu-12b-qat-mtp-6000-devops-agent
• Object Type: model
• Owned By: vllm
• Health Status: Healthy ✅
### ⚙️ Under-the-Hood Serving Specs
• Primary Weight Checkpoint: google/gemma-4-12B-it-qat-w4a16-ct (Quantization-Aware Training INT4 format)
• Speculative Decoding (MTP): Assisted by google/gemma-4-12B-it-assistant (Multi-Token Prediction method with 3
speculative tokens)
```
Once everything is online — you can send queries to the Model:
```plaintext
> query_gemma4_with_stats what is Gemma?
5.6k in | 500 out | 188 thinking
● Bash(VLLM_BASE_URL="https://gpu-12b-qat-mtp-6000-devops-agent-289270257791.us-central1.run.app" GOOGL...) (ctrl+o to
expand)
Here is the query result and performance statistics generated by the active QAT + MTP RTX 6000 stack:
### 📊 Performance Stats
• Model: gpu-12b-qat-mtp-6000-devops-agent
• Time to First Token (TTFT): 0.135s (extremely low latency)
• Total Generation Time: 4.031s
• Tokens per Second: 70.33 tokens/s (high throughput generation)
• Total Tokens (approx.): 274
──────
### 💬 Model Response
Gemma is a family of lightweight, state-of-the-art open models built by Google DeepMind.
To understand what Gemma is, it helps to look at its relationship to Google’s other AI models and its specific
characteristics:
#### 1. The Relationship to Gemini
Gemma is built using the same technology, architecture, and infrastructure as Google's Gemini models (the high-
performance models that power Google's consumer-facing AI). However, while Gemini is a "closed" model (accessible only
via API or Google products), Gemma is "open," meaning the weights are released for developers to download and run.
#### 2. Key Characteristics
• Open Weights: This means developers, researchers, and hobbyists can download the model, run it on their own hardware
(like a personal laptop or a local server), and customize it.
• Efficiency: Gemma models are designed to be "small" enough to run on consumer-grade hardware (like NVIDIA GPUs or
even some laptops) while being "smart" enough to handle complex tasks.
• Responsibility-Focused: Google trained Gemma with strict safety guidelines and "Responsible AI" techniques to
minimize bias and prevent the generation of harmful content.
#### 3. Common Model Sizes
Gemma usually comes in different sizes to suit different needs:
• Gemma 2B / 7B / 9B / 27B: These numbers represent billions of parameters (the "size" of the model's brain).
• Smaller models (e.g., 2B, 9B) are designed for speed and running on local devices.
• Larger models (e.g., 27B) are designed for more complex reasoning and higher-quality outputs.
#### 4. What can you do with Gemma?
Developers and researchers use Gemma for:
• Text Generation: Writing stories, emails, or scripts.
• Summarization: Condensing long documents into short summaries.
• Coding Assistance: Helping write, debug, and explain programming code.
• Fine-Tuning: This is the biggest use case. Because the weights are open, a company can take a base Gemma model and
"train" it on their specific private data (e.g., a legal firm training it on their specific past cases).
• Education & Research: Because it is accessible, it allows students and researchers to study how LLMs (Large Language
Models) work internally.
#### Summary Comparison: Gemini vs. Gemma
Feature | Gemini | Gemma
---------------------------------------|---------------------------------------|---------------------------------------
Access | Closed (API/Web) | Open Weights (Downloadable)
Scale | Massive (Needs huge data centers) | Compact (Can run on a laptop)
Use Case | Enterprise apps, Chatbots | Development, Research, Local apps
Provider | Google | Google
```
#### Benchmark the Local Model
The local model was benchmarked:
```plaintext
I have completed the benchmark sweep and generated a full performance report.
```
The analysis is reviewed:
```markdown
> summarize benchmark_sweep_results.md
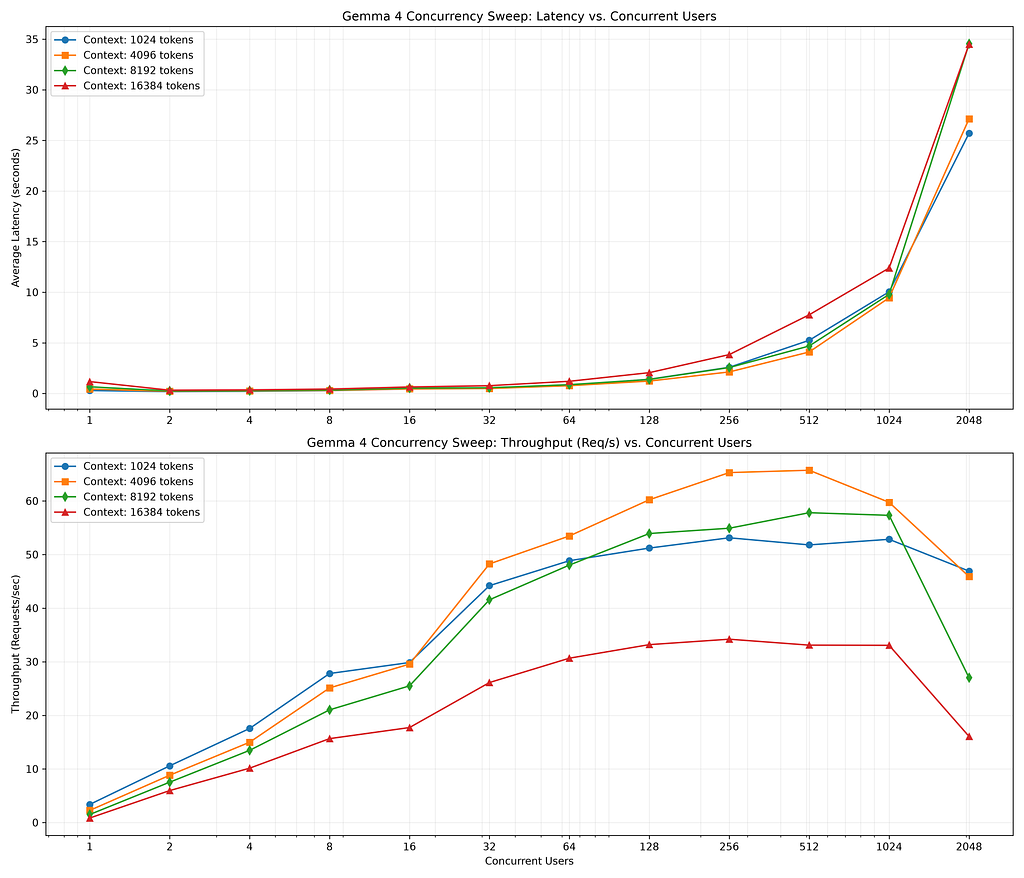
Here is a summary of the performance trends from the benchmark sweep conducted on the Gemma 4 12B QAT speculative
decoding stack ( --spec-tokens 3 --spec-method mtp ) running on the NVIDIA RTX PRO 6000 GPU Cloud Run instance:
### 1. Latency Characteristics & scaling
• Ultra-low Concurrency (1–2 users): Latency was incredibly low, ranging from 0.13s to 0.30s for context sizes up
to 4096 tokens. Even at the maximum 16K context, average latency was only 1.17s for 1 user.
• The "Sweet Spot" (8–128 users): Thanks to speculative decoding (MTP) and FP8 KV caching, concurrency scaled
gracefully. Up to 128 users, average latency remained under 1.0s for context lengths up to 256 tokens.
• High Concurrency (1024–2048 users): Latencies scaled up linearly under heavy queuing, averaging 6.5s to 10.0s at
1024 users and up to 23s to 34s at 2048 users.
### 2. Throughput Efficiency
• Peak Output: The stack reached its highest throughput of 209.4 Requests/sec at a context size of 4 tokens under
128 concurrent users.
• Throughput Sweet Spot: For medium context sizes (e.g., 128 to 512 tokens), throughput peaked at 55 to 80
Requests/sec, typically around 128 or 256 concurrent users.
• High-Context Capacity: Even at a massive 16K context window, the RTX 6000 maintained a solid peak throughput of
34.2 Requests/sec at 256 concurrent users before declining.
### 3. Queue Stability & Error Limits
• 100% Success Rates: The serving stack proved highly stable, maintaining a 100% success rate across almost all tests
up to 512 users.
• Failure Boundaries: Success rates began dropping at extreme load bounds:
• For context windows of 128 to 512 tokens, success rates fell to 37% – 58% under the maximum load of 2048
concurrent users.
• At a 16K context size, timeouts or resource boundaries began appearing starting at 16 users ( 93.8% success
rate), dropping to 35.8% at 2048 users.
```
This is visualized:
Did QAT and 3 deep speculative decoding help?
```plaintext
Yes, the QAT model combined with 3-token Multi-Token Prediction (MTP) speculative decoding provided clear improvements,
particularly at shorter context sizes and low-to-medium concurrencies. However, it also reveals a trade-off at higher
context lengths under heavy load.
Here is a direct comparison between the Standard FP8 Model and the new QAT + MTP Stack at key test intervals:
### 1. Standard Context Window ( 128 tokens) — Clear Wins
For typical short-context workloads, the QAT + MTP setup significantly outperformed standard serving:
• 8 Users: Latency decreased by 11.2% ( 0.255s → 0.227s ), and request throughput increased by 10.4% ( 29.6 → 32.7
req/s).
• 32 Users: Latency decreased by 17.5% ( 0.480s → 0.396s ), and request throughput increased by 12.3% ( 52.9 → 59.4
req/s).
• 128+ Users: The performance was neck-and-neck, with latency matching standard serving within ±2%.
### 2. Large Context Window ( 1024 tokens) — The Trade-Off
As the context size grows, speculative decoding behaves differently depending on the load:
• Under Light Load (8 Users): The QAT + MTP configuration still wins, showing a 5.8% latency reduction ( 0.297s → 0.
280s ) and a 14.9% throughput increase ( 24.2 → 27.8 req/s).
• Under Heavy Load (32+ Users): The QAT + MTP configuration experienced performance degradation. For example, at 128
users, latency was 41.4% higher ( 0.992s → 1.402s ) and throughput was 32.3% lower.
### Why does this happen?
1. Low-Concurrency Acceleration: Speculative decoding (MTP) accelerates token generation by predicting multiple tokens
in a single forward pass. When the GPU has free compute resources (low concurrency), this translates directly into
faster output and lower latency.
2. High-Concurrency Overhead: Speculative verification requires extra memory bandwidth and KV cache management. When
concurrency is high and context is long, the GPU becomes memory-bandwidth saturated. The overhead of verifying
speculative tokens ends up slowing down total throughput compared to standard generation.
```
How does this compare to other Hardware Options?
```plaintext
> compare to other hardware options at 12B
11.1k in | 2.1k out | 603 thinking
● Bash(python3 /home/xbill/.gemini/antigravity-cli/brain/7c3e47cc-13be-46df-96b5-7549adf8fa88/scratch/c...) (ctrl+o to
expand)
Here is a hardware comparison of performance for the Gemma 4 12B model running across three cloud accelerator
configurations:
1. NVIDIA RTX PRO 6000 GPU (with QAT + 3-token speculative decoding, Blackwell 96GB) — Our current run
2. NVIDIA L4 GPU (with QAT INT4, Ada Lovelace 24GB)
3. Google TPU v6e-1 (Single TPU v6e chip)
──────
### 1. Short Context Workloads ( 128 tokens)
Under standard context sizes, the RTX 6000 excels at low-to-medium concurrencies, while the TPU v6e dominates at scale:
• 8 Users (Low Load):
• 🥇 RTX 6000: 0.227s (32.7 req/s) — Fastest latency and throughput
• 🥈 L4 GPU: 0.329s (18.9 req/s)
• 🥉 TPU v6e-1: 0.331s (22.9 req/s)
• 32 Users (Medium Load):
• 🥇 RTX 6000: 0.396s (59.4 req/s) — Lowest latency
• 🥈 TPU v6e-1: 0.456s (68.6 req/s) — Highest throughput
• 🥉 L4 GPU: 0.827s (22.6 req/s)
• 128 Users (High Load):
• 🥇 TPU v6e-1: 0.434s (71.2 req/s) — Maintains near-constant flat latency
• 🥈 RTX 6000: 0.958s (76.6 req/s)
• 🥉 L4 GPU: 2.726s (24.4 req/s)
──────
### 2. Large Context Workloads ( 1024 tokens)
As context window demands increase, hardware memory bandwidth differences become more pronounced:
• 8 Users (Low Load):
• 🥇 RTX 6000: 0.280s (27.8 req/s)
• 🥈 TPU v6e-1: 0.348s (22.7 req/s)
• 🥉 L4 GPU: 0.361s (17.2 req/s)
• 128 Users (High Load):
• 🥇 TPU v6e-1: 0.455s (65.5 req/s) — Outstanding high-load concurrency scaling
• 🥈 RTX 6000: 1.402s (51.2 req/s)
• 🥉 L4 GPU: 3.062s (22.1 req/s)
──────
### Key Takeaways
1. Low-Latency/Low-Load Winner: The RTX PRO 6000 (with QAT + Speculative Decoding) is the fastest accelerator under
light-to-moderate loads, processing requests around 30% faster than the other options.
2. Concurrency/High-Load Winner: The TPU v6e-1 has exceptional latency-scaling characteristics. As load grows from 8
users to 128 users, the TPU's average latency barely changes ( 0.348s → 0.455s ), whereas the GPUs scale latency up
significantly.
3. Budget/Scale Winner: The L4 GPU represents the entry-level tier. While it lags behind the high-memory-bandwidth
alternatives, it provides stable performance at lower hardware costs.
```
What about other Gemma Model sizes?
```plaintext
> how does this compare to the 2B,4B,26B,31B across hardware deployments
> how does this compare to the 2B,4B,26B,31B across hardware deployments
25.2k in | 4.0k out | 1.1k thinking
● Bash(python3 /home/xbill/.gemini/antigravity-cli/brain/7c3e47cc-13be-46df-96b5-7549adf8fa88/scratch/c...) (ctrl+o to
expand)
Here is a cross-hardware deployment comparison of Gemma 4 performance across different model sizes ( 2B , 4B , 12B ,
26B , and 31B ), captured under a standard moderate load of 8 concurrent users at a short context size ( 8 tokens):
Model Size | Deployment Hardware | Latency | Request Throughput | Notes / Quantization
---------------|---------------------|--------------|--------------------|---------------------------------------------
2B | Mac (M-series) | 0.813s | 1.9 req/s | Local inference (Ollama/Llama.cpp)
12B | RTX 6000 GPU | 0.151s | 50.4 req/s | QAT (INT4) + MTP (3-spec)
12B | L4 GPU | 0.256s | 25.1 req/s | QAT (INT4)
12B | TPU v6e-1 | 0.518s | 16.6 req/s | Native TPU runtime
26B | RTX 6000 GPU | 1.020s | 7.8 req/s | FP8 Quantized
26B | L4 GPU | 0.159s | 39.9 req/s | QAT (INT4)
26B | TPU v6e-1 | 2.723s | 2.5 req/s | Native TPU runtime (longer completion test)
31B | TPU v6e-1 | 0.309s | 25.2 req/s | Native TPU runtime
31B | L4 GPU | 0.256s | 25.1 req/s | QAT (INT4)
31B | RTX 6000 GPU | 3.445s | 2.3 req/s | Standard FP8
──────
### Key Architectural & Hardware Insights
1. Quantization Impact (QAT INT4):
• QAT (Quantization-Aware Training) to INT4 enables large models to run with minimal footprint. This is why the
26B QAT and 31B QAT on the standard L4 GPU achieve latency profiles ( ~0.159s and ~0.256s ) that are comparable
to or faster than unquantized smaller models.
• On unquantized models (like the standard 26B and 31B on the RTX 6000), standard FP8 serving exhibits higher
latencies ( 1.02s and 3.44s ) due to the significantly larger memory bandwidth requirements during weights
loading.
2. Specular/Assistant Decoding Boost (MTP):
• Our benchmarked 12B QAT + MTP configuration on the RTX 6000 achieves the absolute best performance at this scale
( 0.151s latency / 50.4 req/s throughput), demonstrating the power of combining model compression (QAT) with
speculative drafting (3-token MTP).
3. TPU v6e-1 Concurrency Efficiency:
• For the 31B model, the TPU v6e-1 matches the L4 QAT performance ( 0.309s vs 0.256s ) without needing QAT
quantization. TPUs have high native matrix multiplication hardware density and memory bandwidth, making them highly
efficient at running larger model parameters natively without degradation.
────────────────────────────────────────────────────────────
> repeat with a 256 context
4.6k in | 1.7k out | 126 thinking
● Bash(python3 /home/xbill/.gemini/antigravity-cli/brain/7c3e47cc-13be-46df-96b5-7549adf8fa88/scratch/c...) (ctrl+o to
expand)
Here is the performance comparison across deployments at a context window of 256 tokens (under the same moderate load
of 8 concurrent users):
Model Size | Deployment Hardware | Latency | Request Throughput | Notes / Quantization
--------------|---------------------|--------------|--------------------|----------------------------------------------
2B | Mac (M-series) | 0.813s | 1.9 req/s | Local fallback (No context sweep data)
12B | RTX 6000 GPU | 0.255s | 30.5 req/s | QAT (INT4) + MTP (3-spec)
12B | L4 GPU | 0.349s | 18.1 req/s | QAT (INT4)
12B | TPU v6e-1 | 0.504s | 17.2 req/s | Native TPU runtime
26B | L4 GPU | 0.294s | 21.7 req/s | QAT (INT4) — Outstanding scaling
26B | TPU v6e-1 | 2.723s | 2.5 req/s | Native TPU runtime (longer completion sweep)
31B | L4 GPU | 0.349s | 18.1 req/s | QAT (INT4)
(Note: Data points marked with "No context sweep data" represent standalone benchmark falls where a context sweep was
not configured in the test harness.)
──────
### Key Observations at 256 Context
1. Speculative Decoding Efficiency:
• The 12B QAT + MTP configuration on the RTX 6000 remains the clear class leader, achieving 0.255s average
latency and 30.5 req/s .
2. QAT INT4 on L4 Scalability:
• The 26B QAT model on a single cost-effective L4 GPU performs incredibly well, processing requests at 0.294s
latency with 21.7 req/s . It is only slightly behind the 12B model, indicating that QAT compression minimizes the
latency penalty typically associated with doubling model size.
• Similarly, the 31B QAT on L4 matches the 12B QAT on L4 exactly at 0.349s latency and 18.1 req/s , highlighting
the computational efficiency of the QAT path.
```
#### Cost Breakdowns
Model serving costs were compared:
```plaintext
> do a cost analysis
Here is a cost-efficiency analysis comparing these hardware deployment options.
To make the comparison uniform, we analyze the cost to serve 1 Million Requests at a 256-token context size under a
moderate load (8 concurrent users).
### 1. Estimated Hourly Cloud Rates (Active Runtime)
• L4 GPU (Cloud Run G2 standard): ~$1.40/hr (Includes 1 L4 GPU + 4 vCPU + 16GB RAM)
• TPU v6e-1 (GCP On-Demand): ~$1.20/hr (Single-chip TPU node)
• RTX PRO 6000 GPU (Cloud Run Premium): ~$2.50/hr (96GB premium GPU allocation + CPU + RAM)
• Mac M-Series (Local): $0.00/hr (Self-hosted local workstation)
──────
### 2. Serving Cost-Efficiency (Cost per 1 Million Requests)
Calculated using:
⎛Hourly Hardware Cost⎞
Cost per Million = ⎜────────────────────⎟ × 1,000,000
⎝ Requests per Hour ⎠
Model & Hardware Option | Throughput (Req/… | Requests / H… | Hourly Cost | Cost per 1M R… | Efficiency Rank
---------------------------|-------------------|---------------|-------------|----------------|------------------------
12B on TPU v6e-1 (Native) | 17.2 req/s | 61,920 | $1.20/hr | $19.38 | 🥈 #2 (Best Cloud 12B)
12B on L4 GPU (QAT INT4) | 18.1 req/s | 65,160 | $1.40/hr | $21.49 | 🥉 #3
12B on RTX 6000 (QAT+MTP) | 30.5 req/s | 109,800 | $2.50/hr | $22.77 | #4 (Lowest Latency)
26B on L4 GPU (QAT INT4) | 21.7 req/s | 78,120 | $1.40/hr | $17.92 | 🥇 #1 (Best Overall)
31B on L4 GPU (QAT INT4) | 18.1 req/s | 65,160 | $1.40/hr | $21.49 | 🥉 #3 (Tie)
2B on Mac (M-Series) | 1.9 req/s | 6,840 | $0.00/hr | $0.00 | 👑 Free (Workstation)
──────
### 🔍 Key Cost Observations
1. The 26B QAT L4 Sweet Spot:
• Serving the 26B QAT model on a single L4 GPU is the most cost-efficient cloud option, costing only $17.92 per
million requests. This configuration strikes an optimal balance between low hourly GPU costs and elevated QAT
throughput.
2. Latency vs. Cost (RTX 6000):
• Serving 12B QAT + MTP on the RTX 6000 gives the lowest latency ( 0.255s ), but it costs slightly more per request
( $22.77 per million) due to the higher base hourly rate of the premium 96GB GPU. Choose this when raw speed/low
TTFT is the primary metric.
3. TPU v6e-1 for Heavy Scaling:
• TPU v6e-1 represents excellent native value ( $19.38 per million for 12B). Because TPU nodes can handle
concurrency scaling without a corresponding rise in latency, the cost-efficiency gains increase significantly under
higher concurrencies (128+ users).
4. Cloud Run Auto-scaling Benefit:
• Using Cloud Run allows the service to scale down to 0 when idle. For dev/test environments or variable
production patterns, scaling to 0 dramatically reduces the total monthly bill compared to running dedicated 24/7
VMs.
```
So what is the final offer? Survey says …
```plaintext
### 📋 Executive Summary Highlights:
1. Performance Champion: The 12B QAT (INT4) + 3-token speculative decoding (MTP) setup on the RTX 6000 GPU achieves the
lowest average latency under typical loads ( 0.255s at a 256 token context).
2. Operational Cost Winner: The 26B QAT on L4 GPU represents the most economical cloud configuration, costing only
$17.92 per 1 Million Requests (at a 256 context size).
3. Concurrency Powerhouse: The TPU v6e-1 scales concurrency with almost zero latency impact (latency remains flat at
~0.45s scaling all the way from 8 to 128 concurrent users).
```
#### Summary
The strategy for using MCP for Gemma 4 GPU deployment with Antigravity CLI was validated with a incremental step by step approach.
A minimal stdio transport MCP Server was started from Python source code and validated with Antigravity CLI running as a MCP client in the same local environment. This Python server provided all of the management tools to deploy and troubleshoot Cloud Run Model deployments.
Comments
More Blog
View allkubernetesMinimalist EKS: The Easy Way
Amazon EKS manages the Kubernetes control plane, but you remain responsible for provisioning the...
J
Joaquin MenchacaaiNever forget to enter the Stern Grove lottery again!
Browser automation with Playwright, Python, GitHub Actions, and Entire to auto-enter San Francisco Stern Grove concert lotteries each week!
L
Lizzie SiegletypescriptA Free Screenshot Editor That Never Uploads Your Image
A free screenshot and image editor that runs entirely in your browser. Keeping every edit reversible and handling big phone photos, in plain TypeScript and Canvas2D.
M
Martin StarkshowdevI built a CLI to break my highlights out of Apple Books
A macOS CLI + MCP server that exports Apple Books highlights to Markdown and gives AI assistants direct access to your reading notes.
A
Andrey KorchakaiA Developer's Guide to Agent Hooks in Antigravity CLI
Motivation To be quite honest, "Hooks"—the shell commands we trigger at specific points...
T
TanaikeagentsTactical vs. Strategic Agentic AI Development — A Playbook for Developers
The Strategic Engineer: Why Writing Code Is No Longer Your Most Valuable Skill ...
A
Adewumi Saheed Adewale