Back to Blog python
 gemma
gemma community
 ai
ai ai
ai githubactions
 ai
ai
Building a Robust Classifier with Stacked Generalization
Debajyati Dey October 12, 2025
0 views
I am thinking to start writing an ML series. The series would contain various ML approaches...
I am thinking to start writing an ML series. The series would contain various ML approaches walkthrough and deep learning concepts. I will also add any extra article not planned to do if anyone requests such.
In this article, I am going to explain and demonstrate a specific kind of ensemble learning called Stacking or Stacked Generalization.
Firstly, if you don't know what ensemble learning stands for, I am giving you a short, simple definition to understand.
Look, generally in basic machine learning tasks we use 1 model to be trained on training and validation datasets and then use the model on the testing dataset to measure its accuracy.
But, in a real world scenario, we all know that a model's accuracy can vary, and it won't/can't give correct predictions on each and every data.
In machine learning, we are always up to improving the accuracy of our final result. Right?
That is why over the years, ML Engineers and researchers have proposed innovative solutions/techniques which may not always directly improve the accuracy of the model itself but improve the accuracy of the final result. Such one kind of method is called Ensemble Learning.
What Did I Mean? What Does Ensemble Learning Do to Improve Accuracy of the Final Result?
Ensemble Learning is a machine learning approach where we don't use a single model but use multiple individual models to create a stronger and more accurate model.
If we use only one model, the output could be biased and could be less accurate and precise. So? So we can use multiple models and combine their predictions to form a more reliable prediction.
This is the core idea.
Now let's discuss the 3 different ensemble methods that exist. This will give you a clearer & better idea of what we are doing/going to do in this article.
The 3 Kinds
There are 3 different kinds of ensembles. One of them is already known to you from the title of the article which is a stacking ensemble. We will go through that at the end. Let's first check out the other 2 first.
Bagging
A bagging ensemble is kind of an ensemble approach where multiple homogeneous (same type) models (often referred to as estimators. Also called base models) are arranged parallelly and they receive the same data as input. Now, all of them can get the same set of the data as input or may get different subsets of the same data depending on the implementation.
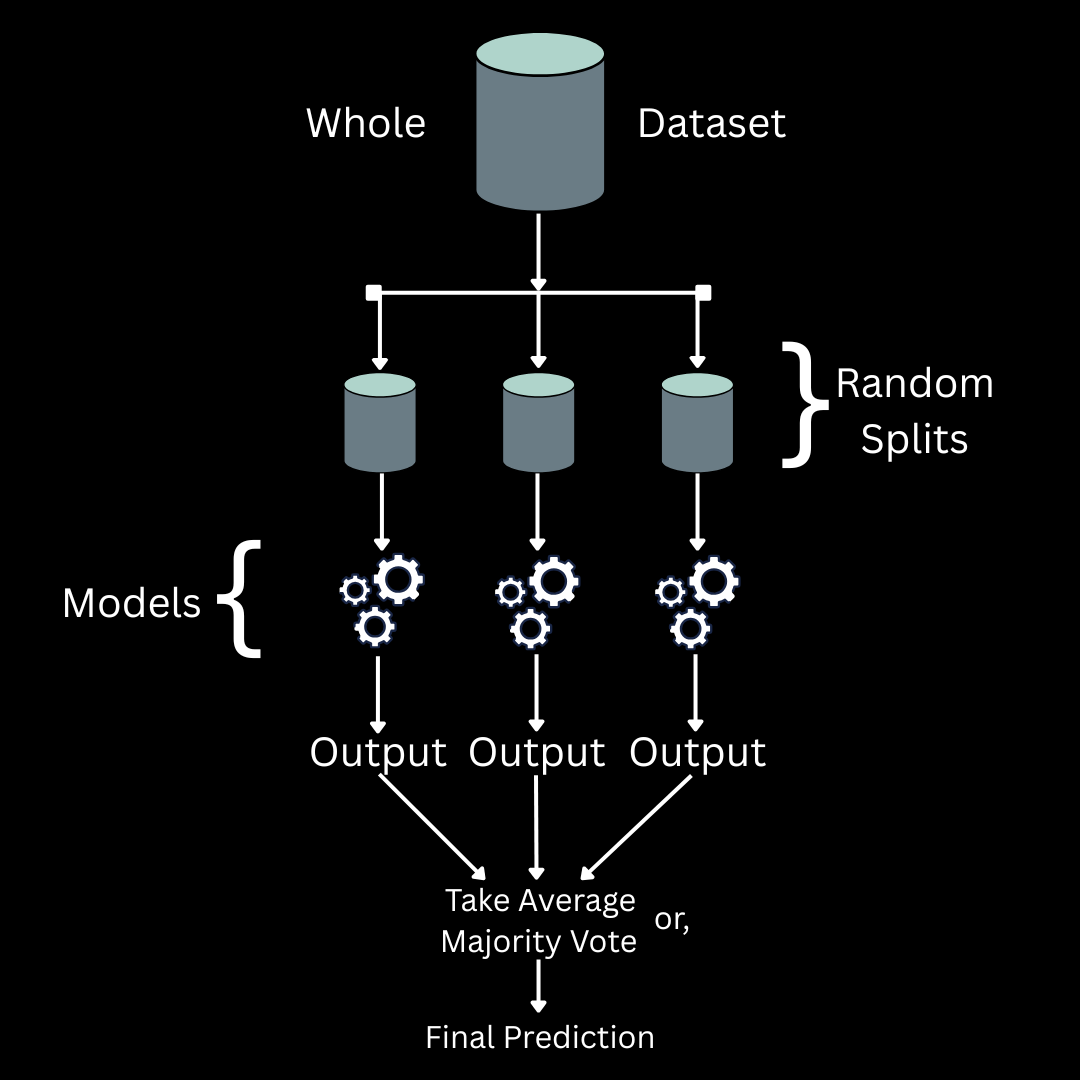
In case of a classification task, the final prediction is calculated by taking the majority vote of the all output predictions, and in case of regression tasks we simply just take the average of all the predicted values.
The diagram above shows a schematic illustration of a bagging ensemble.
Example: Random forest is a bagging ensemble of decision trees.
Boosting
Below I have shown an illustration of the Boosting ensemble architecture.
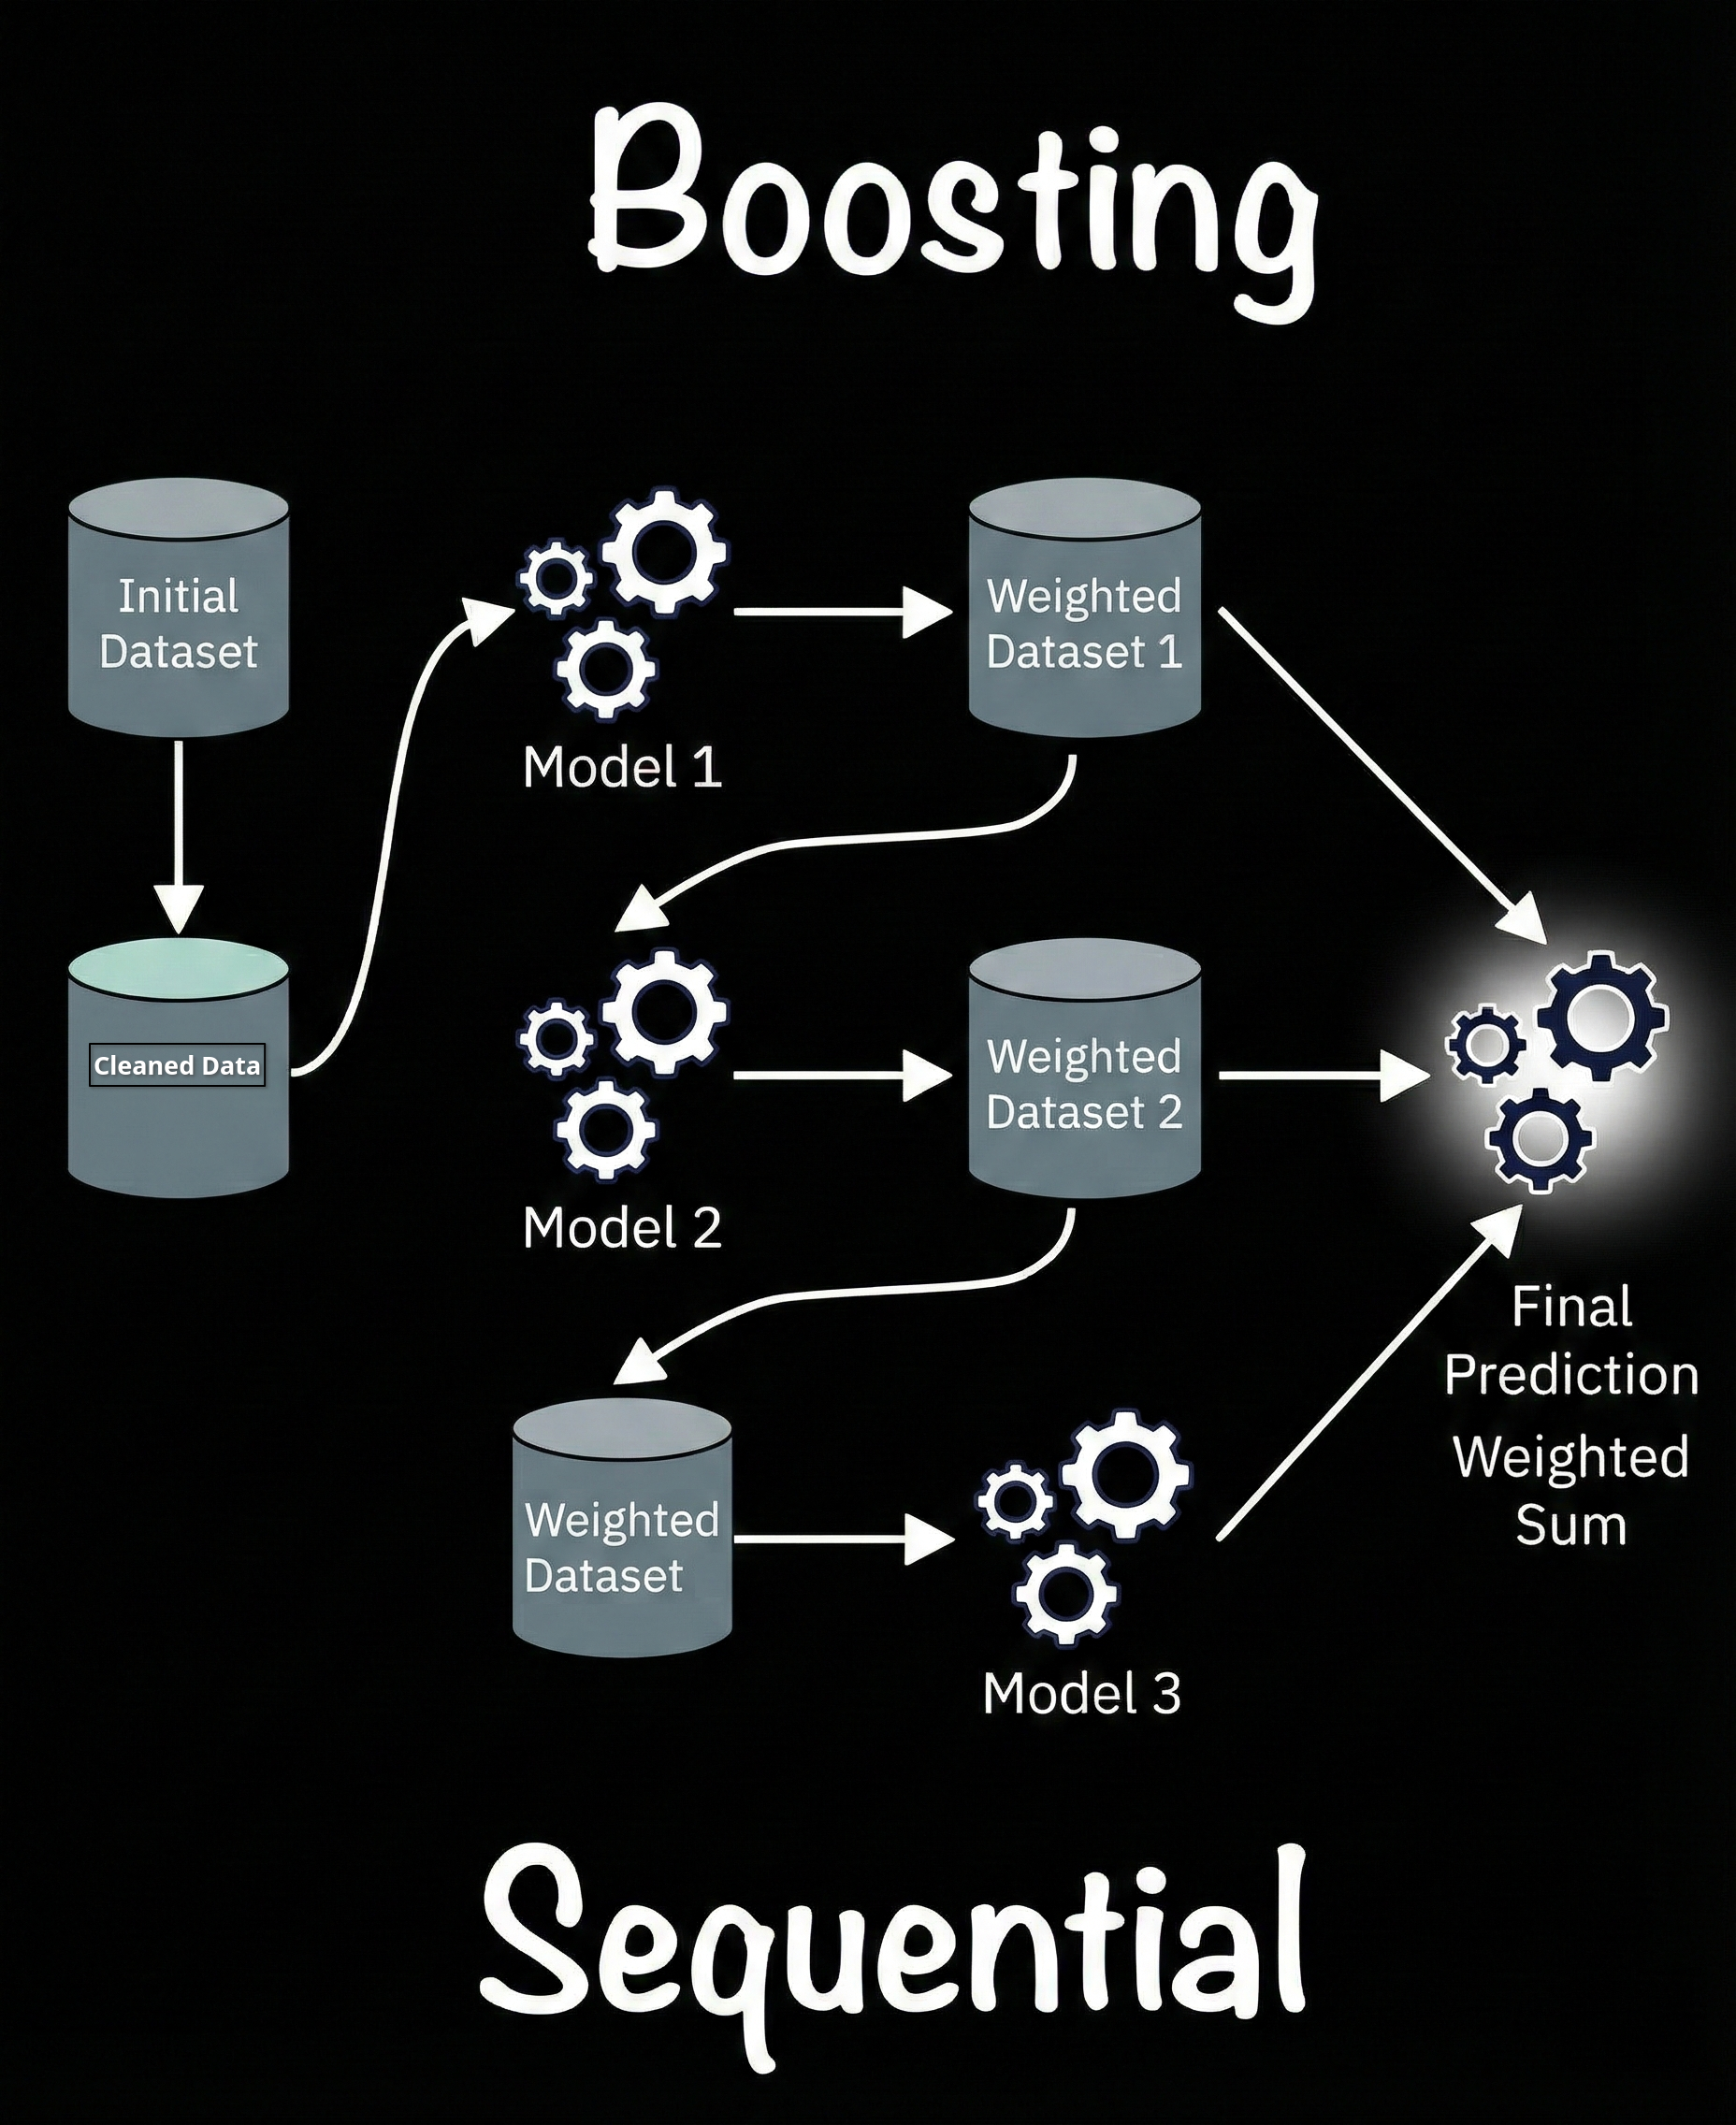
In a boosting ensemble, multiple homogeneous models are arranged sequentially and here each subsequent model (estimator) improves the predictions (output) of the previous by learning from the output and errors. The first model gets the original dataset as input and the next ones get the weighted version (data along with output of the previous one).
The final prediction is calculated by aggregating the individual models’ outputs and so basically the weighted sum or mean of the individual models’ predictions.
Example: Gradient Boosted Decision Trees, CatBoost, etc.
Stacking
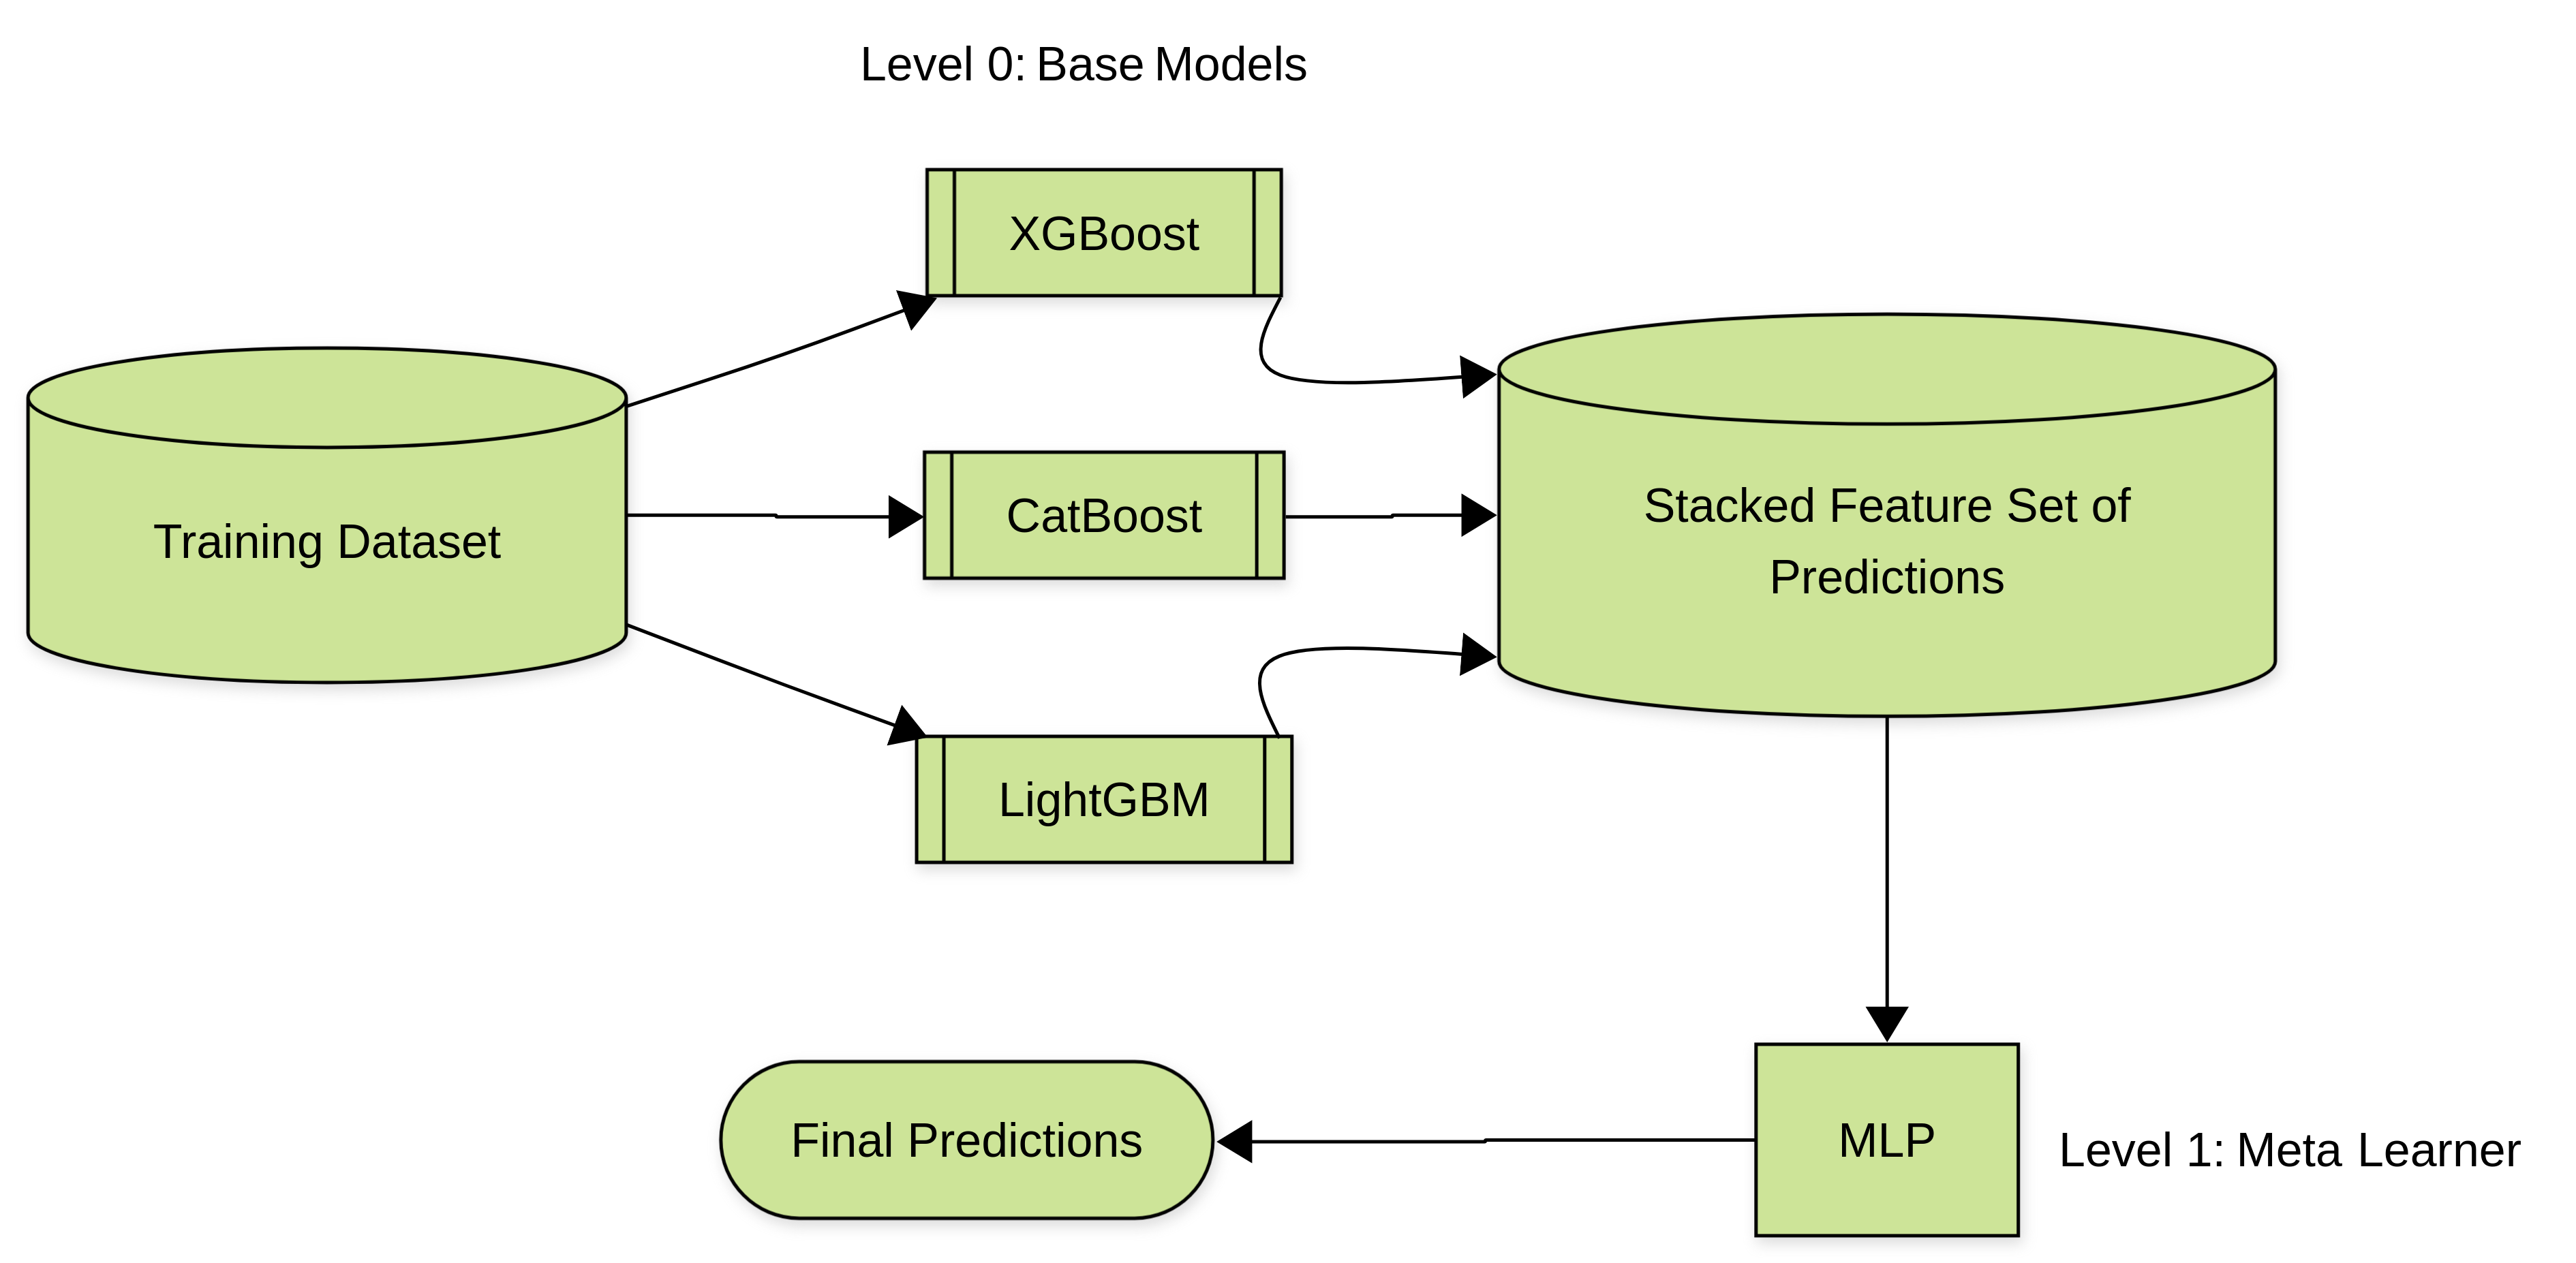
A Stacking ensemble is a completely different kind of ensemble. In a stacking ensemble, we combine multiple heterogeneous (different kind) models (weak learners also called base models) parallelly, and from their learnings a strong learner (also called meta learner, because it learns from the learnings of other learners) chosen as the final classifier, makes and learns to make the final prediction.

It creates a completely new model.
I hope the diagram of a stacking ensemble, shown above (a very basic and simple representation), was helpful in making the overall idea clear and lucid.
This layered approach allows the meta-model to learn the best way to weigh and combine the individual strengths and weaknesses of the base models. This leads to a final model that outperforms any single base model.
Great! As now, you have the basic idea of ensembles, and most importantly the stacking ensemble, let's go to the part of the article where we create the stacking classifier.
Start Programming
We will use the scikit-learn python library to build the stacking ensemble.
Okay, time to set up virtual environment (you can use a Colab Notebook if you prefer, to skip the venv part) & install dependencies -
I am using uv to setup the environment and manage dependencies.
uv init stacking-ensemble
cd stacking-ensemble
uv add scikit-learn catboost xgboost lightgbm matplotlib seaborn
source ./.venv/bin/activate
Now we are ready to code.
First things first. The initial necessary imports.
import numpy as np
from sklearn.datasets import load_breast_cancer
from sklearn.model_selection import train_test_split
from sklearn.neural_network import MLPClassifier
from sklearn.ensemble import StackingClassifier
from sklearn.metrics import accuracy_score, log_loss, confusion_matrix, classification_report

from xgboost import XGBClassifier
from catboost import CatBoostClassifier
from lightgbm import LGBMClassifier
Preparee the base models and the meta model -
# Level 0 (Base Layers/Models)
# These models are trained on the original feature set
base_models = [
    ('xgb', XGBClassifier(n_estimators=100, eval_metric='logloss', random_state=42, n_jobs=-1)),
    ('cat', CatBoostClassifier(iterations=100, verbose=0, random_state=42)),
    ('lgbm', LGBMClassifier(n_estimators=100, random_state=42, n_jobs=-1, verbose=-1))
]

# Level 1 (Meta-Layer/Final Classifier)
# This model takes the predictions/probabilities of the base models as its new input features.
meta_model = MLPClassifier(hidden_layer_sizes=512,activation="logistic",learning_rate="adaptive")
The Level 0 models are the foundation of the stacked ensemble.
We will use the StackingClassifier API from scikit-learn to build the stacking ensemble classifier. The StackingClassifier constructor expects base models to be provided as a list of tuples. Where each tuple is contains the name of the model as string followed the instantiated sklearn compatible classifier model.
The most crucial step in a Machine Learning task is preparing the data. We are using the load_breast_cancer function from sklearn.datasets to load a standard binary classification dataset. This dataset contains features derived from digitized images of breast mass samples, with the target variable indicating whether the mass is malignant (cancerous) or benign (non-cancerous).
data = load_breast_cancer()
X, y = data.data, data.target

X_train, X_test, y_train, y_test = train_test_split(X, y, test_size=0.3, random_state=42)

print(f"--- Loaded Real-World Dataset: {data.DESCR.splitlines()[0]} ---")
print(f"Dataset Size: {len(X)} samples, {X.shape[1]} features.")
print(f"Training on {len(X_train)} samples, testing on {len(X_test)} samples.")
Now write a function to encapsulate the stacked classifier building logic.
def build_stacked_mlp(base_estimators, final_estimator):
    """
    Builds the Stacked Generalization Model.
    The StackingClassifier handles the training process for this layered structure.
    """
    print("--- Defining Stacked Model (MLP of ML Models) ---")
    stacked_model = StackingClassifier(
        estimators=base_estimators,
        final_estimator=final_estimator,
        cv=5, # 5-fold cross-validation to generate level 1 training data (predictions)
        passthrough=True, # Pass original features to the meta-model as well
        n_jobs=-1
    )
    return stacked_model
The param n_jobs allows the model to use all available CPU cores.
Now you might be thinking, out of so many models existing in the world why did I choose these 3 models to be using as base models and why the MLPClassifier as final classifier. Why???
The base models used here are -
- XGBoost (
xgb): Known for its optimized performance, flexibility, and regularization techniques (L1 and L2) which help prevent overfitting. It builds trees sequentially, with each new tree correcting errors made by previous ones. Uses Hessian curvature and Taylor Expansion (2nd order derivative) loss function to minimize loss. Also referred to as the "King of Machine Learning Algorithms". - CatBoost (
cat): Specialized in handling categorical features directly without extensive preprocessing (though not explicitly used for this in this numerical dataset, its internal mechanisms differ). It uses symmetric trees and ordered boosting, which helps reduce prediction shift and yields robust models. - LightGBM (
lgbm): Designed for efficiency and speed, especially on large datasets. It uses a leaf-wise (rather than level-wise) tree growth algorithm, which can lead to faster training and higher accuracy, but also a higher risk of overfitting if not properly tuned.
These three models are all powerful gradient boosting algorithms, which are known for their high accuracy and robust performance across a wide range of tabular datasets.
Because of their differing internal mechanics, these models are likely to make different types of errors and capture different patterns in the data. This diversity is crucial for a stacked ensemble, as the meta-learner can then learn from these varied perspectives to make a more informed final decision.
Finally I want to add that the reason I chose MLPClassifier as the meta learner is also thoughtful.
The predictions (or probabilities) from the base models form the new feature set for the meta-model. An MLPClassifier can learn non-linear ways to combine these outputs. Simpler meta-learners like Logistic Regression can only learn linear relationships. But an MLP (Multi layer perceptron) can identify more complex interactions and dependencies between the base model predictions.
The activation="logistic" and learning_rate="adaptive" parameters further enhance its ability to adapt and find suitable weights for combining the base models' insights. The logistic activation function is used for binary classification outputs.
Now create the stacking classifier by calling the function we defined.
stacked_mlp = build_stacked_mlp(base_models, meta_model)
You could do this by directly writing the implementation without creating a function, but I honestly prefer grouping consecutive instructions into reusable functions because that resonates with me more.
Define a function for calculating metrics -
def calculate_metrics(y_true, y_pred, y_proba):
    """Calculates both accuracy and log loss."""
    acc = accuracy_score(y_true, y_pred)
    # log_loss expects probabilities for each class (i.e., shape (n_samples, n_classes))
    # We clip probabilities to prevent log_loss from failing due to p=0 or p=1
    y_proba = np.clip(y_proba, 1e-15, 1 - 1e-15)
    loss = log_loss(y_true, y_proba)
    return acc, loss
First lets evaluate the individual base models to get a detailed overview so that we can make comparisons with the final model later.
for name, model in base_models:
    model.fit(X_train, y_train)

    y_train_pred = model.predict(X_train)
    y_train_proba = model.predict_proba(X_train)
    train_acc, train_loss = calculate_metrics(y_train, y_train_pred, y_train_proba)

    y_test_pred = model.predict(X_test)
    y_test_proba = model.predict_proba(X_test)
    test_acc, test_loss = calculate_metrics(y_test, y_test_pred, y_test_proba)

    print(f"\n[LAYER 0 MODEL: {name.upper()}]")
    print(f"  - Training: Accuracy={train_acc:.4f}, Log Loss={train_loss:.4f}")
    print(f"  - Test:     Accuracy={test_acc:.4f}, Log Loss={test_loss:.4f}")
On my end it appeared like this -
--- Training Individual Base Layers (Level 0) and Evaluating Metrics ---

[LAYER 0 MODEL: XGB]
  - Training: Accuracy=1.0000, Log Loss=0.0060
  - Test:     Accuracy=0.9649, Log Loss=0.0806

[LAYER 0 MODEL: CAT]
  - Training: Accuracy=1.0000, Log Loss=0.0140
  - Test:     Accuracy=0.9708, Log Loss=0.0701

[LAYER 0 MODEL: LGBM]
  - Training: Accuracy=1.0000, Log Loss=0.0005
  - Test:     Accuracy=0.9474, Log Loss=0.1195
Now train the stacked_mlp with the fit method.
stacked_mlp.fit(X_train, y_train)
Training done. So the only thing left is testing our stacking ensemble to see if it performs better overall than the individual models or not.
y_pred_stacked = stacked_mlp.predict(X_test)
y_proba_stacked = stacked_mlp.predict_proba(X_test)

final_acc, final_loss = calculate_metrics(y_test, y_pred_stacked, y_proba_stacked)

print("\n--- Final Stacked Model (Level 1 MLP Classifier) Test Metrics ---")
print(f"  - Accuracy: {final_acc:.4f}")
print(f"  - Log Loss: {final_loss:.4f}")
And see, here is the result. Our approach worked!
--- Final Stacked Model (Level 1 MLP Classifier) Test Metrics ---
  - Accuracy: 0.9766
  - Log Loss: 0.0529
The stacked model actually achieves higher accuracy than the individual models. And the logarithmic loss value of stacked_mlp is also much lower than the ones of the individual models.
But we are not done yet, let's analyse more deeply by visualizing the results in a more detailed way.
Visualizing the Results
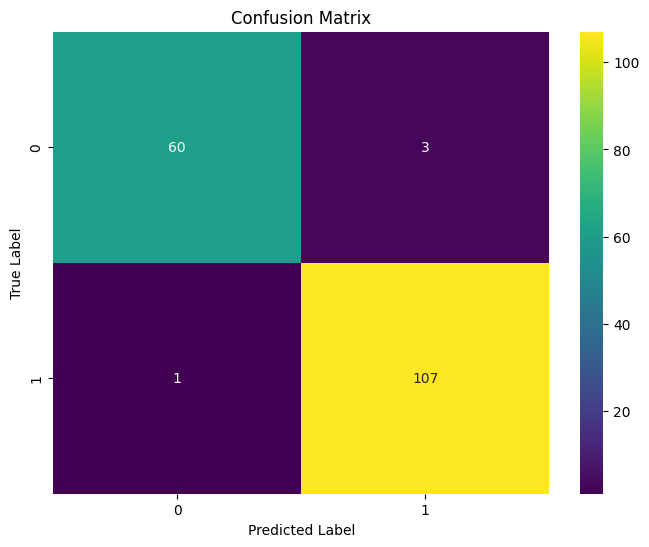
Let's plot a confusion matrix -
import matplotlib.pyplot as plt
import seaborn as sns

cm = confusion_matrix(y_test, y_pred_stacked)
plt.figure(figsize=(8, 6))
sns.heatmap(cm, annot=True, fmt='d', cmap='viridis')
plt.title(f'Confusion Matrix')
plt.ylabel('True Label')
plt.xlabel('Predicted Label')
plt.show()
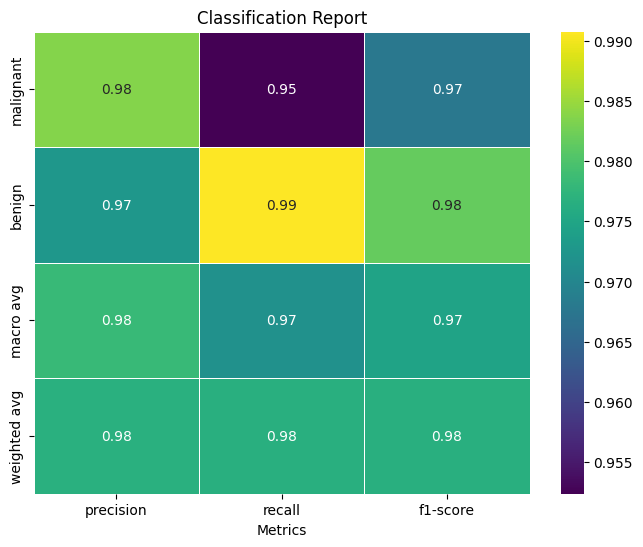
Good. Now lets plot the classification report -
classifi_report = classification_report(y_test, y_pred_stacked, target_names=target_names, output_dict=True)

import pandas as pd

cf = pd.DataFrame(classifi_report).transpose()
cf.to_csv('classification_report.csv')

cf = cf.drop(labels=['accuracy'],errors='ignore')
cf_plot = cf[['precision', 'recall', 'f1-score']]

plt.figure(figsize=(8, 6))
sns.heatmap(cf_plot, annot=True, fmt='.2f', cmap='viridis',linewidths=.5)
plt.xlabel('Metrics')
plt.title('Classification Report')
plt.show()
Conclusion
I hope you learnt something new from this article or at least got a hands on overview on how to build ML stacking ensembles and use them utilizing the straight-forward and easy StackingClassifier API of the scikit-learn module.
In a future article we will go through how to build deep learning stacking ensembles using keras functional API.
Now, if you found this article helpful, if this blog added some value to your time and energy, please show some love by giving the article some likes and share it with your dev friends.
Feel free to connect with me. :)
| Thanks for reading! 🙏🏻 <br/> Written with 💚 by Debajyati Dey |  |
|  |
|  |
|  |
|  |
|-----|------|-----|-----|-----|-----|-----|
|
|-----|------|-----|-----|-----|-----|-----|
Follow me on Dev to motivate me so that I can bring more such tutorials like this on here!
{% user ddebajyati %}
Happy coding 🧑🏽💻👩🏽💻! Have a nice day ahead! 🚀

Comments
More Blog
View allgemmaFive Gemma-4 models, one accelerator: what porting E2B 31B to AWS Inferentia2 taught me
I ported the whole Gemma-4 family — E2B, E4B, 12B, 31B, and the 26B-A4B MoE — to run on...
X
xbillcommunityHey DEV, I'm Tobore. Let's actually connect.
Hey DEV, I'm Tobore. Let's actually connect. I've been on here for a while now, mostly writing and...
L
Laurina AyarahaiI burned through thousands of AI tokens. Then a friend did it for free
(yep, kinda clickbait, just for the funsies 😊) At the beginning of the year, I relaunched my...
P
Paulo HenriqueaiClaude might be saturating your machine
My laptop was sitting idle with the fan at full tilt. Nothing was running that I knew of. The culprit...
S
Sidhant PandagithubactionsAutomated GitHub Code Reviews Using Google Gemini
I Built a Thing! TL;DR — Google Gemini-based Pull Request reviews and Issue Triaging for...
D
Darren "Dazbo" LesteraiWhat is an "agentic harness," actually?
I've been hearing the word "harness" thrown around a lot lately. I assumed it just meant "the IDE" or...
T
Tilde A. ThuriumReady-made automations for this
Workflows from the Neura Market marketplace related to this DeepSeek resource
- Building a RAG Chatbot for Movie Recommendations with Qdrant and OpenAIn8n · $14.99 · Related topic
- TechCrunch AI Article Scraper & Classifier with GPT-4.1-nano to Sheets & Telegramn8n · $14.99 · Related topic
- Automate Profile List Building with Airtop and Google Sheetsn8n · $4.99 · Related topic
- Automate Your Website Building with N8N: Unsubscribe Workflowmake · $6.62 · Related topic