Back to Blog aws
aws gemma
gemma community
 ai
ai ai
ai githubactions
 ai
ai
The hosting setup nobody talks about anymore
Erik Hanchett February 15, 2026
0 views
Ever had this problem? You're building something real, real-time features, background workers, cron...
Ever had this problem?
You're building something real, real-time features, background workers, cron jobs, maybe a database or two. You've outgrown the managed platforms, or you're tired of stitching together five different SaaS subscriptions to get what a single server could give you. You want to understand your infrastructure, not just deploy to it. Let me introduce you to the world of Virtual Private Servers (VPS).
A VPS gives you full control over a private server that you yourself manage. Root access, any library or service you want, no execution limits or timeouts. If something breaks, you can SSH in and fix it, no support tickets, no waiting.
That flexibility comes with a tradeoff: you're responsible for the setup, the security, and the maintenance. Managed platforms abstract that away, which is exactly why they're great for simpler use cases. However when your app needs more than what a platform gives you out of the box, or when you just want to learn how the pieces fit together, running your own server is worth the investment.
The purpose of this tutorial is to walk you through that setup end to end. We'll launch a VPS, configure a web server with a CDN, connect it to a domain, and wire up a deployment pipeline. By the end you'll understand every layer of your stack. Let's jump in!
Heads up — this tutorial gets you to a working deployment. If you plan to serve real user traffic, check the Production Hardening section before going live.
Table of Contents
- Our Setup
- Step-by-step
- Launching your EC2 instance
- Installing nginx and Docker
- Configuring AWS Systems Manager
- Setting up the deploy directory and ECR
- Connecting GitHub with OIDC
- Adding the GitHub Action and Dockerfile
- Testing the deployment
- Setting up CloudFront, SSL, and nginx
- Connecting your domain with Route 53
- Adding cache behaviors
- Production hardening
- Cleanup
- Wrapping up
Want a video instead?
{% embed https://youtu.be/VKk-l97CNU8?si=ZfiQd1Nvc7NXz_Yh %}
Our Setup
Full disclosure, I'm a Developer Advocate for AWS, so I'll be using AWS services in the tutorial as it's what I'm most familiar with. I've been hosting web apps on VPS for years. Feel free to use whatever VPS provider you'd like though.
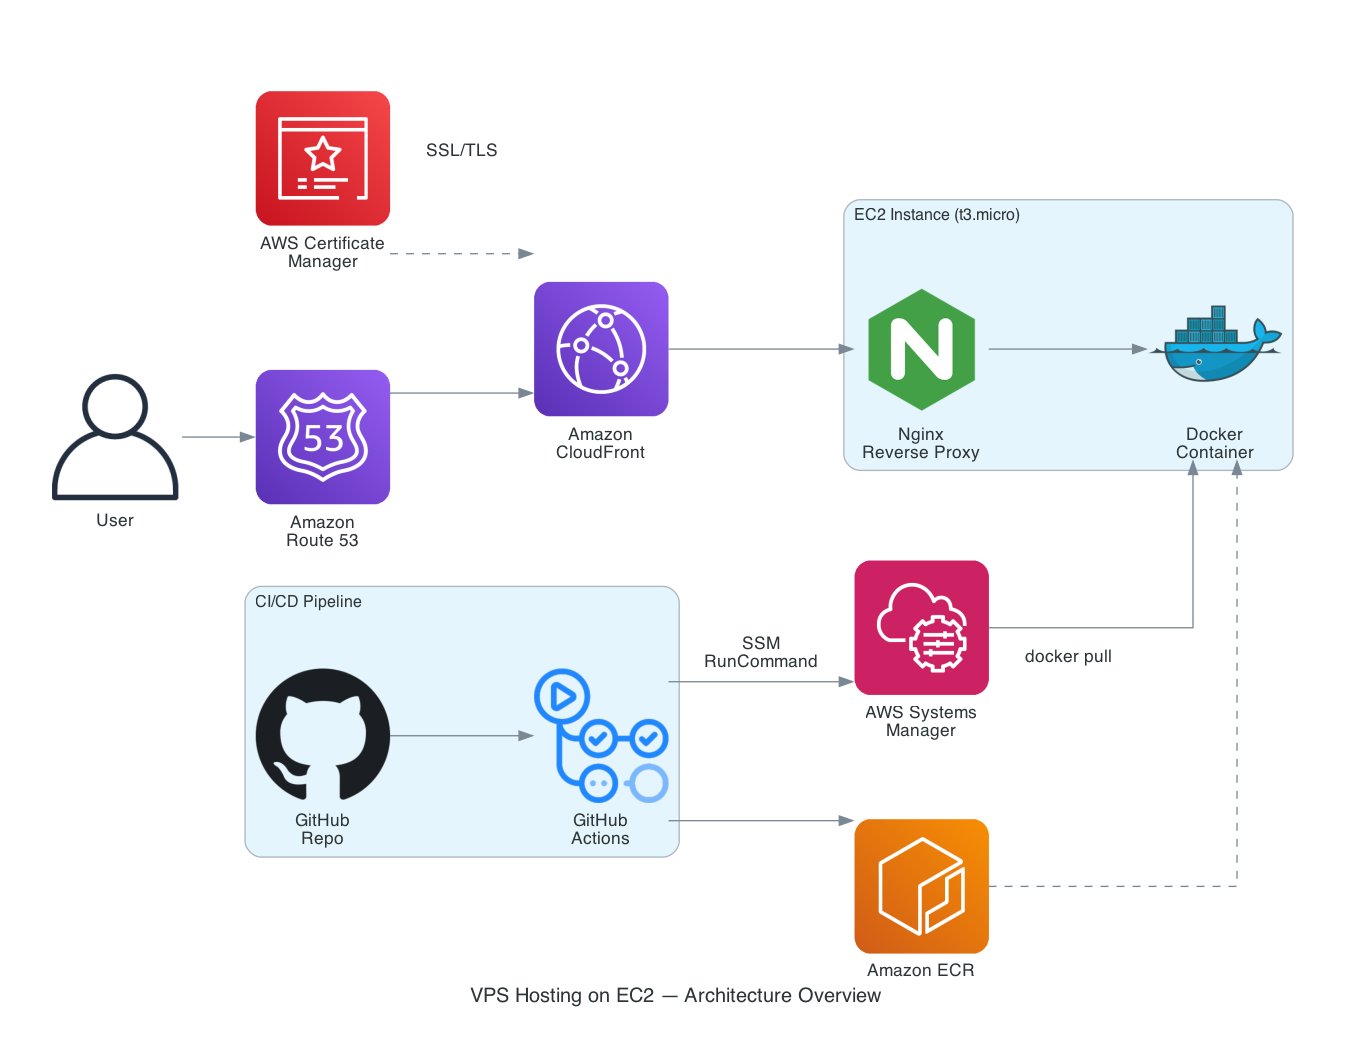
In this post we are using an Amazon EC2 T3 Micro instance running Ubuntu with an nginx web server. We'll use AWS Systems Manager to help set up a CI/CD pipeline using GitHub Actions. We'll then configure AWS Certificate Manager with Amazon CloudFront and have it connected to our domain with Amazon Route 53! We'll be using a Vue Nuxt 4 application as our web app.
Here is a high level diagram of our final output.
Prerequisites
Don't worry, you won't need to be an EC2 or AWS expert to follow this post. I'll assume you have some basic knowledge of software development, but that's it. To get started make sure you sign up for a free AWS account. I'll also assume you have some sort of application you want to deploy and it's already on GitHub. In this example we'll be using Nuxt with SSR, but you can use whatever you'd like.
Step-by-step
Typically in enterprise applications you might see infrastructure as code (IAC) building and deploying applications on AWS. However, for this tutorial we'll be going directly to the AWS console. I find this the simplest way to get started.
If you're following along with this tutorial, or skimming it through to get ideas, make sure to download a good agentic IDE like Kiro CLI. Kiro CLI can be installed remotely on your server and help you troubleshoot any production issue you have while setting up your service. I used it extensively while researching this blog post, and you should too!
Launching your EC2 instance
To host our application we'll start by creating a new EC2 instance. Log into the AWS Console to begin. Make sure you're on N. Virginia us-east-1 in the top right-hand corner.
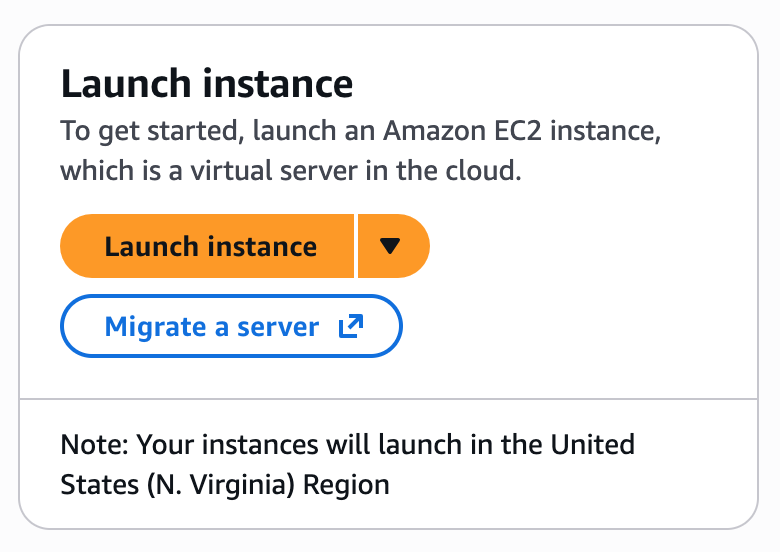
Search for EC2 in your AWS Console. It will bring you to a page where you can click Launch instance.
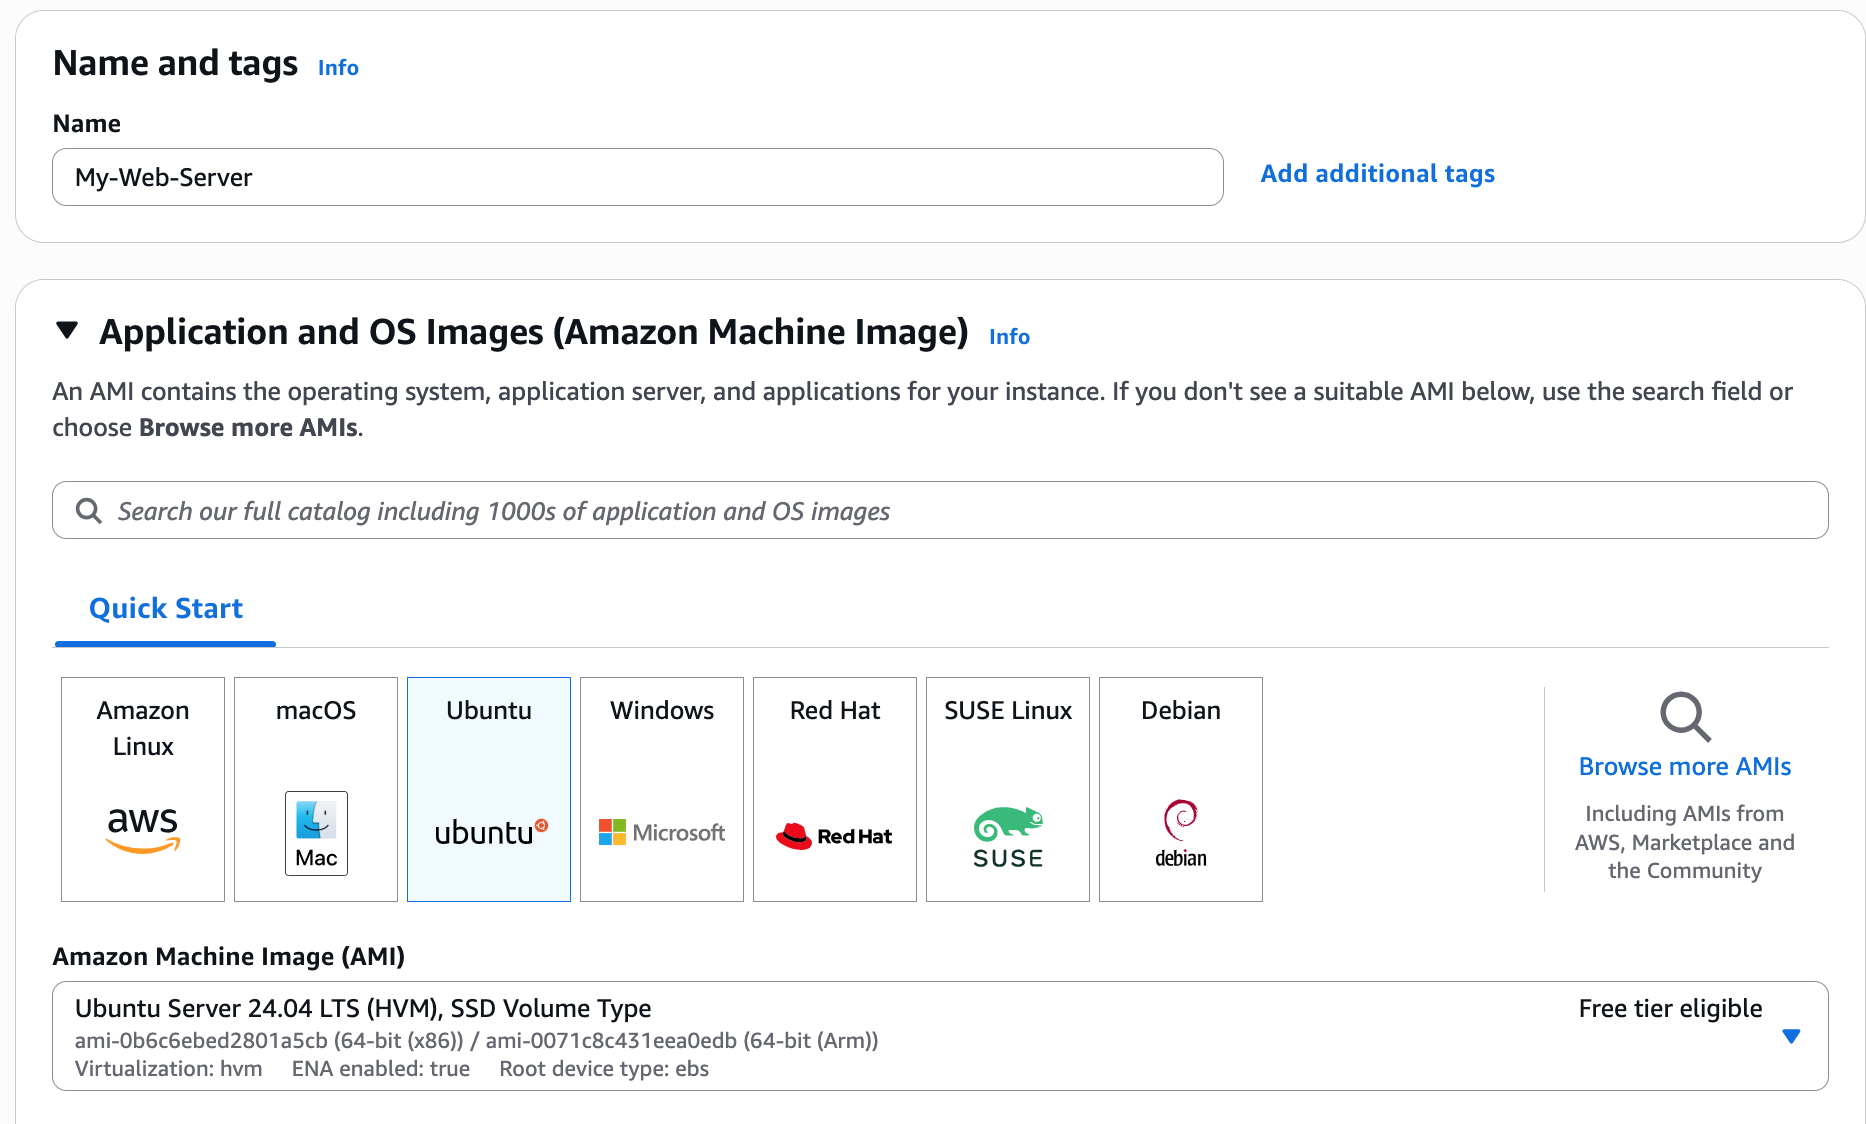
You'll then be brought to a screen with a lot of options. Don't worry, just fill out the name of your server. In this case I chose My-Web-Server and pick an OS image. I really like Ubuntu for beginners so I chose that.
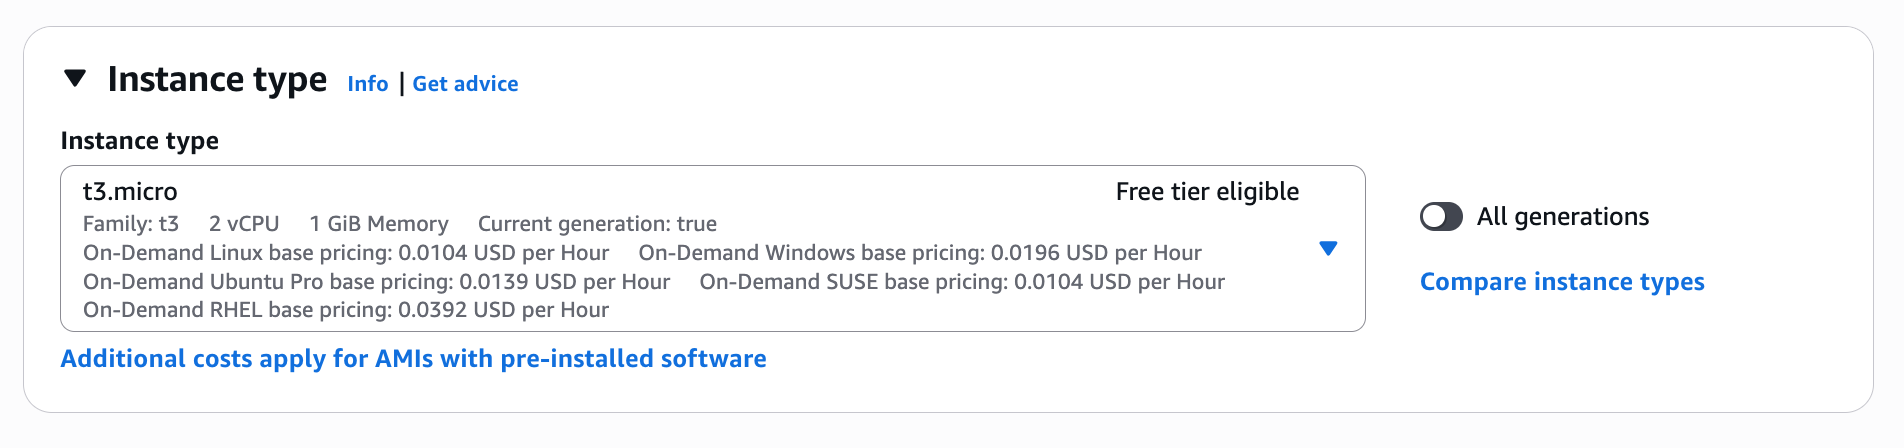
Next you'll need to select an instance type. We want to keep this server cheap (and free-tier eligible), so let's go with the t3.micro instance that has 2 vCPUs and 1 GiB of memory.
What about traffic? I know what you're thinking, how much traffic can a t3.micro instance handle? While I can't say for sure, we'll be using a Content Delivery Network (CDN) via Amazon CloudFront and caching as much as possible to help absorb traffic spikes. And if you ever outgrow a single instance, AWS can handle it. An Auto Scaling Group (ASG) can spin up additional EC2 instances once a certain traffic threshold is met, an Application Load Balancer (ALB) can distribute incoming traffic across them, and a Web Application Firewall (WAF) can block malicious or "noisy" traffic. We won't be covering those in this post, but I'd recommend reading up on it here if you're interested.
Click the Create new key pair button. This will send you to a popup to add a new key. Add a new key pair name, leave the rest as default and click Create key pair.
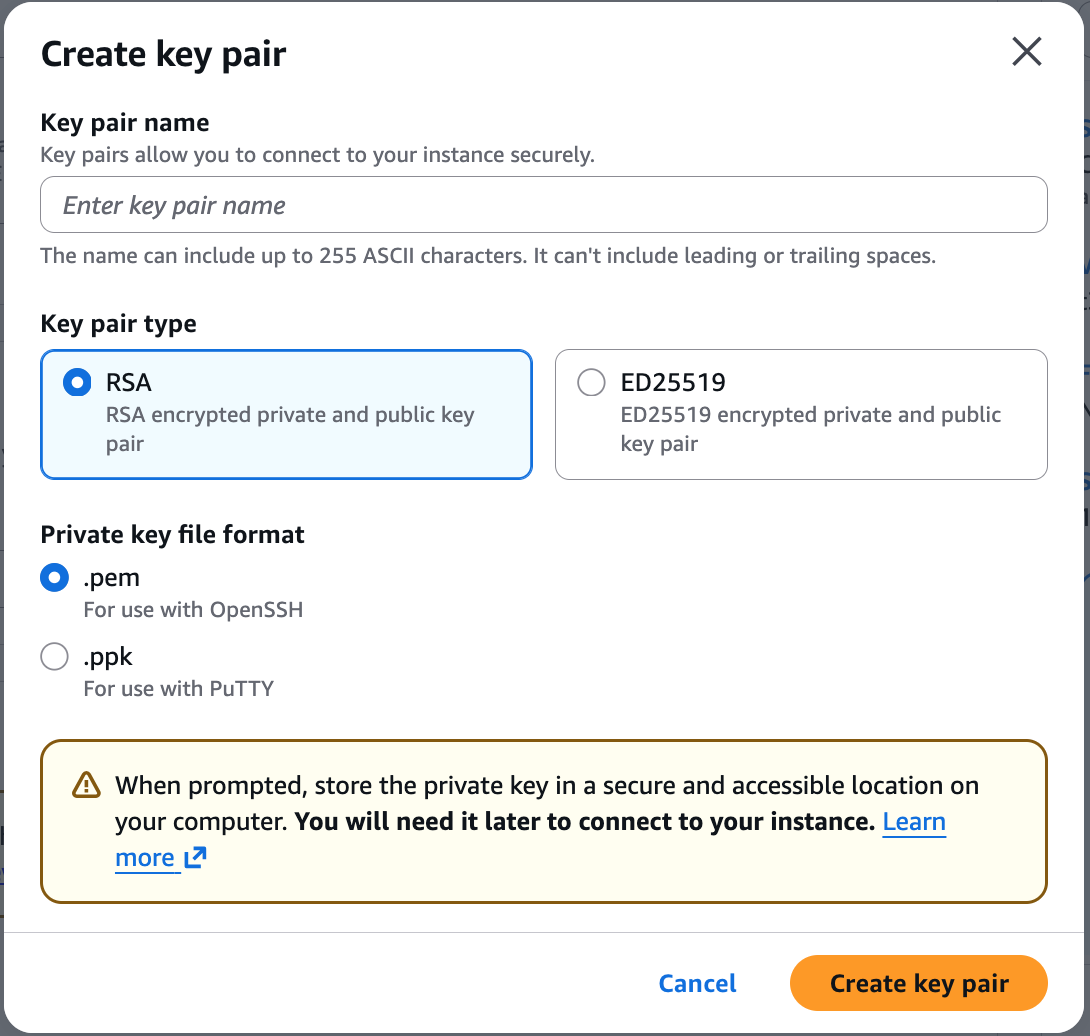
It will then ask you to save the key. This is very important. You'll need this key to SSH into your instance later. Save it somewhere safe.
In the network settings you may see a banner that you don't have a default VPC. Click create a new VPC. On the next page leave everything as default and click Create default VPC.

You should now be able to select your VPC, if it's not already selected.

In the Firewall (security groups) make sure to change the Allow SSH traffic from to only allow traffic from your IP. It should be listed in the dropdown.
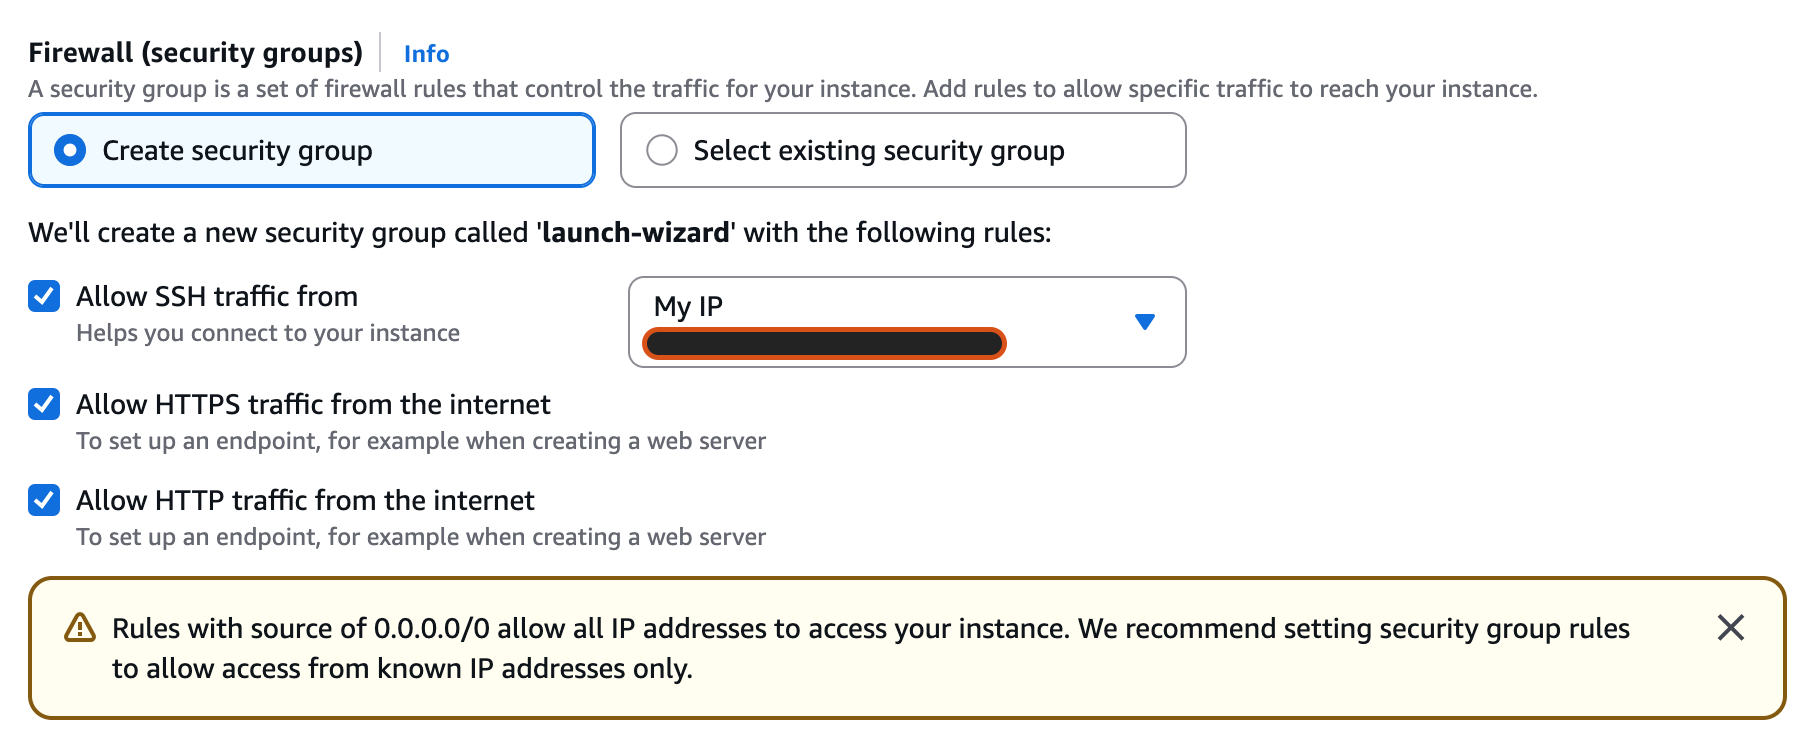
At the bottom click on Launch instance and you'll see a nice green Success banner. You can click on your instance i-*** to look at it!

In the next window look for the public IP address. Save it!
Now jump into your favorite terminal. Make sure you're in the same directory as the *.pem file you created earlier. You'll need to set some permissions on it. You'll then be able to SSH into your server. Make sure to replace ip-address with the public IP address you saved from the EC2 instance.
chmod 400 your-pem-file.pem
ssh -i your-pem-file.pem ubuntu@ip-address
🎉 Congrats! You've logged in for the first time!
Installing nginx and Docker
Now that we have our EC2 instance up and running, let's do something with it!
First update and then upgrade Ubuntu to the latest. It may ask you to restart some services. You may consider some best practices when working with EC2 as well.
Let's install nginx. This will be our web server that we'll use as a reverse proxy. It listens on port 80 for incoming traffic and forwards it to our Nuxt app running on port 3000.
sudo apt update && sudo apt upgrade
sudo apt install -y nginx
After nginx is installed we'll need to do some configuration. Let's add a new site under the sites-available directory. We'll call it nuxt.
sudo nano /etc/nginx/sites-available/nuxt
Replace it with the code below.
server {
  listen 80;
  server_name _;

  # (we’ll enable this after CloudFront is created)
  # if ($http_x_origin_verify != "REPLACE_WITH_SECRET") { return 403; }

  location / {
    proxy_pass http://127.0.0.1:3000;
    proxy_http_version 1.1;

    proxy_set_header Host $host;
    proxy_set_header X-Real-IP $remote_addr;
    proxy_set_header X-Forwarded-For $proxy_add_x_forwarded_for;
    proxy_set_header X-Forwarded-Proto $scheme;
    proxy_set_header Upgrade $http_upgrade;
    proxy_set_header Connection "upgrade";
  }
}
This is a basic setup for nginx. Check out the beginners guide for more information on what each option does. The Upgrade and Connection headers are there so WebSocket connections work correctly — handy if your app uses real-time features.
You may have noticed a comment at the top! Don't worry, we'll come back to this later when we set up CloudFront.
To enable the site we have to create a symbolic link from sites-available to sites-enabled. We'll also do a little cleanup and remove the default nginx site and restart it.
sudo ln -sf /etc/nginx/sites-available/nuxt /etc/nginx/sites-enabled/nuxt
sudo rm -f /etc/nginx/sites-enabled/default
sudo nginx -t
sudo systemctl reload nginx
If all goes well we'll get a successful message! If not, double-check the nuxt configuration inside nginx. It's easy to copy something wrong.
At this point we have a few options to handle our Nuxt site. We could just copy the dist folder over, install node, and use something like pm2 to manage the node process. While this works, I find it a little brittle.
Running everything on our EC2 instance requires managing dependencies directly on the system, making it harder to ensure consistent environments between development and production. Docker containers provide a better option. They isolate our dependencies, we can roll back easier, and we'll have more predictable deployments since everything your app needs is packaged together.
To install Docker we'll follow the official Docker docs that recommend using the apt repository.
# Add Docker's official GPG key:
sudo apt update
sudo apt install ca-certificates curl
sudo install -m 0755 -d /etc/apt/keyrings
sudo curl -fsSL https://download.docker.com/linux/ubuntu/gpg -o /etc/apt/keyrings/docker.asc
sudo chmod a+r /etc/apt/keyrings/docker.asc

# Add the repository to Apt sources:
sudo tee /etc/apt/sources.list.d/docker.sources <<EOF
Types: deb
URIs: https://download.docker.com/linux/ubuntu
Suites: $(. /etc/os-release && echo "${UBUNTU_CODENAME:-$VERSION_CODENAME}")
Components: stable
Signed-By: /etc/apt/keyrings/docker.asc
EOF

sudo apt update
The above code allows us to install Docker under apt. Let's do so.
sudo apt install docker-ce docker-ce-cli containerd.io docker-buildx-plugin docker-compose-plugin
Let's verify it's working. Always use sudo to run docker commands.
sudo systemctl status docker
sudo docker run hello-world
Configuring AWS Systems Manager
AWS Systems Manager (SSM) agent should already be installed on the instance; however, in case it isn't, you can use snap to install it. We'll then run a systemctl command to start the service.
SSM is a comprehensive management service that provides a unified user interface for tracking and resolving operational issues across AWS and hybrid cloud environments.
sudo snap install amazon-ssm-agent --classic
sudo systemctl enable snap.amazon-ssm-agent.amazon-ssm-agent.service
sudo systemctl start snap.amazon-ssm-agent.amazon-ssm-agent.service
We can verify it's running by checking the status.
sudo systemctl status snap.amazon-ssm-agent.amazon-ssm-agent.service
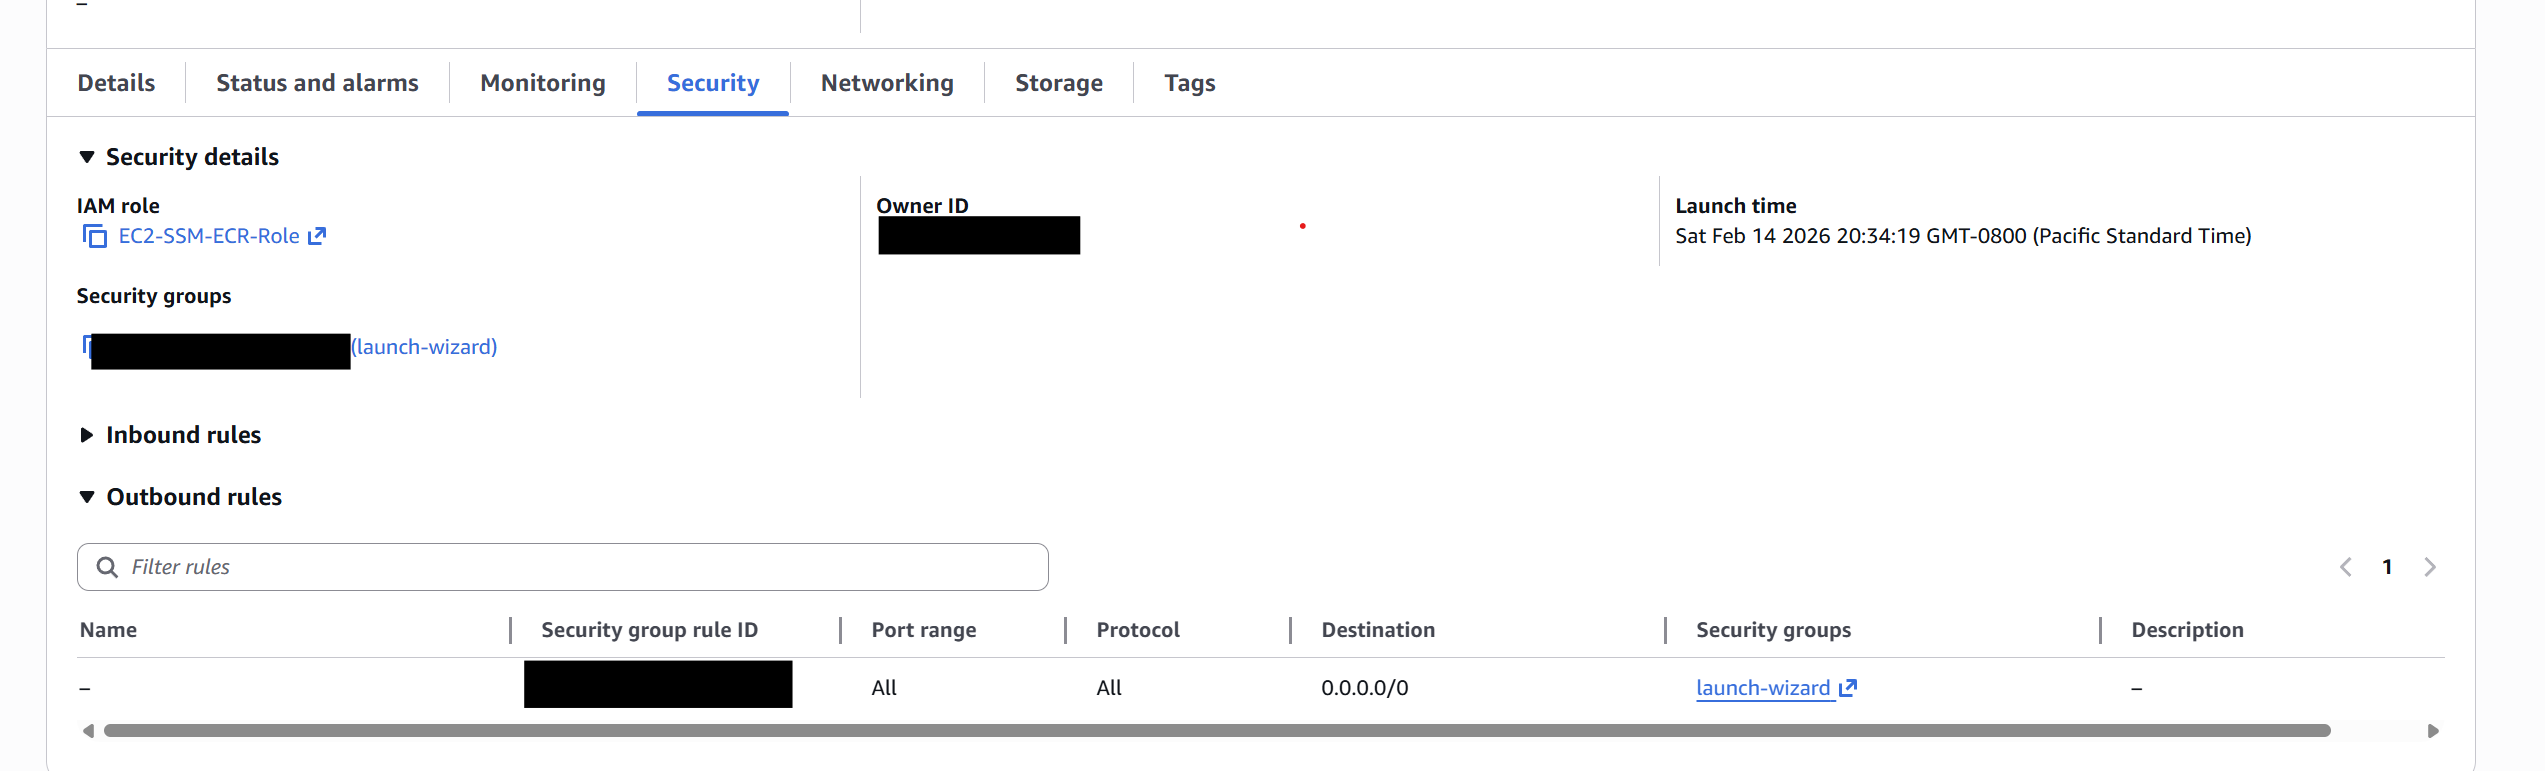
Back inside the console open up the EC2 instance. Use the Actions menu to modify the attached IAM role.
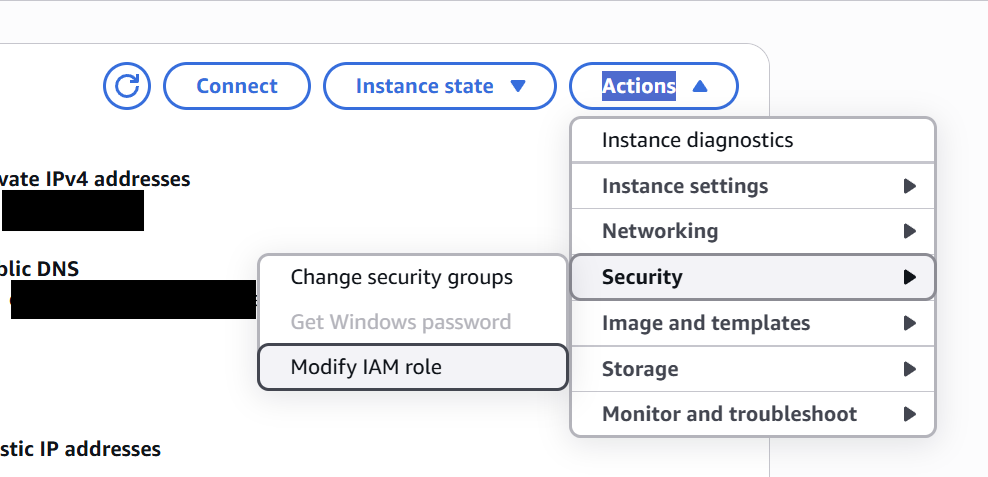
Make sure to attach the AmazonSSMManagedInstanceCore and AmazonEC2ContainerRegistryReadOnly policies. The AmazonSSMManagedInstanceCore policy allows the EC2 instance to be managed by AWS Systems Manager, enabling remote access and command execution without SSH. The AmazonEC2ContainerRegistryReadOnly policy grants the instance permission to pull Docker images from Amazon Elastic Container Registry (ECR) repositories.
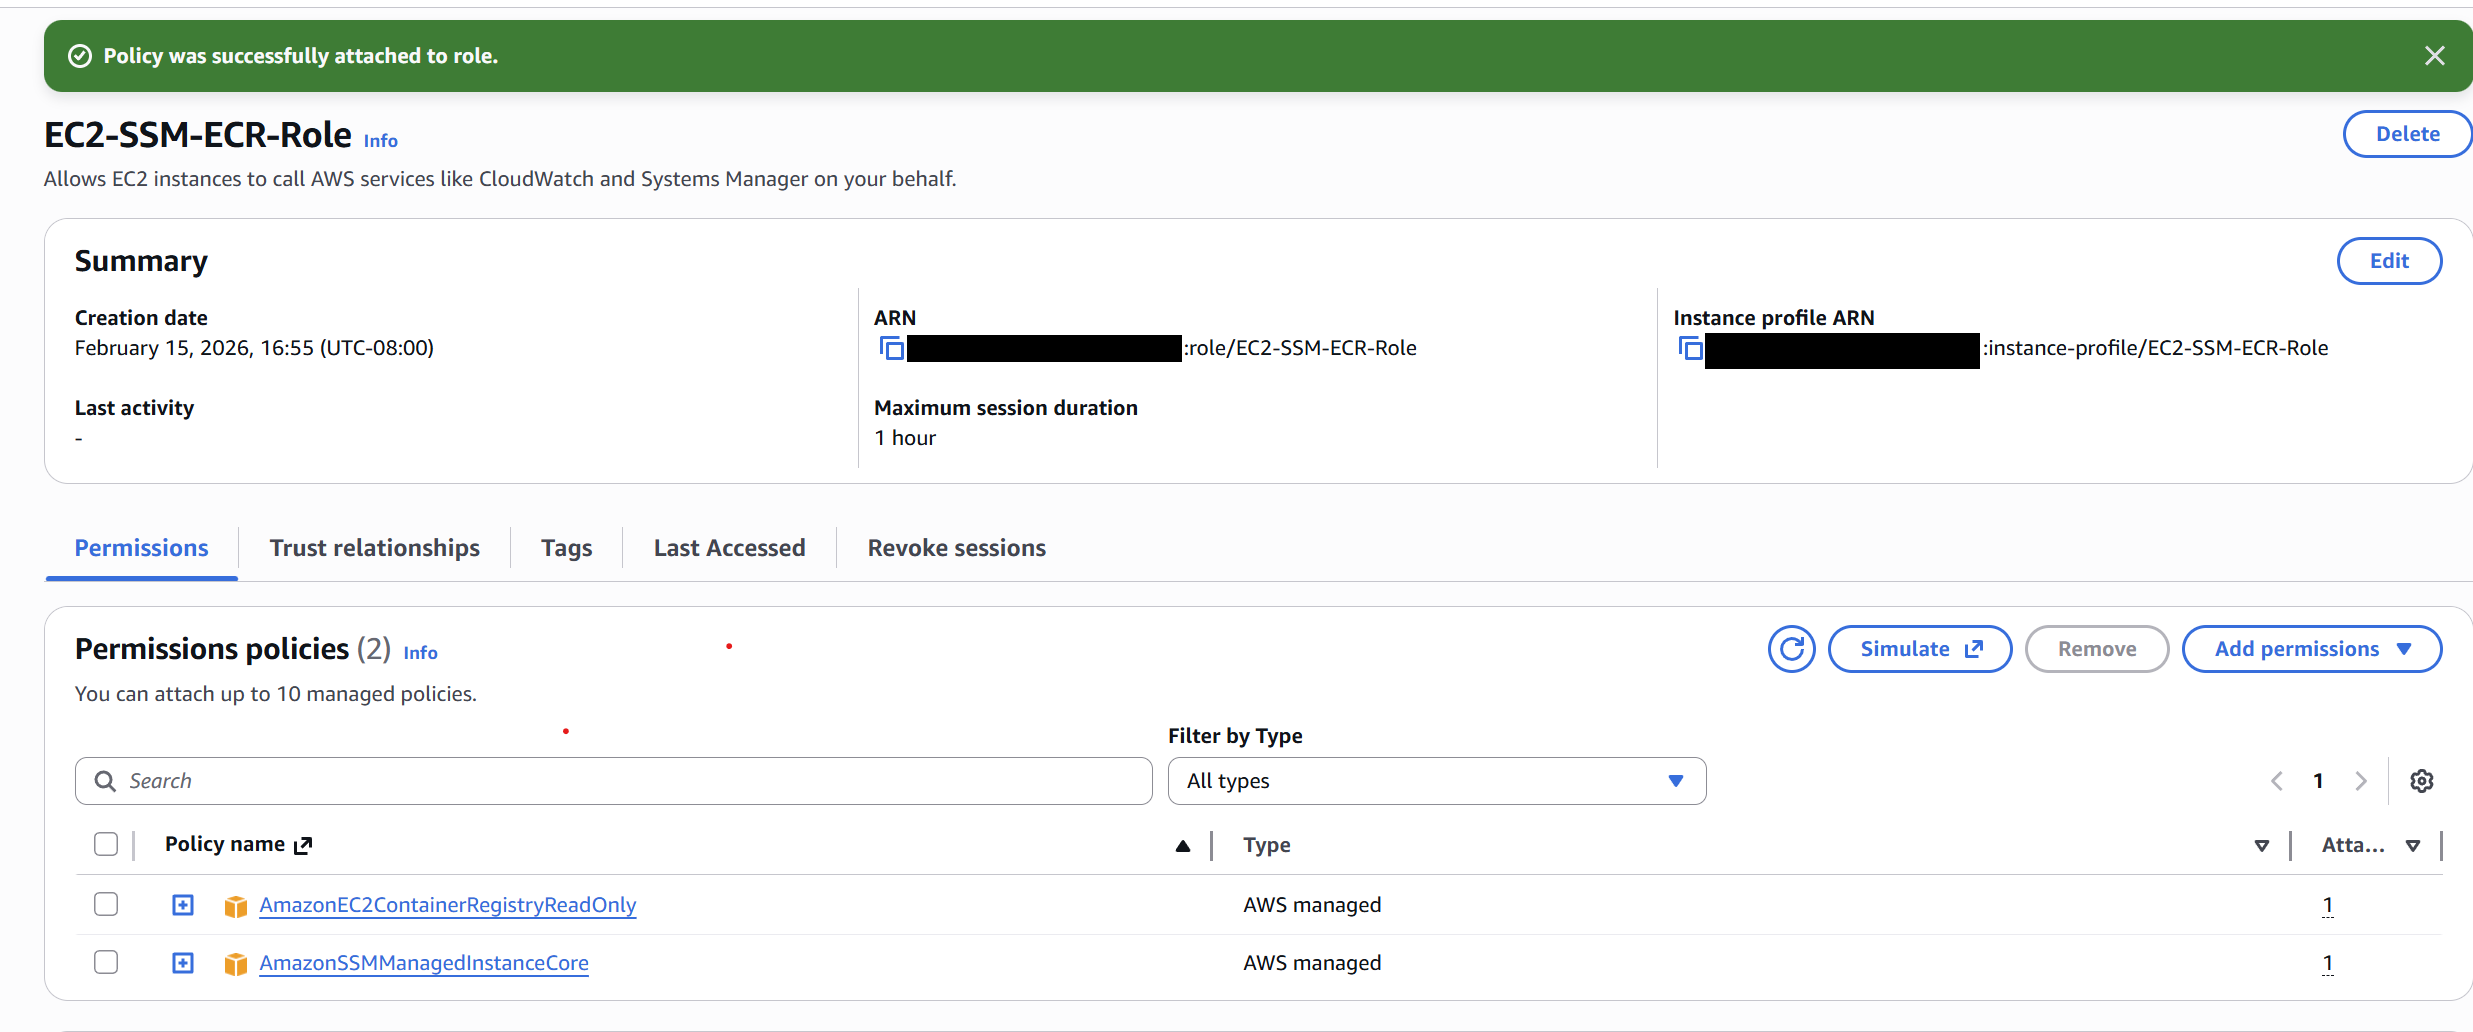
Add the new role and click the Update IAM role button to complete the process.

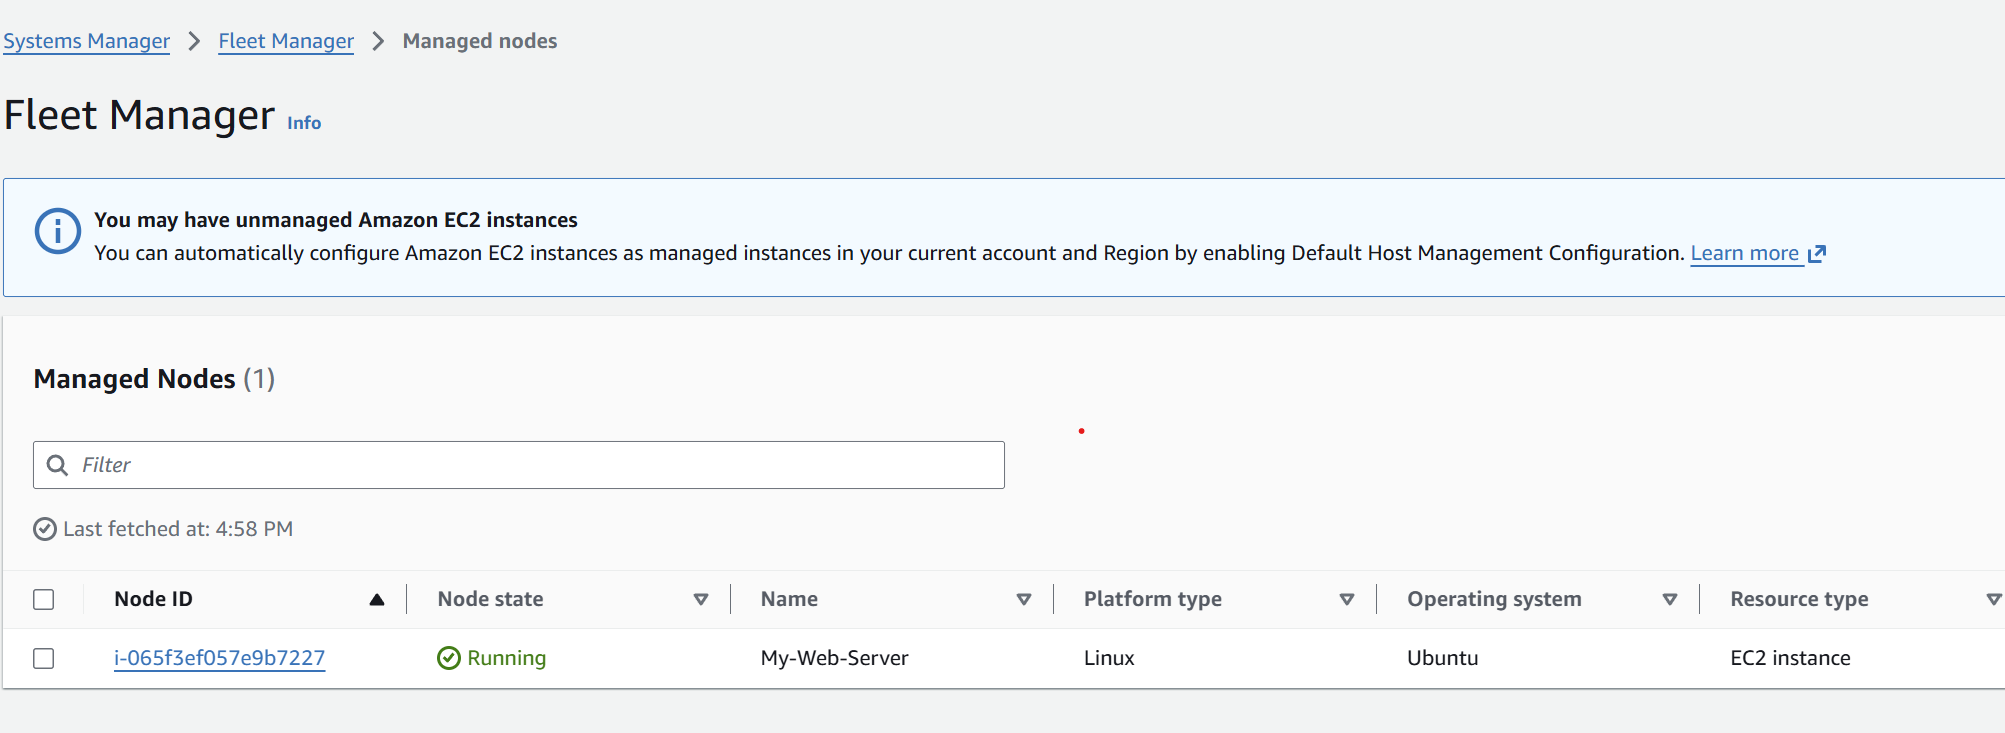
If you like, you can check Systems Manager in the console to see the EC2 instance connected. Search for Systems Manager -> Fleet Manager and you'll see the instance connected.
Setting up the deploy directory and ECR
For our app deployment, we'll be hosting our images on ECR. We'll need a script that will be triggered by SSM to pull the latest tag and run it.
To do this we'll create a new directory.
sudo mkdir -p /opt/nuxt-app
sudo chown ubuntu:ubuntu /opt/nuxt-app
cd /opt/nuxt-app
Let's create the docker-compose.yml file inside the /opt/nuxt-app folder. Don't worry about the image, we'll replace that later. Also go ahead and create an empty .env file now — Docker Compose will fail if the env_file path doesn't exist.
touch /opt/nuxt-app/.env
services:
  nuxt:
    image: REPLACE_LATER
    ports:
      - "127.0.0.1:3000:3000"
    env_file:
      - /opt/nuxt-app/.env
    restart: unless-stopped
We'll need to install the AWS CLI so we can pull down the deployed image from ECR. Install the latest version from the docs.
sudo apt install unzip
curl "https://awscli.amazonaws.com/awscli-exe-linux-x86_64.zip" -o "awscliv2.zip"
unzip awscliv2.zip
sudo ./aws/install
As always, make sure it works by running the commands below.
aws --version
aws sts get-caller-identity
This will verify that AWS CLI is working and that the permissions we set earlier in the IAM policy are there.
Let's now configure ECR!
Inside the AWS console head to ECR → Repositories → Create repository.

Add a name and create it. In this case I'll use the postfix ec2/host!
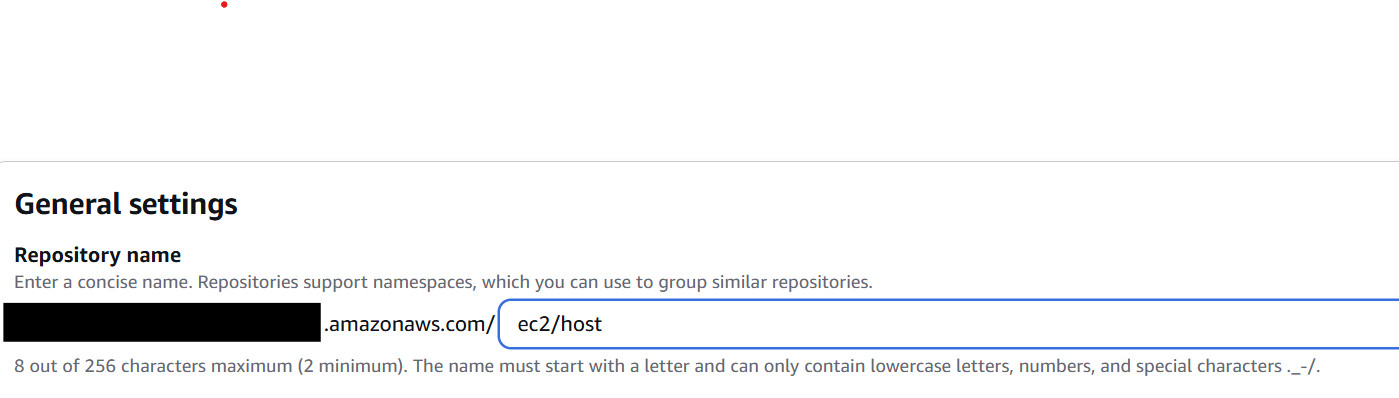
Make sure to write down the full ECR repository name for later.
Connecting GitHub with OIDC
Now let's set up an OIDC provider for GitHub. Later we'll create a GitHub Action that will need access to our AWS account to work. To get more information on how OIDC providers work in GitHub, feel free to check out this guide.
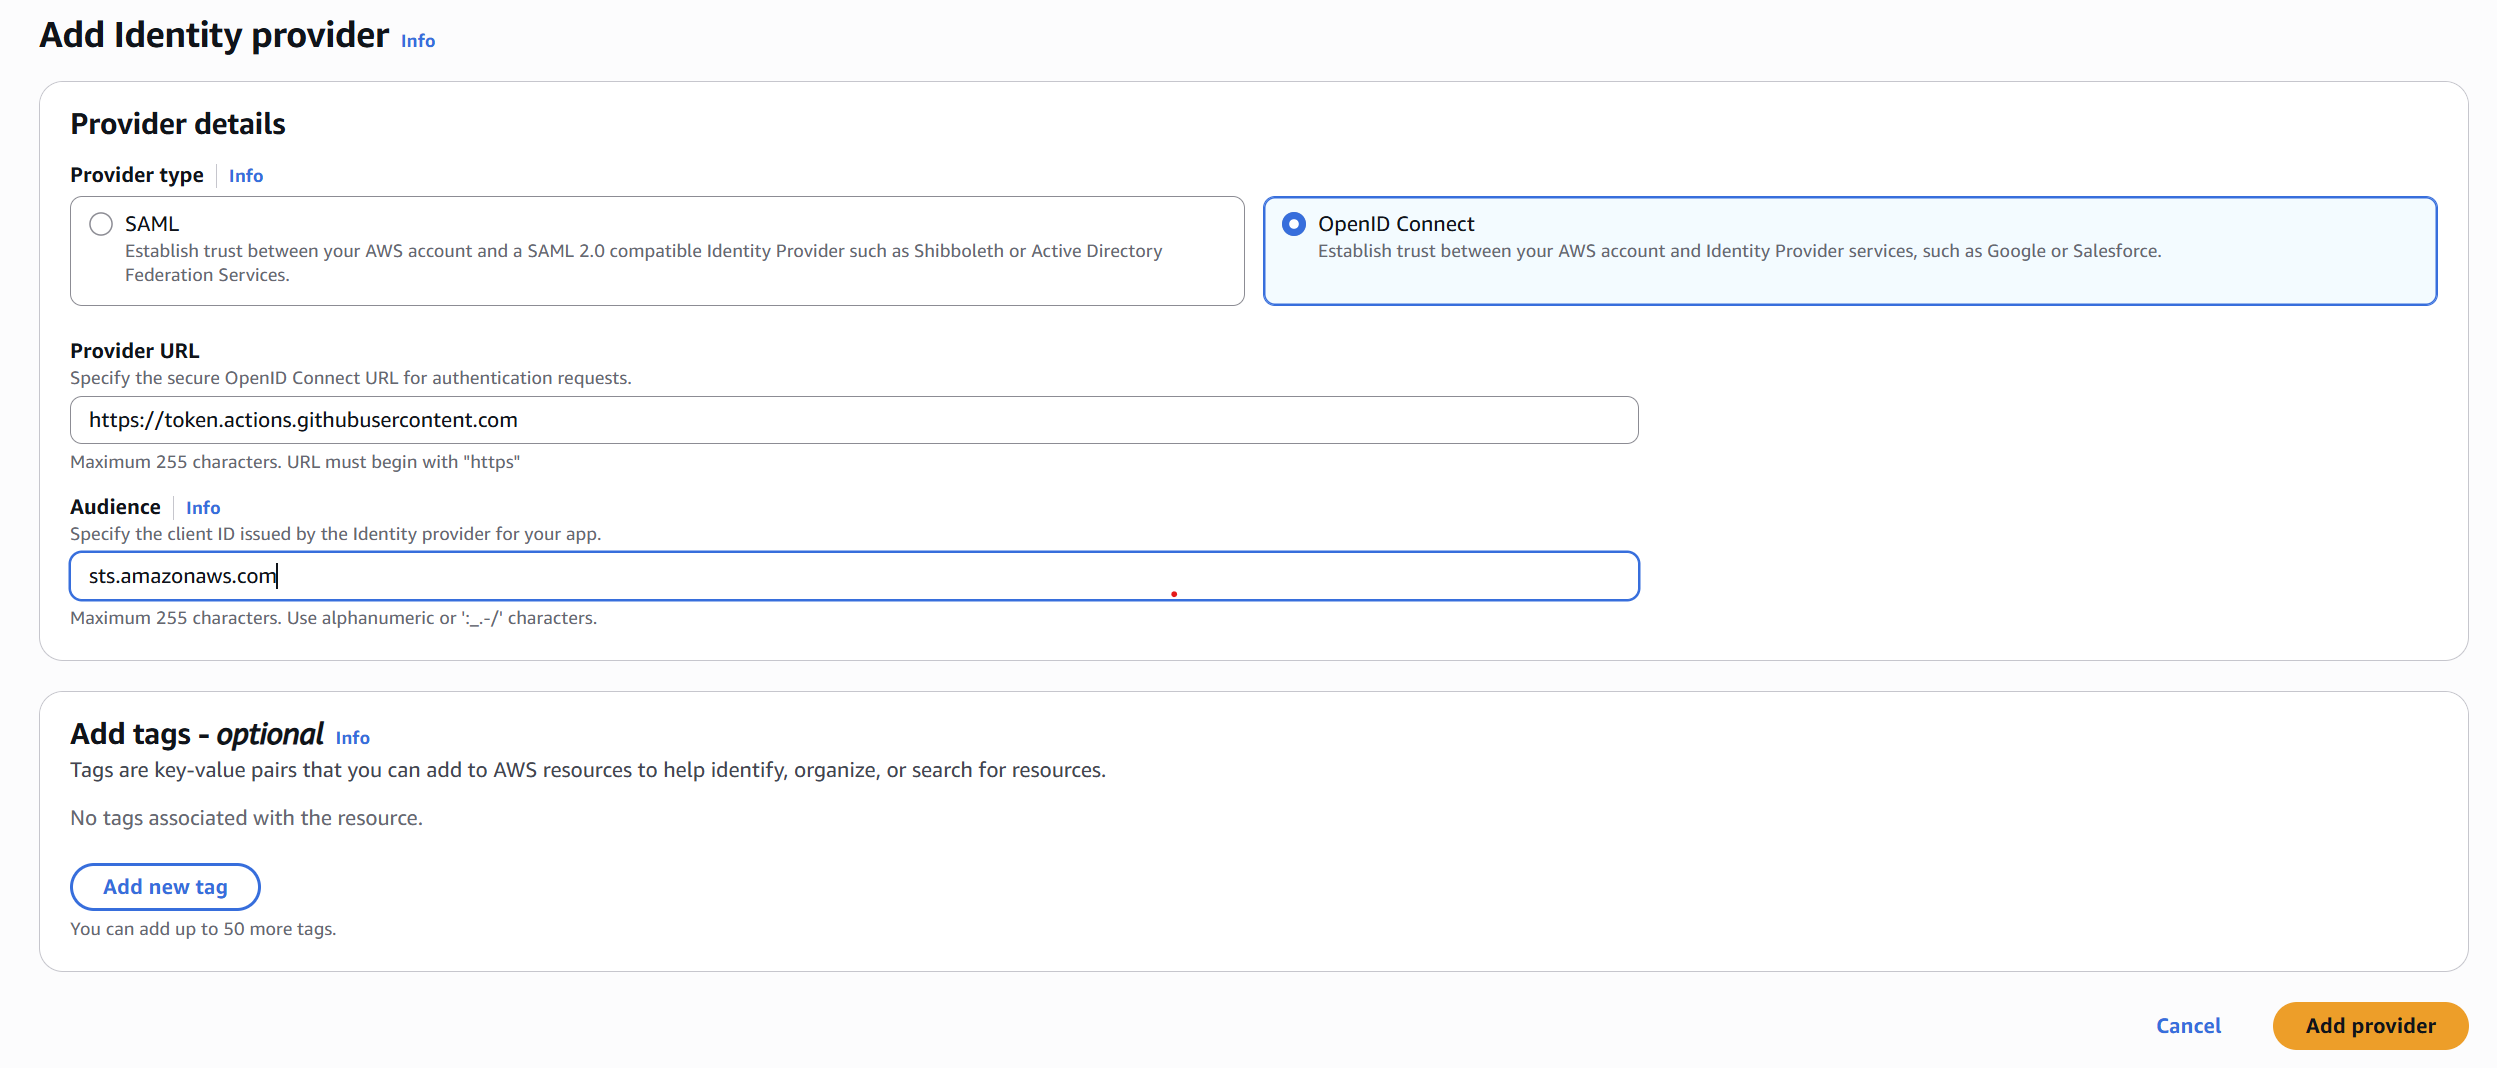
Inside the AWS console head to IAM → Identity Providers → Add provider.
On this page make sure to select OpenID Connect, use the URL https://token.actions.githubusercontent.com and the audience as sts.amazonaws.com. It should look like the screenshot below!
Now let's create a new role for this.
Inside the AWS console head to IAM → Roles → Create role.
Create a new IAM role connecting to this provider. Choose Web identity and make sure to use the new identity provider you just created. Type in the GitHub organization and repository. If you like, you can also select the branch.
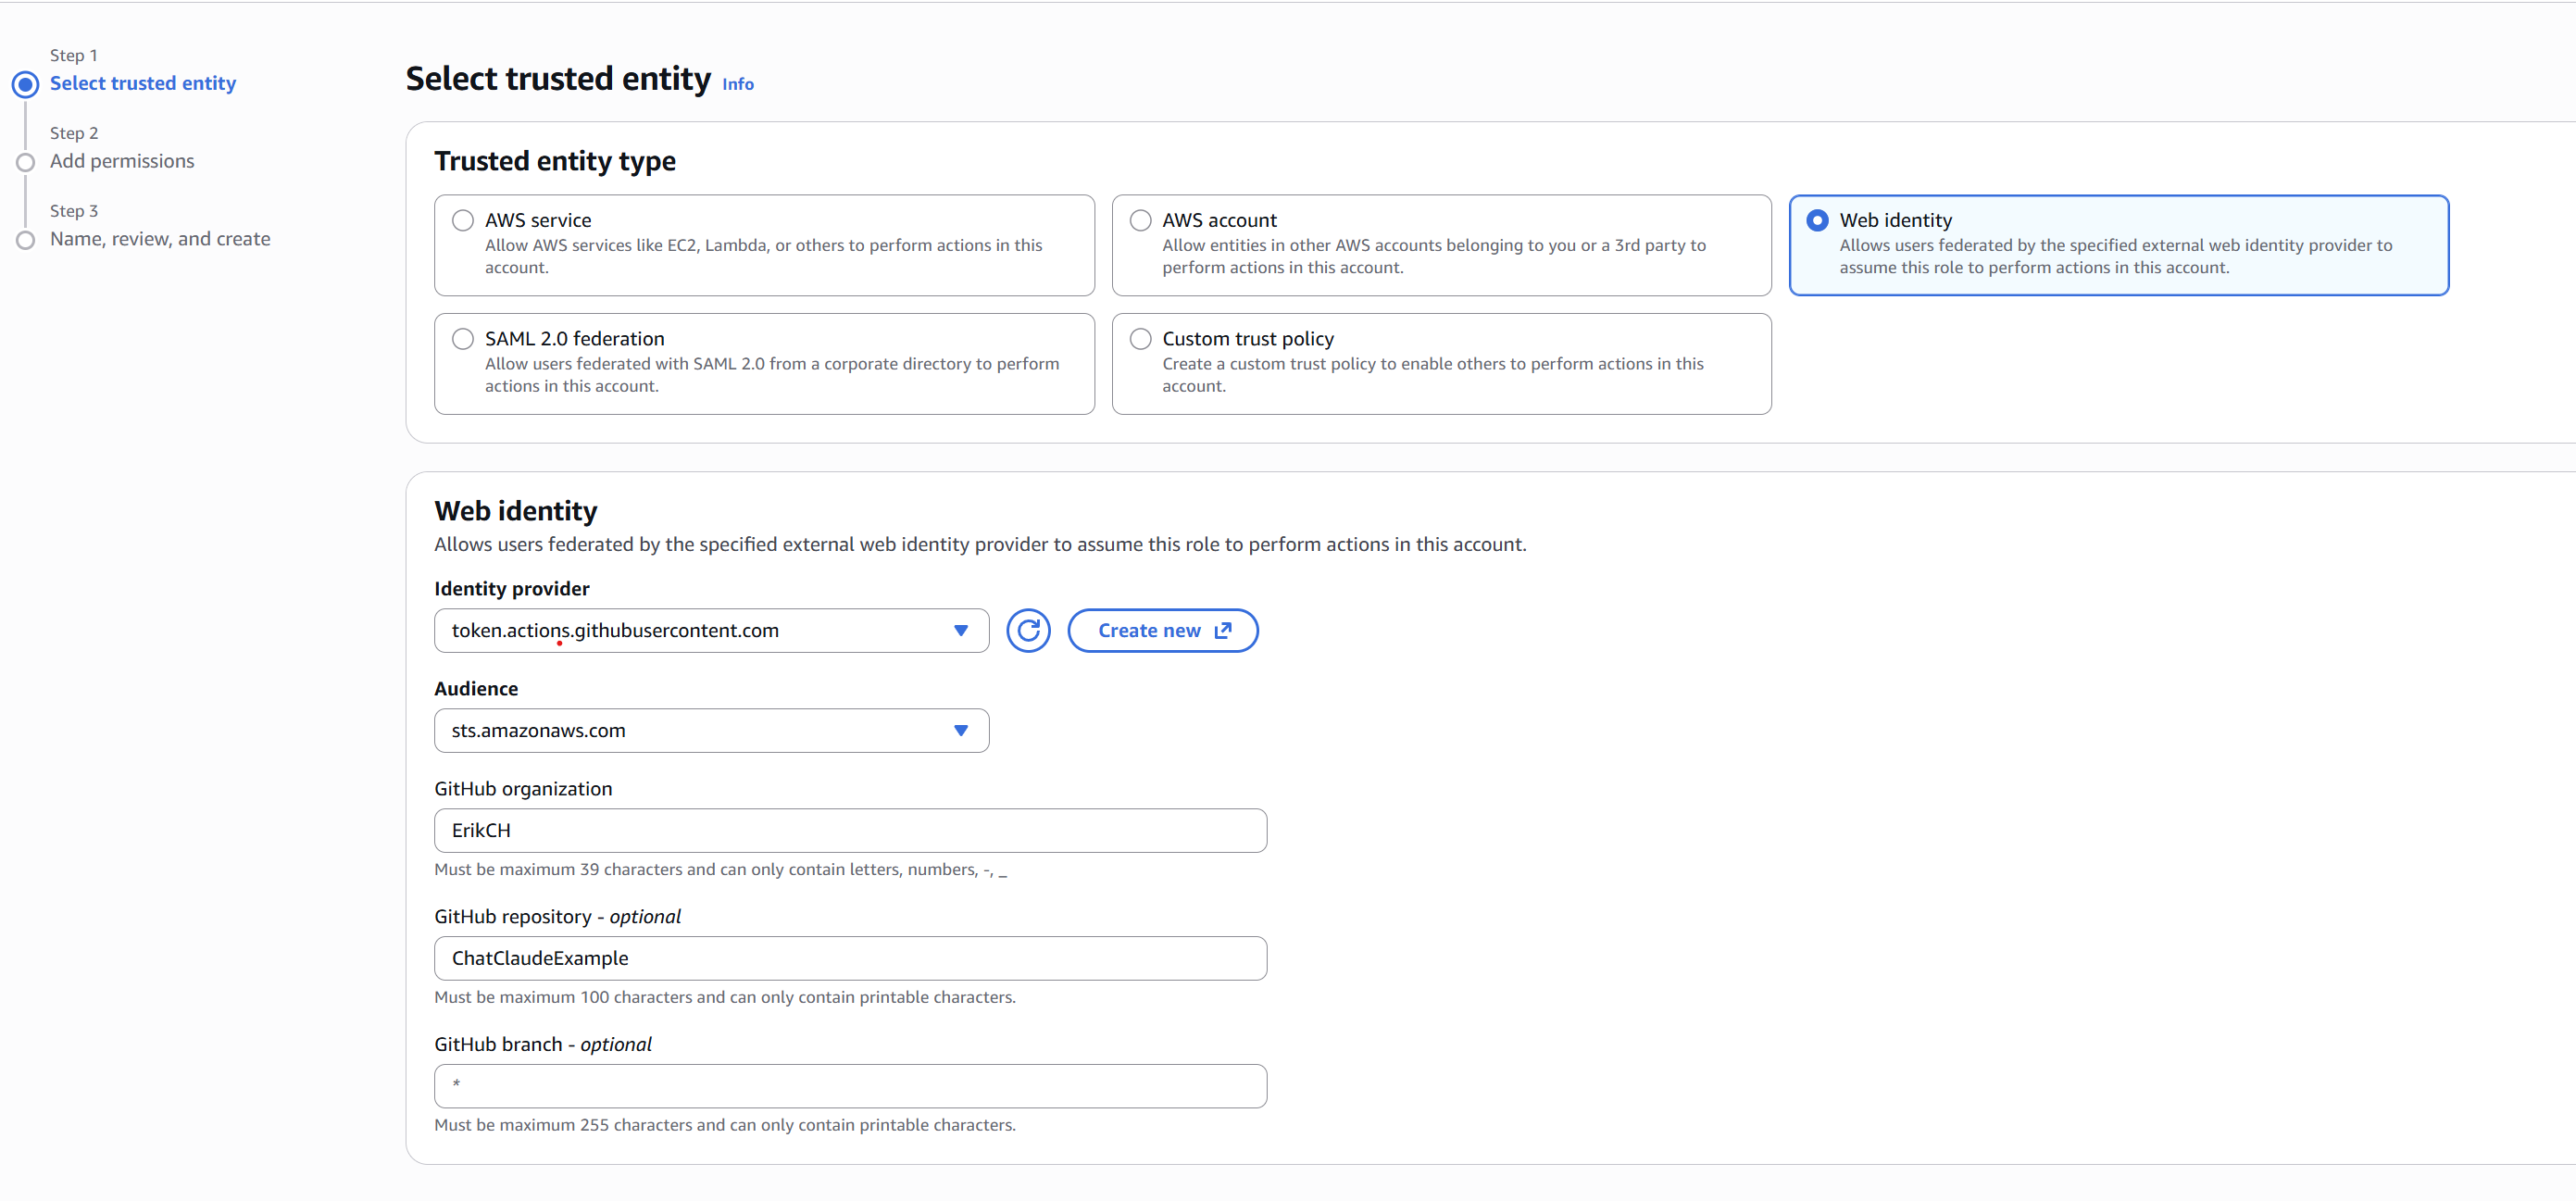
Click next a few times and create the role! We aren't done yet though — we need to make sure this role has permissions to ECR so the GitHub Action can trigger our deployment workflow.
Under permissions click the Create inline policy.
Select JSON and copy and paste this in.
{
  "Version": "2012-10-17",
  "Statement": [
    {
      "Sid": "ECRAuth",
      "Effect": "Allow",
      "Action": "ecr:GetAuthorizationToken",
      "Resource": "*"
    },
    {
      "Sid": "ECRPush",
      "Effect": "Allow",
      "Action": [
        "ecr:BatchCheckLayerAvailability",
        "ecr:CompleteLayerUpload",
        "ecr:InitiateLayerUpload",
        "ecr:PutImage",
        "ecr:UploadLayerPart",
        "ecr:BatchGetImage"
      ],
      "Resource": "arn:aws:ecr:YOUR-REGION:YOUR-ACCOUNT-ID:repository/YOUR-REPO-NAME"
    },
    {
      "Sid": "SSMRunCommand",
      "Effect": "Allow",
      "Action": "ssm:SendCommand",
      "Resource": [
        "arn:aws:ssm:*:*:document/AWS-RunShellScript",
        "arn:aws:ec2:YOUR-REGION:YOUR-ACCOUNT-ID:instance/i-xxxxxxxxxxxxxxxxx"
      ]
    }
  ]
}
Make sure to update the instance with your instance ID. You can find that in your EC2 console. It starts with i-. You also need to update YOUR-REGION (e.g. us-east-1) and YOUR-ACCOUNT-ID with your account ID. Also update YOUR-REPO-NAME with your ECR repo name. In my case I called it ec2/host.
⚠️ Setting up for production We're using
AWS-RunShellScripthere which lets the CI pipeline run any shell command on your instance. That's great for a tutorial, however a compromised GitHub Actions workflow or malicious PR could achieve remote code execution on your host. In production, create a custom SSM document that only runs your deploy script. That way even if the GitHub role is compromised, it can only trigger the specific deployment, not arbitrary commands on your box. A minimal custom document looks like this:{ "schemaVersion": "2.2", "description": "Deploy Nuxt app", "mainSteps": [{ "action": "aws:runShellScript", "name": "deploy", "inputs": { "runCommand": ["sudo bash /opt/nuxt-app/deploy.sh"] } }] }Then reference your custom document name in the GitHub Action instead of
AWS-RunShellScript.
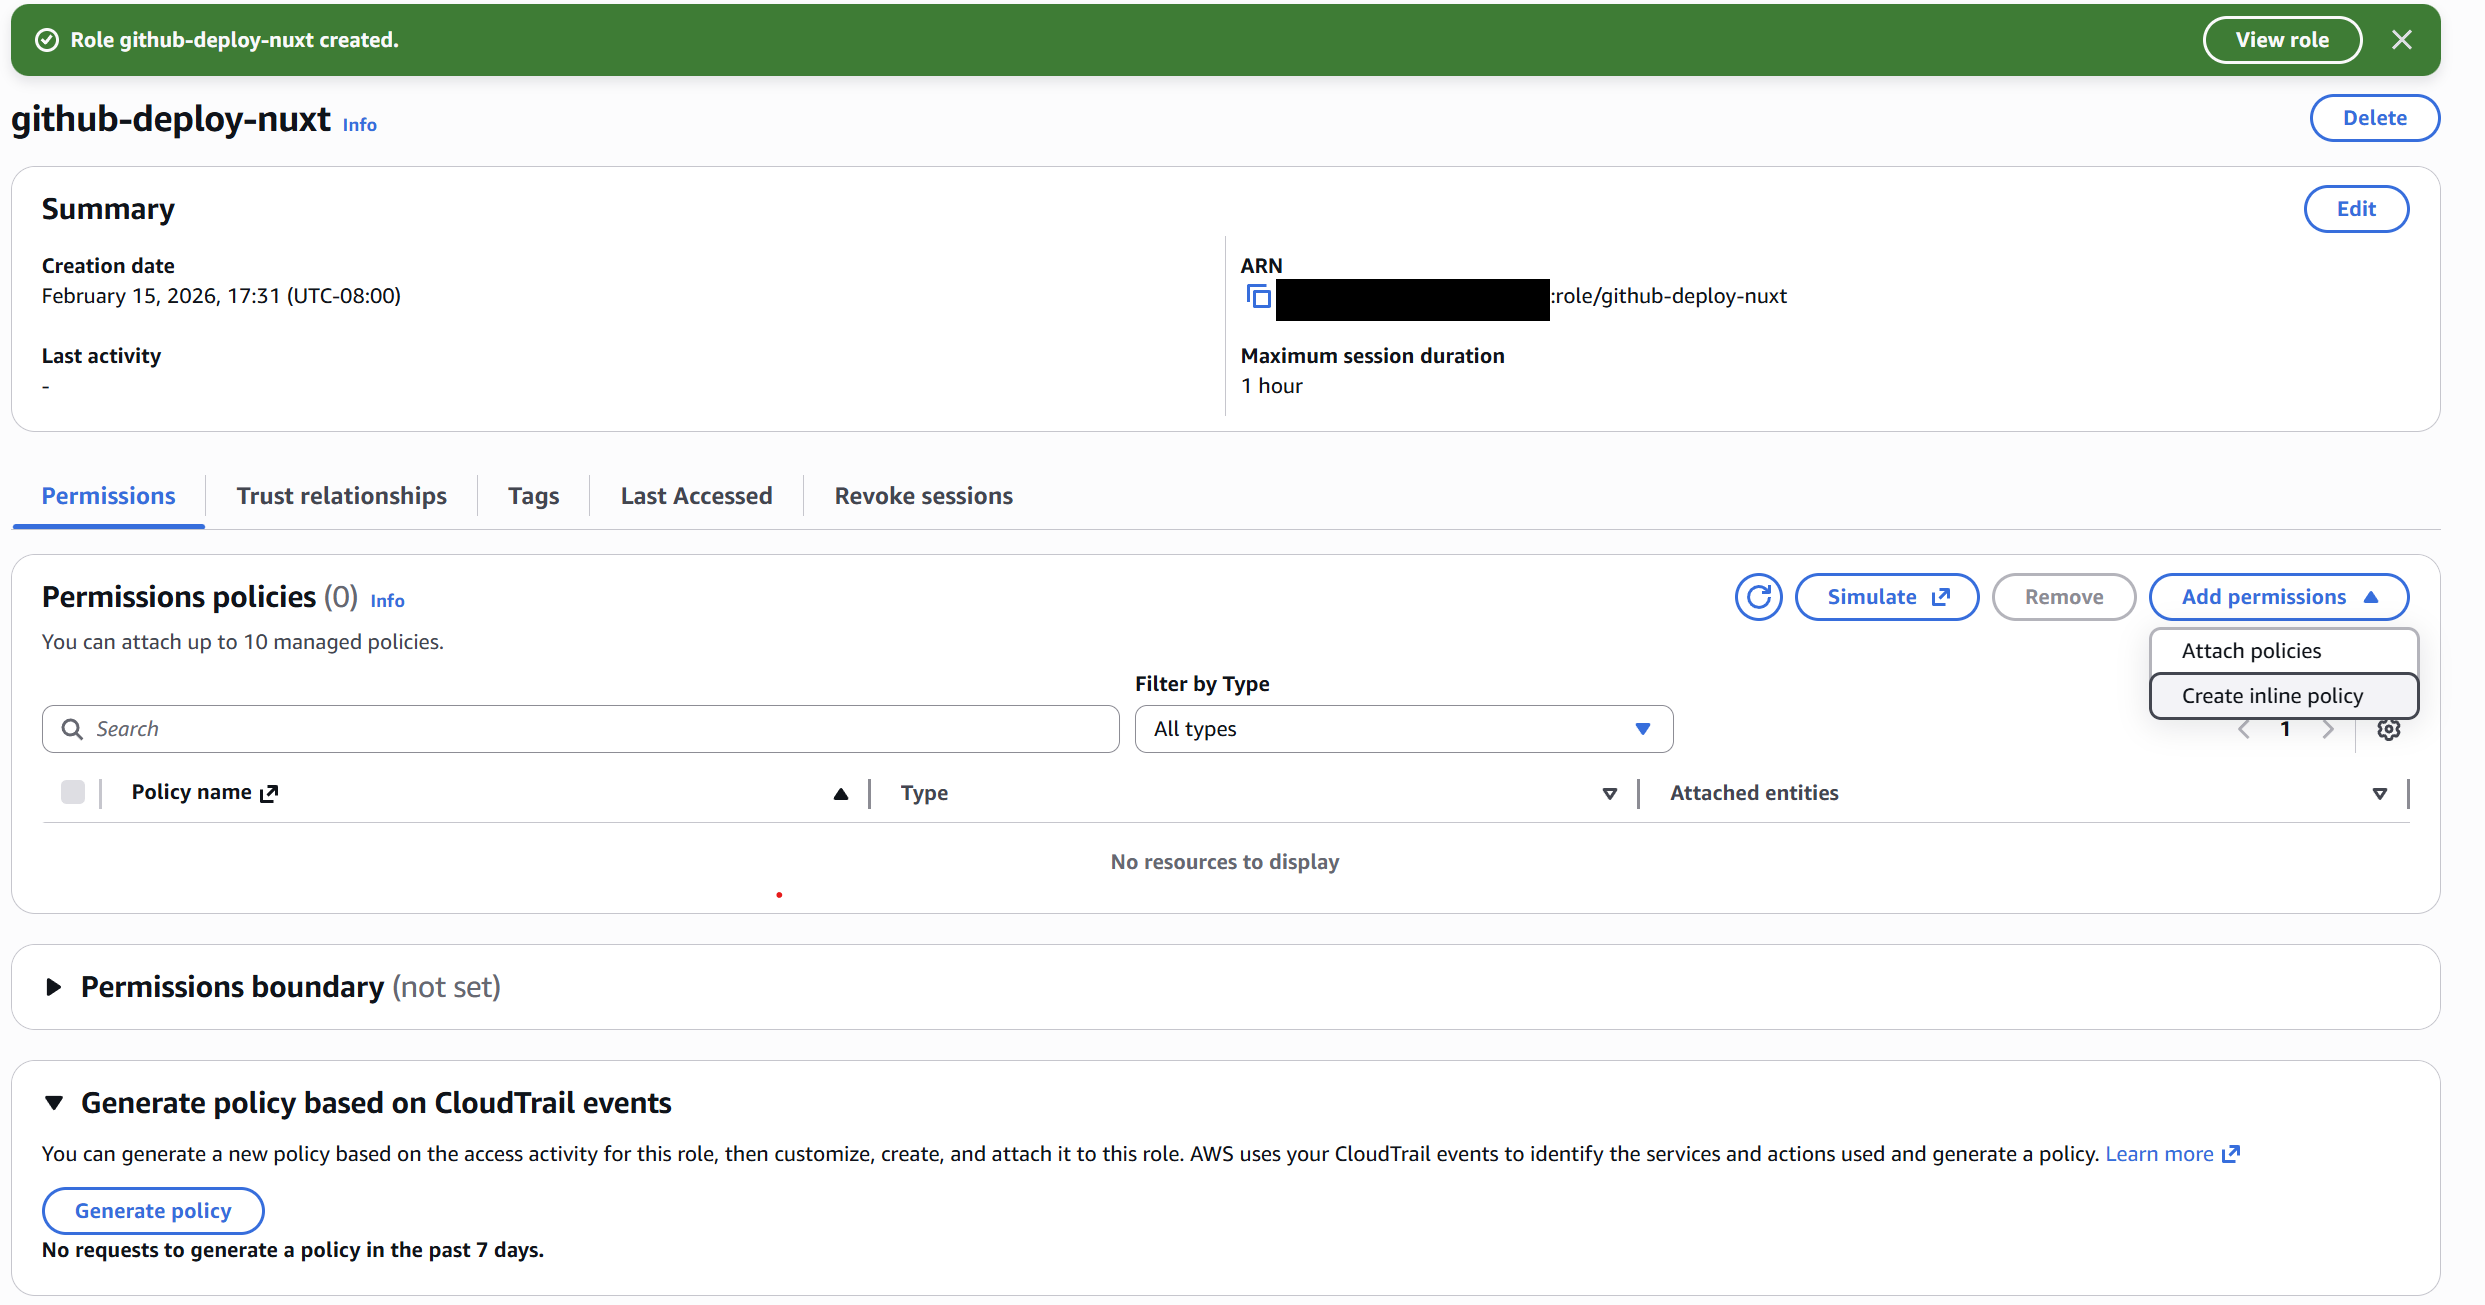
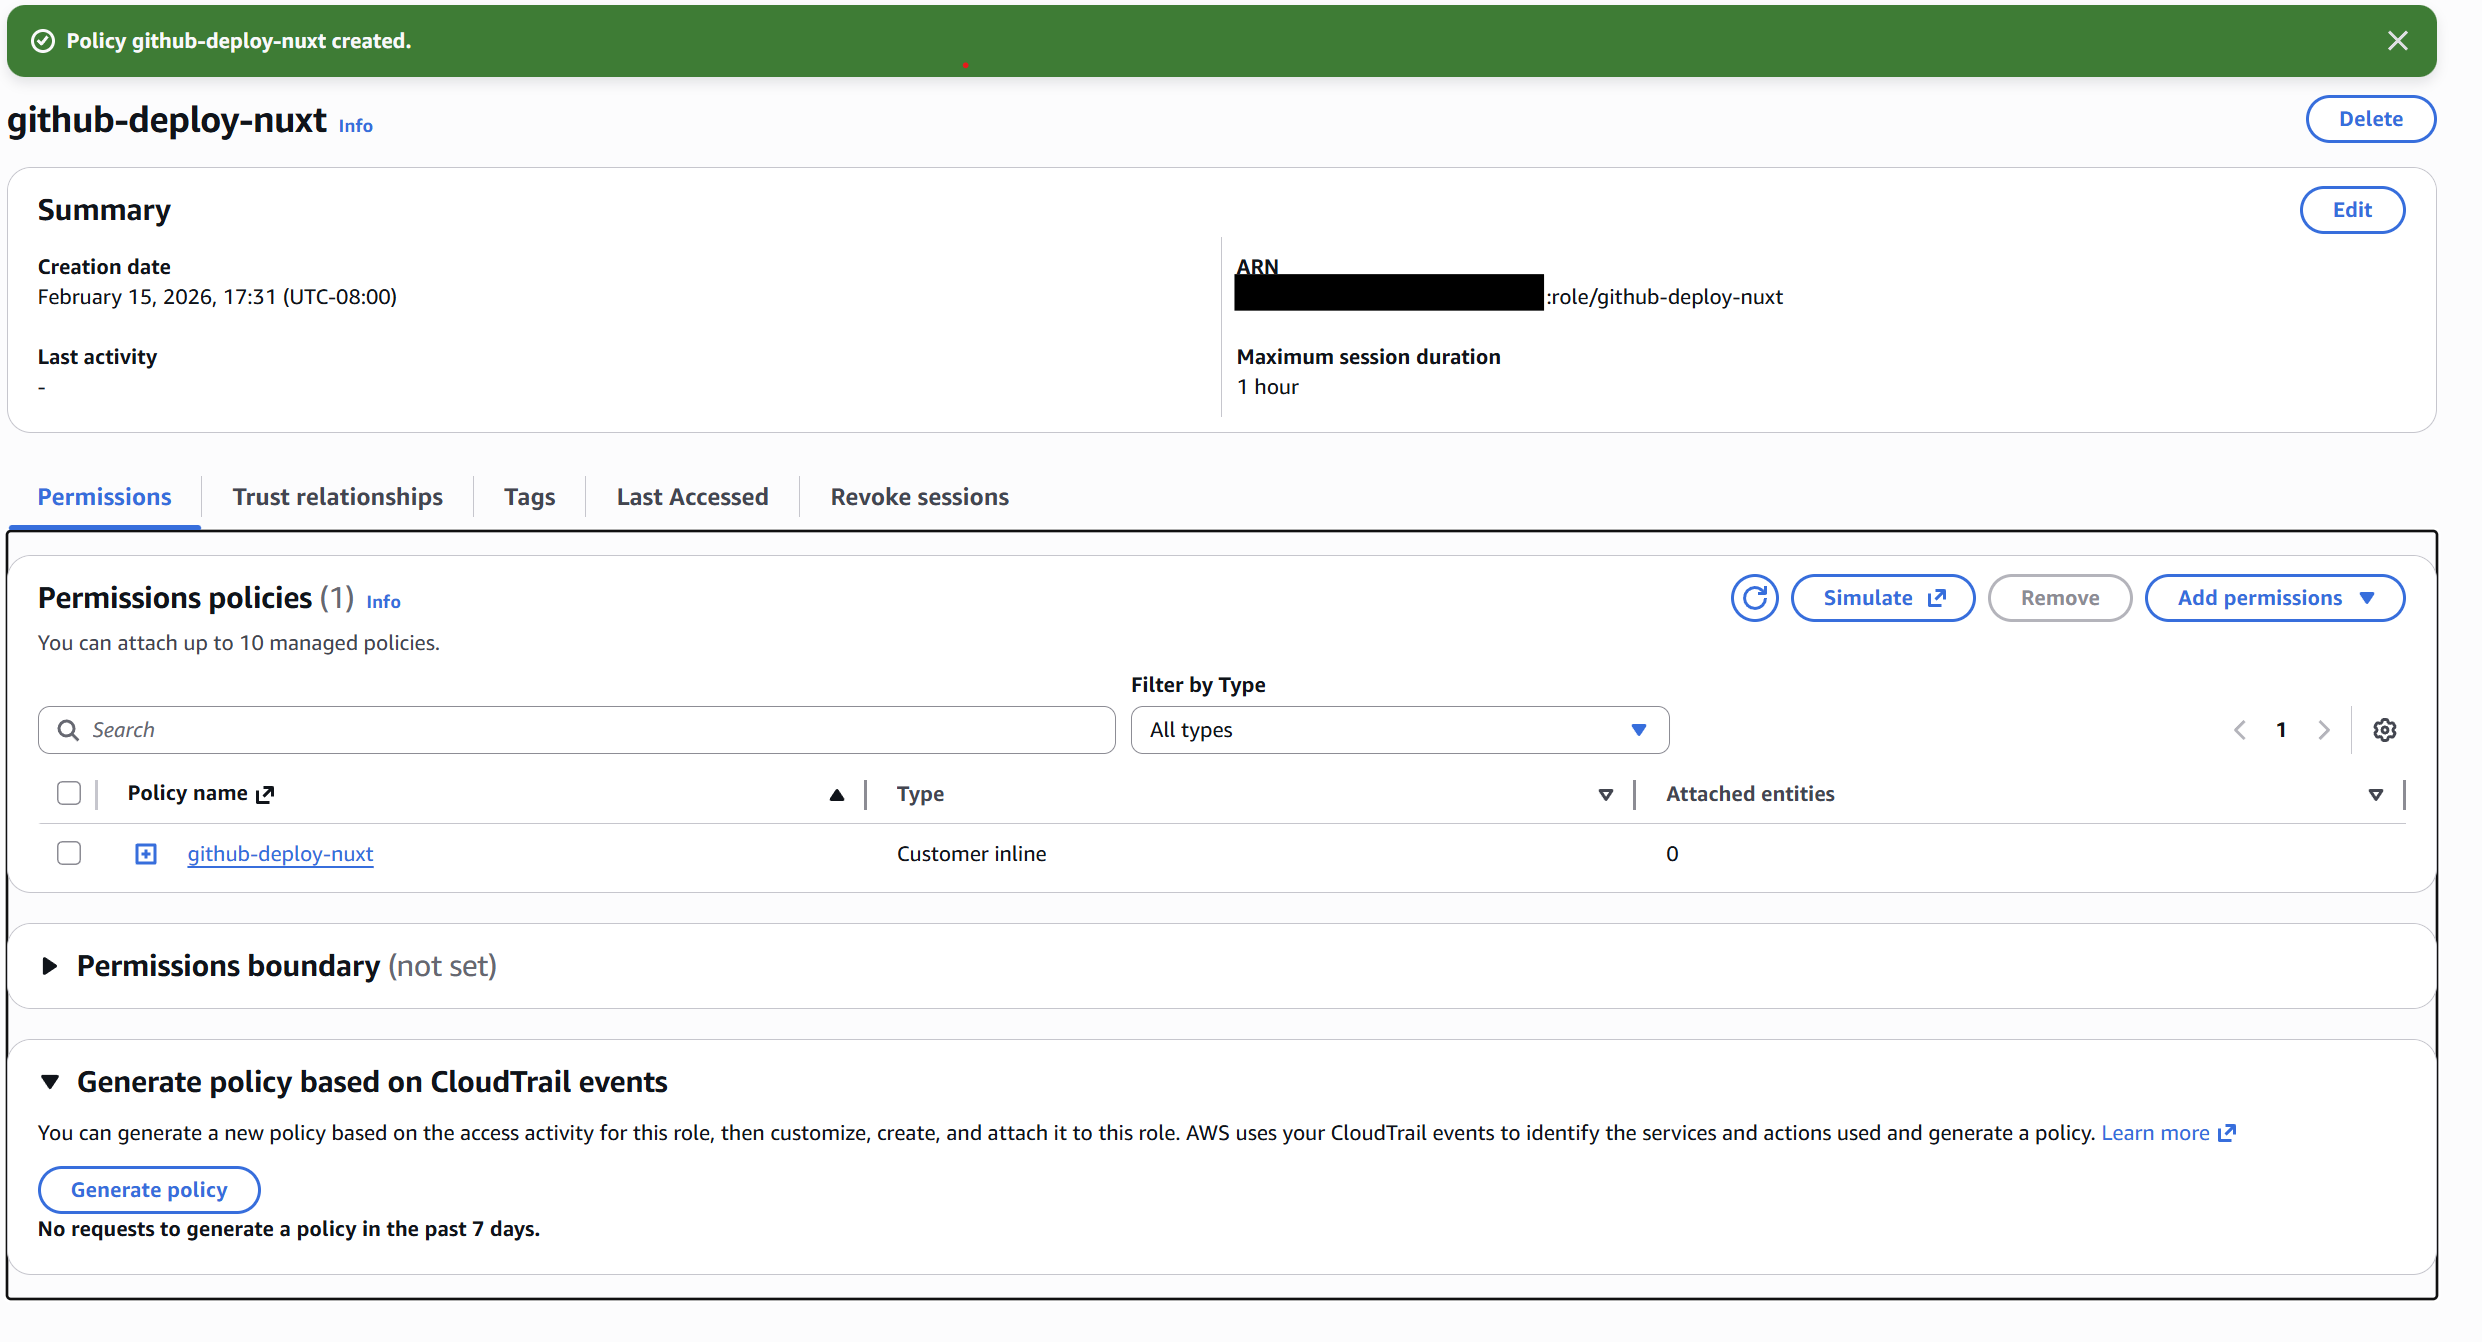
Click create, name it github-deploy-nuxt, and you are good to go.
Make sure to copy the ARN for later!
Now inside our GitHub repo let's add the GitHub variables.
Open up your GitHub repo and head to Settings → Secrets and Variables → Actions → Variables.
Add five new environment variables. These will be used in our GitHub Action.
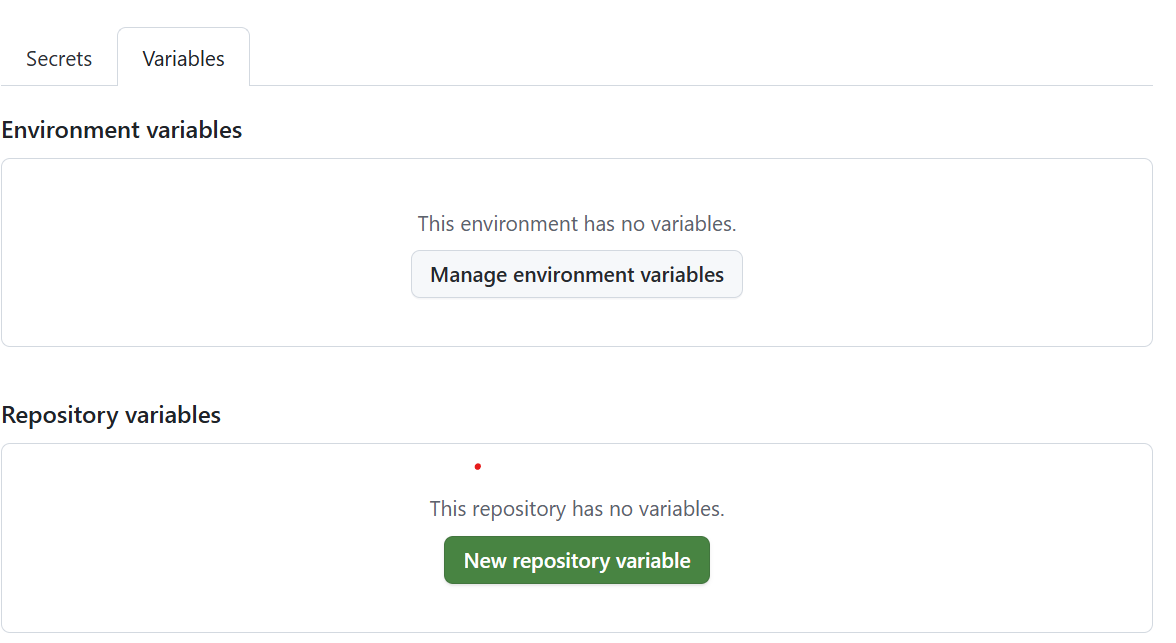
Add each variable one by one.
AWS_REGION	us-west-2
AWS_ACCOUNT_ID	your account id
ECR_REPO	ec2/host
INSTANCE_ID	i-xxxxxx
AWS_DEPLOY_ROLE_ARN	role ARN from above
Adding the GitHub Action and Dockerfile
For the deployment to work successfully we need to set up a GitHub Action that will deploy our app. Let's do that now.
In your repo add a new .github/workflows/deploy.yml file. This will be run whenever a push occurs to main.
name: Deploy Nuxt SSR

on:
  push:
    branches: ["main"]

permissions:
  id-token: write
  contents: read

jobs:
  deploy:
    runs-on: ubuntu-latest

    steps:
      - uses: actions/checkout@v4

      - name: Configure AWS credentials
        uses: aws-actions/configure-aws-credentials@v4
        with:
          role-to-assume: ${{ vars.AWS_DEPLOY_ROLE_ARN }}
          aws-region: ${{ vars.AWS_REGION }}

      - name: Login to ECR
        uses: aws-actions/amazon-ecr-login@v2

      - name: Build and push Docker image
        run: |
          IMAGE_URI=${{ vars.AWS_ACCOUNT_ID }}.dkr.ecr.${{ vars.AWS_REGION }}.amazonaws.com/${{ vars.ECR_REPO }}

          docker build -t $IMAGE_URI:prod .
          docker push $IMAGE_URI:prod

      - name: Deploy via SSM
        run: |
          COMMAND_ID=$(aws ssm send-command \
            --instance-ids "${{ vars.INSTANCE_ID }}" \
            --document-name "AWS-RunShellScript" \
            --parameters '{"commands":["sudo bash /opt/nuxt-app/deploy.sh"]}' \
            --query "Command.CommandId" --output text)

          aws ssm wait command-executed \
            --command-id "$COMMAND_ID" \
            --instance-id "${{ vars.INSTANCE_ID }}"
This action will assume our AWS credentials based on the GitHub role we just created. It will then build a Docker image and push it to ECR. We'll then trigger SSM to run our script that will complete the deployment.
For us to build our Docker image, we'll need a Dockerfile in the root of our repo. Head to the repo and in the root add a new Dockerfile. This will build our Nuxt application.
# --- build stage ---
FROM node:20-bookworm-slim AS build
WORKDIR /app

COPY package*.json ./
RUN npm ci

COPY . .
RUN npm run build

# --- runtime stage ---
FROM node:20-bookworm-slim AS runtime
WORKDIR /app
ENV NODE_ENV=production

COPY --from=build /app/.output ./.output

EXPOSE 3000
CMD ["node", ".output/server/index.mjs"]
We'll also need a .dockerignore file.
node_modules
.nuxt
.output
.git
.gitignore
.env
.env.*
*.pem
*.md
.vscode
.idea
Before we get too far, let's test it out.
Testing the deployment
We are going to test our deployment, but first let's temporarily open up port 3000 on our EC2 host. We can then connect to the IP address later to see if our deployment works.
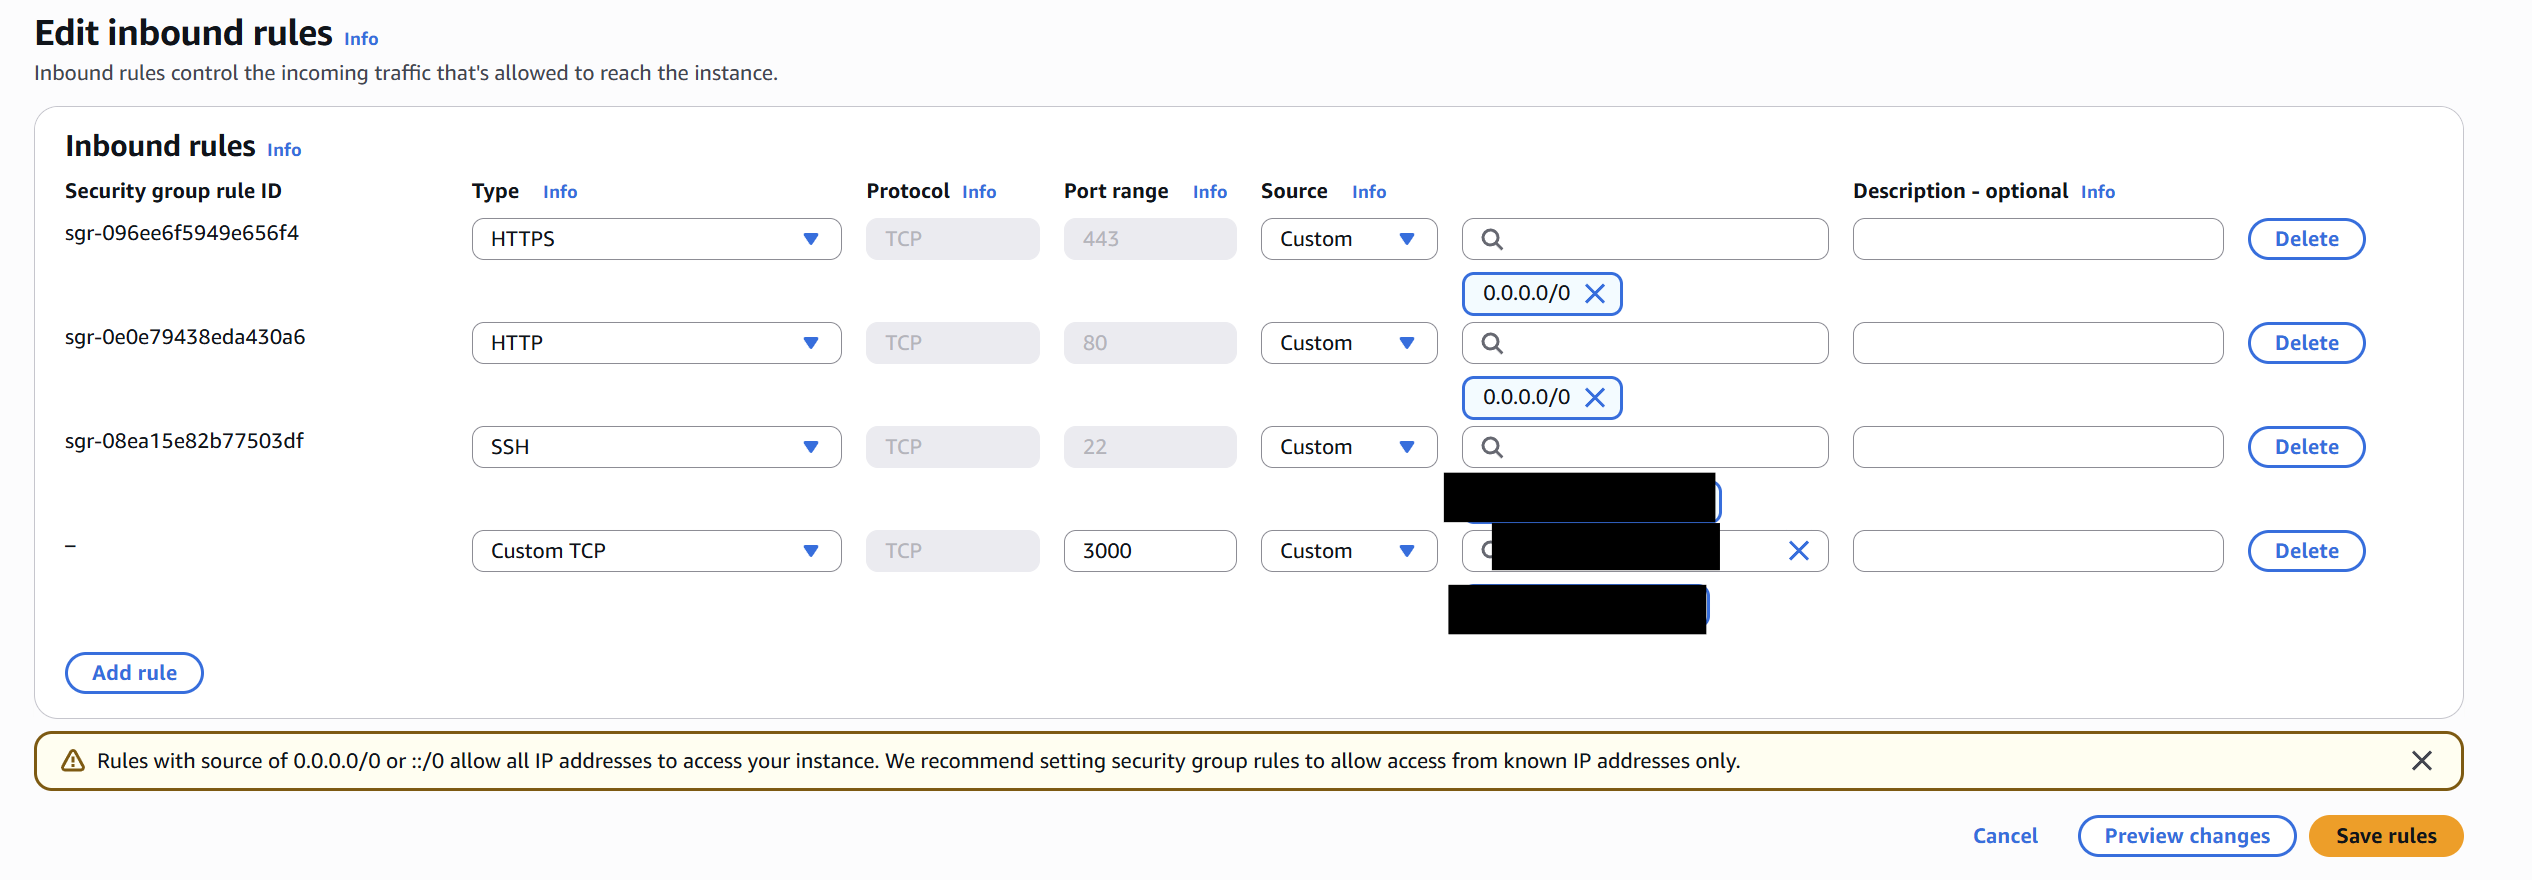
Inside the AWS console head to EC2 → Security Groups → Inbound rules.
Click on the security group.
Edit inbound rules and add your IP address on port 3000 on Custom.
Let's head back to the Docker Compose file again. This is important — before you push anything to GitHub, update the docker-compose.yml with your real ECR image URI. If you skip this step the deploy will fail because Docker won't know what image to pull. Add in the ECR image name and set the port to 3000. Make sure to add the :prod tag.
services:
  nuxt:
    image: <account-id>.dkr.ecr.us-east-1.amazonaws.com/ec2/host:prod
    ports:
      - "3000:3000"
    env_file:
      - /opt/nuxt-app/.env
    restart: unless-stopped
For my app I use several secrets; however, as you can see from earlier, our Docker ignore file excludes .env files (for good reason). Create a new .env file with the secrets. This will be injected into our docker image later.
sudo nano /opt/nuxt-app/.env
Next is the deploy script!
nano /opt/nuxt-app/deploy.sh
The GitHub action will run this on every deploy to main.
#!/bin/bash

cd /opt/nuxt-app

aws ecr get-login-password \
--region YOUR_REGION | \
docker login \
--username AWS \
--password-stdin YOUR_ACCOUNT_ID.dkr.ecr.YOUR_REGION.amazonaws.com

docker compose pull
docker compose up -d
docker image prune -f
⚠️ Don't use .env files in production Plaintext
.envfiles on disk have no rotation, no audit trail, and no access control. For production, use AWS Secrets Manager or Systems Manager Parameter Store (SecureString) to manage application secrets and pull them at runtime. The.envapproach shown here is suitable for development and tutorials only. You could also set up a blue/green deployment — spin up the new container, health-check it, then swap traffic only if healthy. For the purpose of this tutorial though, we'll keep it simpler.
Replace the YOUR_ACCOUNT_ID with your account id and YOUR_REGION with your region.
Then make it executable.
chmod +x deploy.sh
We are finally ready to try it all out! Push all your changes from your repo to GitHub and check the Actions tab at the top and see it deploying!
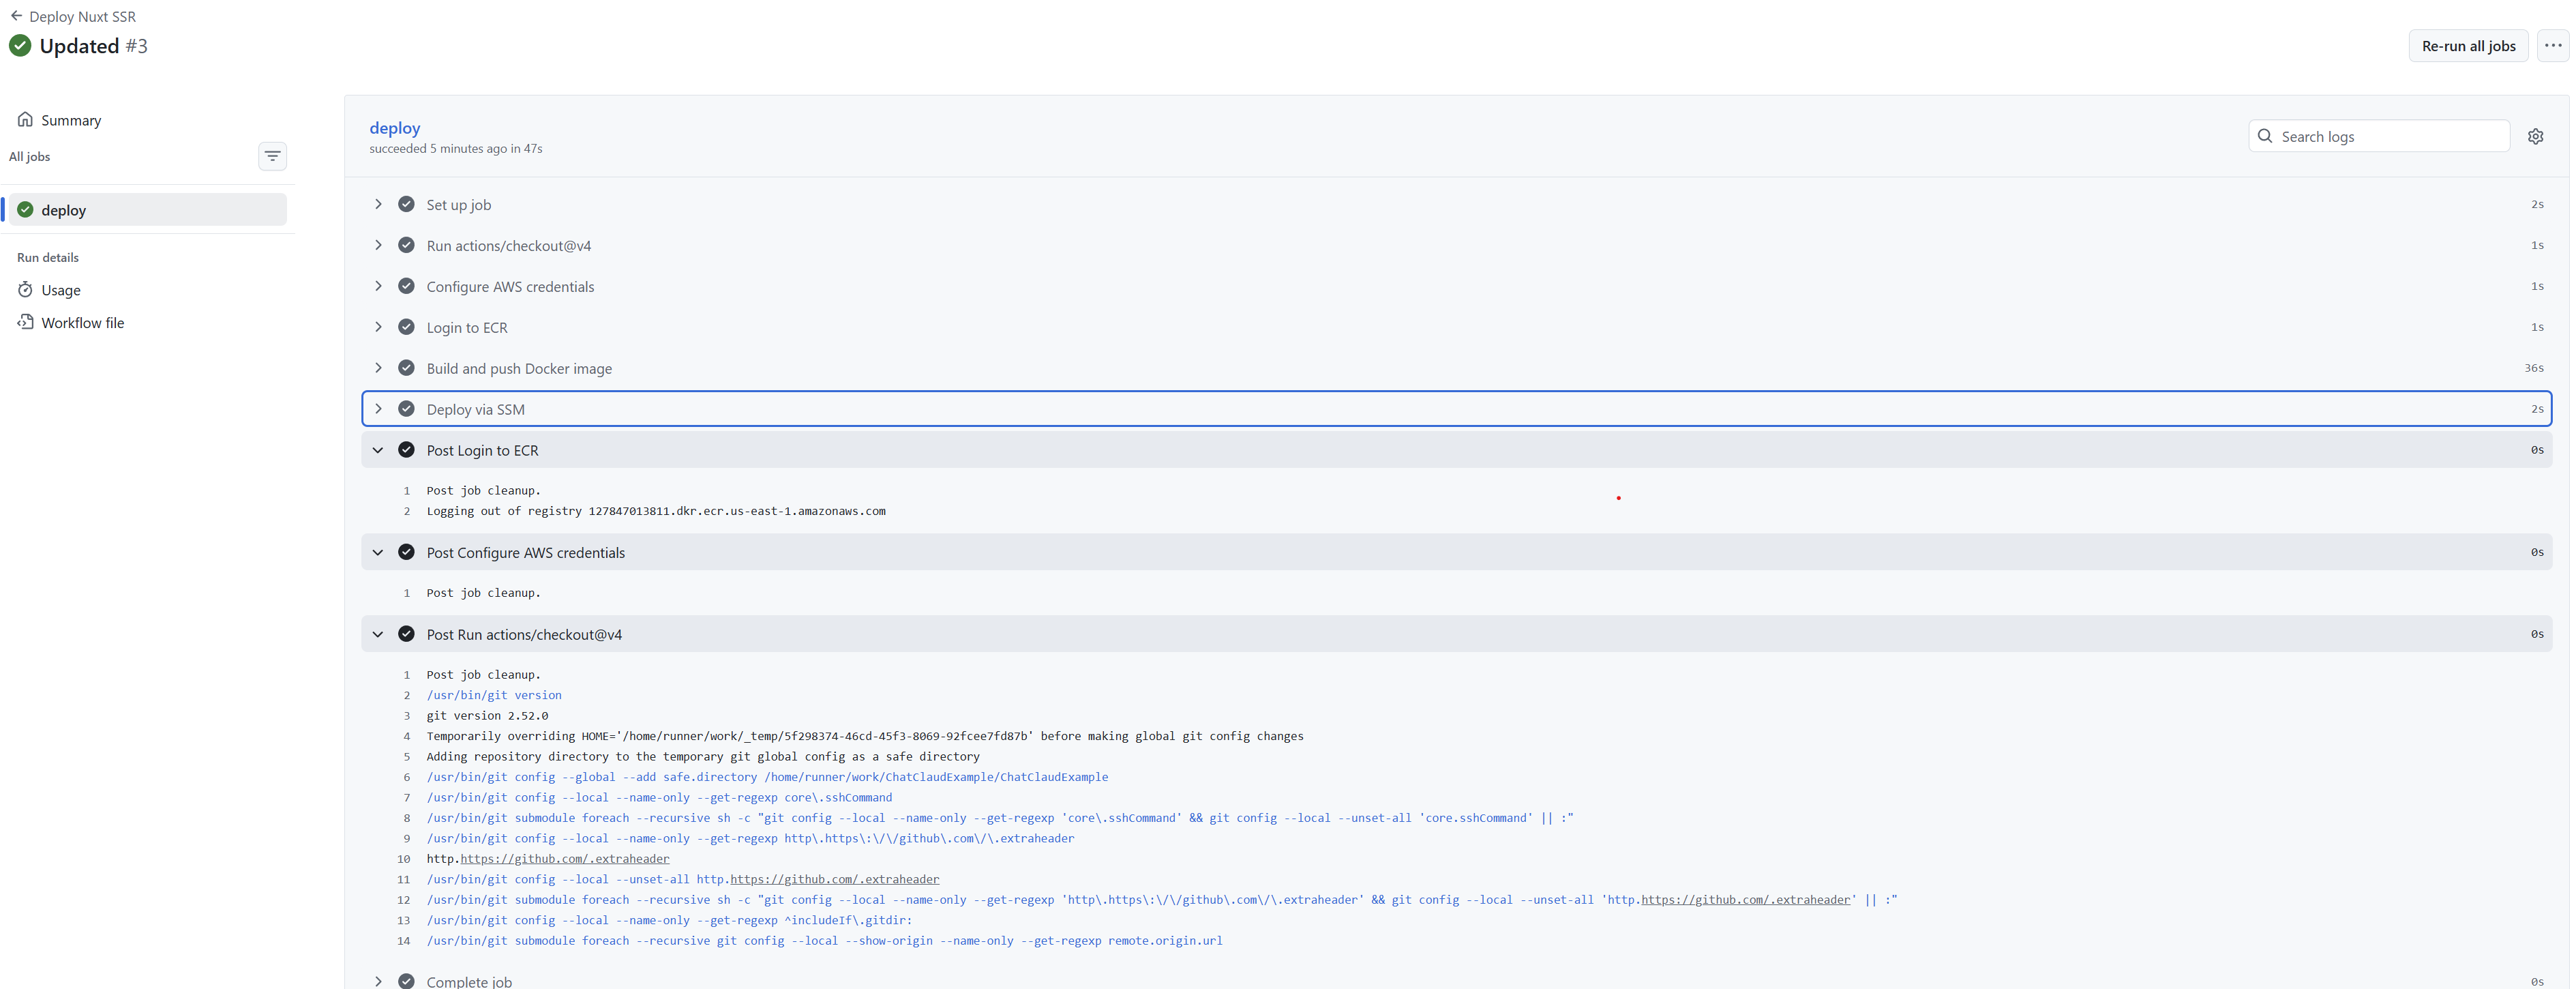
Troubleshooting If you see errors at this point, you'll need to double-check your GitHub role and that everything is connected. This might be a good time to use Kiro to help troubleshoot the problem!
We can check if everything works by loading up port 3000 with the public IP address of the EC2 instance.
Go to http://<your-ec2-ip-address>:3000
Congrats 🥳! You now have a working deployment pipeline and your container is working!
Setting up CloudFront, SSL, and nginx
Our pipeline is working; however, we need to revert the ports change we made in the docker-compose.yml file.
Change back the /opt/nuxt-app/docker-compose.yml to
services:
  nuxt:
    image: xxxx.dkr.ecr.us-east-1.amazonaws.com/ec2/host:prod
    ports:
      - "127.0.0.1:3000:3000"
    env_file:
      - /opt/nuxt-app/.env
    restart: unless-stopped
Then apply it
cd /opt/nuxt-app
sudo docker compose up -d
⚠️ Remove port 3000 from your security group now. It exposes your raw application server to the internet, bypassing nginx. This was only needed for testing — don't leave it open.
Let's see if it works on the normal port 80.
Open up http://<your-ec2-ip-address>
If all goes well you should be seeing your website! 🎉
But now we need CloudFront to add a Content Delivery Network (CDN) that will cache our static assets globally and improve performance for users worldwide. CloudFront also provides additional security features and helps protect our origin server from direct access.
Let's assume you already have a domain in Route53.
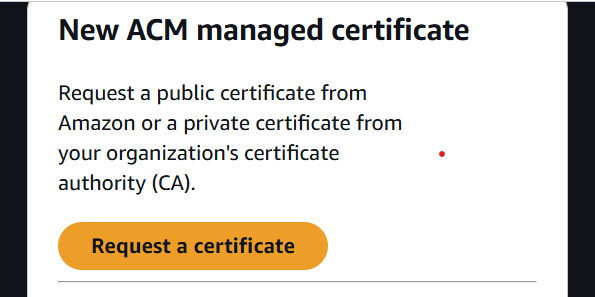
Let's request a public certificate so we can add in SSL.
In the AWS Console head to Certificate Manager → switch region to us-east-1 → Request certificate → Request a public certificate .
Then add your fully qualified domain (e.g. yourdomain.com). And add another for www (e.g. www.yourdomain.com).
Leave everything else defaulted and click Request. Wait a few minutes for the certificate to be issued.
Inside the AWS Console head to CloudFront and create a new distribution.
Click Create Distribution. Choose the free plan. Make sure to enter the distribution name, the domain name, and the Domain to serve (www).
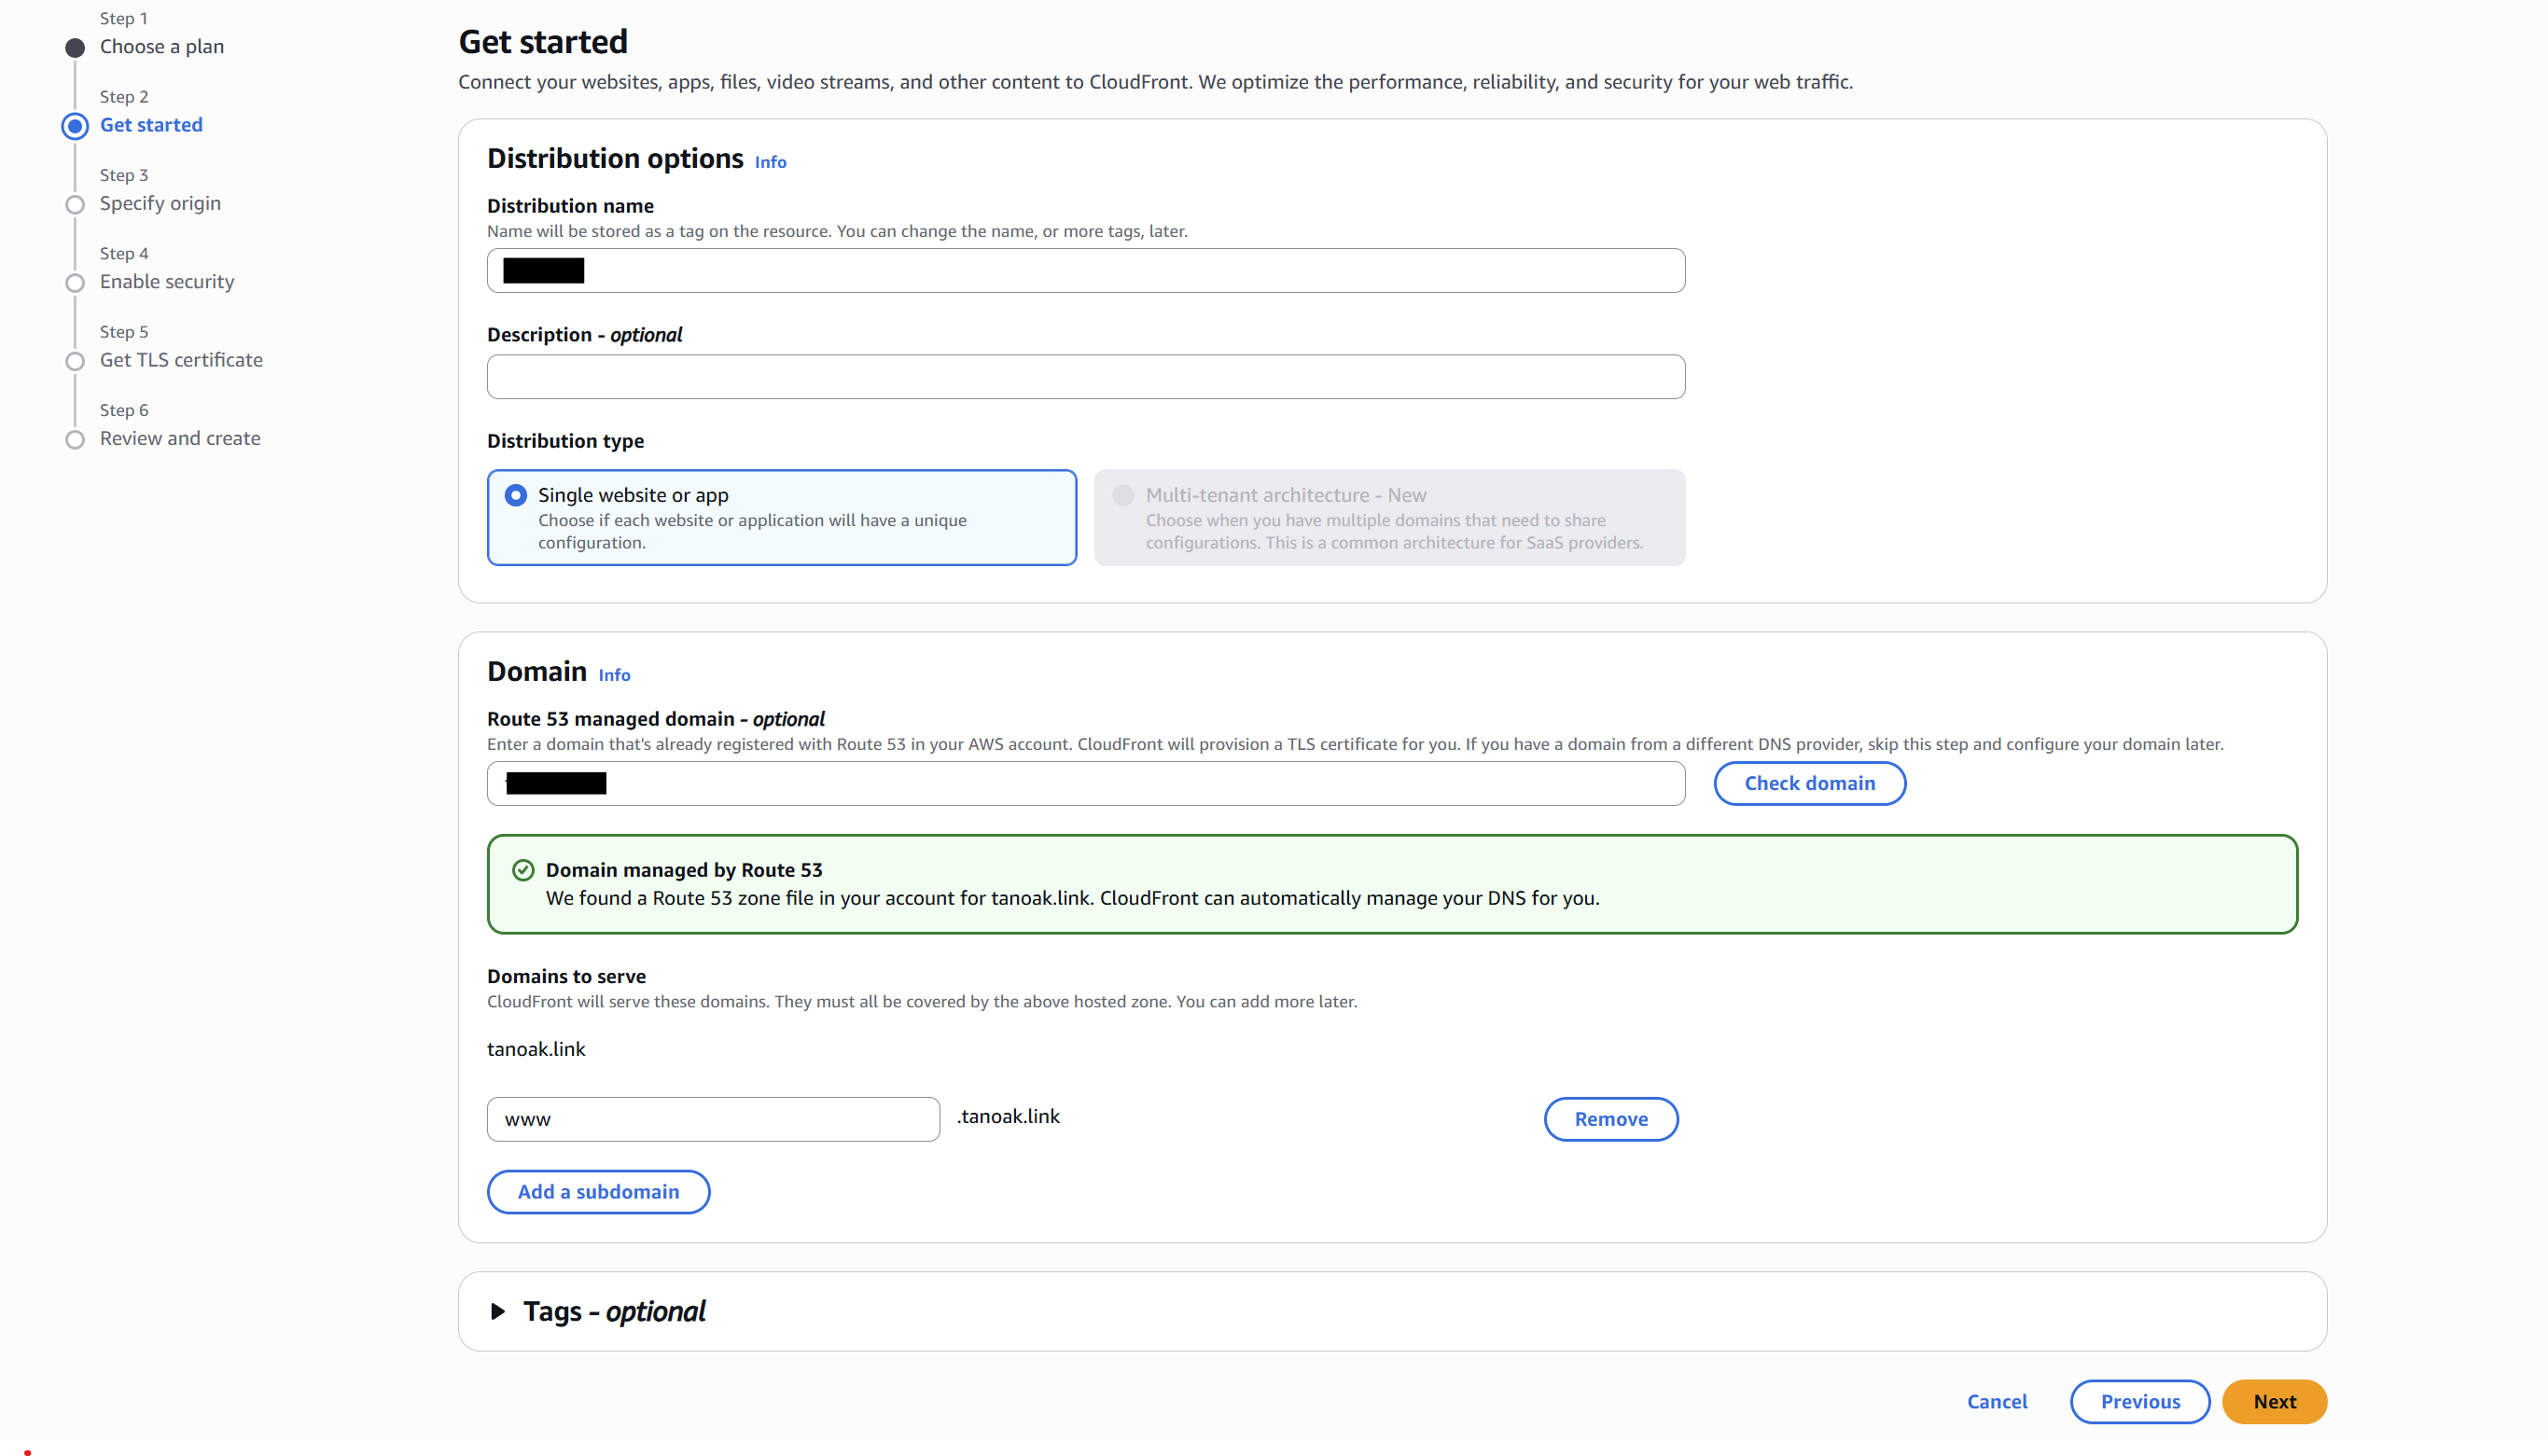
On the next page choose Other. For origin, type in the public DNS of the EC2 instance. You may need to go back to grab it.
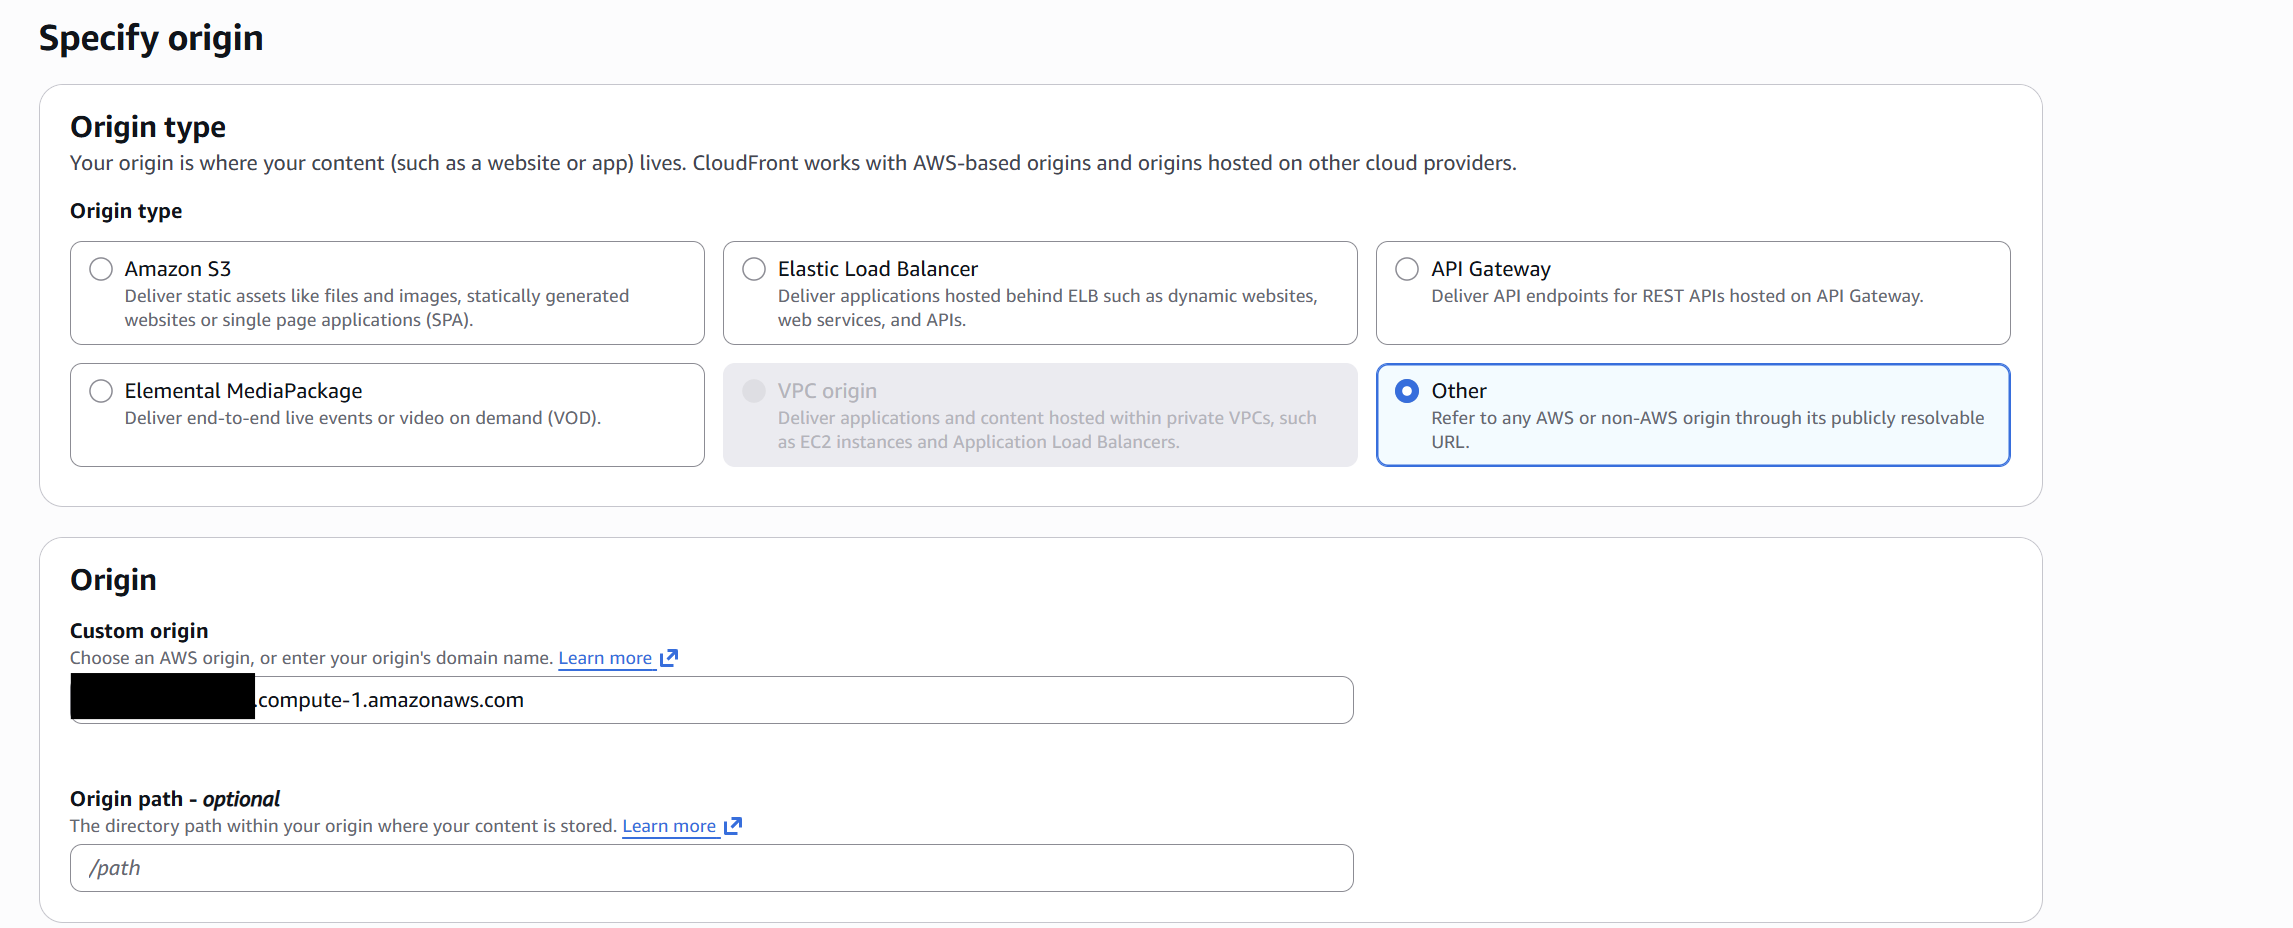
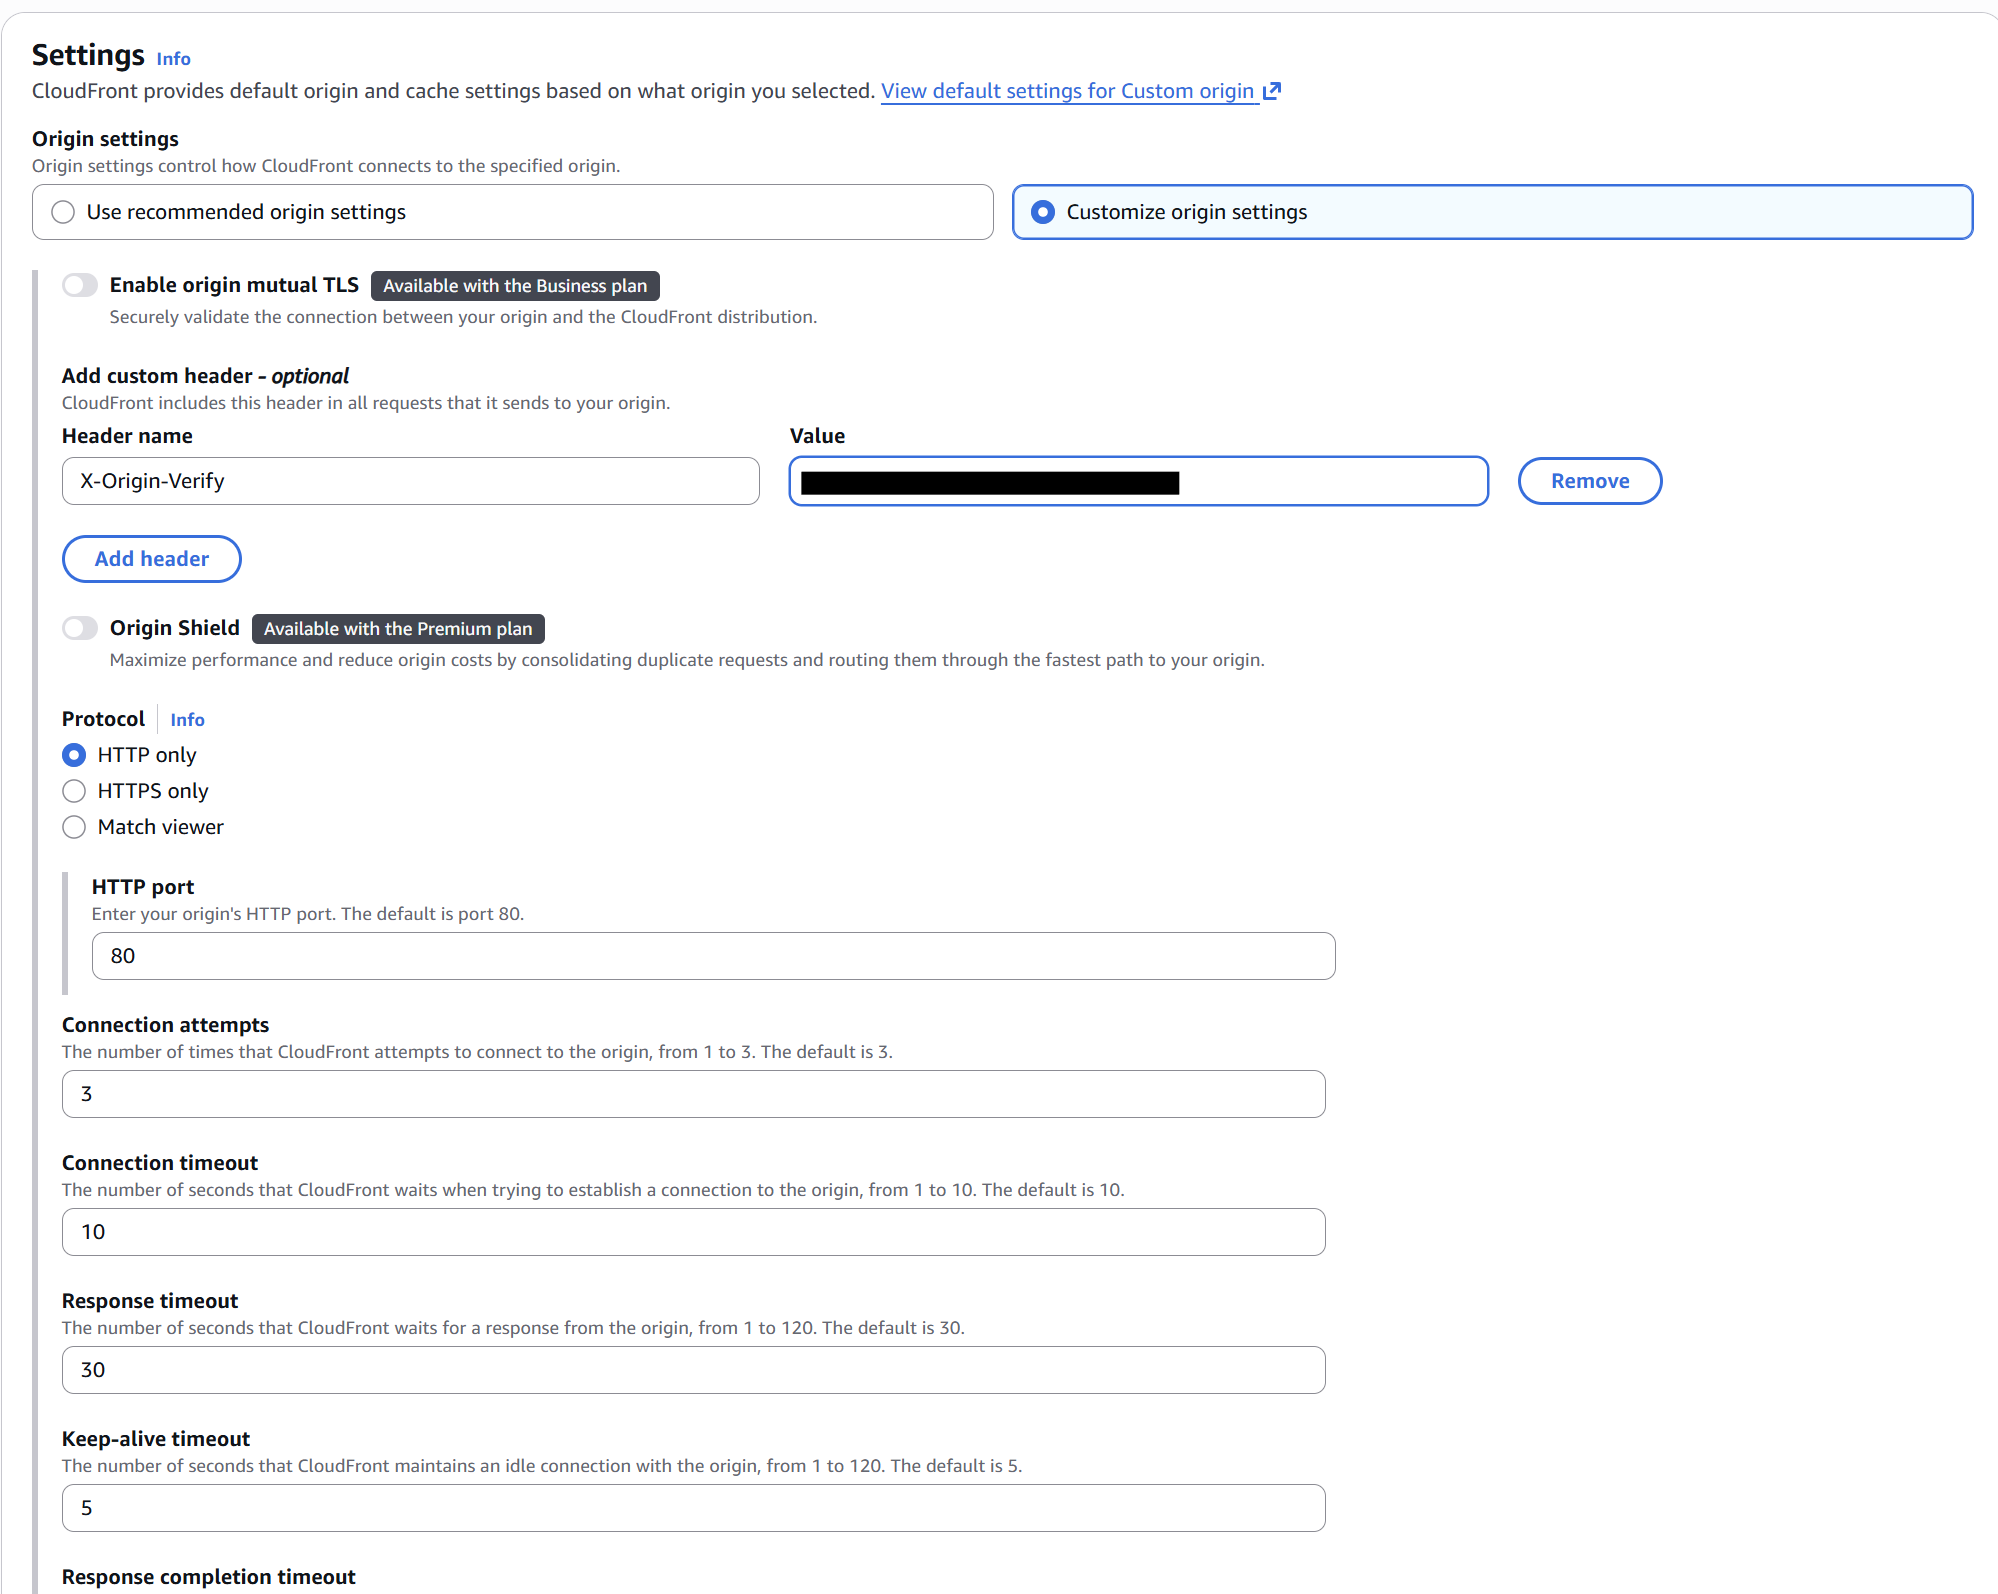
Set the origin settings to customize origin settings. Then set an X-Origin-Verify header with a random secret you create.
Why this header matters The CloudFront Origin Header is extremely important. This ensures that your origin server can only be accessed through CloudFront and not directly from the internet, providing an additional layer of security.
⚠️ Use HTTPS to your origin in production We're using HTTP for the origin protocol here since CloudFront handles HTTPS for your users. However, the X-Origin-Verify shared secret is transmitted in plaintext over this connection. Even with the security group locked to the CloudFront prefix list, traffic between CloudFront edge nodes and your EC2 instance traverses the public internet and could be intercepted. For production workloads, install a certificate on your instance (a self-signed cert works fine since CloudFront doesn't validate origin certs by default, or use Certbot for a free Let's Encrypt certificate), switch nginx to listen on 443, update CloudFront's origin protocol to HTTPS-only, and move your prefix list security group rule from port 80 to 443. This encrypts the entire path and keeps the shared header as a defense-in-depth measure rather than your primary access control.
For cache settings, choose "CachingDisabled" as we'll configure specific caching behaviors for different content types after creating the distribution.
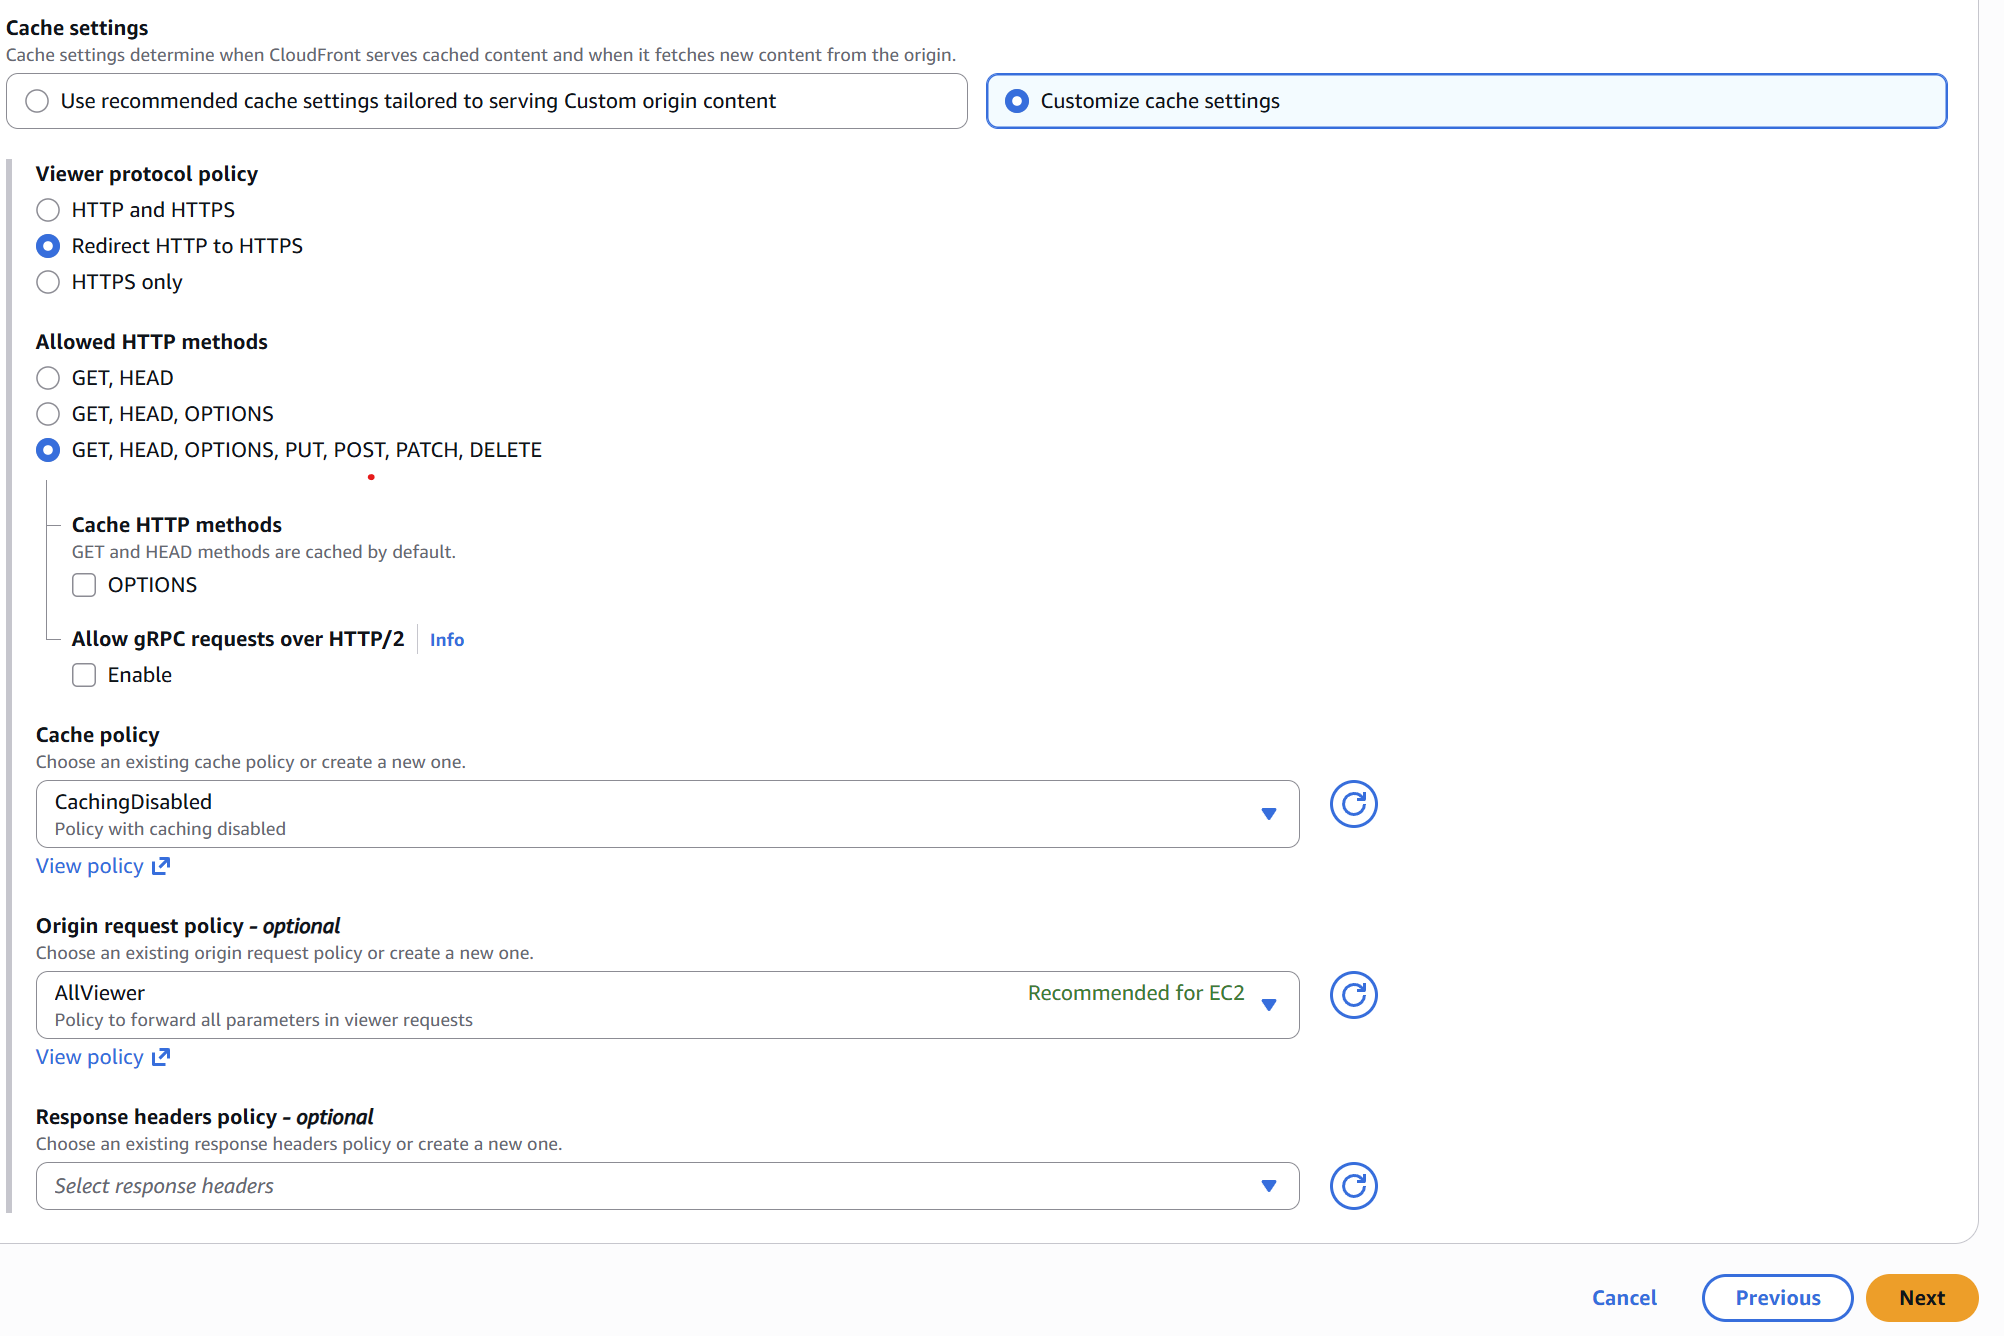
For the Web Application Firewall (WAF) settings, don't make any additional changes.
On the settings page, select the SSL certificate you created earlier from the dropdown menu. Make sure both your domain and www subdomain are covered.
Review all your configuration settings and click "Create distribution". CloudFront will take several minutes to deploy globally — you'll see the status change from "Deploying" to "Enabled" when it's ready.
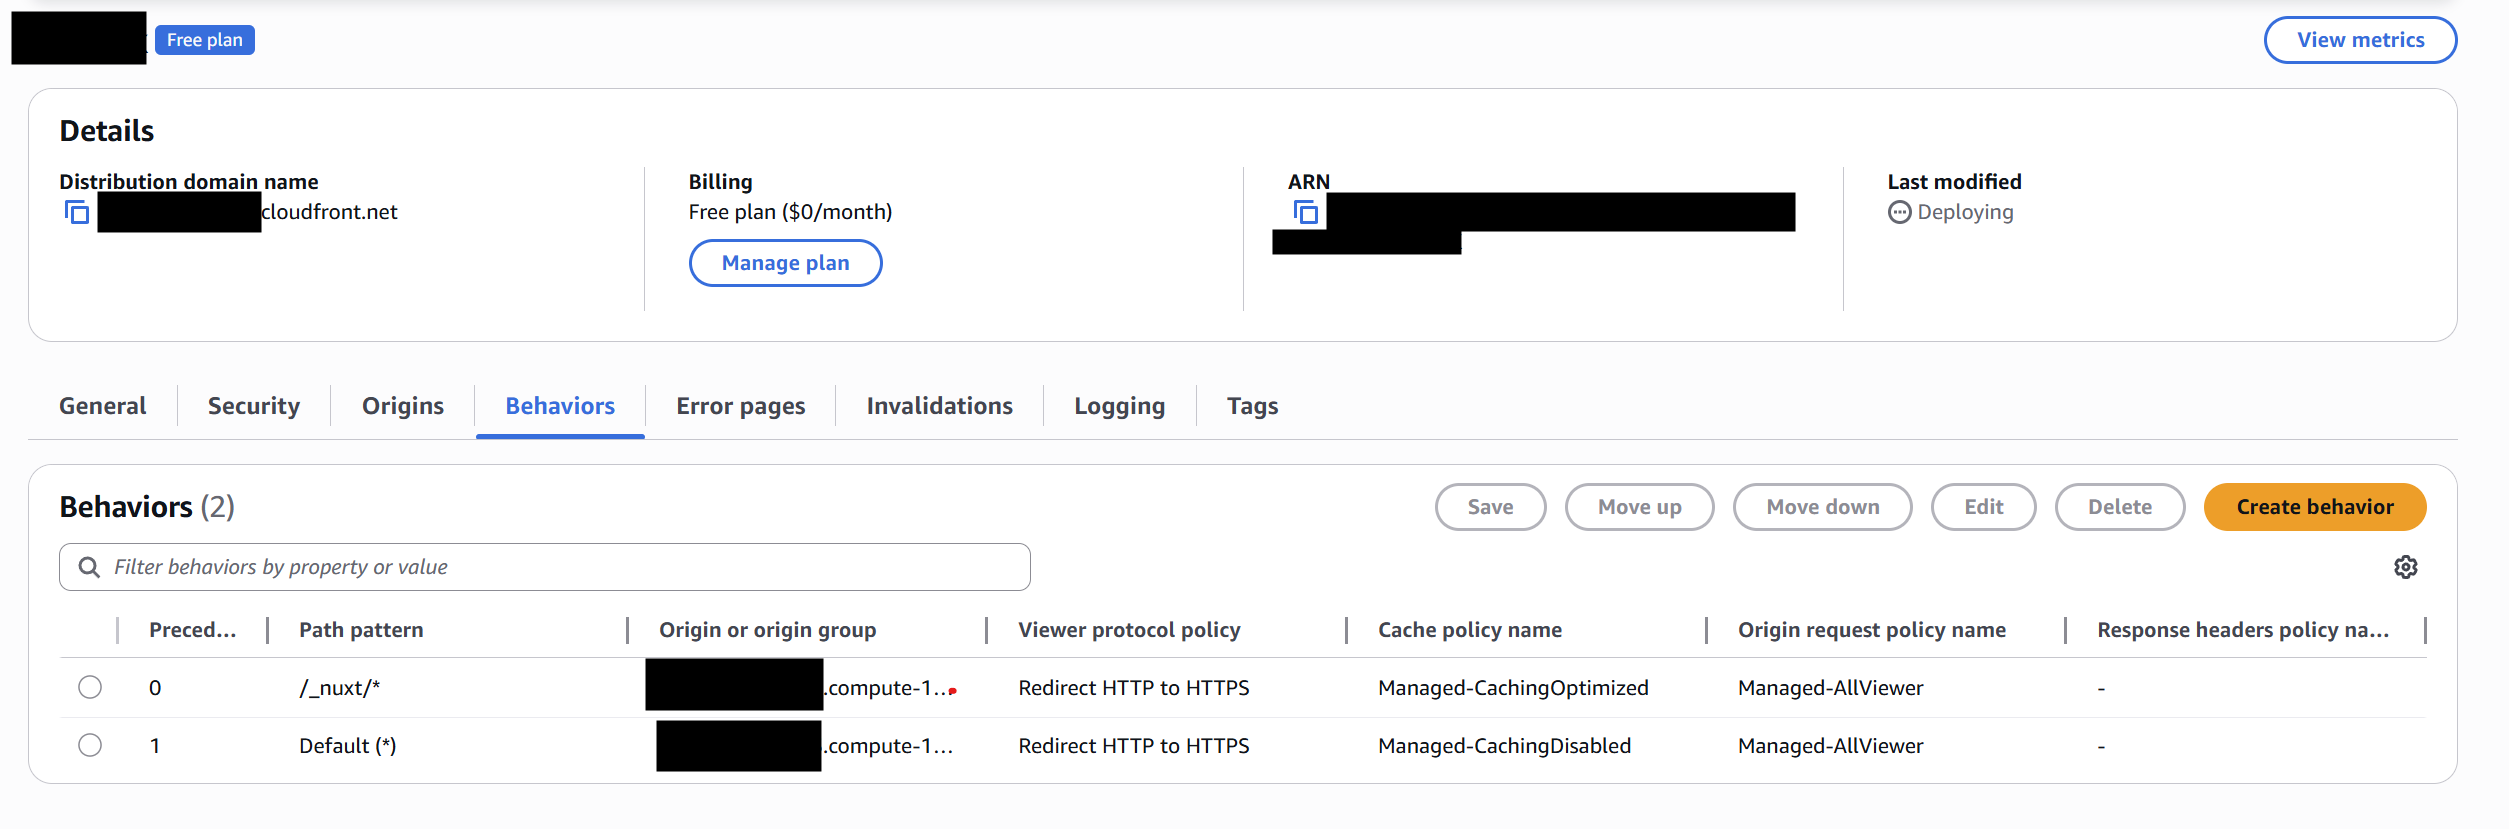
After it's enabled, add a new behavior. Click Create behavior. Fill out the Path pattern as /_nuxt/*, set the Origin and origin groups dropdown to the EC2 instance. Make sure to set the Viewer protocol policy to Redirect HTTP to HTTPS and set the Allowed HTTP methods to GET, HEAD.
It should look like this at the end
Now that CloudFront is in place, let's update the nginx configuration with the new secret key we created earlier.
sudo nano /etc/nginx/sites-available/nuxt
server {
  listen 80;
  server_name _;

   if ($http_x_origin_verify != "REPLACE_WITH_SECRET") { return 403; }

  location / {
    proxy_pass http://127.0.0.1:3000;
    proxy_http_version 1.1;

    proxy_set_header Host $host;
    proxy_set_header X-Real-IP $remote_addr;
    proxy_set_header X-Forwarded-For $proxy_add_x_forwarded_for;
    proxy_set_header X-Forwarded-Proto $scheme;
    proxy_set_header Upgrade $http_upgrade;
    proxy_set_header Connection "upgrade";
  }
}
Replace the REPLACE_WITH_SECRET with the variable you set up in CloudFront.
Then reload nginx.
sudo systemctl reload nginx
Now if you test the origin you should get a 403 forbidden.
Go to http://<your-ec2-ip-address>
Lock down port 80 For an extra layer of security, go to your EC2 security group and delete the existing port 80 inbound rule, then add a new one with the source set to the AWS-managed prefix list
com.amazonaws.global.cloudfront.origin-facing. This restricts port 80 so only CloudFront's network can reach your instance. Combined with the origin verify header, you now have two layers of protection on your origin.
🔥 We are getting one step closer!
Connecting your domain with Route 53
Now you need to connect your CloudFront distribution to your domain through Route53.
Go to Route53 in the AWS console and navigate to your hosted zone for your domain. Click "Create record" to add a new A record that will point your domain to the CloudFront distribution.
Make sure you add a record. Choose Alias and then choose Alias to CloudFront distribution from the dropdown. Select your CloudFront distribution from the list. Leave the Record name blank for the root domain.
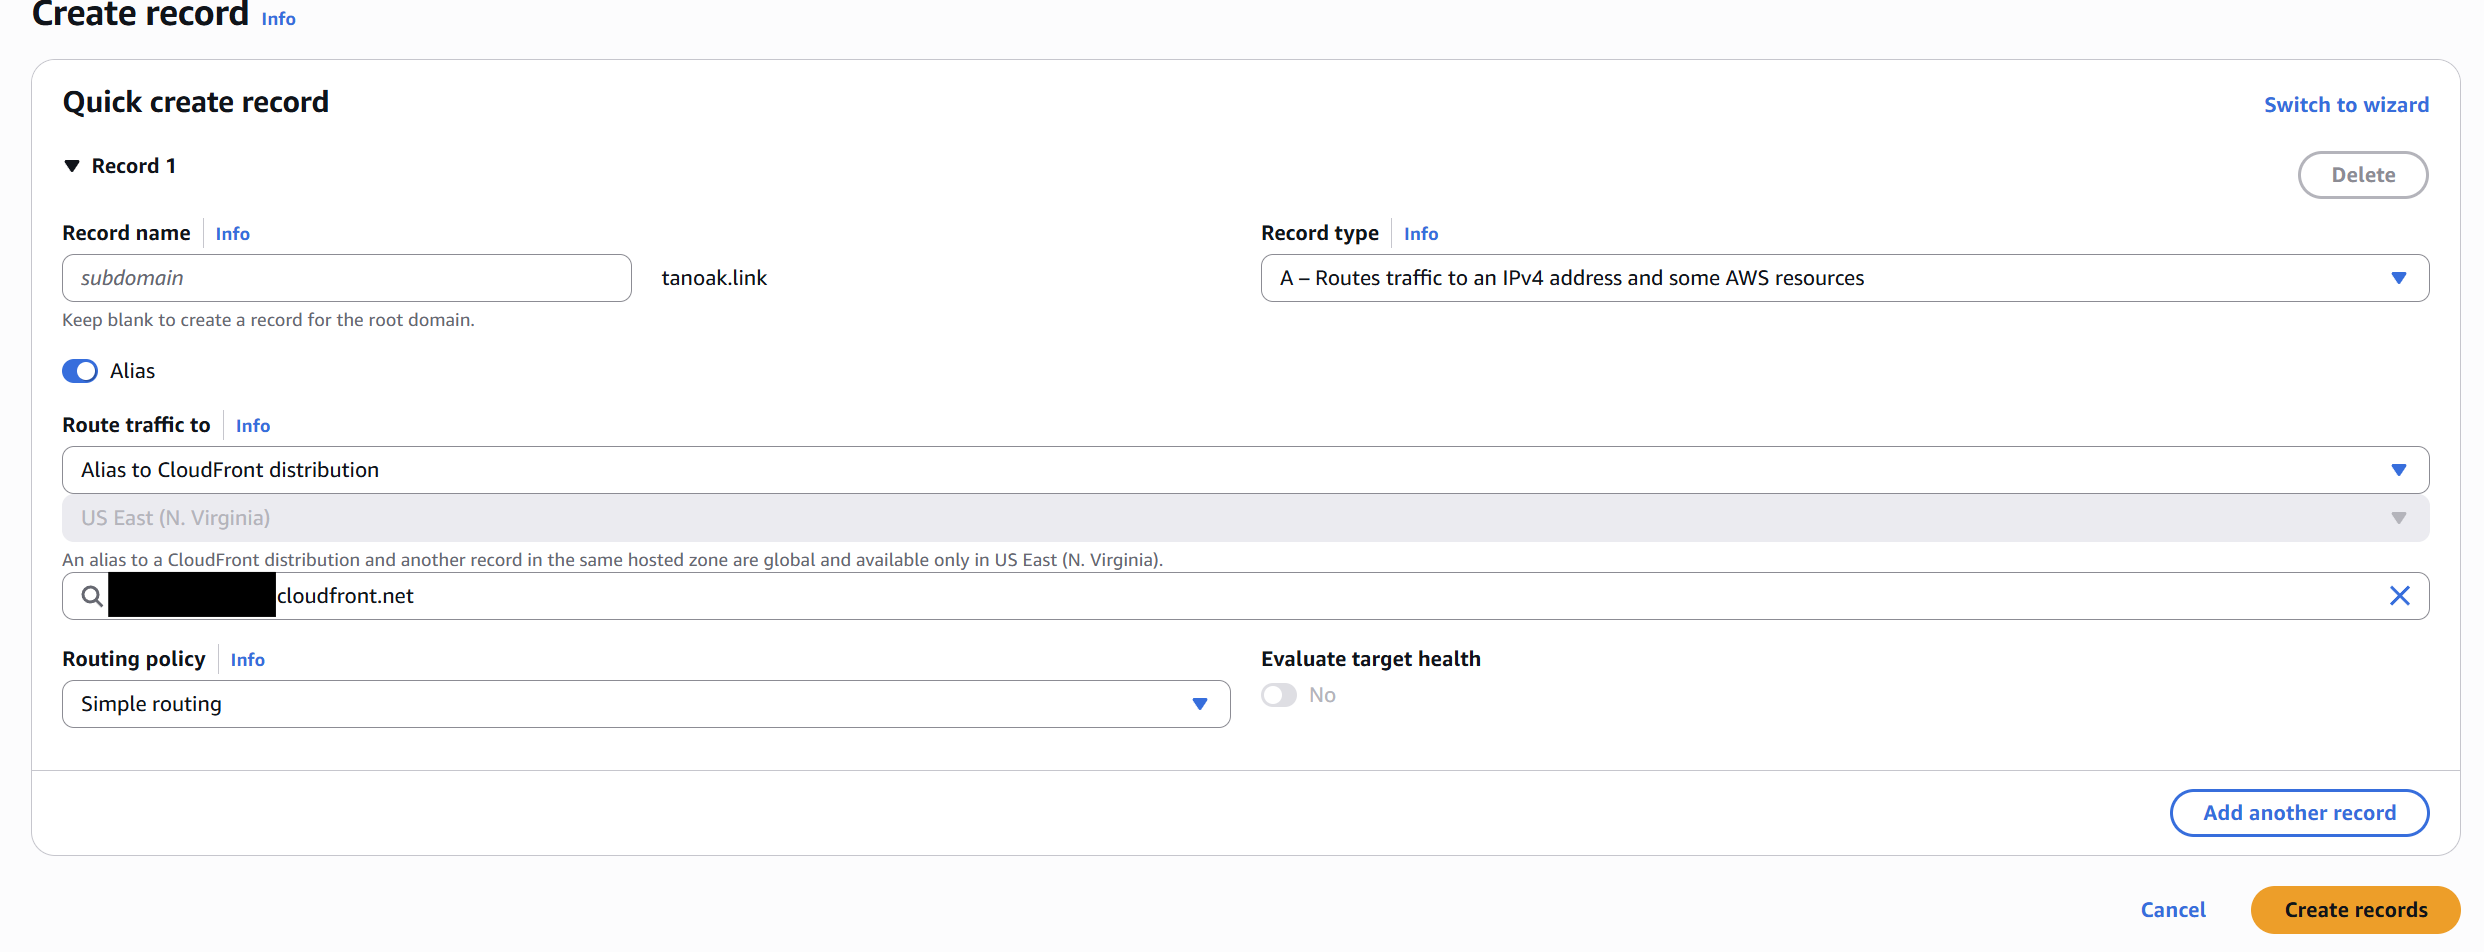
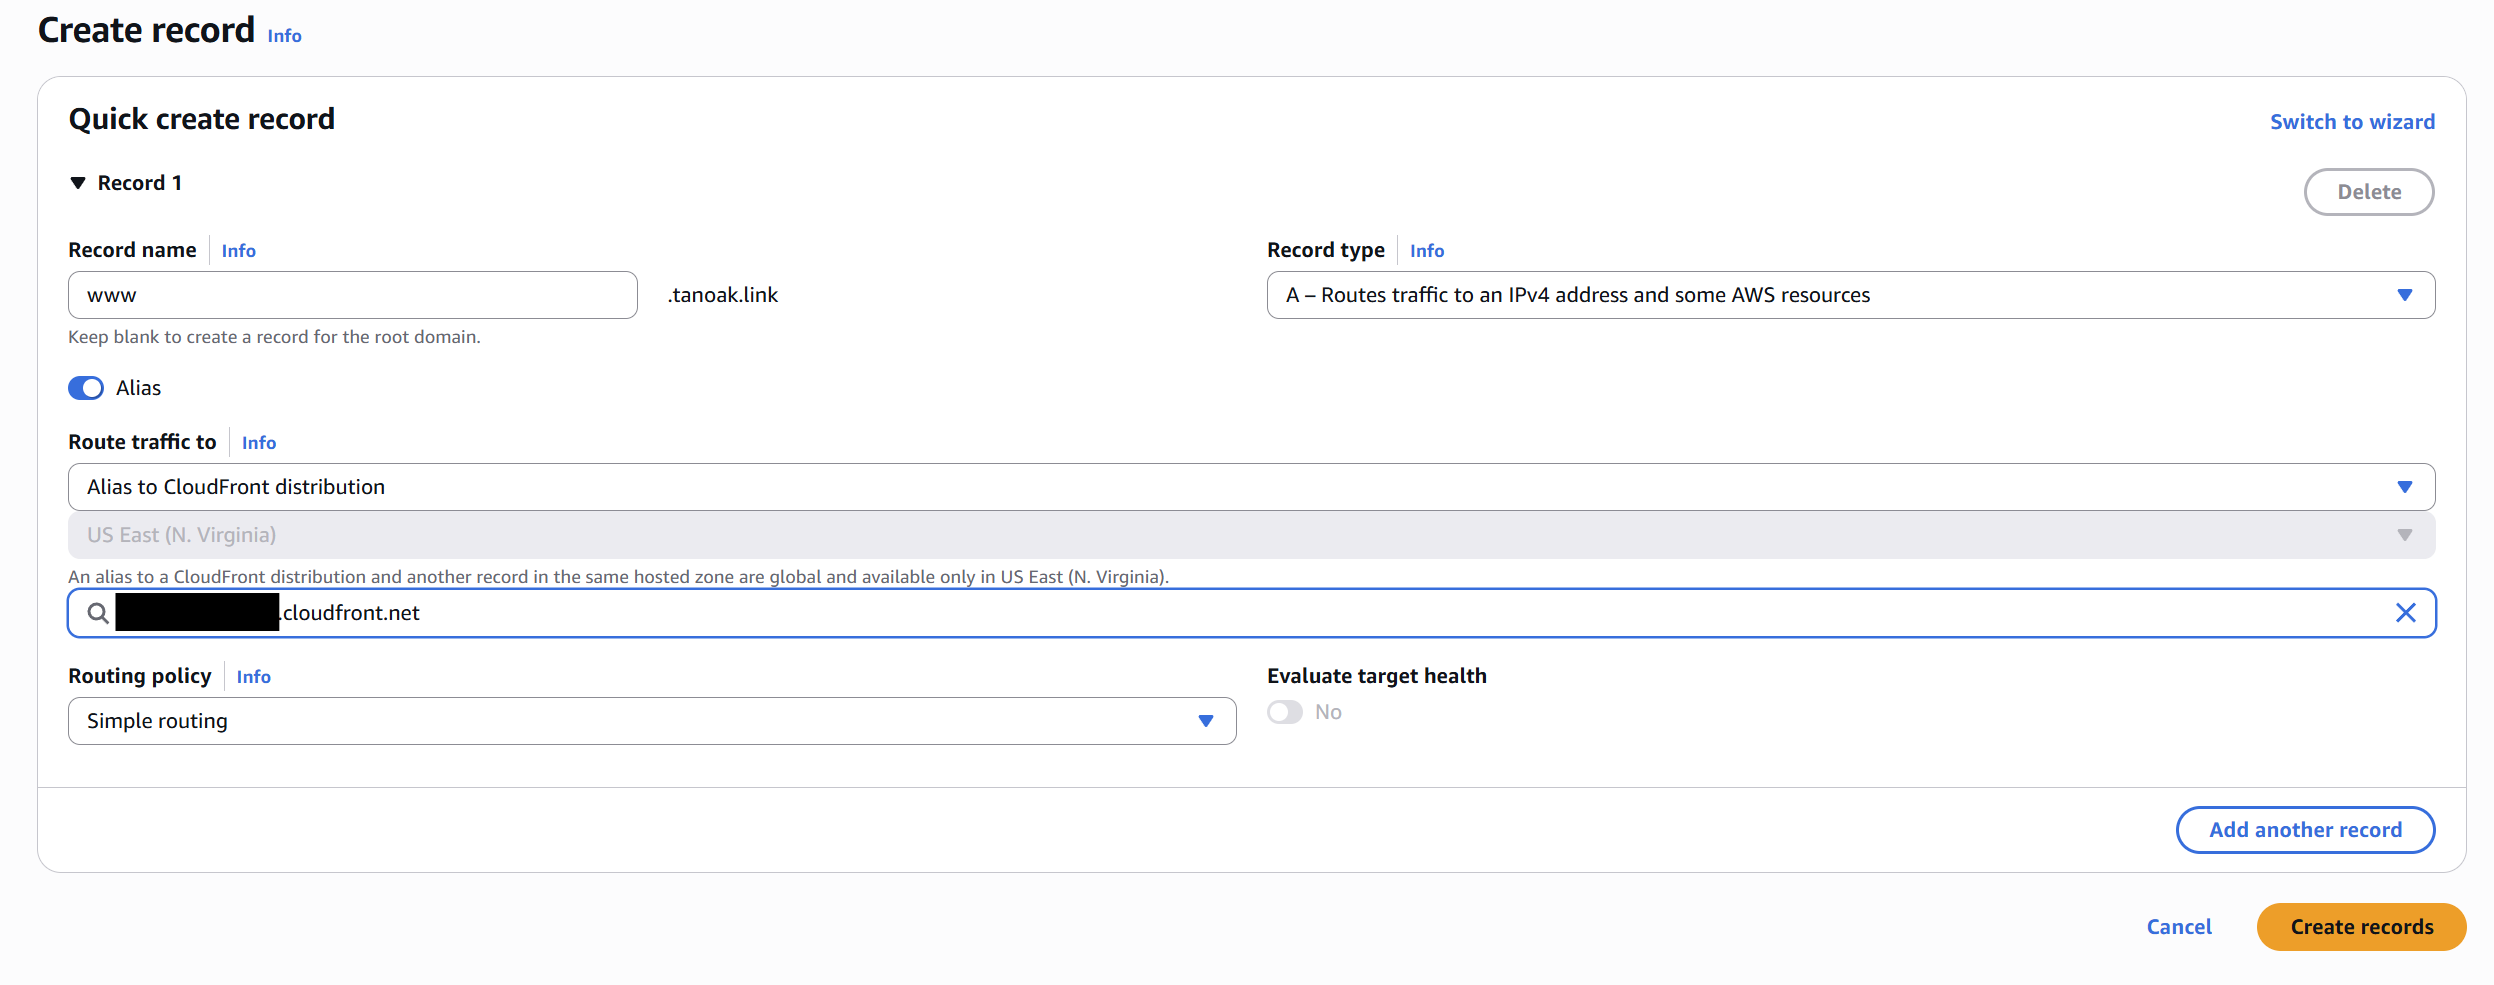
Add another A record, but this time for the www subdomain.
It might take a few minutes for DNS propagation to complete, but your site should be accessible at your domain shortly after creating the A records.
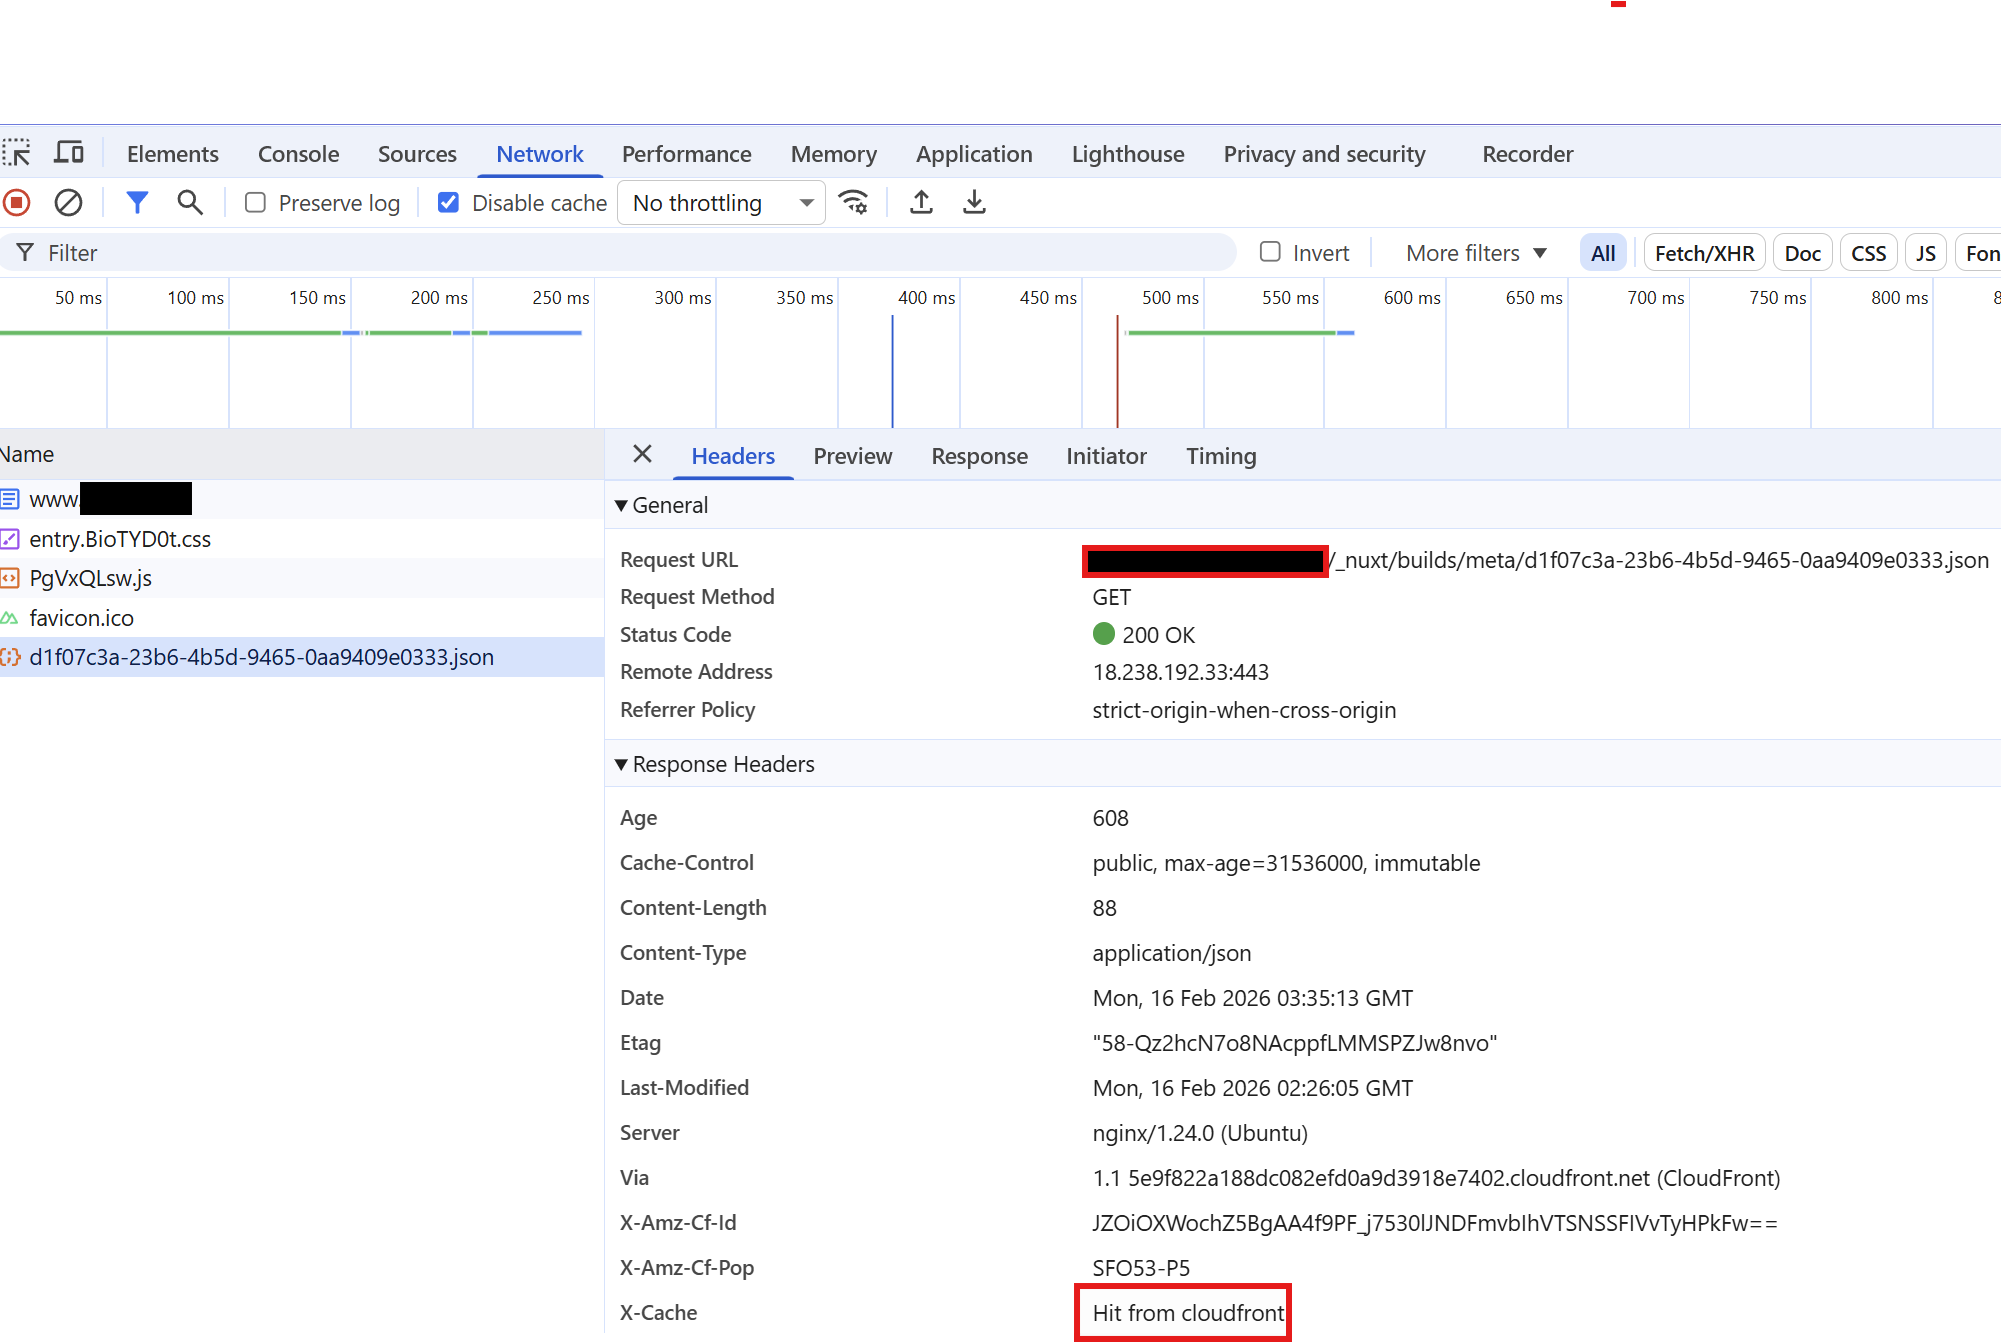
You can test the CloudFront distribution directly using its domain name while waiting for DNS to propagate. Once everything is working, visit your domain and you should see your site served securely over HTTPS!
Go to https://<your-domain> 🎇
You can even open Chrome DevTools and check the Network tab to see CloudFront cache hits in the response headers.
Adding cache behaviors
If you'd like, we can add additional caching to our CloudFront distribution.
/favicon.ico/robots.txt/sitemap.xml/images/*
Each of these files can have their own caching rules. Static assets can be cached for longer periods, while you might want to disable caching entirely for server-side rendered (SSR) routes in Nuxt to ensure dynamic content is always fresh.
To add these behaviors, go back to your CloudFront distribution and create new behaviors for each path pattern, adjusting the cache settings based on how frequently the content changes.
Once everything is working properly, it's also a good security practice to remove SSH access from your EC2 instance's security group. Since we set up AWS Systems Manager earlier, you can still connect to your instance anytime through the SSM Session Manager in the AWS console — no SSH key needed, no port 22 open to the internet. Just head to your EC2 security group, delete the inbound rule for port 22, and save.
Production hardening
What we've built so far is a solid working deployment — but it's tutorial-grade. Before serving real user traffic, here are the things you'll want to tighten up.
Secrets management. Replace the flat .env file with AWS Secrets Manager or SSM Parameter Store (SecureString). This gives you rotation, audit trails, and fine-grained access control instead of plaintext on disk.
Origin encryption. Install a TLS certificate on your instance (self-signed works since CloudFront doesn't validate origin certs by default, or use Certbot for a free Let's Encrypt certificate), switch nginx to listen on 443, and set CloudFront's origin protocol to HTTPS-only. Then move your prefix list security group rule from port 80 to 443. This encrypts the hop between CloudFront and your origin so the X-Origin-Verify header can't be sniffed in transit.
Lock down SSM. Replace AWS-RunShellScript with a custom SSM document that only runs your deploy script. This limits the blast radius if your GitHub Actions role is ever compromised. See the example earlier in this post.
Security group hygiene. Remove SSH (port 22) access entirely — you have SSM Session Manager for shell access. Restrict port 80/443 ingress to the CloudFront managed prefix list (com.amazonaws.global.cloudfront.origin-facing) so only CloudFront can reach your origin.
Monitoring and detection. Set up CloudWatch alarms for CPU, memory, and disk usage. Enable VPC Flow Logs to capture network traffic metadata. Consider enabling AWS WAF on your CloudFront distribution to filter malicious requests. Without these, a breach or resource issue could go undetected indefinitely.
Zero-downtime deploys. Set up a blue/green deployment — spin up the new container, health-check it, then swap traffic only if healthy. Your deploy script can pull the new image, start it on a different port, verify it responds, then update nginx and stop the old container.
Scaling. If you outgrow a single instance, add an Auto Scaling Group with an Application Load Balancer to distribute traffic across multiple instances.
Cleanup
If you're done experimenting and want to tear everything down, here's the order I'd go in:
- Head to Route 53 and delete the A records you created for your domain and www.
- Go to CloudFront, disable your distribution, wait about 5 to 10 minutes, then delete it.
- Delete the ACM certificate in Certificate Manager.
- Head to ECR and delete your repository.
- Terminate your EC2 instance and delete the security group and key pair you created.
- Clean up the IAM roles and the OIDC identity provider for GitHub.
Going in this order avoids dependency issues, CloudFront needs to be disabled before you can delete the certificate, and Route 53 records need to be removed before disabling the distribution.
Wrapping up
Remember the problem we started with? Too many subscriptions, serverless timeouts, and no real control over your stack. We just solved all of that with a single EC2 instance.
Here's what we built: a t3.micro instance running Ubuntu with nginx as a reverse proxy, Docker for containerization, a CI/CD pipeline with GitHub Actions and ECR, CloudFront as our CDN with SSL via Certificate Manager, and Route 53 pointing our domain to it all.
This gives you a working foundation you can build on. Check the Production Hardening section above to close the gaps before serving real traffic — but the hard part is done. You own your stack, you understand every piece of it, and you can evolve it on your terms.
If this helped you out, drop a comment below and let me know what you're deploying. Until next time!
Comments
More Blog
View allgemmaFive Gemma-4 models, one accelerator: what porting E2B 31B to AWS Inferentia2 taught me
I ported the whole Gemma-4 family — E2B, E4B, 12B, 31B, and the 26B-A4B MoE — to run on...
X
xbillcommunityHey DEV, I'm Tobore. Let's actually connect.
Hey DEV, I'm Tobore. Let's actually connect. I've been on here for a while now, mostly writing and...
L
Laurina AyarahaiI burned through thousands of AI tokens. Then a friend did it for free
(yep, kinda clickbait, just for the funsies 😊) At the beginning of the year, I relaunched my...
P
Paulo HenriqueaiClaude might be saturating your machine
My laptop was sitting idle with the fan at full tilt. Nothing was running that I knew of. The culprit...
S
Sidhant PandagithubactionsAutomated GitHub Code Reviews Using Google Gemini
I Built a Thing! TL;DR — Google Gemini-based Pull Request reviews and Issue Triaging for...
D
Darren "Dazbo" LesteraiWhat is an "agentic harness," actually?
I've been hearing the word "harness" thrown around a lot lately. I assumed it just meant "the IDE" or...
T
Tilde A. ThuriumReady-made automations for this
Workflows from the Neura Market marketplace related to this DeepSeek resource
- Building a RAG Chatbot for Movie Recommendations with Qdrant and OpenAIn8n · $14.99 · Related topic
- Automatic Background Removal for Images in Google Driven8n · $14.99 · Related topic
- Create a Custom Qdrant MCP Server for Enhanced API Featuresn8n · $19.99 · Related topic
- Automate Image Background Removal and Log Results in Google Sheetsn8n · $14.99 · Related topic