Back to Blog workspacestudio
 gemma
gemma community
 ai
ai ai
ai githubactions
 ai
ai
Google Workspace Studio Tutorial: Auto-Organize Your Inbox with Smart Labels & Priority Notifications
Aryan Irani April 2, 2026
0 views
The average professional spends 28% of their workday reading and answering emails. But here's the...
The average professional spends 28% of their workday reading and answering emails. But here's the problem, not all emails are created equal. A Pizza Discount doesn't deserve the same mental space as a Project Delay notification from a CEO.
So, I decided to fix it. I used Google Workspace Studio to build what I call an Email Organiser. It's an AI agent that actually reads my mail, labels it correctly, and - most importantly - only pings my Google Chat when something is actually on fire.
Here is how I built it (and how you can too, without writing a single line of code).
If you missed my previous tutorial on the Meeting Prep Agent, start there for the basics. Prefer to watch instead of read? Check out the video version of that guide here.
Prefer to watch instead of read? Check out the video version of the guide here.
{% embed https://youtu.be/YLFYu_9dkw4 %}
What Is Google Workspace Studio? (Quick Recap)
Google Workspace Studio is Google's no-code AI agent builder (launched December 2025). It lets anyone describe a workflow in natural language, and Gemini builds the entire automation using your Gmail, Drive, Chat, Sheets, and more.
Key Features Used Here:
- New email starter
- Gemini-powered classification
- Conditional actions (Decide step)
- Add labels + Send Chat message
Prerequisites
- Google Workspace Business, Enterprise, or Education plan with Gemini enabled
- Access to studio.workspace.google.com
- (Optional) Pre-create these Gmail labels: Urgent, Client, Internal, Marketing/Promo, Low Priority, Spam
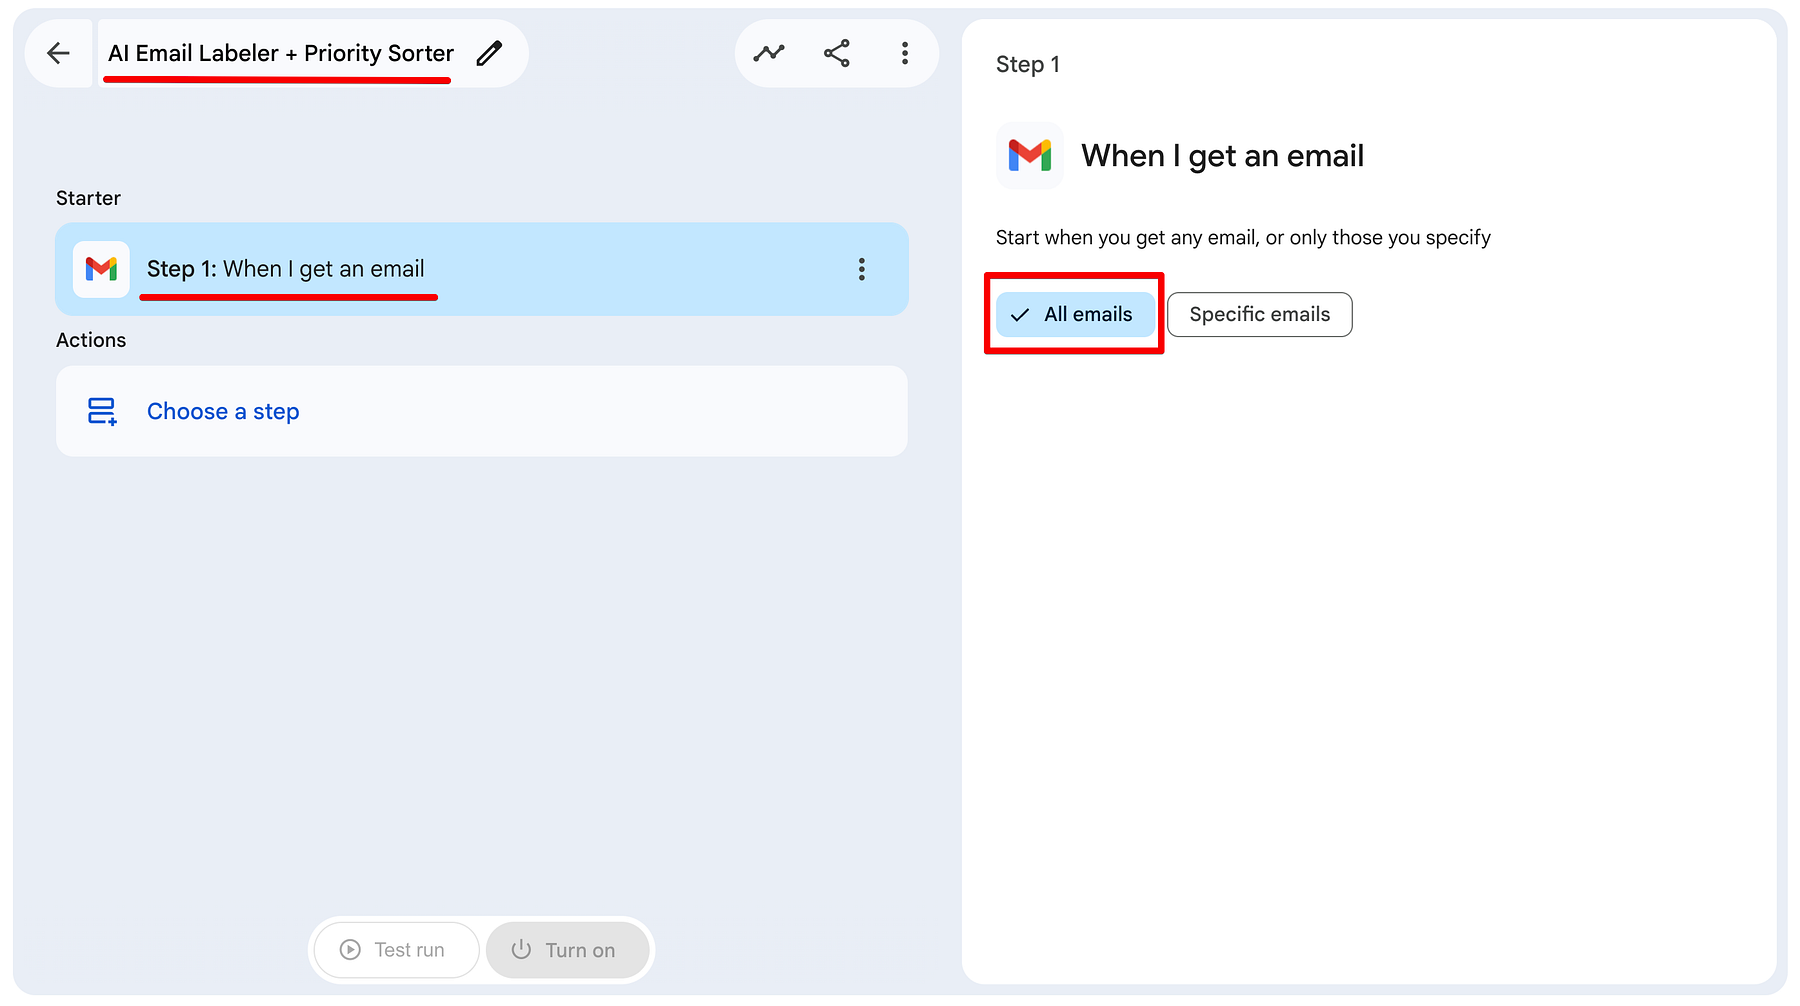
Step 1: Add the Starter (Trigger)
Open studio.workspace.google.com and start a new flow. Name it something like AI Email Labeller + Priority Sorter.
- Starter: Select When I get an email.
- Settings: Keep it on All emails. We want this agent to act as our first line of defense for every message.
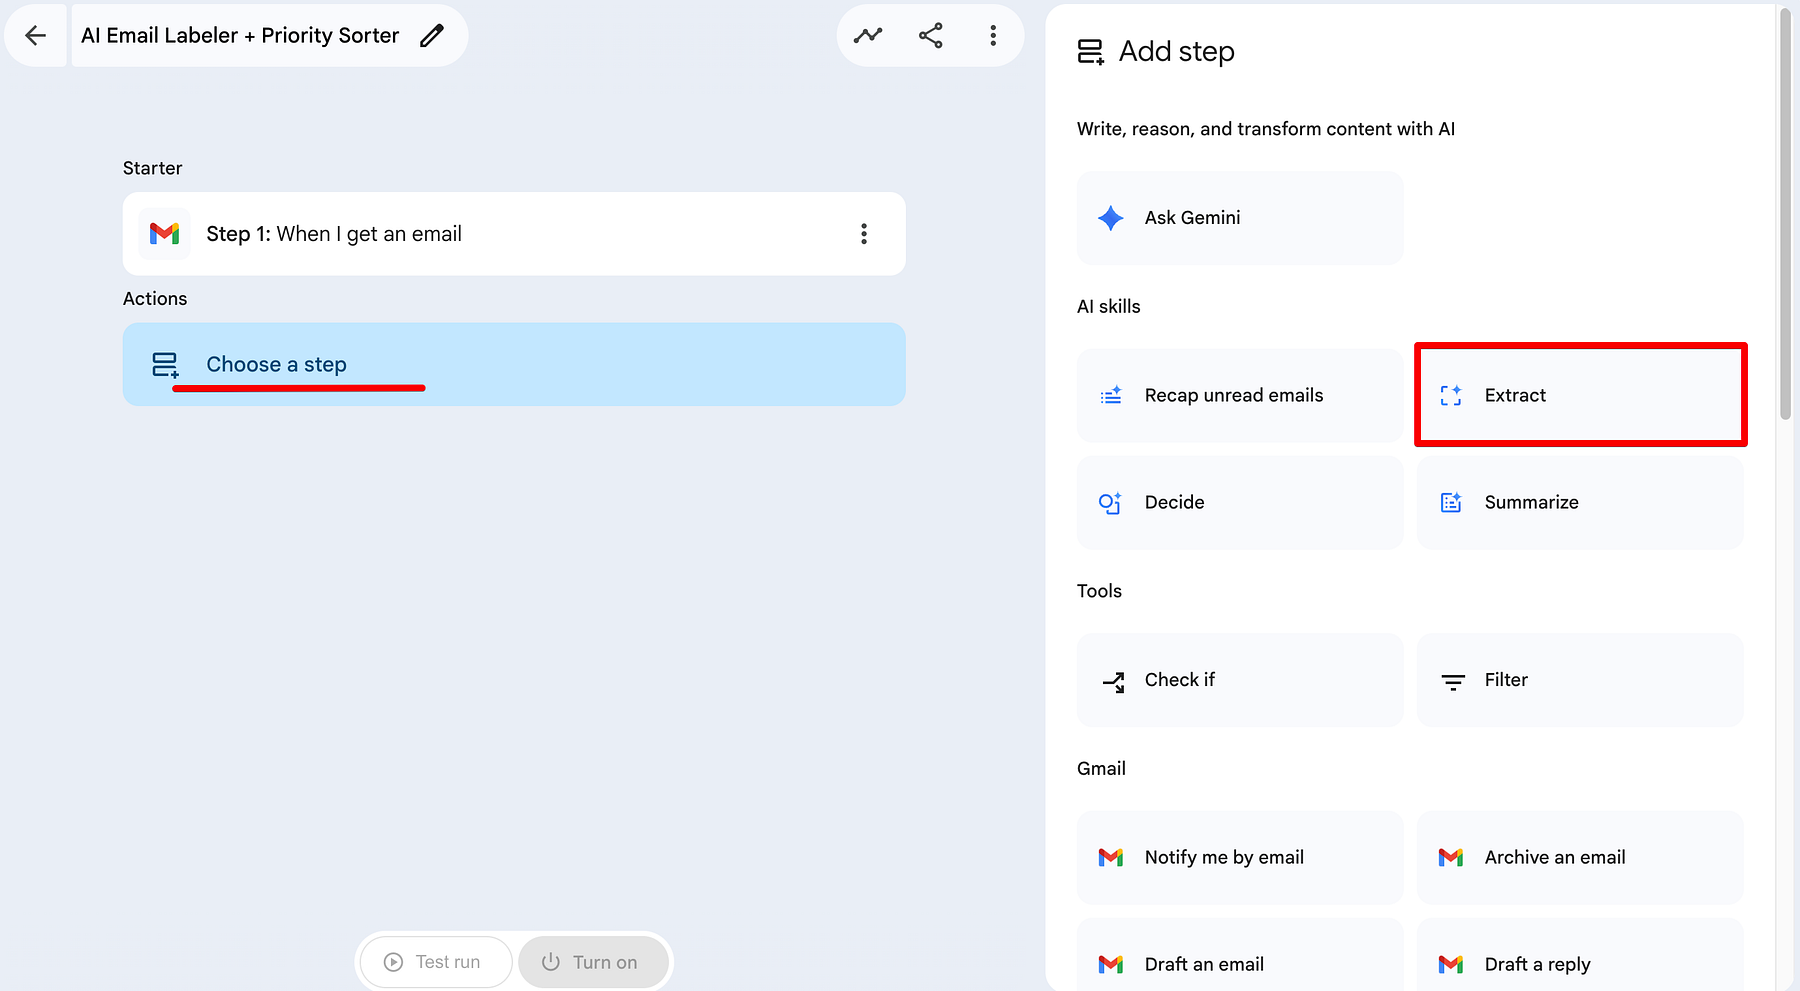
Step 2: The Logic Breakdown (The Extract Action)
After adding the When I get an email starter, the next crucial step is to let Gemini analyze the incoming email. In Workspace Studio, we use the Extract step (powered by Gemini) to intelligently process the email content.
In this step, we aren't just asking Gemini a question; we are using the Extract tool to pull specific metadata out of the raw email body. To make this reliable, we need to provide a rubric so the AI knows exactly how to judge your mail.
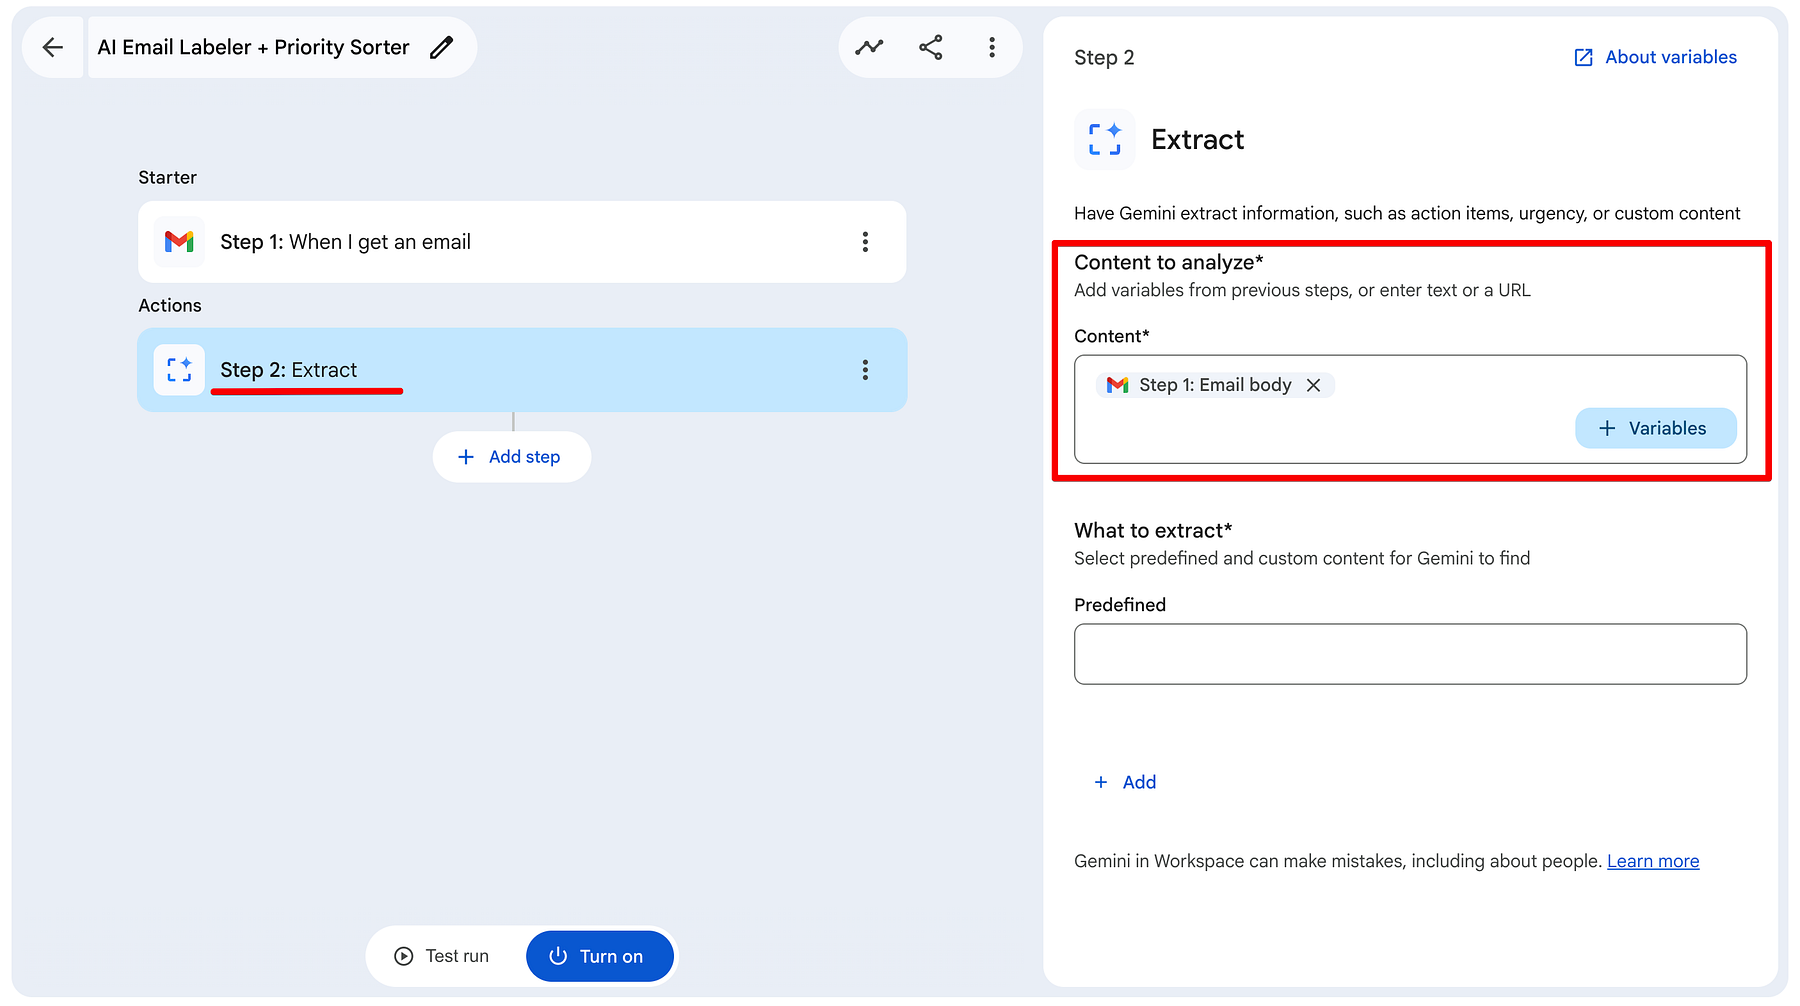
I've pointed it at the Email Body from Step 1 and created two custom fields. Think of this as giving Gemini a Rubric to follow. Instead of guessing, the AI is now acting as a professional assistant following a strict set of rules.
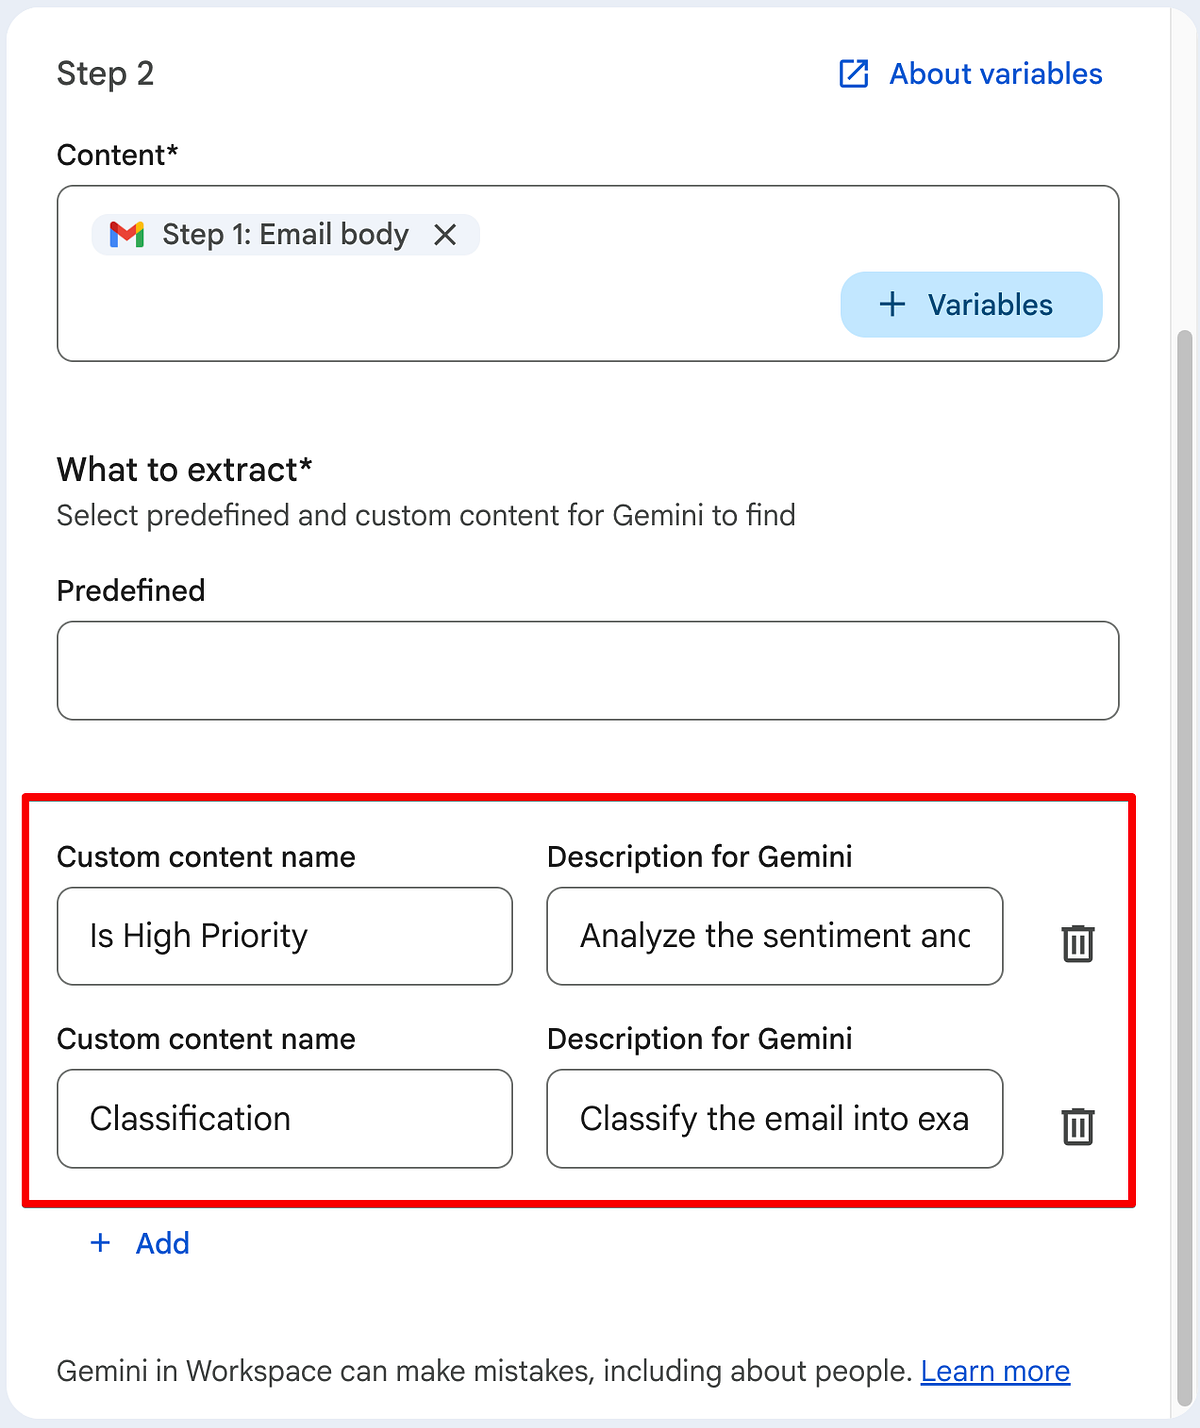
Here is how I configured the two custom content fields to make them Production-Ready:
1. Custom Field: Is High Priority
- The Goal: A simple true/false result that we can use later to trigger a notification.
- Description for Gemini:
Analyze the sentiment and urgency. Return 'true' ONLY if the email indicates a project-blocking issue, an immediate deadline (today/tomorrow), or a direct request for a deliverable from a known client. If it is a general update, a newsletter, or a 'thank you' note, return 'false'. Do not add any punctuation or extra text.
2. Custom Field: Classification
- The Goal: This will be used to apply actual labels in your Gmail sidebar.
- Description for Gemini:
Classify the email into exactly one of these categories: urgent, client, internal, marketing, newsletter or other.
Step 3: The Organization (Physical Labelling)
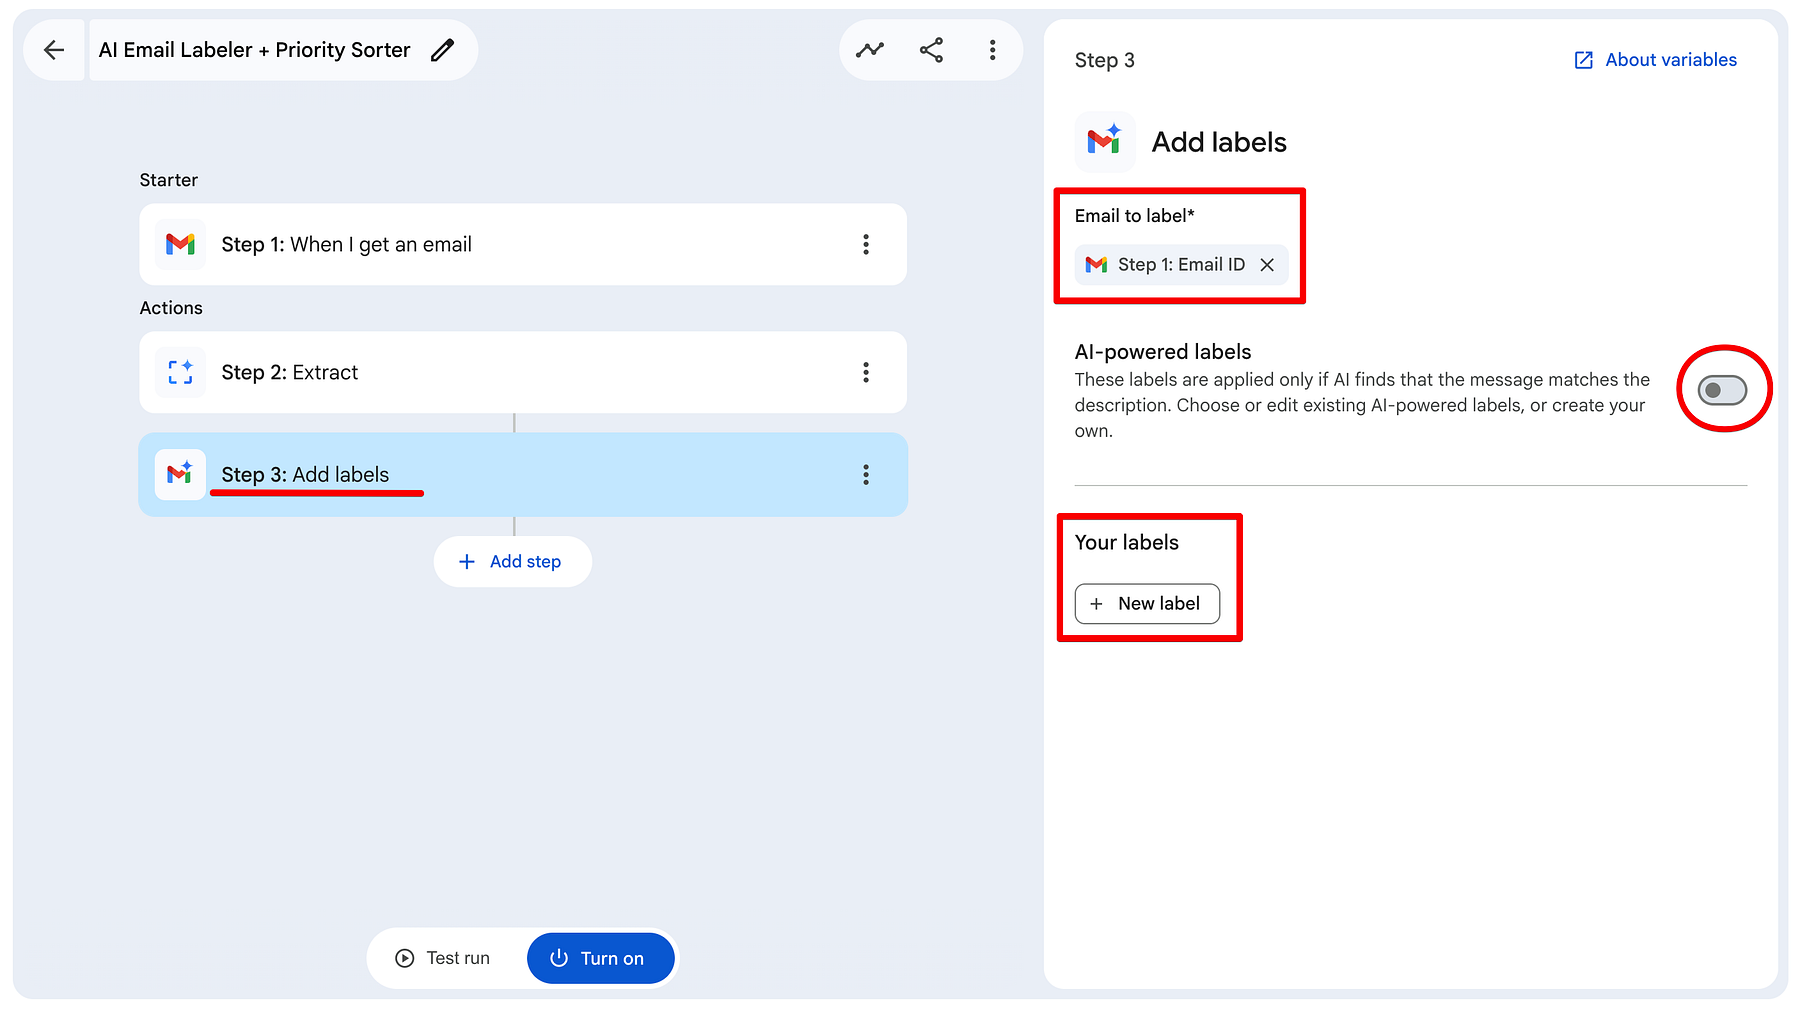
Now that Gemini has categorized our email in its mind, we need it to physically label the email in our Gmail inbox. This is where Step 3 comes in: the Add labels action.
-
Mapping the ID: First, we point the agent to the right email. In the Email to label field, use the + Variables button to insert the[Step 1: Email ID]. This ensures the agent is acting on the exact message that triggered the flow.
-
The AI-Powered Toggle: Notice the AI-powered labels switch. When you turn this on, you aren't just picking a static folder; you are giving Gemini permission to apply labels based on a description.
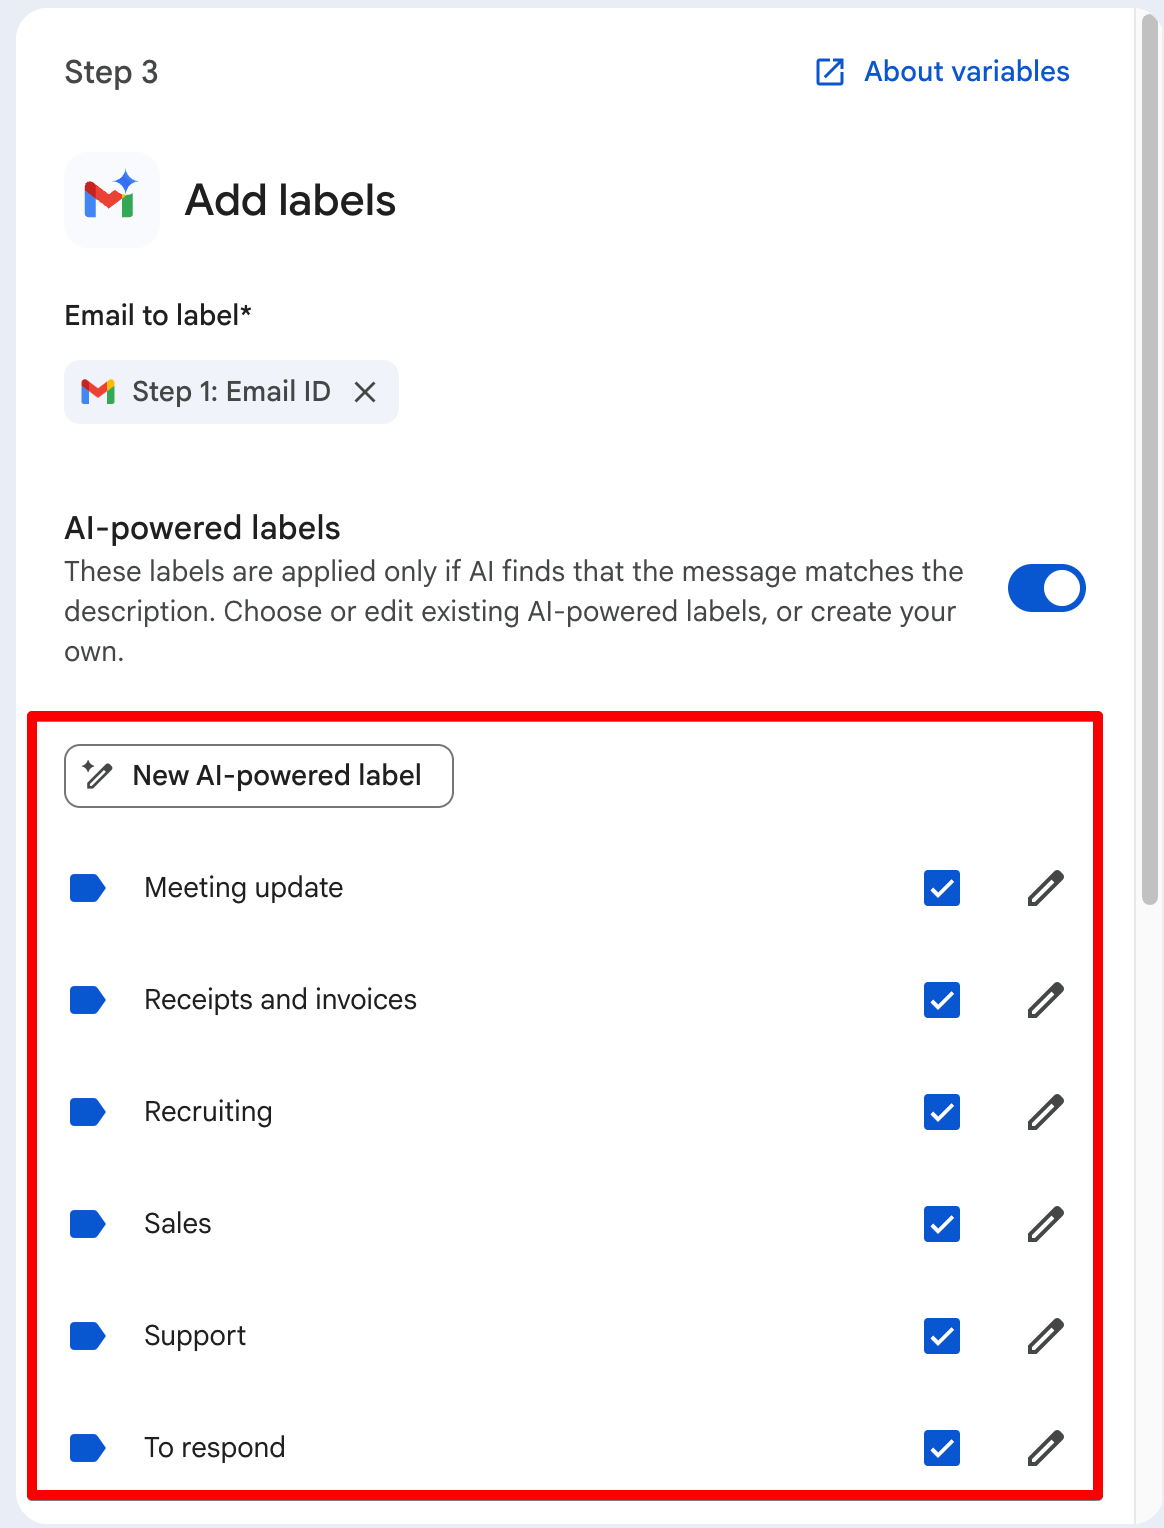
While Google provides great templates like Receipts or Meeting updates, the real power lies in the New AI-powered label button. This is where you can create a label that perfectly matches your workflow.
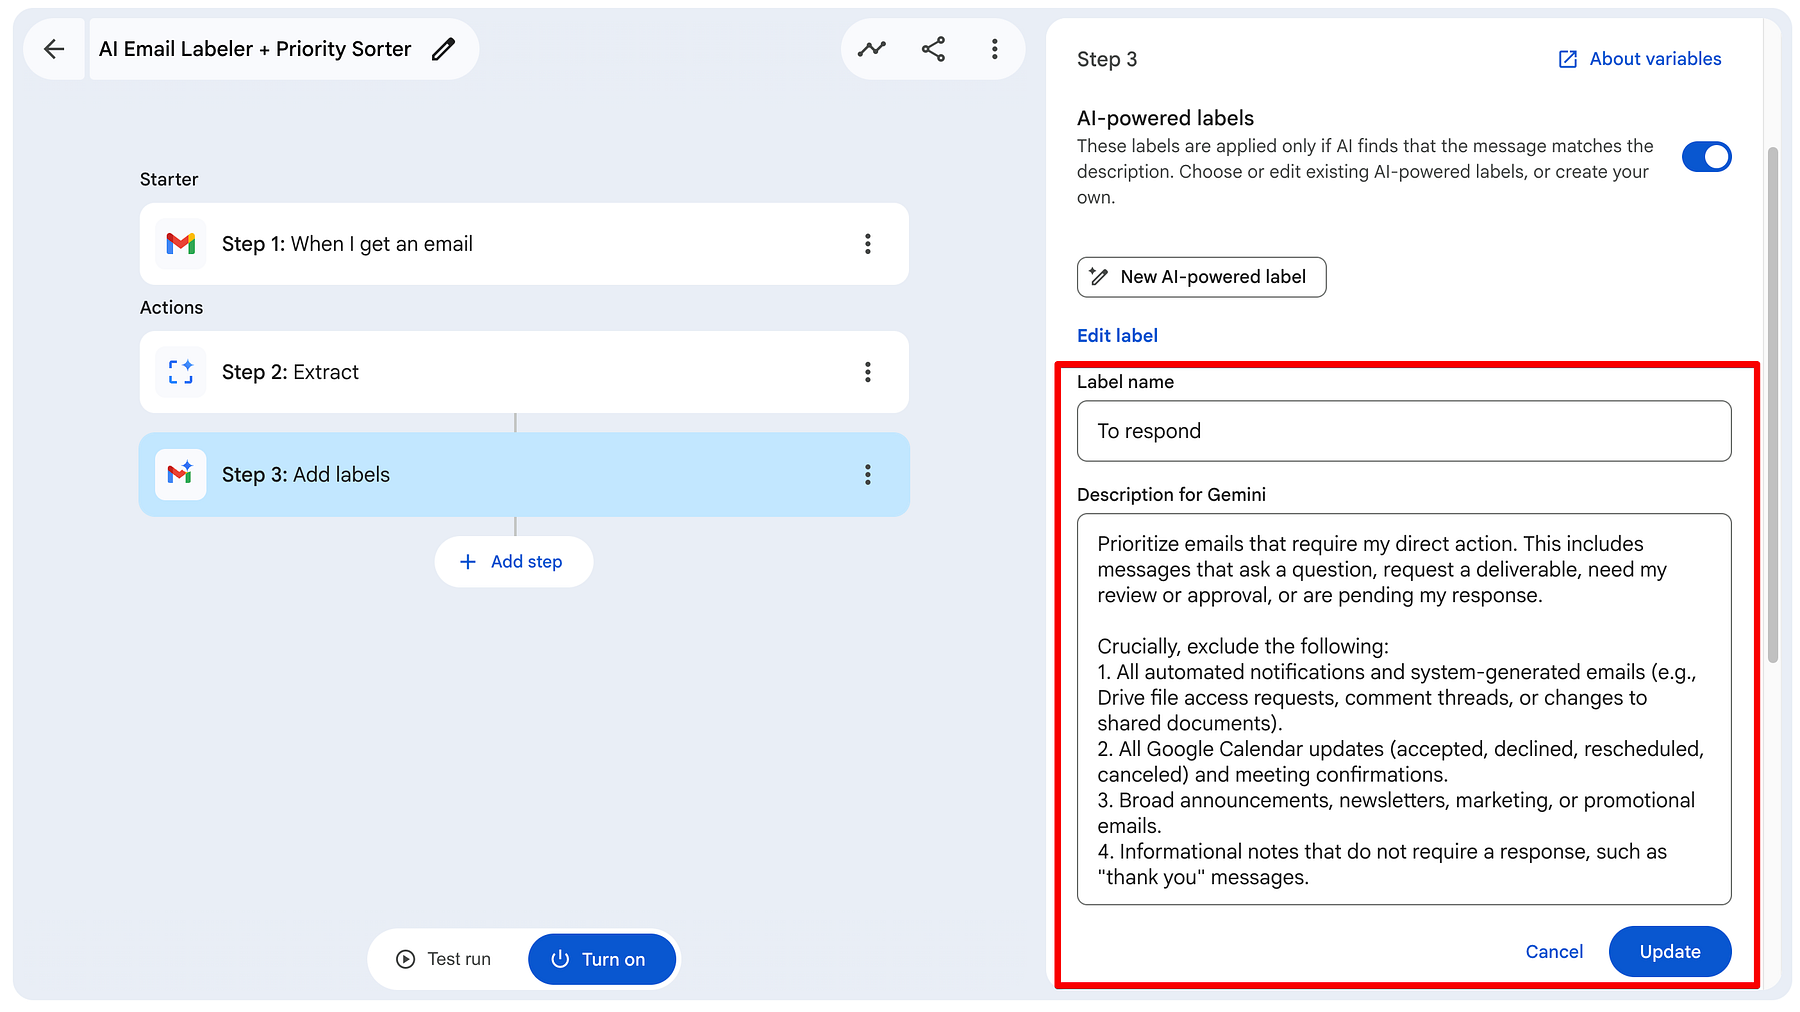
For example, I created a custom label called To Respond. Instead of a simple keyword search, I gave it this description:
Prioritize emails that require my direct action. This includes messages that ask a question, request a deliverable, need my review or approval, or are pending my response. Crucially, exclude the following:
- All automated notifications and system-generated emails (e.g., Drive file access requests, comment threads, or changes to shared documents).
- All Google Calendar updates (accepted, declined, rescheduled, canceled) and meeting confirmations.
- Broad announcements, newsletters, marketing, or promotional emails.
- Informational notes that do not require a response, such as "thank you" messages.
By using custom descriptions, your labels become much more accurate than traditional Gmail filters. You aren't just looking for "Meeting" - you're looking for the intent to meet.
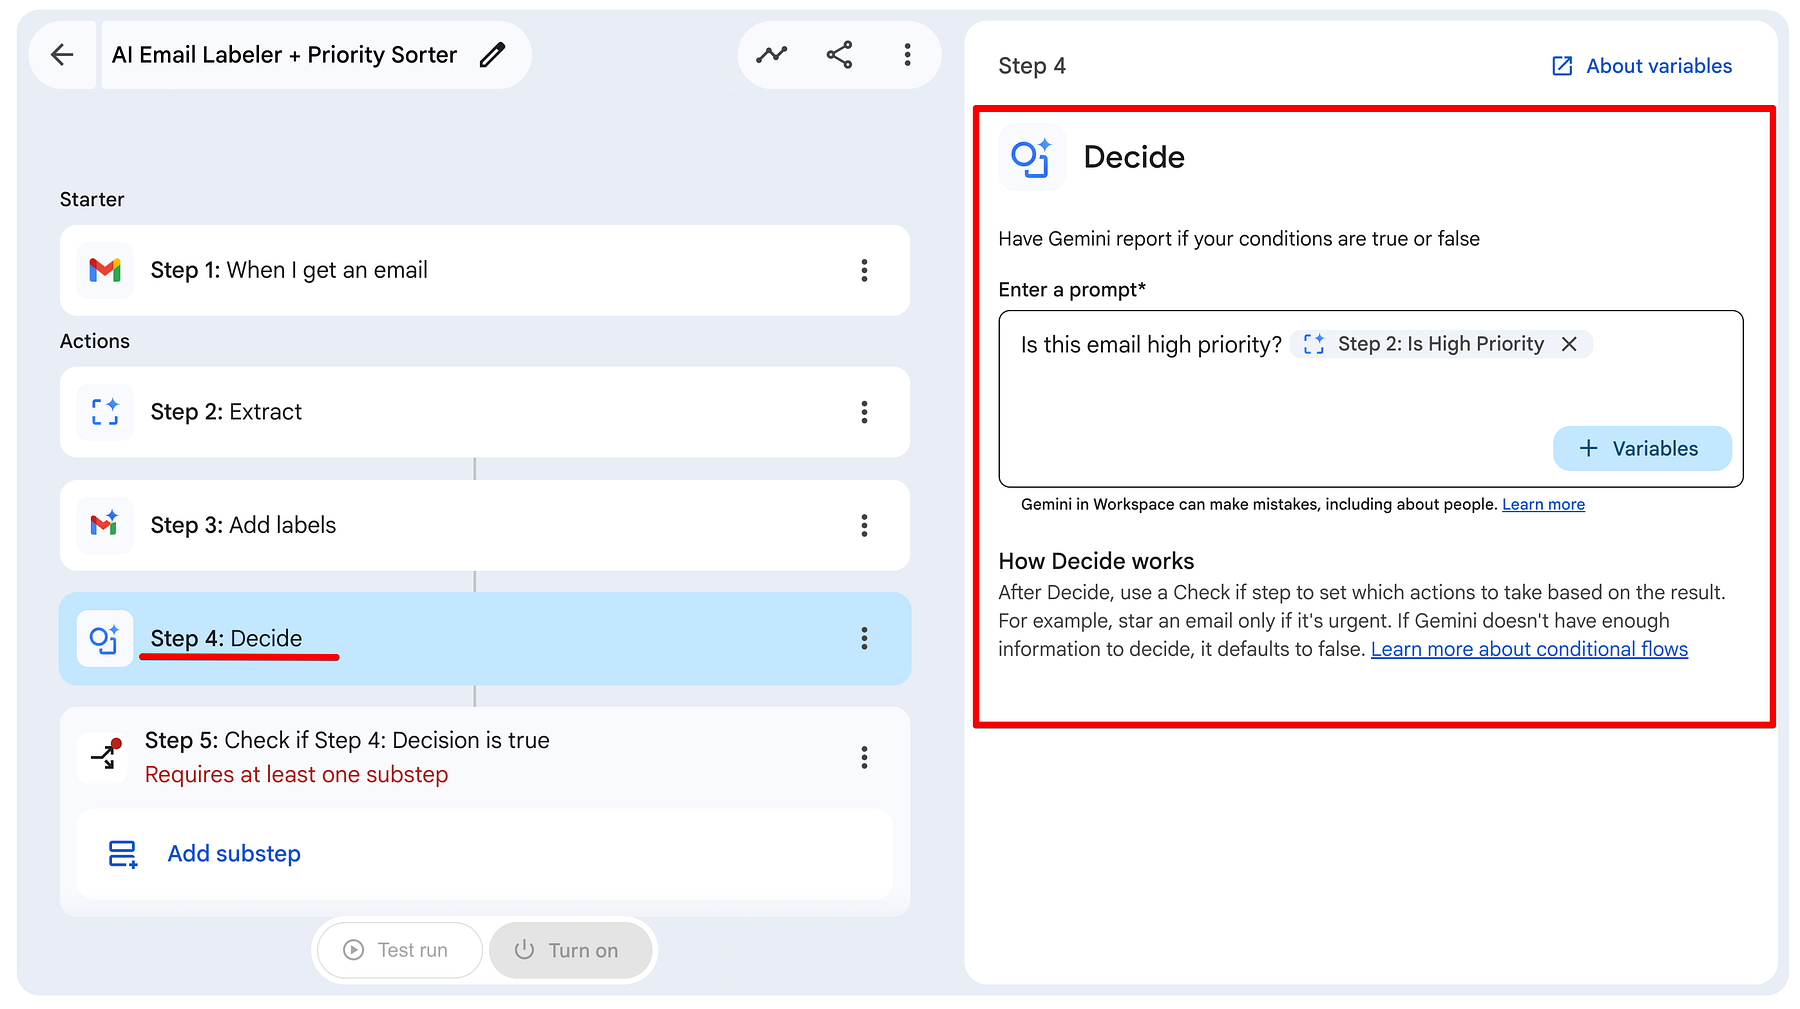
Step 4: Add the Decide Step (High Priority Check)
After classifying the email and applying the label, we need to decide whether this email is important enough to notify us in Google Chat.
This is where the Decide step comes in.
- Click + Add step → Select Decide.
- In the prompt field, paste the following: Is this email high priority?
- Click the + Variables button and insert Step 2: Is High Priority.
The full prompt should now read something like:
Step 5: Check if the Decision is True
The Decide step only makes a decision - it doesn't automatically route the flow. We need a Check if step to act on that decision.
- Click on Step 5: Check if
- Set the condition as follows:
- If → Select Step 4: Decision
- is → true
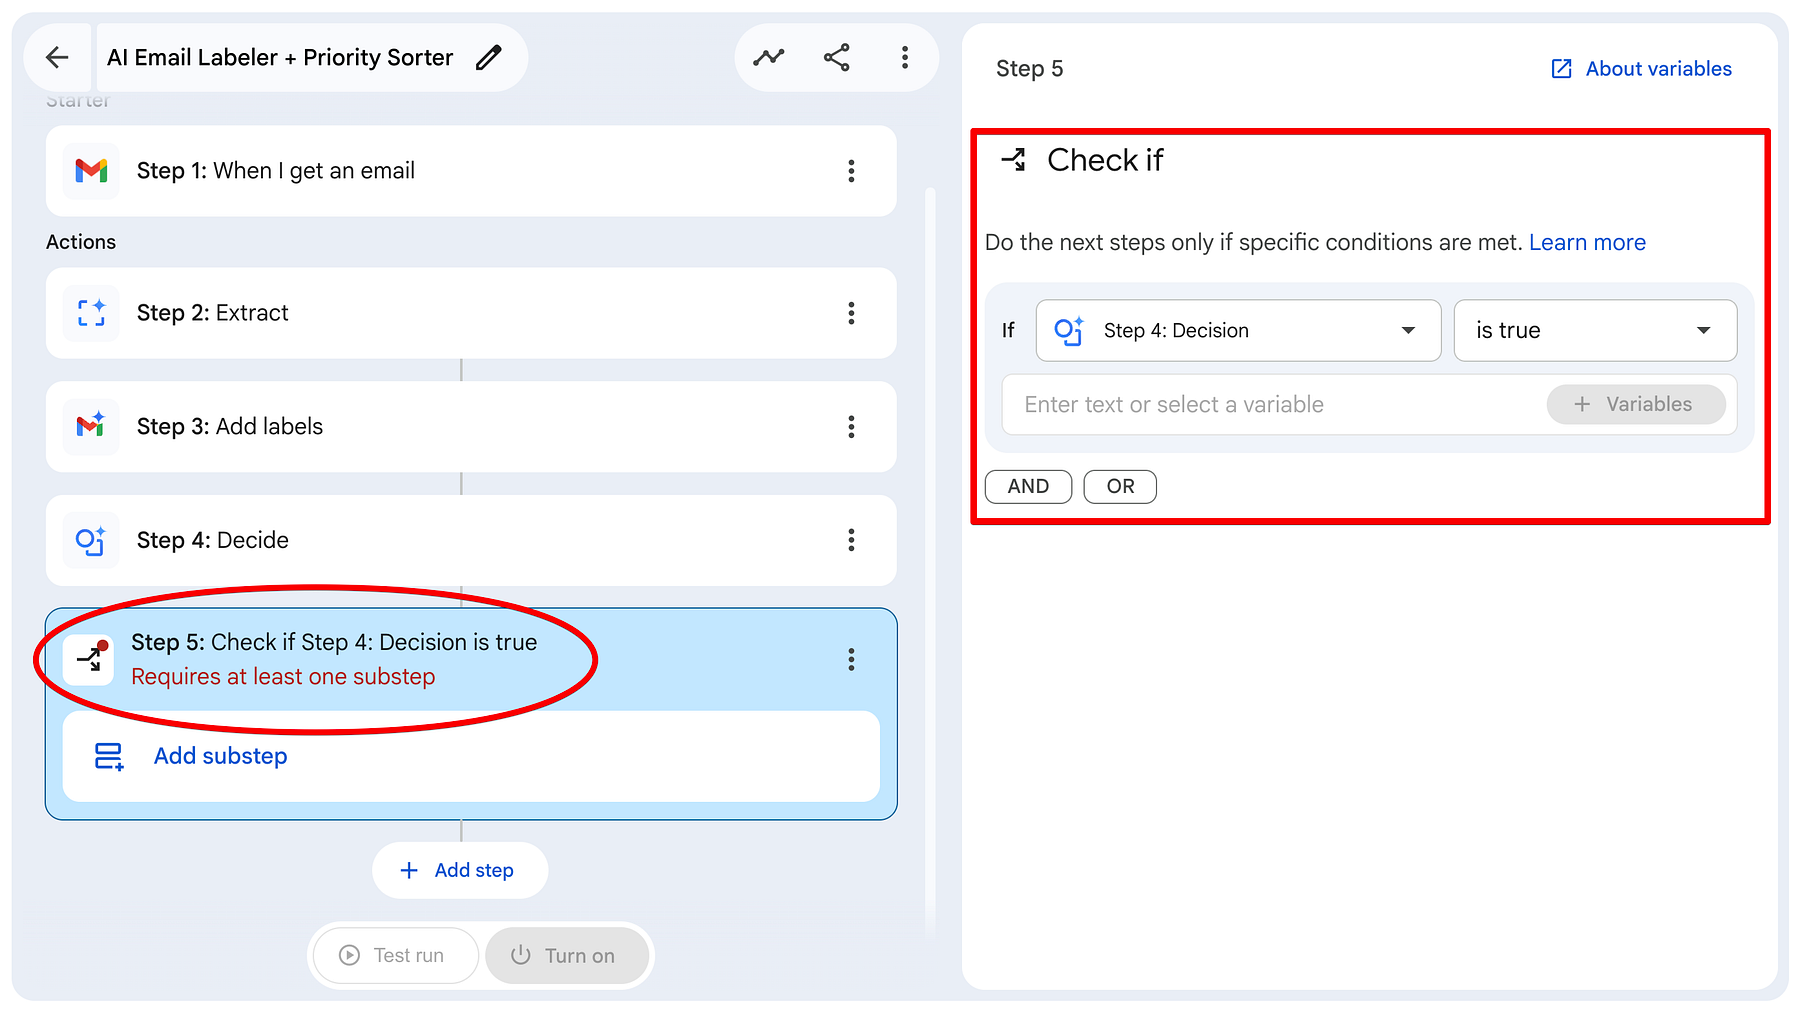
This creates two paths:
- True branch: High-priority emails (Urgent or Client) → We will send a Chat notification.
- False branch: Normal emails → No notification (they only get labeled).
This branching logic is what makes the agent smart - it only bothers you for important emails.
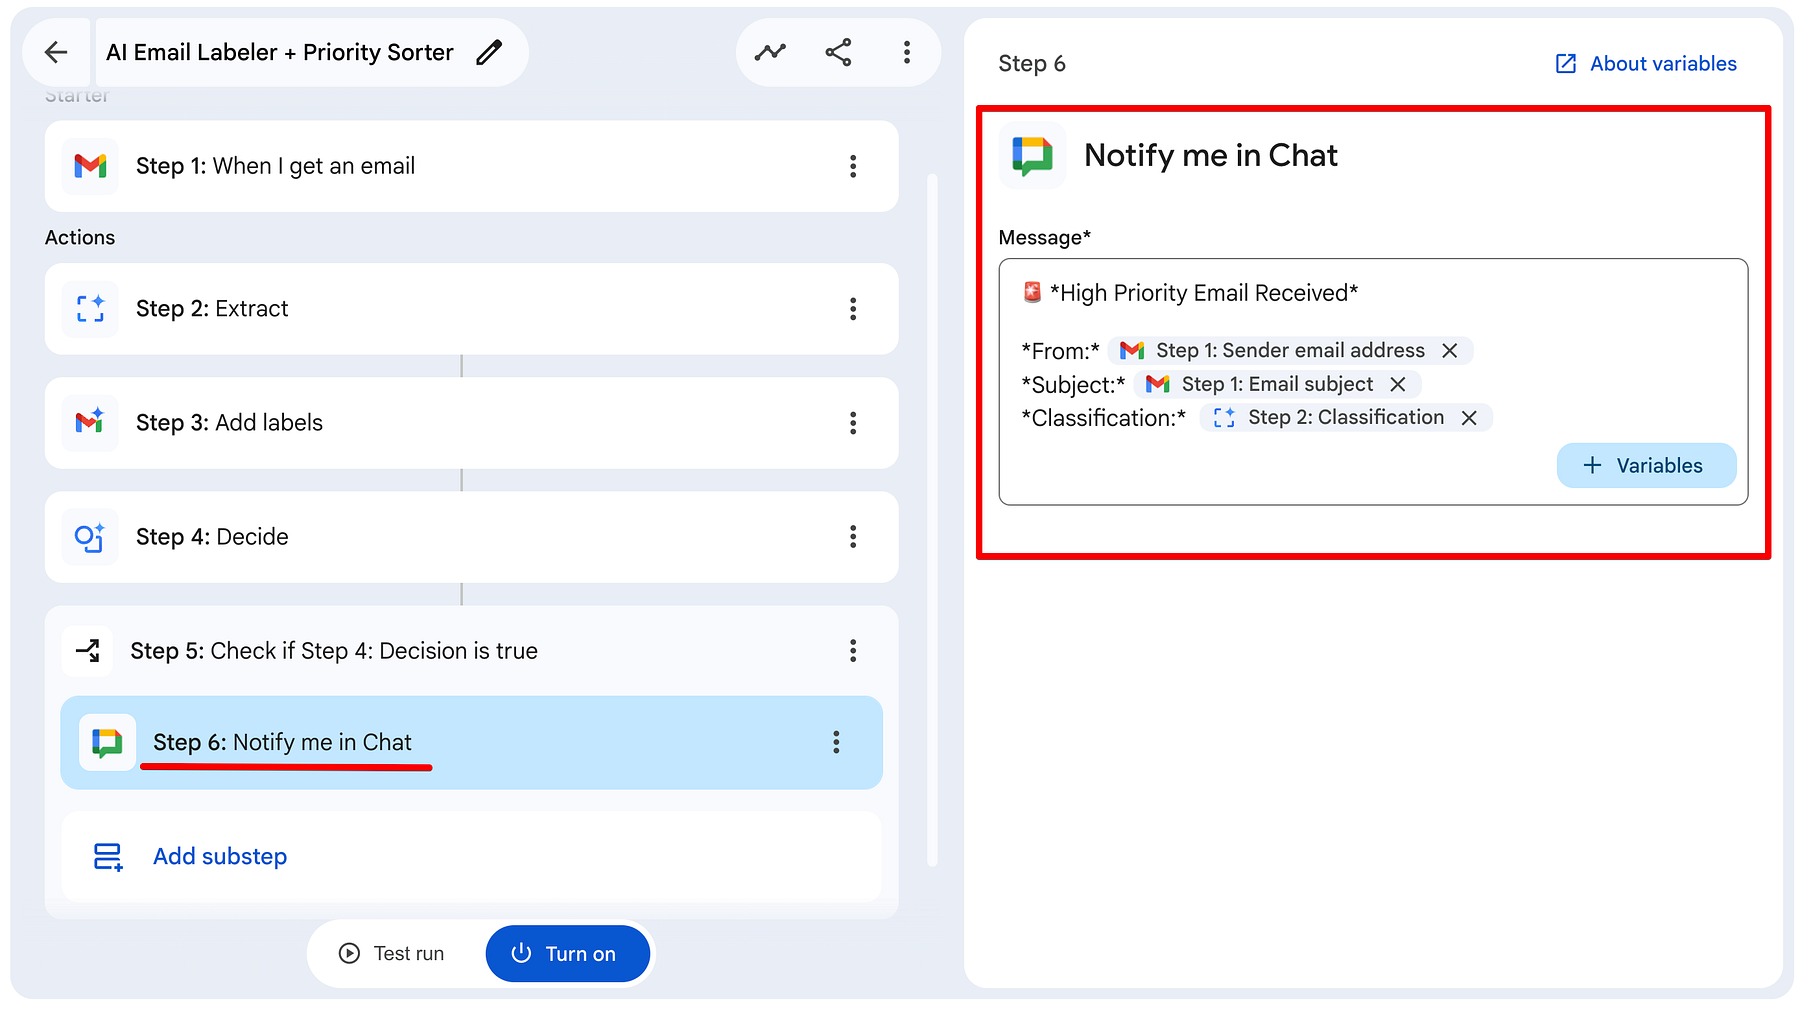
Step 6: Add Notify Me in Chat
Now we add the final action that only runs for high-priority emails.
How to Configure Step 6:
- Make sure you are on Check if step (Step 5).
- Click Add substep → Select Notify me in Chat.
- In the Message field, create a clean and useful notification using variables. You can add or remove variables as needed.
Testing and Activation
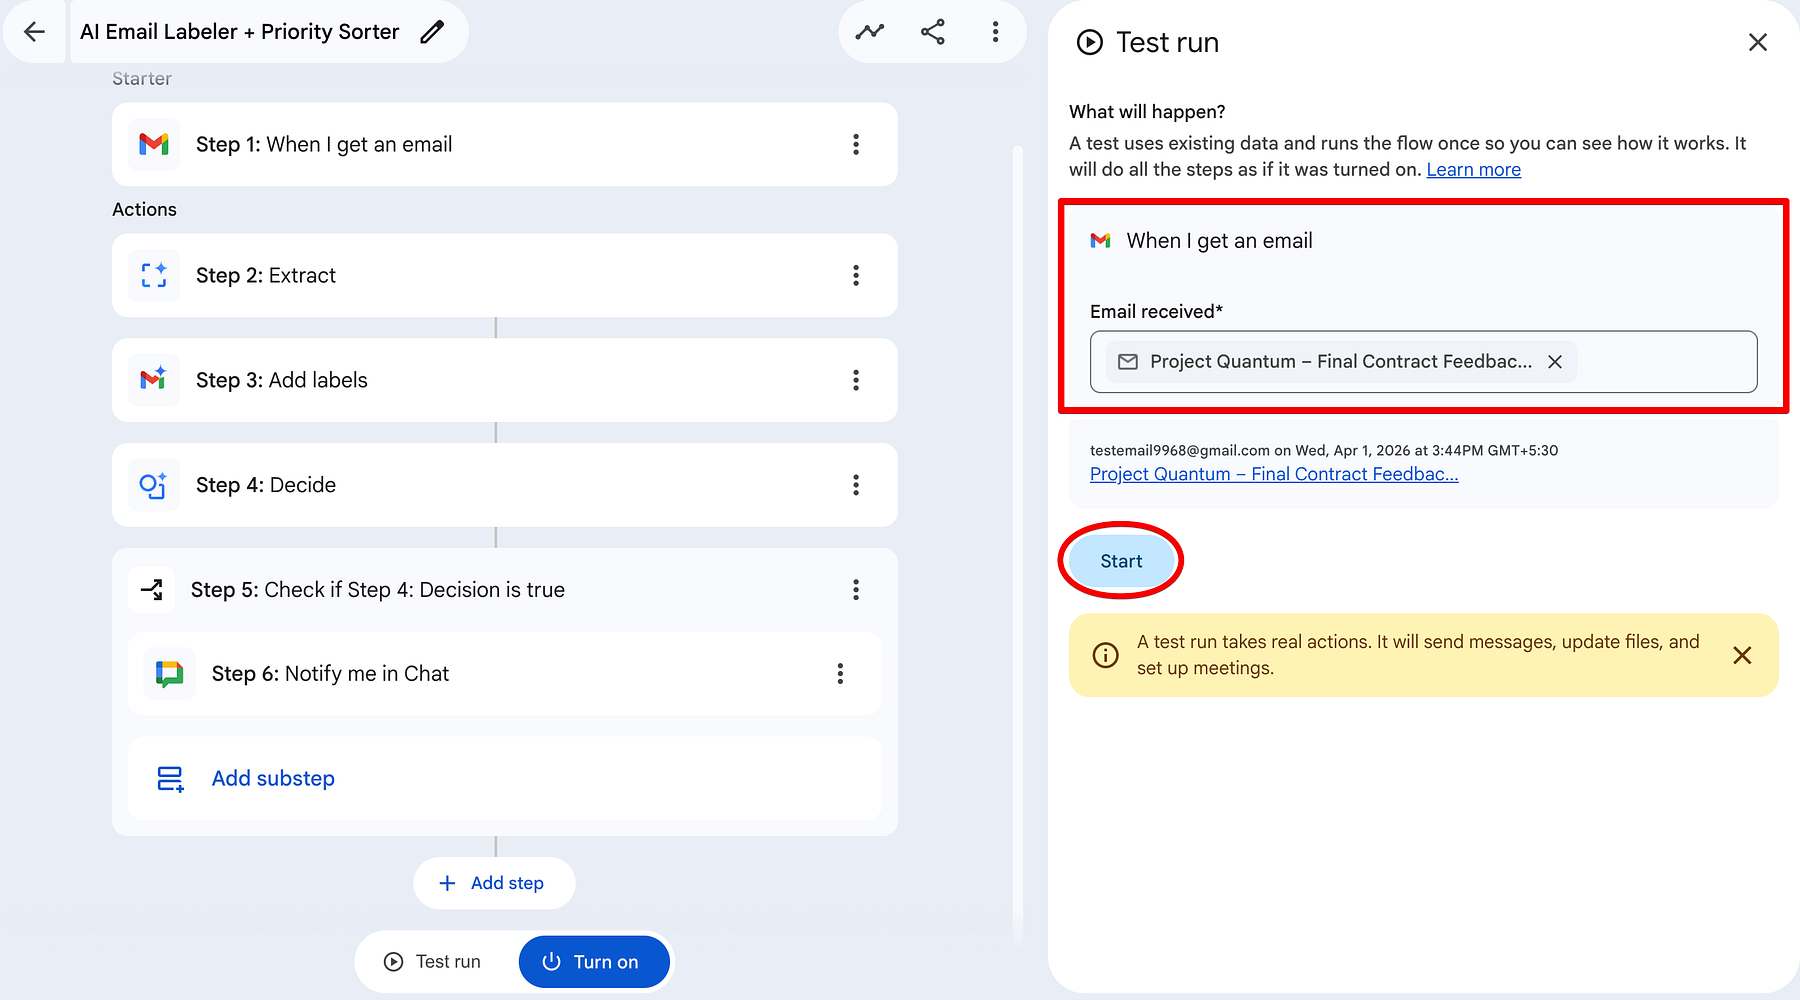
Now that the full flow is built, it's time to test it with real emails. I sent two very different emails to my inbox. I wanted to see if Gemini could distinguish between an important email and a casual request.
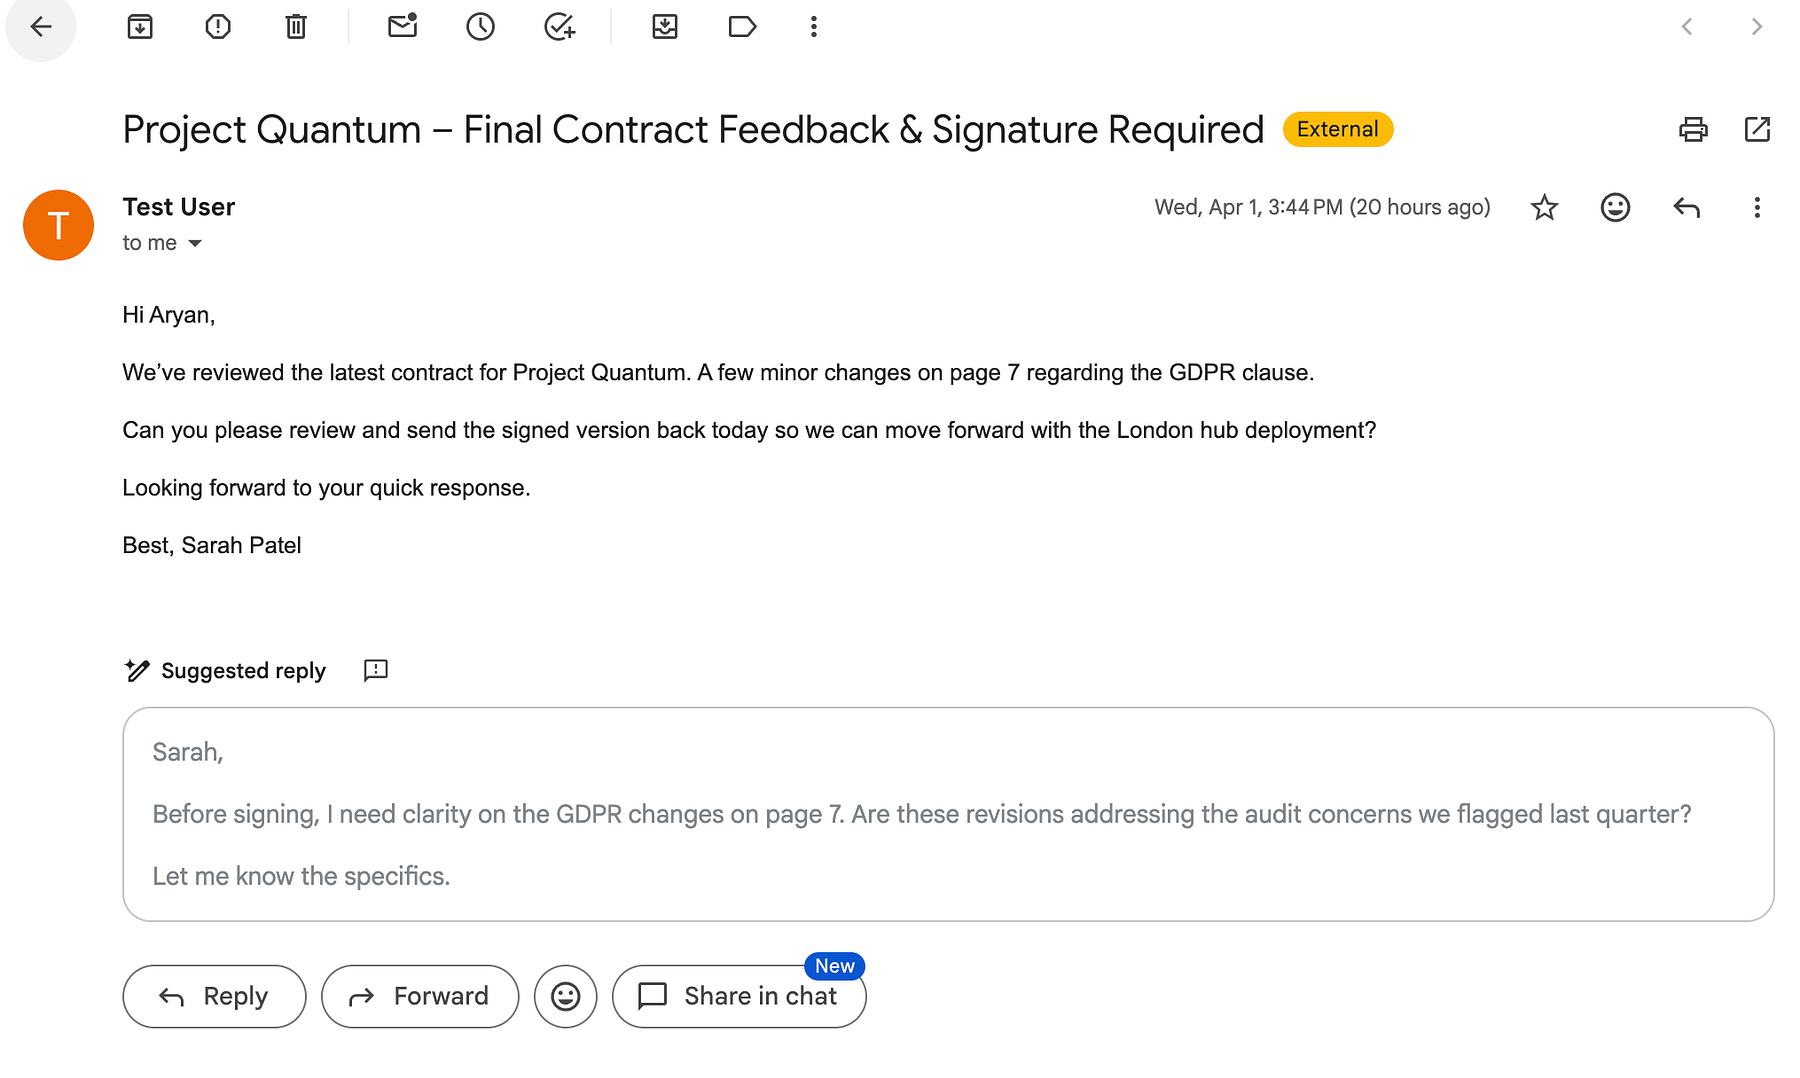
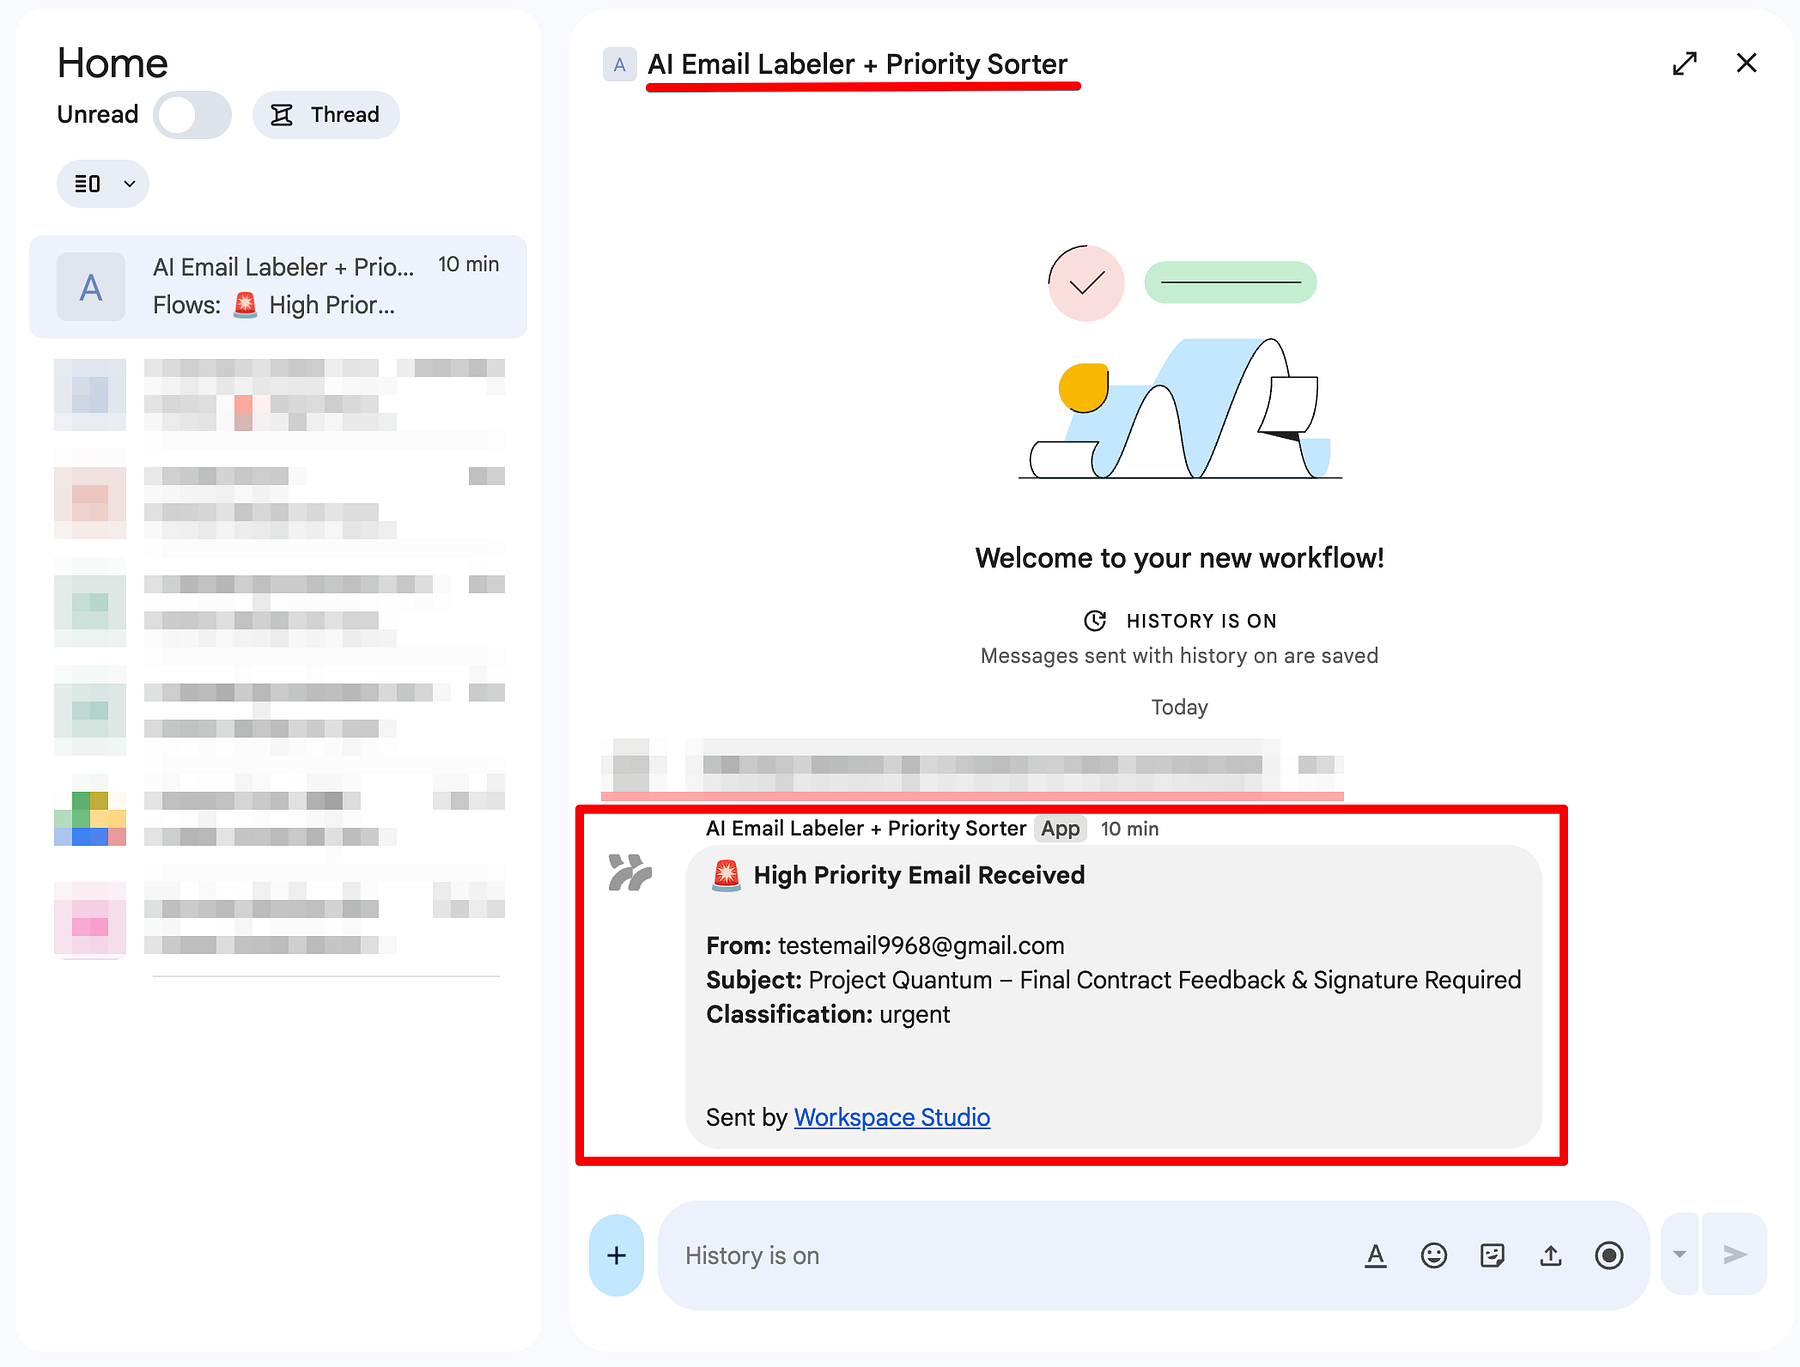
Case 1: High Priority
I sent an email regarding Project Quantum - Final Contract Feedback & Signature Required.
Back in the studio, go ahead and click on Test run and select the email you would like to work on, which in this case is the Project Quantum email. Once selected, click on Start.
- The Content: It mentioned a London hub deployment and a deadline of today.
- The Result: Gemini nailed it. In the Test Run, it identified that a signature was needed (Step 2 extraction: true) and classified it as a client request.
- The Action: Because the priority was true, the Check if logic passed. My phone immediately pinged with a Google Chat notification: 🚨 High Priority Email Received.
Case 2: The Important but Quiet (Low Priority)
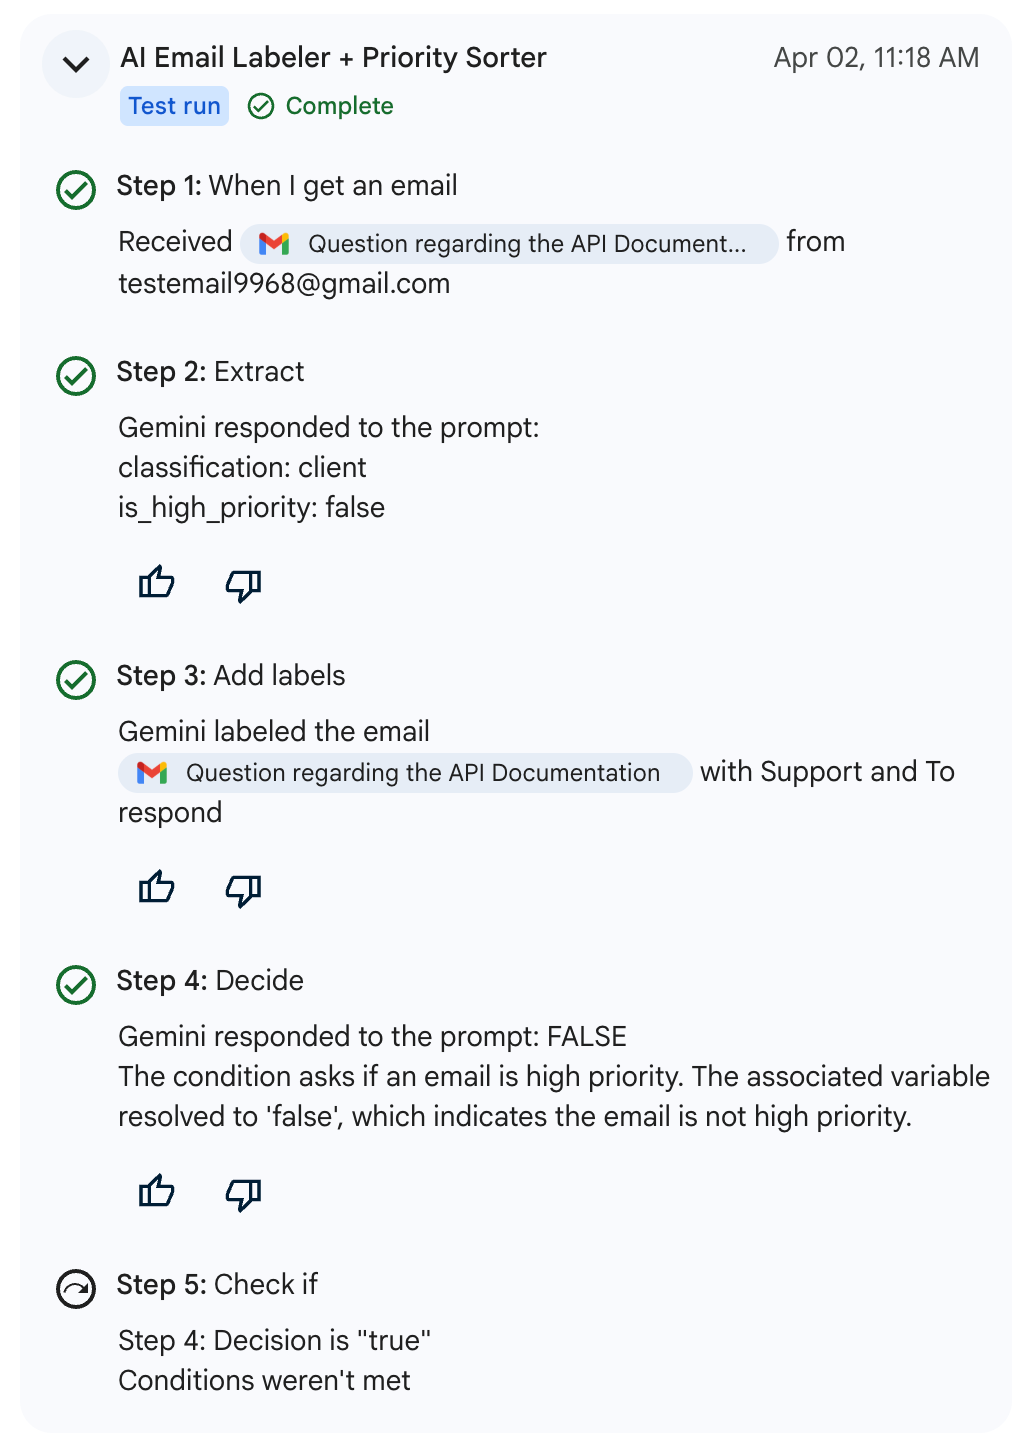
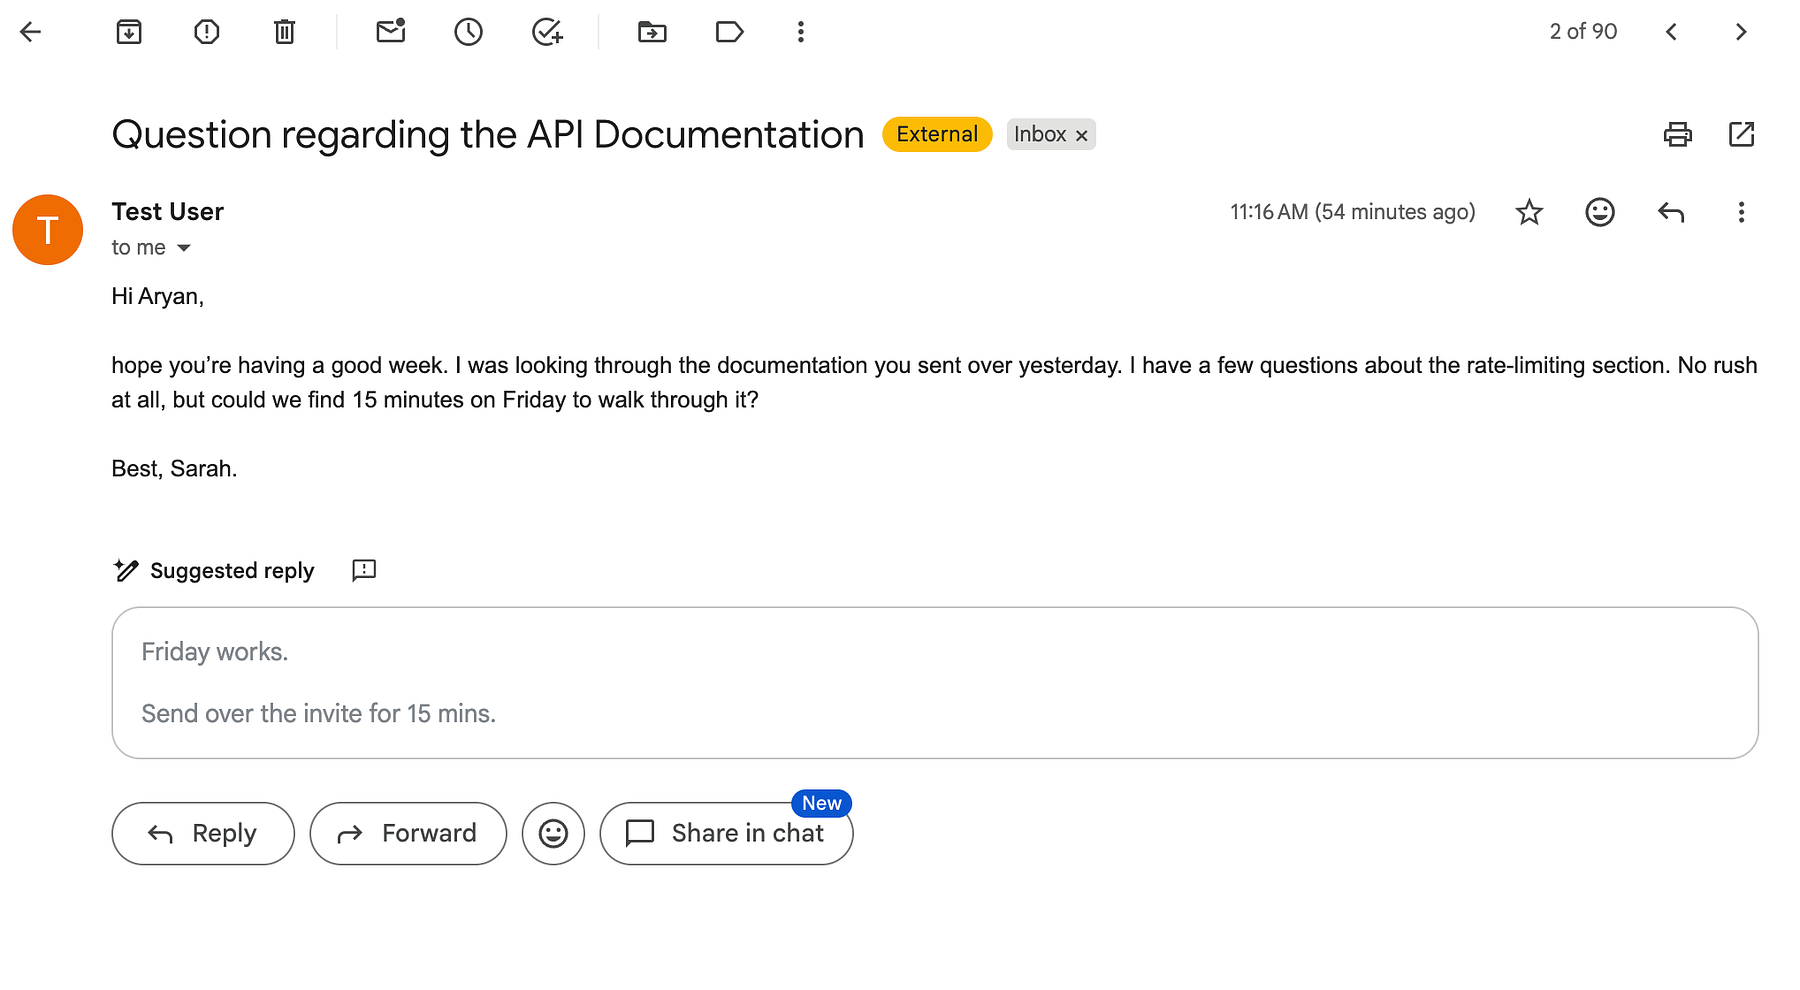
Next, I sent a follow-up: Question regarding the API Documentation.
Back in the studio, follow the same steps as we did previously to test the second email.
- The Content: Sarah had a few questions but explicitly said, No rush at all.
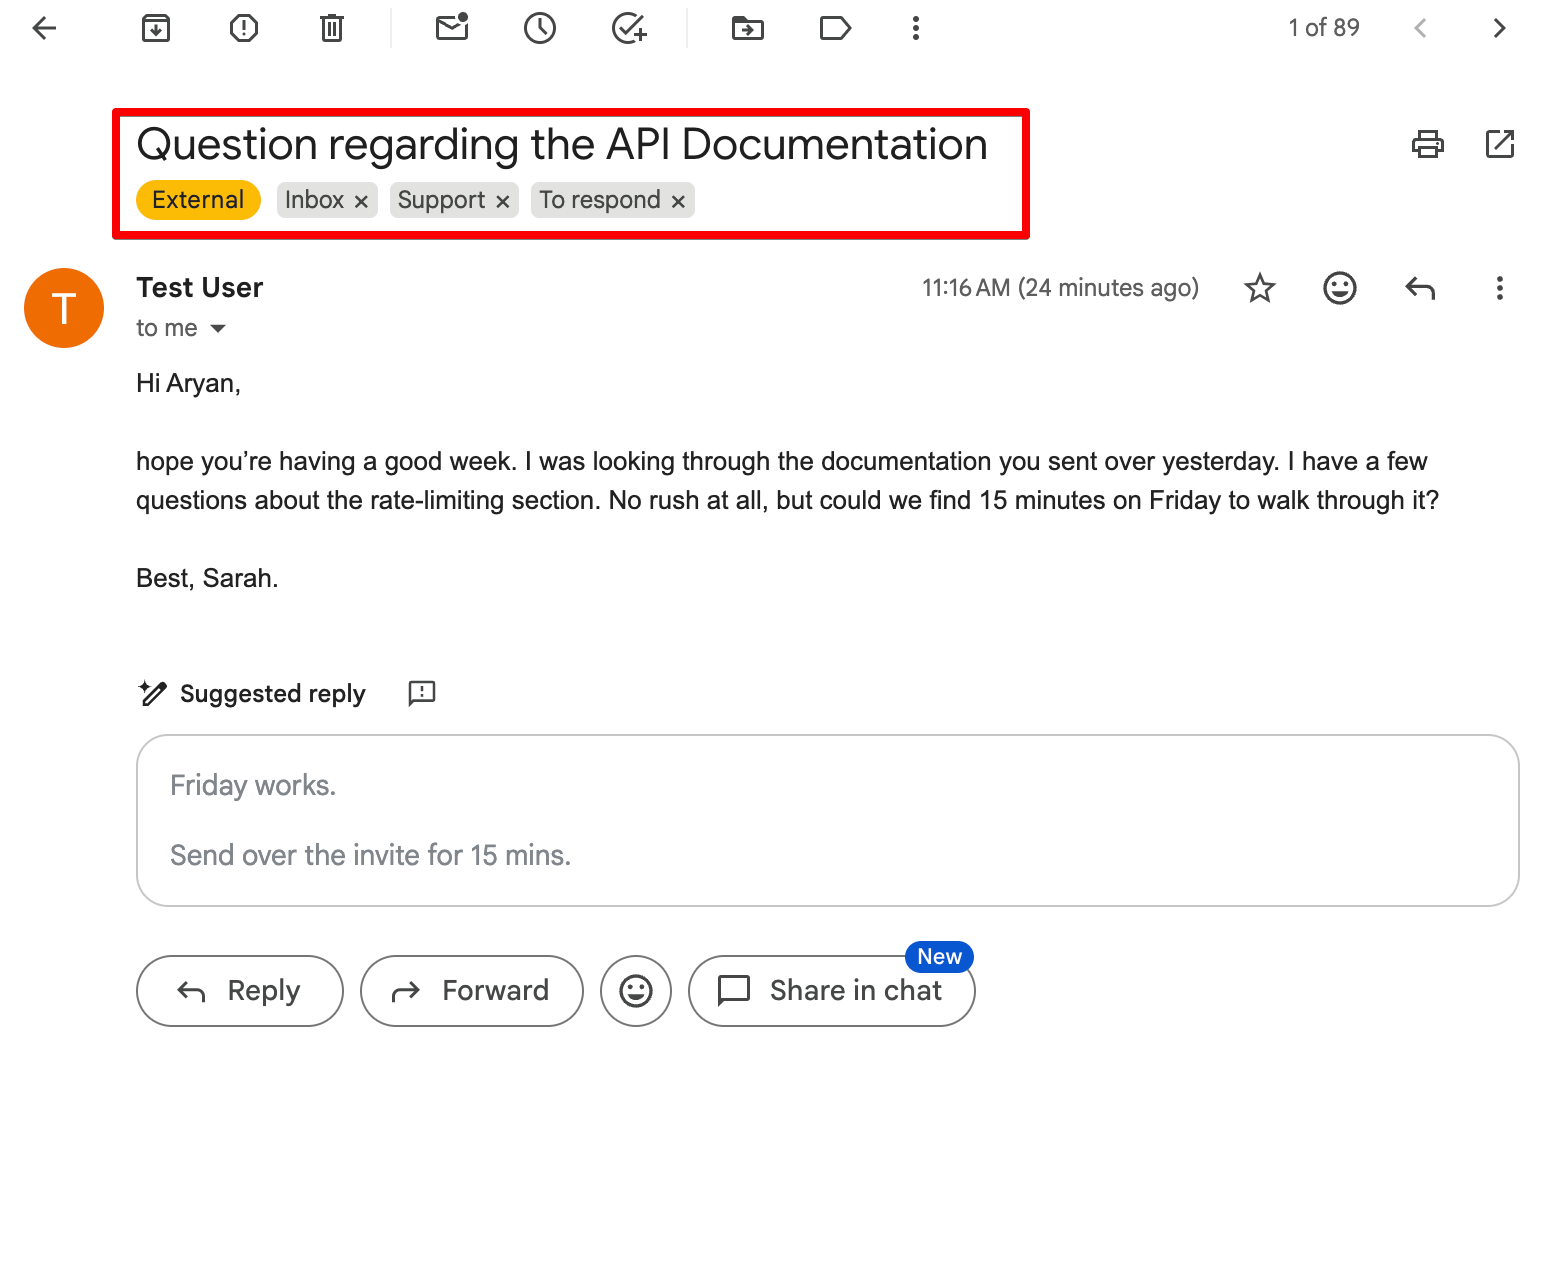
- The Result: Gemini recognized that Sarah was asking a question, so it applied the To respond and Support label in my Gmail sidebar . However, it also read the No rush sentiment and set priority to false.

- The Action: The Check if logic stopped the flow. No Chat notification. My focus remained unbroken, but the email was waiting for me in the right folder when I was ready for it.
Going Live (Turn On) Once you are happy with the test results, click the blue Turn on button. Within a few seconds, you'll see a confirmation snackbar at the bottom left:
Your flow is on and ready to work!
From this point forward, the AI agent is my primary filter. It organizes the chaos in the background and only interrupts me when the work truly demands it.
Note: The agent only acts on new emails received after it is turned on. Existing emails in your inbox will not be processed retroactively.
Conclusion
You now have a fully functional AI Email Labeler + Priority Sorter running in your Gmail.
It intelligently classifies every incoming email, applies the right label, and only notifies you when something genuinely requires your attention - giving you back hours of focus every week.
This is the real power of Google Workspace Studio: turning repetitive manual work into intelligent, automatic systems.
What's Next?
This is only the beginning of our journey with Google Workspace Studio. I have a full roadmap of content coming your way to help you master every corner of this platform:
- 🚀 More Workflows: Stay tuned as we build dedicated AI agents for HR Onboarding, Sales Lead Management, and Automated Expense Tracking.
- 🧠 Deep-Dive Tutorials: I'll be releasing specific guides on mastering Variables, optimizing your Starter triggers, and advanced Prompt Engineering to make Gemini even smarter.
- 📺 Follow the Youtube Playlist: You can catch every click-by-click build and all upcoming tutorials in my Google Workspace Studio Tutorial Series Playlist on YouTube.
Feel free to reach out if you have any issues/feedback at aryanirani123@gmail.com.
Comments
More Blog
View allgemmaFive Gemma-4 models, one accelerator: what porting E2B 31B to AWS Inferentia2 taught me
I ported the whole Gemma-4 family — E2B, E4B, 12B, 31B, and the 26B-A4B MoE — to run on...
X
xbillcommunityHey DEV, I'm Tobore. Let's actually connect.
Hey DEV, I'm Tobore. Let's actually connect. I've been on here for a while now, mostly writing and...
L
Laurina AyarahaiI burned through thousands of AI tokens. Then a friend did it for free
(yep, kinda clickbait, just for the funsies 😊) At the beginning of the year, I relaunched my...
P
Paulo HenriqueaiClaude might be saturating your machine
My laptop was sitting idle with the fan at full tilt. Nothing was running that I knew of. The culprit...
S
Sidhant PandagithubactionsAutomated GitHub Code Reviews Using Google Gemini
I Built a Thing! TL;DR — Google Gemini-based Pull Request reviews and Issue Triaging for...
D
Darren "Dazbo" LesteraiWhat is an "agentic harness," actually?
I've been hearing the word "harness" thrown around a lot lately. I assumed it just meant "the IDE" or...
T
Tilde A. ThuriumReady-made automations for this
Workflows from the Neura Market marketplace related to this DeepSeek resource
- Generate Professional Document Drafts from PDFs with Google Drive, GP-4, and Email Notificationsn8n · $9.99 · Related topic
- Automate Employee Onboarding with Slack, Jira, and Google Workspace Integrationn8n · $24.99 · Related topic
- Automate Multi-Step Onboarding with Google Sheets, Forms, and Gmail Notificationsn8n · $24.99 · Related topic
- Extract Data from Trip Receipts with GP-4.1-mini, Google Sheets & Email Notificationsn8n · $14.99 · Related topic