Back to Blog machinelearning
 ai
ai googleadk
 googleadk
 python
 python
 googleadk
Detecting and Editing Visual Objects with Gemini
Laurent Picard March 2, 2026
0 views
A few notes before we start: The complete source code for this article, including future updates,...
---
title: Detecting and Editing Visual Objects with Gemini
published: true
tags: machinelearning,gemini,imagegeneration,objectdetection
cover_image: https://storage.googleapis.com/github-repo/generative-ai/gemini/use-cases/spatial-understanding/object_detection_and_editing/cover_image.png
canonical_url: https://towardsdatascience.com/detecting-and-editing-visual-objects-with-gemini
---
---
_A few notes before we start:_
- _The complete source code for this article, including future updates, is available in [this notebook](https://github.com/GoogleCloudPlatform/generative-ai/blob/main/gemini/use-cases/spatial-understanding/object_detection_and_editing.ipynb) under the Apache 2.0 license._
- _All new images in this article were generated with Gemini Nano Banana using the explored proof-of-concept. All source images are either in the public domain or free to use (reference links are provided in the code output)._
- _You can experiment with Gemini models for free in [Google AI Studio](https://aistudio.google.com). For programmatic API access, please note that while a free tier is available for some models (i.e., you can perform object detection), image generation is a pay-as-you-go service._
---
## ✨ Overview
Traditional computer vision models are typically trained to detect a fixed set of object classes, like "person", "cat", or "car". If you want to detect something specific that wasn't in the training set, such as an "illustration" in a book photograph, you usually have to gather a dataset, label it manually, and train a custom model, which can take hours or even days.
In this exploration, we'll test a different approach using Gemini. We will leverage its spatial understanding capabilities to perform open-vocabulary object detection. This allows us to find objects based solely on a natural language description, without any training.
Once the visual objects are detected, we'll extract them and then use Gemini's image editing capabilities (specifically the Nano Banana models) to restore and creatively transform them.
---
## 🔥 Challenge
We are dealing with unstructured data: photos of books, magazines, and objects in the wild. These images present several difficulties for traditional computer vision:
- Variety: The objects we want to find (illustrations, engravings, and any visuals in general) vary wildly in style and content.
- Distortion: Pages are curved, photos are taken at angles, and lighting is uneven.
- Noise: Old books have stains, paper grain, and text bleeding through from the other side.
Our challenge is to build a robust pipeline that can detect these objects despite the distortions, extract them cleanly, and edit them to look like high-quality digital assets… all using simple text prompts.
---
## 🏁 Setup
### 🐍 Python packages
We'll use the following packages:
- `google-genai`: the [Google Gen AI Python SDK](https://pypi.org/project/google-genai) lets us call Gemini with a few lines of code
- `pillow` for image management
- `matplotlib` for result visualization
We'll also use these packages (dependencies of `google-genai`):
- `pydantic` for data management
- `tenacity` for request management
```python
pip install --quiet "google-genai>=1.64.0" "pillow>=11.3.0" "matplotlib>=3.10.0"
```
---
### 🔗 Gemini API
To use the Gemini API, we have two main options:
1. Via **Vertex AI** with a Google Cloud project
2. Via **Google AI Studio** with a Gemini API key
{% details The Google Gen AI SDK provides a unified interface to these APIs, and we can use environment variables for the configuration. 🔽 %}
**🛠️ Option 1 - Gemini API via Vertex AI**
Requirements:
- A Google Cloud project
- The Vertex AI API must be enabled for this project: ▶️ [Enable the Vertex AI API](https://console.cloud.google.com/flows/enableapi?apiid=aiplatform.googleapis.com,storage-component.googleapis.com)
Gen AI SDK environment variables:
- `GOOGLE_GENAI_USE_VERTEXAI="True"`
- `GOOGLE_CLOUD_PROJECT="<PROJECT_ID>"`
- `GOOGLE_CLOUD_LOCATION="<LOCATION>"`
> 💡 For preview models, the location must be set to `global`. For generally available models, we can choose the closest location among the [Google model endpoint locations](https://cloud.google.com/vertex-ai/generative-ai/docs/learn/locations#google_model_endpoint_locations).
> ℹ️ Learn more about [setting up a project and a development environment](https://cloud.google.com/vertex-ai/docs/start/cloud-environment).
**🛠️ Option 2 - Gemini API via Google AI Studio**
Requirement:
- A Gemini API key
Gen AI SDK environment variables:
- `GOOGLE_GENAI_USE_VERTEXAI="False"`
- `GOOGLE_API_KEY="<API_KEY>"`
> ℹ️ Learn more about [getting a Gemini API key from Google AI Studio](https://aistudio.google.com/app/apikey).
💡 You can store your environment configuration outside of the source code:
| Environment | Method |
| ------------------- | ----------------------------------------------------------- |
| IDE | `.env` file (or equivalent) |
| Colab | Colab Secrets (🗝️ icon in left panel, see code below) |
| Colab Enterprise | Google Cloud project and location are automatically defined |
| Vertex AI Workbench | Google Cloud project and location are automatically defined |
{% enddetails %}
{% details Define the following environment detection functions. You can also define your configuration manually if needed. 🔽 %}
```python
# @title {display-mode: "form"}
import os
import sys
from collections.abc import Callable
from google import genai
# Manual setup (leave unchanged if setup is environment-defined)
# @markdown **Which API: Vertex AI or Google AI Studio?**
GOOGLE_GENAI_USE_VERTEXAI = True # @param {type: "boolean"}
# @markdown **Option A - Google Cloud project [+location]**
GOOGLE_CLOUD_PROJECT = "" # @param {type: "string"}
GOOGLE_CLOUD_LOCATION = "global" # @param {type: "string"}
# @markdown **Option B - Google AI Studio API key**
GOOGLE_API_KEY = "" # @param {type: "string"}
def check_environment() -> bool:
check_colab_user_authentication()
return check_manual_setup() or check_vertex_ai() or check_colab() or check_local()
def check_manual_setup() -> bool:
return check_define_env_vars(
GOOGLE_GENAI_USE_VERTEXAI,
GOOGLE_CLOUD_PROJECT.strip(), # Might have been pasted with line return
GOOGLE_CLOUD_LOCATION,
GOOGLE_API_KEY,
)
def check_vertex_ai() -> bool:
# Workbench and Colab Enterprise
match os.getenv("VERTEX_PRODUCT", ""):
case "WORKBENCH_INSTANCE":
pass
case "COLAB_ENTERPRISE":
if not running_in_colab_env():
return False
case _:
return False
return check_define_env_vars(
True,
os.getenv("GOOGLE_CLOUD_PROJECT", ""),
os.getenv("GOOGLE_CLOUD_REGION", ""),
"",
)
def check_colab() -> bool:
if not running_in_colab_env():
return False
# Colab Enterprise was checked before, so this is Colab only
from google.colab import auth as colab_auth # type: ignore
colab_auth.authenticate_user()
# Use Colab Secrets (🗝️ icon in left panel) to store the environment variables
# Secrets are private, visible only to you and the notebooks that you select
# - Vertex AI: Store your settings as secrets
# - Google AI: Directly import your Gemini API key from the UI
vertexai, project, location, api_key = get_vars(get_colab_secret)
return check_define_env_vars(vertexai, project, location, api_key)
def check_local() -> bool:
vertexai, project, location, api_key = get_vars(os.getenv)
return check_define_env_vars(vertexai, project, location, api_key)
def running_in_colab_env() -> bool:
# Colab or Colab Enterprise
return "google.colab" in sys.modules
def check_colab_user_authentication() -> None:
if running_in_colab_env():
from google.colab import auth as colab_auth # type: ignore
colab_auth.authenticate_user()
def get_colab_secret(secret_name: str, default: str) -> str:
from google.colab import errors, userdata # type: ignore
try:
return userdata.get(secret_name)
except errors.SecretNotFoundError:
return default
def disable_colab_cell_scrollbar() -> None:
if running_in_colab_env():
from google.colab import output # type: ignore
output.no_vertical_scroll()
def get_vars(getenv: Callable[[str, str], str]) -> tuple[bool, str, str, str]:
# Limit getenv calls to the minimum (may trigger UI confirmation for secret access)
vertexai_str = getenv("GOOGLE_GENAI_USE_VERTEXAI", "")
if vertexai_str:
vertexai = vertexai_str.lower() in ["true", "1"]
else:
vertexai = bool(getenv("GOOGLE_CLOUD_PROJECT", ""))
project = getenv("GOOGLE_CLOUD_PROJECT", "") if vertexai else ""
location = getenv("GOOGLE_CLOUD_LOCATION", "") if project else ""
api_key = getenv("GOOGLE_API_KEY", "") if not project else ""
return vertexai, project, location, api_key
def check_define_env_vars(
vertexai: bool,
project: str,
location: str,
api_key: str,
) -> bool:
match (vertexai, bool(project), bool(location), bool(api_key)):
case (True, True, _, _):
# Vertex AI - Google Cloud project [+location]
location = location or "global"
define_env_vars(vertexai, project, location, "")
case (True, False, _, True):
# Vertex AI - API key
define_env_vars(vertexai, "", "", api_key)
case (False, _, _, True):
# Google AI Studio - API key
define_env_vars(vertexai, "", "", api_key)
case _:
return False
return True
def define_env_vars(vertexai: bool, project: str, location: str, api_key: str) -> None:
os.environ["GOOGLE_GENAI_USE_VERTEXAI"] = str(vertexai)
os.environ["GOOGLE_CLOUD_PROJECT"] = project
os.environ["GOOGLE_CLOUD_LOCATION"] = location
os.environ["GOOGLE_API_KEY"] = api_key
def check_configuration(client: genai.Client) -> None:
service = "Vertex AI" if client.vertexai else "Google AI Studio"
print(f"✅ Using the {service} API", end="")
if client._api_client.project:
print(f' with project "{client._api_client.project[:7]}…"', end="")
print(f' in location "{client._api_client.location}"')
elif client._api_client.api_key:
api_key = client._api_client.api_key
print(f' with API key "{api_key[:5]}…{api_key[-5:]}"', end="")
print(f" (in case of error, make sure it was created for {service})")
print("✅ Environment functions defined")
```
{% enddetails %}
---
### 🤖 Gen AI SDK
To send Gemini requests, create a `google.genai` client:
```python
from google import genai
check_environment()
client = genai.Client()
check_configuration(client)
```
---
### 🖼️ Image test suite
{% details Let's define a list of images for our tests: 🔽 %}
```python
from dataclasses import dataclass
from enum import StrEnum
Url = str
class Source(StrEnum):
incunable = "https://tile.loc.gov/image-services/iiif/service:rbc:rbc0001:2014:2014rosen0487:0165/full/pct:25/0/default.jpg"
engravings = "https://tile.loc.gov/image-services/iiif/service:gdc:gdcscd:00:34:07:66:92:1:00340766921:0121/full/pct:50/0/default.jpg"
museum_guidebook = "https://tile.loc.gov/image-services/iiif/service:rbc:rbc0001:2014:2014gen34181:0033/full/pct:75/0/default.jpg"
denver_illustrated = "https://tile.loc.gov/image-services/iiif/service:gdc:gdclccn:rc:01:00:04:94:rc01000494:0051/full/pct:50/0/default.jpg"
physics_textbook = "https://tile.loc.gov/image-services/iiif/service:gdc:gdcscd:00:03:64:87:31:8:00036487318:0103/full/pct:50/0/default.jpg"
portrait_miniatures = "https://tile.loc.gov/image-services/iiif/service:rbc:rbc0001:2024:2024rosen013592v02:0249/full/pct:50/0/default.jpg"
wizard_of_oz_drawings = "https://tile.loc.gov/image-services/iiif/service:rbc:rbc0001:2006:2006gen32405:0048/full/pct:25/0/default.jpg"
paintings = "https://images.unsplash.com/photo-1714146681164-f26fed839692?h=1440"
alice_drawing = "https://images.unsplash.com/photo-1630595011903-689853b04ee2?h=800"
book = "https://images.unsplash.com/photo-1643451533573-ee364ba6e330?h=800"
manual = "https://images.unsplash.com/photo-1623666936367-a100f62ba9b7?h=800"
electronics = "https://images.unsplash.com/photo-1757397584789-8b2c5bfcdbc3?h=1440"
@dataclass
class SourceMetadata:
title: str
webpage_url: Url
credit_line: str
LOC = "Library of Congress"
LOC_RARE_BOOKS = "Library of Congress, Rare Book and Special Collections Division"
LOC_MEETING_FRONTIERS = "Library of Congress, Meeting of Frontiers"
metadata_by_source: dict[Source, SourceMetadata] = {
Source.incunable: SourceMetadata(
"Vergaderinge der historien van Troy (1485)",
"https://www.loc.gov/resource/rbc0001.2014rosen0487/?sp=165",
LOC_RARE_BOOKS,
),
Source.engravings: SourceMetadata(
"Harper's illustrated catalogue (1847)",
"https://www.loc.gov/resource/gdcscd.00340766921/?sp=121",
LOC,
),
Source.museum_guidebook: SourceMetadata(
"Barnum's American Museum illustrated (1850)",
"https://www.loc.gov/resource/rbc0001.2014gen34181/?sp=33",
LOC_RARE_BOOKS,
),
Source.denver_illustrated: SourceMetadata(
"Denver illustrated (1893)",
"https://www.loc.gov/resource/gdclccn.rc01000494/?sp=51",
LOC_MEETING_FRONTIERS,
),
Source.physics_textbook: SourceMetadata(
"Lessons in physics (1916)",
"https://www.loc.gov/resource/gdcscd.00036487318/?sp=103",
LOC,
),
Source.portrait_miniatures: SourceMetadata(
"The history of portrait miniatures (1904)",
"https://www.loc.gov/resource/rbc0001.2024rosen013592v02/?sp=249",
LOC_RARE_BOOKS,
),
Source.wizard_of_oz_drawings: SourceMetadata(
"The wonderful Wizard of Oz (1899)",
"https://www.loc.gov/resource/rbc0001.2006gen32405/?sp=48",
LOC_RARE_BOOKS,
),
Source.paintings: SourceMetadata(
"Open book showing paintings by Vincent van Gogh",
"https://unsplash.com/photos/9hD7qrxICag",
"Photo by Trung Manh cong on Unsplash",
),
Source.alice_drawing: SourceMetadata(
"Open book showing an illustration and text from Alice's Adventures in Wonderland",
"https://unsplash.com/photos/bewzr_Q9u2o",
"Photo by Brett Jordan on Unsplash",
),
Source.book: SourceMetadata(
"Open book showing two botanical illustrations",
"https://unsplash.com/photos/4IDqcNj827I",
"Photo by Ranurte on Unsplash",
),
Source.manual: SourceMetadata(
"Open user manual for vintage camera",
"https://unsplash.com/photos/aaFU96eYASk",
"Photo by Annie Spratt on Unsplash",
),
Source.electronics: SourceMetadata(
"Circuit board with electronic components",
"https://unsplash.com/photos/Aqa1pHQ57pw",
"Photo by Albert Stoynov on Unsplash",
),
}
print("✅ Test images defined")
```
{% enddetails %}
---
### 🧠 Gemini models
Gemini comes in different [versions](https://cloud.google.com/vertex-ai/generative-ai/docs/learn/models#gemini-models). We can currently use the following models:
- For object detection: Gemini 2.5 or Gemini 3, each available in Flash or Pro versions.
- For object editing: Gemini 2.5 Flash Image, Gemini 3 Pro Image, or Gemini 3.1 Flash Image (also known as Nano Banana 🍌, Nano Banana Pro 🍌, and Nano Banana 2 🍌).
---
### 🛠️ Helpers
{% details Now, let's add core helper classes and functions: 🔽 %}
```python
from enum import auto
from pathlib import Path
from typing import Any, cast
import IPython.display
import matplotlib.pyplot as plt
import pydantic
import tenacity
from google.genai.errors import ClientError
from google.genai.types import (
FinishReason,
GenerateContentConfig,
GenerateContentResponse,
PIL_Image,
ThinkingConfig,
ThinkingLevel,
)
# Multimodal models with spatial understanding and structured outputs
class MultimodalModel(StrEnum):
# Generally Available (GA)
GEMINI_2_5_FLASH = "gemini-2.5-flash"
GEMINI_2_5_PRO = "gemini-2.5-pro"
# Preview
GEMINI_3_FLASH_PREVIEW = "gemini-3-flash-preview"
GEMINI_3_1_PRO_PREVIEW = "gemini-3.1-pro-preview"
# Default model used for object detection
DEFAULT = GEMINI_3_FLASH_PREVIEW
# Image generation and editing models (Nano Banana 🍌 models)
class ImageModel(StrEnum):
# Generally Available (GA)
GEMINI_2_5_FLASH_IMAGE = "gemini-2.5-flash-image" # Nano Banana
# Preview
GEMINI_3_PRO_IMAGE_PREVIEW = "gemini-3-pro-image-preview" # Nano Banana Pro
GEMINI_3_1_FLASH_IMAGE_PREVIEW = "gemini-3.1-flash-image-preview" # Nano Banana 2
# Default model used for image editing
DEFAULT = GEMINI_2_5_FLASH_IMAGE
Model = MultimodalModel | ImageModel
def generate_content(
contents: list[Any],
model: Model,
config: GenerateContentConfig | None,
should_display_response_info: bool = False,
) -> GenerateContentResponse | None:
response = None
client = check_client_for_model(model)
for attempt in get_retrier():
with attempt:
response = client.models.generate_content(
model=model.value,
contents=contents,
config=config,
)
if should_display_response_info:
display_response_info(response, config)
return response
def check_client_for_model(model: Model) -> genai.Client:
if (
model.value.endswith("-preview")
and client.vertexai
and client._api_client.location != "global"
):
# Preview models are only available on the "global" location
return genai.Client(location="global")
return client
def display_response_info(
response: GenerateContentResponse | None,
config: GenerateContentConfig | None,
) -> None:
if response is None:
print("❌ No response")
return
if usage_metadata := response.usage_metadata:
if usage_metadata.prompt_token_count:
print(f"Input tokens : {usage_metadata.prompt_token_count:9,d}")
if usage_metadata.candidates_token_count:
print(f"Output tokens : {usage_metadata.candidates_token_count:9,d}")
if usage_metadata.thoughts_token_count:
print(f"Thoughts tokens: {usage_metadata.thoughts_token_count:9,d}")
if (
config is not None
and config.response_mime_type == "application/json"
and response.parsed is None
):
print("❌ Could not parse the JSON response")
return
if not response.candidates:
print("❌ No `response.candidates`")
return
if (finish_reason := response.candidates[0].finish_reason) != FinishReason.STOP:
print(f"❌ {finish_reason = }")
if not response.text:
print("❌ No `response.text`")
return
def generate_image(
sources: list[PIL_Image],
prompt: str,
model: ImageModel,
config: GenerateContentConfig | None = None,
) -> PIL_Image | None:
contents = [*sources, prompt.strip()]
response = generate_content(contents, model, config)
return check_get_output_image_from_response(response)
def check_get_output_image_from_response(
response: GenerateContentResponse | None,
) -> PIL_Image | None:
if response is None:
print("❌ No `response`")
return None
if not response.candidates:
print("❌ No `response.candidates`")
if response.prompt_feedback:
if block_reason := response.prompt_feedback.block_reason:
print(f"{block_reason = :s}")
if block_reason_message := response.prompt_feedback.block_reason_message:
print(f"{block_reason_message = }")
return None
if not (content := response.candidates[0].content):
print("❌ No `response.candidates[0].content`")
return None
if not (parts := content.parts):
print("❌ No `response.candidates[0].content.parts`")
return None
output_image: PIL_Image | None = None
for part in parts:
if part.text:
display_markdown(part.text)
continue
sdk_image = part.as_image()
assert sdk_image is not None
output_image = sdk_image._pil_image
assert output_image is not None
break # There should be a single image
return output_image
def get_thinking_config(model: Model) -> ThinkingConfig | None:
match model:
case MultimodalModel.GEMINI_2_5_FLASH:
return ThinkingConfig(thinking_budget=0)
case MultimodalModel.GEMINI_2_5_PRO:
return ThinkingConfig(thinking_budget=128, include_thoughts=False)
case MultimodalModel.GEMINI_3_FLASH_PREVIEW:
return ThinkingConfig(thinking_level=ThinkingLevel.MINIMAL)
case MultimodalModel.GEMINI_3_1_PRO_PREVIEW:
return ThinkingConfig(thinking_level=ThinkingLevel.LOW)
case _:
return None # Default
def display_markdown(markdown: str) -> None:
IPython.display.display(IPython.display.Markdown(markdown))
def display_image(image: PIL_Image) -> None:
IPython.display.display(image)
def get_retrier() -> tenacity.Retrying:
return tenacity.Retrying(
stop=tenacity.stop_after_attempt(7),
wait=tenacity.wait_incrementing(start=10, increment=1),
retry=should_retry_request,
reraise=True,
)
def should_retry_request(retry_state: tenacity.RetryCallState) -> bool:
if not retry_state.outcome:
return False
err = retry_state.outcome.exception()
if not isinstance(err, ClientError):
return False
print(f"❌ ClientError {err.code}: {err.message}")
retry = False
match err.code:
case 400 if err.message is not None and " try again " in err.message:
# Workshop: first time access to Cloud Storage (service agent provisioning)
retry = True
case 429:
# Workshop: temporary project with 1 QPM quota
retry = True
print(f"🔄 Retry: {retry}")
return retry
print("✅ Helpers defined")
```
{% enddetails %}
---
## 🔍 Detecting visual objects
To perform visual object detection, craft the prompt to indicate what you'd like to detect and how results should be returned. In the same request, it's possible to also extract additional information about each detected object. This can be virtually anything, from labels such as "furniture", "table", or "chair", to more precise classifications like "mammals" or "reptiles", or to contextual data such as captions, colors, shapes, etc.
For the next tests, we'll experiment with detecting illustrations within book photos. Here's a possible prompt:
```python
OBJECT_DETECTION_PROMPT = """
Detect every illustration within the book photo and extract the following data for each:
- `box_2d`: Bounding box coordinates of the illustration only (ignoring any caption).
- `caption`: Verbatim caption or legend such as "Figure 1". Use "" if not found.
- `label`: Single-word label describing the illustration. Use "" if not found.
"""
```
Notes:
- Bounding boxes are very useful for locating or extracting the detected objects.
- Typically, for Gemini models, a `box_2d` bounding box represents coordinates normalized to a `(0, 0, 1000, 1000)` space for a `(0, 0, width, height)` input image.
- We're also requesting to extract captions (metadata often present in reference books) and labels (dynamic metadata).
To automate response processing, it's convenient to define a Pydantic class that matches the prompt, such as:
```python
class DetectedObject(pydantic.BaseModel):
box_2d: list[int]
caption: str
label: str
DetectedObjects = list[DetectedObject]
```
Then, request a structured output with config fields `response_mime_type` and `response_schema`:
```python
config = GenerateContentConfig(
# …,
response_mime_type="application/json",
response_schema=DetectedObjects,
# …,
)
```
This will generate a JSON response which the SDK can parse automatically, letting us directly use object instances:
```python
detected_objects = cast(DetectedObjects, response.parsed)
```
{% details Let's add a few object-detection-specific classes and functions: 🔽 %}
```python
import io
import urllib.request
from collections.abc import Iterator
from dataclasses import field
from datetime import datetime
import PIL.Image
from google.genai.types import Part, PartMediaResolutionLevel
from PIL.PngImagePlugin import PngInfo
OBJECT_DETECTION_PROMPT = """
Detect every illustration within the book photo and extract the following data for each:
- `box_2d`: Bounding box coordinates of the illustration only (ignoring any caption).
- `caption`: Verbatim caption or legend such as "Figure 1". Use "" if not found.
- `label`: Single-word label describing the illustration. Use "" if not found.
"""
# Margin added to detected/cropped objects, giving more context for a better understanding of spatial distortions
CROP_MARGIN_PX = 10
# Set to True to save each generated image
SAVE_GENERATED_IMAGES = False
OUTPUT_IMAGES_PATH = Path("./object_detection_and_editing")
# Matching class for structured output generation
class DetectedObject(pydantic.BaseModel):
box_2d: list[int]
caption: str
label: str
# Misc data classes
InputImage = Path | Url
DetectedObjects = list[DetectedObject]
WorkflowStepImages = list[PIL_Image]
class WorkflowStep(StrEnum):
SOURCE = auto()
CROPPED = auto()
RESTORED = auto()
COLORIZED = auto()
CINEMATIZED = auto()
@dataclass
class VisualObjectWorkflow:
source_image: PIL_Image
detected_objects: DetectedObjects
images_by_step: dict[WorkflowStep, WorkflowStepImages] = field(default_factory=dict)
def __post_init__(self) -> None:
denormalize_bounding_boxes(self)
workflow_by_image: dict[InputImage, VisualObjectWorkflow] = {}
def denormalize_bounding_boxes(self: VisualObjectWorkflow) -> None:
"""Convert the box_2d coordinates.
- Before: [y1, x1, y2, x2] normalized to 0-1000, as returned by Gemini
- After: [x1, y1, x2, y2] in source_image coordinates, as used in Pillow
"""
def to_image_coord(coord: int, dim: int) -> int:
return int(coord * dim / 1000 + 0.5)
w, h = self.source_image.size
for obj in self.detected_objects:
y1, x1, y2, x2 = obj.box_2d
x1, x2 = to_image_coord(x1, w), to_image_coord(x2, w)
y1, y2 = to_image_coord(y1, h), to_image_coord(y2, h)
obj.box_2d = [x1, y1, x2, y2]
def detect_objects(
image: InputImage,
prompt: str = OBJECT_DETECTION_PROMPT,
model: MultimodalModel = MultimodalModel.DEFAULT,
config: GenerateContentConfig | None = None,
media_resolution: PartMediaResolutionLevel | None = None,
display_results: bool = True,
) -> None:
display_image_source_info(image)
pil_image, content_part = get_pil_image_and_part(image, model, media_resolution)
prompt = prompt.strip()
contents = [content_part, prompt]
config = config or get_object_detection_config(model)
response = generate_content(contents, model, config)
if response is not None and response.parsed is not None:
detected_objects = cast(DetectedObjects, response.parsed)
else:
detected_objects = DetectedObjects()
workflow = VisualObjectWorkflow(pil_image, detected_objects)
workflow_by_image[image] = workflow
add_cropped_objects(workflow, image, prompt)
if display_results:
display_detected_objects(workflow)
def get_pil_image_and_part(
image: InputImage,
model: MultimodalModel,
media_resolution: PartMediaResolutionLevel | None,
) -> tuple[PIL_Image, Part]:
if isinstance(image, Path):
image_bytes = image.read_bytes()
else:
headers = {"User-Agent": "Mozilla/5.0"}
req = urllib.request.Request(image, headers=headers)
with urllib.request.urlopen(req, timeout=10) as response:
image_bytes = response.read()
pil_image = PIL.Image.open(io.BytesIO(image_bytes))
mime_type = f"image/{pil_image.format.lower()}" if pil_image.format else "image/*"
content_part = Part.from_bytes(
data=image_bytes,
mime_type=mime_type,
media_resolution=media_resolution,
)
return pil_image, content_part
def get_object_detection_config(model: Model) -> GenerateContentConfig:
# Low randomness for more determinism
return GenerateContentConfig(
temperature=0.0,
top_p=0.0,
seed=42,
response_mime_type="application/json",
response_schema=DetectedObjects,
thinking_config=get_thinking_config(model),
)
def add_cropped_objects(
workflow: VisualObjectWorkflow,
input: InputImage,
prompt: str,
crop_margin: int = CROP_MARGIN_PX,
) -> None:
cropped_images: list[PIL_Image] = []
obj_count = len(workflow.detected_objects)
for obj_order, obj in enumerate(workflow.detected_objects, 1):
cropped_image, _ = extract_object_image(workflow.source_image, obj, crop_margin)
cropped_images.append(cropped_image)
save_workflow_image(
WorkflowStep.SOURCE,
WorkflowStep.CROPPED,
input,
obj_order,
obj_count,
cropped_image,
dict(prompt=prompt, crop_margin=str(crop_margin)),
)
workflow.images_by_step[WorkflowStep.CROPPED] = cropped_images
def extract_object_image(
image: PIL_Image,
obj: DetectedObject,
margin: int = 0,
) -> tuple[PIL_Image, tuple[int, int, int, int]]:
def clamp(coord: int, dim: int) -> int:
return min(max(coord, 0), dim)
x1, y1, x2, y2 = obj.box_2d
w, h = image.size
if margin != 0:
x1, x2 = clamp(x1 - margin, w), clamp(x2 + margin, w)
y1, y2 = clamp(y1 - margin, h), clamp(y2 + margin, h)
box = (x1, y1, x2, y2)
object_image = image.crop(box)
return object_image, box
def save_workflow_image(
source_step: WorkflowStep,
target_step: WorkflowStep,
input_image: InputImage,
obj_order: int,
obj_count: int,
target_image: PIL_Image | None,
image_info: dict[str, str] | None = None,
) -> None:
if not SAVE_GENERATED_IMAGES or target_image is None:
return
OUTPUT_IMAGES_PATH.mkdir(parents=True, exist_ok=True)
time_str = datetime.now().strftime("%Y-%m-%d_%H-%M-%S")
try:
filename = f"{Source(input_image).name}_"
except ValueError:
filename = ""
filename += f"{obj_order}o{obj_count}_{source_step}_{target_step}_{time_str}.png"
image_path = OUTPUT_IMAGES_PATH.joinpath(filename)
params = {}
if image_info:
png_info = PngInfo()
for k, v in image_info.items():
png_info.add_text(k, v)
params.update(pnginfo=png_info)
target_image.save(image_path, **params)
# Matplotlib
FIGURE_FG_COLOR = "#F1F3F4"
FIGURE_BG_COLOR = "#202124"
EDGE_COLOR = "#80868B"
rcParams = {
"figure.dpi": 300,
"text.color": FIGURE_FG_COLOR,
"figure.facecolor": FIGURE_BG_COLOR,
"figure.edgecolor": FIGURE_FG_COLOR,
"axes.titlecolor": FIGURE_FG_COLOR,
"axes.edgecolor": EDGE_COLOR,
"xtick.color": FIGURE_FG_COLOR,
"ytick.color": FIGURE_FG_COLOR,
"xtick.bottom": False,
"xtick.top": False,
"ytick.left": False,
"ytick.right": False,
"xtick.labelbottom": False,
"ytick.labelleft": False,
}
plt.rcParams.update(rcParams)
def display_image_source_info(image: InputImage) -> None:
def get_image_info_md() -> str:
if image not in Source:
return f"[[Source Image]({image})]"
source = Source(image)
metadata = metadata_by_source.get(source)
if not metadata:
return f"[[Source Image]({source.value})]"
parts = [
f"[Source Image]({source.value})",
f"[Source Page]({metadata.webpage_url})",
metadata.title,
metadata.credit_line,
]
separator = "•"
inner_info = f" {separator} ".join(parts)
return f"{separator} {inner_info} {separator}"
def yield_md_rows() -> Iterator[str]:
horizontal_line = "---"
image_info = get_image_info_md()
yield horizontal_line
yield f"_{image_info}_"
yield horizontal_line
display_markdown(f"{chr(10)}{chr(10)}".join(yield_md_rows()))
def display_detected_objects(workflow: VisualObjectWorkflow) -> None:
source_image = workflow.source_image
detected_objects = PIL.Image.new("RGB", source_image.size, "white")
for obj in workflow.detected_objects:
obj_image, box = extract_object_image(source_image, obj)
detected_objects.paste(obj_image, (box[0], box[1]))
_, (ax1, ax2) = plt.subplots(1, 2, layout="compressed")
ax1.imshow(source_image)
ax2.imshow(detected_objects)
disable_colab_cell_scrollbar()
plt.show()
print("✅ Object detection helpers defined")
```
{% enddetails %}
---
🧪 Let's start simple: can we detect the single illustration in this incunable from 1485?
```python
detect_objects(Source.incunable)
```
> _• [Source Image](https://tile.loc.gov/image-services/iiif/service:rbc:rbc0001:2014:2014rosen0487:0165/full/pct:25/0/default.jpg) • [Source Page](https://www.loc.gov/resource/rbc0001.2014rosen0487/?sp=165) • Vergaderinge der historien van Troy (1485) • Library of Congress, Rare Book and Special Collections Division •_

> 💡 This works nicely. The bounding box is very precise, enclosing the hand-colored woodcut illustration very tightly.
---
🧪 Now, let's check the detection of the multiple visuals in this museum guidebook:
```python
detect_objects(Source.museum_guidebook)
```
> _• [Source Image](https://tile.loc.gov/image-services/iiif/service:rbc:rbc0001:2014:2014gen34181:0033/full/pct:75/0/default.jpg) • [Source Page](https://www.loc.gov/resource/rbc0001.2014gen34181/?sp=33) • Barnum's American Museum illustrated (1850) • Library of Congress, Rare Book and Special Collections Division •_
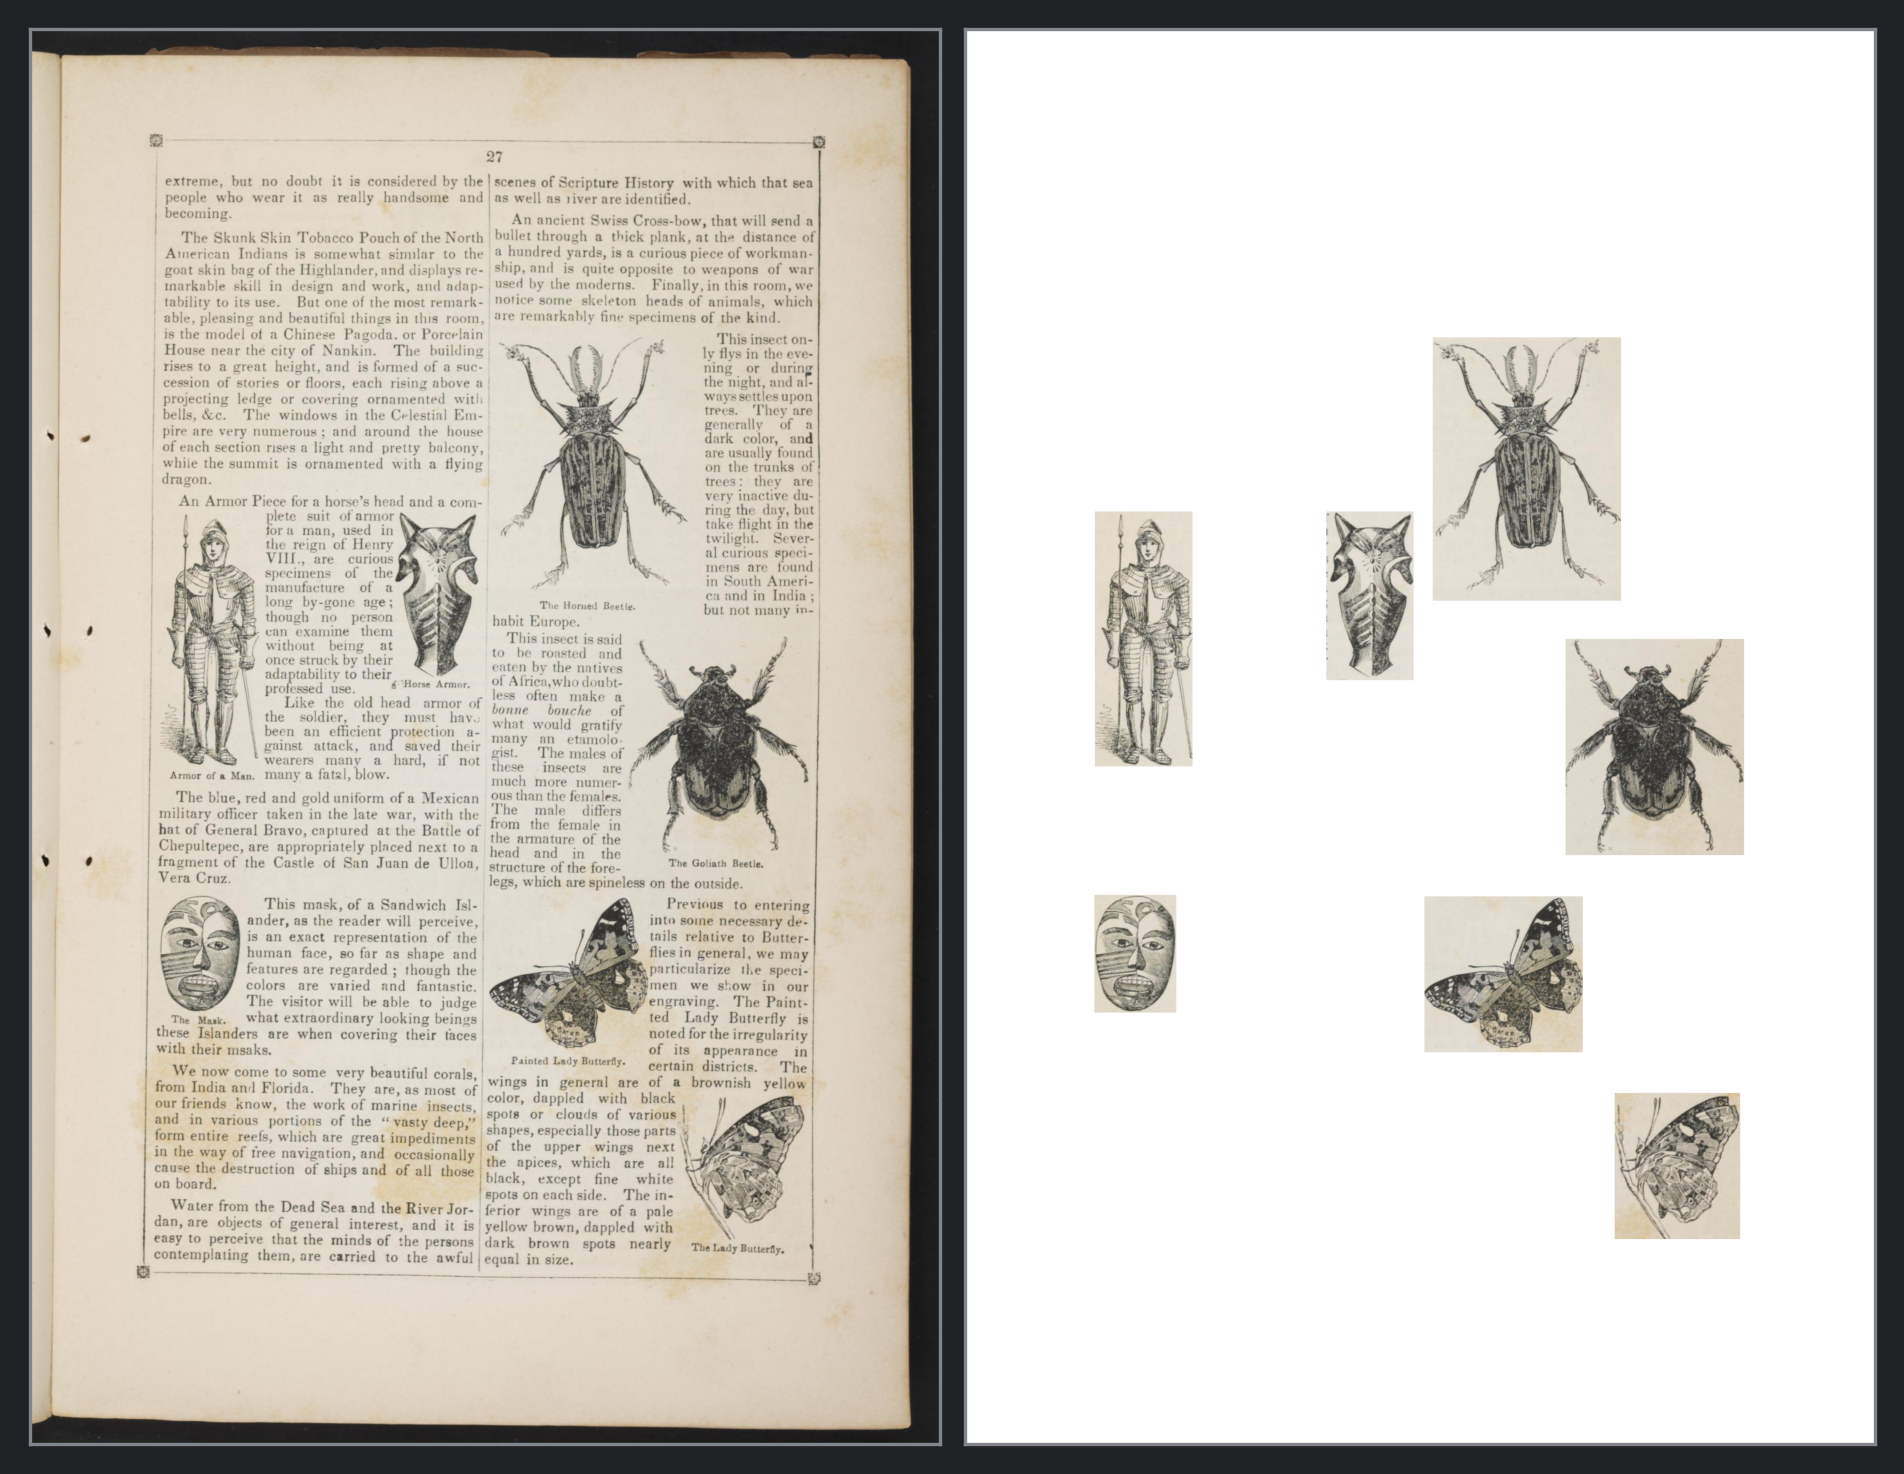
> 💡 Remarks:
>
> - The bounding boxes are again very precise.
> - The results are perfect: there are no false positives and no false negatives.
> - The captions below the visuals are not enclosed within the bounding boxes, which was specifically requested. The bounding box granularity can be controlled by changing the prompt.
---
🧪 What about slightly warped visuals?
```python
detect_objects(Source.paintings)
```
> _• [Source Image](https://images.unsplash.com/photo-1714146681164-f26fed839692?h=1440) • [Source Page](https://unsplash.com/photos/9hD7qrxICag) • Open book showing paintings by Vincent van Gogh • Photo by Trung Manh cong on Unsplash •_

> 💡 This doesn't make a difference. Notice how the bottom-right painting is partially covered by the orange bookmark. We'll try to fix that in the restoration step.
---
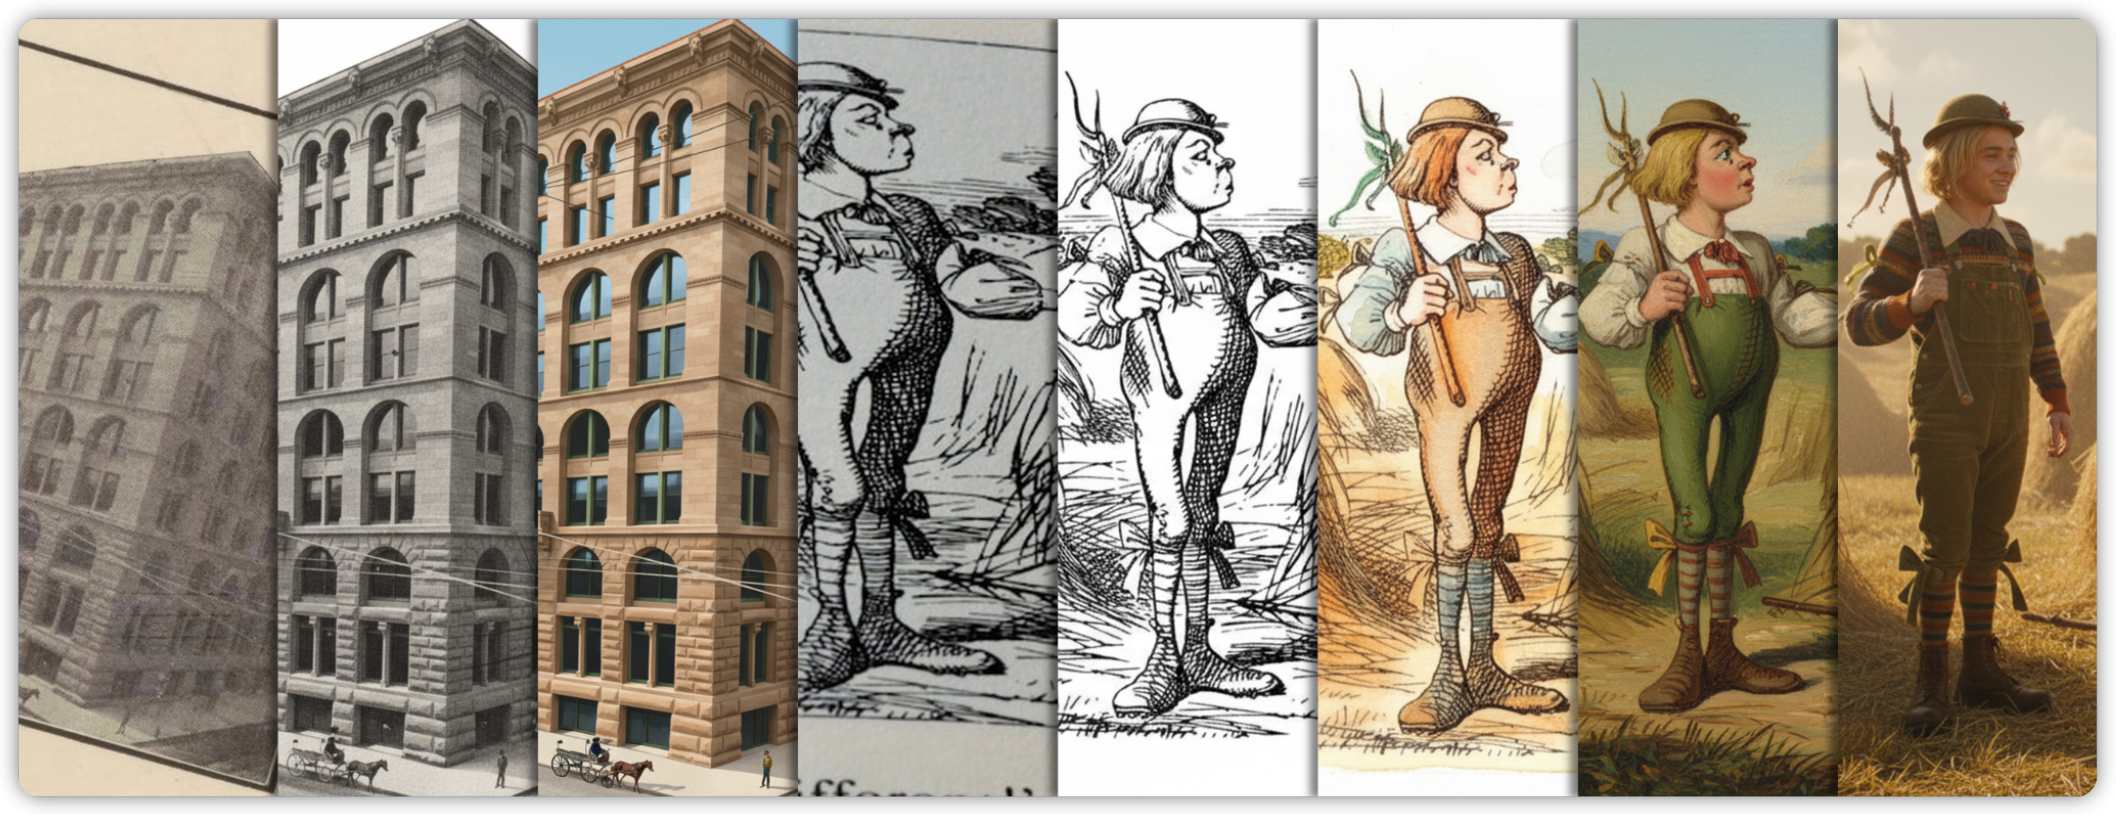
🧪 What about the tilted visuals in this book about the architecture in Denver?
```python
detect_objects(Source.denver_illustrated)
```
> _• [Source Image](https://tile.loc.gov/image-services/iiif/service:gdc:gdclccn:rc:01:00:04:94:rc01000494:0051/full/pct:50/0/default.jpg) • [Source Page](https://www.loc.gov/resource/gdclccn.rc01000494/?sp=51) • Denver illustrated (1893) • Library of Congress, Meeting of Frontiers •_
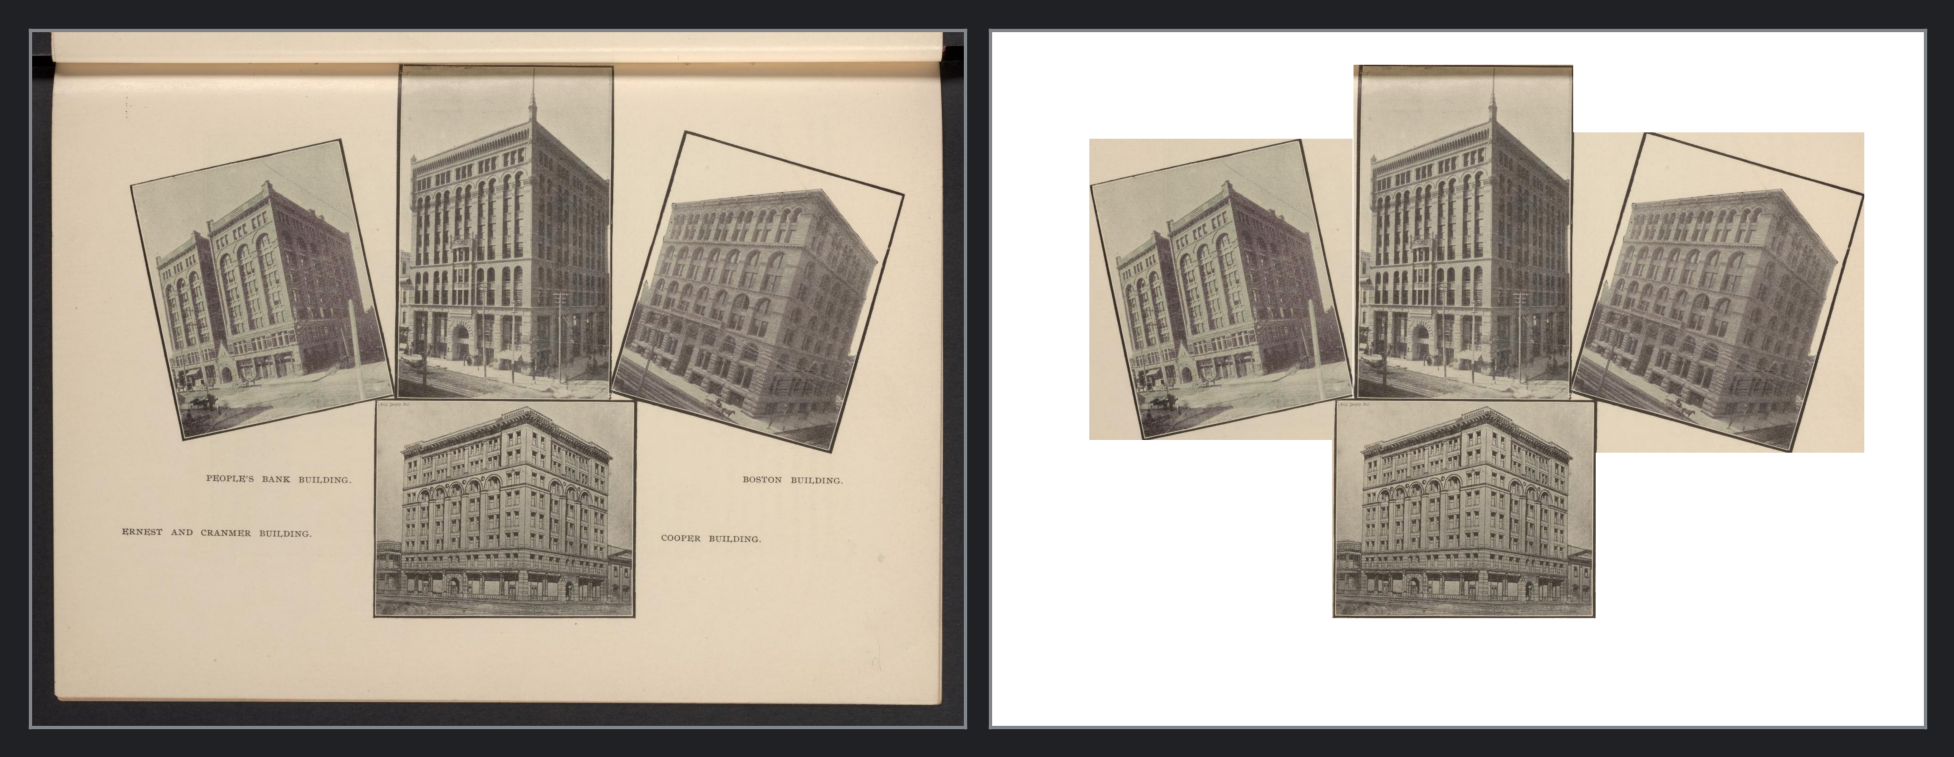
> 💡 Each visual is perfectly detected: spatial understanding covers tilted objects.
---
🧪 Finally, let's check the detection on this significantly warped book page from Alice's Adventures in Wonderland:
```python
detect_objects(Source.alice_drawing)
```
> _• [Source Image](https://images.unsplash.com/photo-1630595011903-689853b04ee2?h=800) • [Source Page](https://unsplash.com/photos/bewzr_Q9u2o) • Open book showing an illustration and text from Alice's Adventures in Wonderland • Photo by Brett Jordan on Unsplash •_
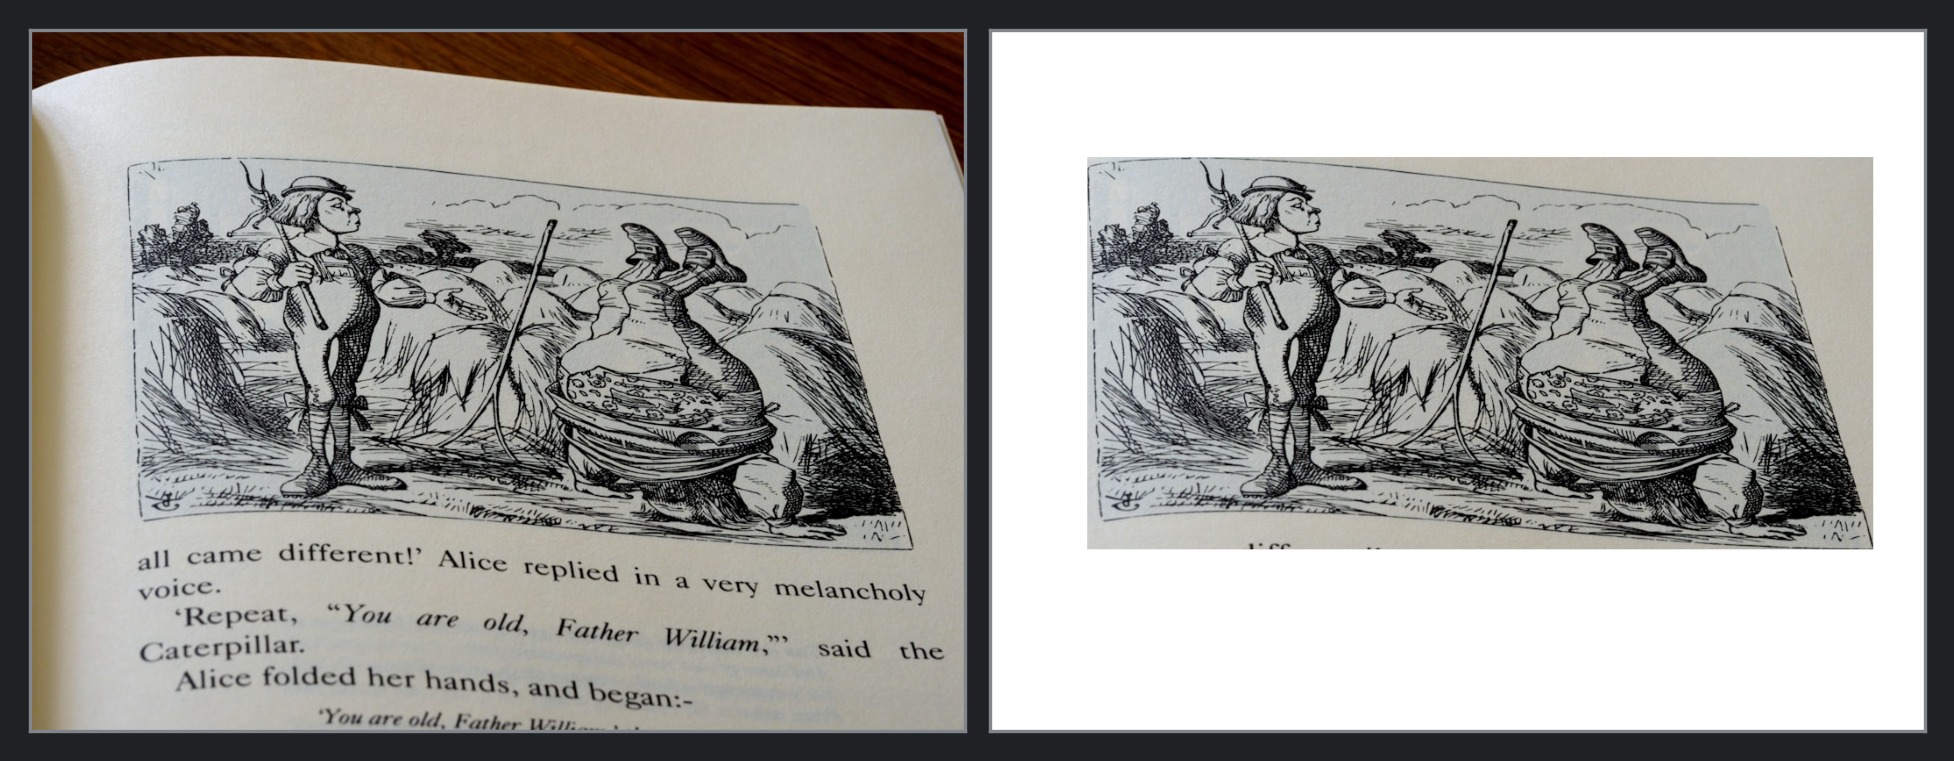
> 💡 Page curvature and other distortions don't prevent non-rectangular objects from being detected. In fact, spatial understanding works at the pixel level, which explains this precision for warped objects. If you'd like to work at a lower level, you can also ask for a "segmentation mask" in the prompt and you'll get a base64-encoded PNG (each pixel giving the 0-255 probability it belongs to the object within the bounding box). See the [segmentation doc](https://ai.google.dev/gemini-api/docs/image-understanding#segmentation) for more details.
---
## 🏷️ Text extraction and dynamic labeling
On top of localizing each object with its bounding box, our prompt requested to extract a verbatim `caption` and to assign a single-word `label`, when possible.
{% details Let's add a simple function to display the detection data in a table: 🔽 %}
```python
from collections import defaultdict
def display_detection_data(source: Source, show_consolidated: bool = False) -> None:
def string_with_visible_linebreaks(s: str) -> str:
return f'''"{s.replace(chr(10), "↩️")}"'''
def yield_md_rows_consolidated(workflow: VisualObjectWorkflow) -> Iterator[str]:
yield "| label | count | captions |"
yield "| :--- | ---: | :--- |"
stats = defaultdict(list)
for obj in workflow.detected_objects:
stats[obj.label].append(string_with_visible_linebreaks(obj.caption))
for label, captions in stats.items():
count = len(captions)
label_captions = " • ".join(sorted(captions))
yield f"| {label} | {count} | {label_captions} |"
def yield_md_rows_with_bbox(workflow: VisualObjectWorkflow) -> Iterator[str]:
yield "| box_2d | label | caption |"
yield "| :--- | :--- | :--- |"
for obj in workflow.detected_objects:
yield f"| {obj.box_2d} | {obj.label} | {string_with_visible_linebreaks(obj.caption)} |"
workflow = workflow_by_image.get(source)
if workflow is None:
print(f'❌ No detection for source "{source.name}"')
return
md_rows = list(
yield_md_rows_consolidated(workflow)
if show_consolidated
else yield_md_rows_with_bbox(workflow)
)
display_image_source_info(source)
display_markdown(chr(10).join(md_rows))
```
{% enddetails %}
---
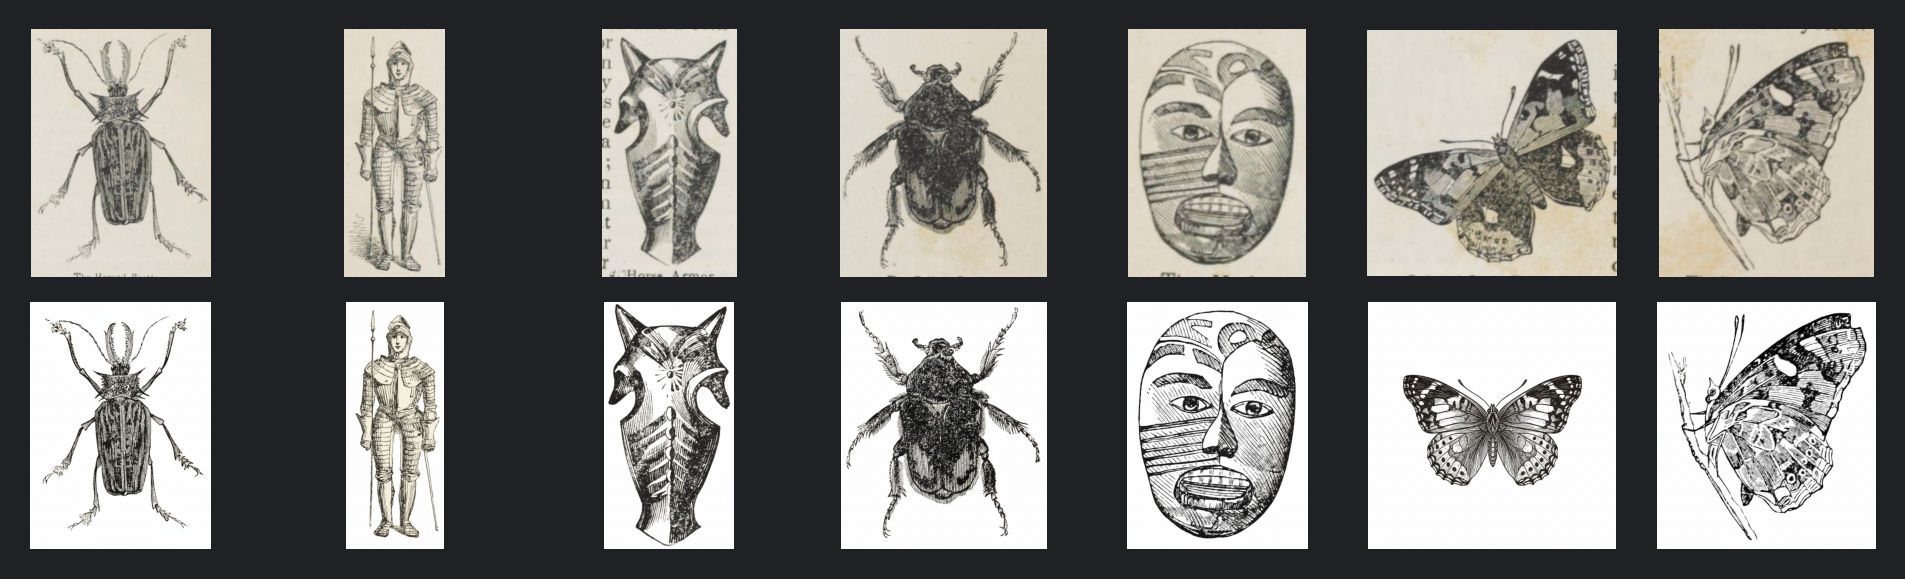
In the museum guidebook, the dynamic labeling is precise according to the context, and the captions below each illustration are perfectly extracted:
```python
display_detection_data(Source.museum_guidebook)
```
> _• [Source Image](https://tile.loc.gov/image-services/iiif/service:rbc:rbc0001:2014:2014gen34181:0033/full/pct:75/0/default.jpg) • [Source Page](https://www.loc.gov/resource/rbc0001.2014gen34181/?sp=33) • Barnum's American Museum illustrated (1850) • Library of Congress, Rare Book and Special Collections Division •_
| box_2d | label | caption |
| :--- | :--- | :--- |
| [954, 629, 1338, 1166] | beetle | "The Horned Beetle." |
| [265, 984, 464, 1504] | armor | "Armor of a Man." |
| [737, 984, 915, 1328] | armor | "Horse Armor." |
| [1225, 1244, 1589, 1685] | beetle | "The Goliath Beetle." |
| [264, 1766, 431, 2006] | mask | "The Mask." |
| [937, 1769, 1260, 2087] | butterfly | "Painted Lady Butterfly." |
| [1325, 2170, 1581, 2468] | butterfly | "The Lady Butterfly." |
---
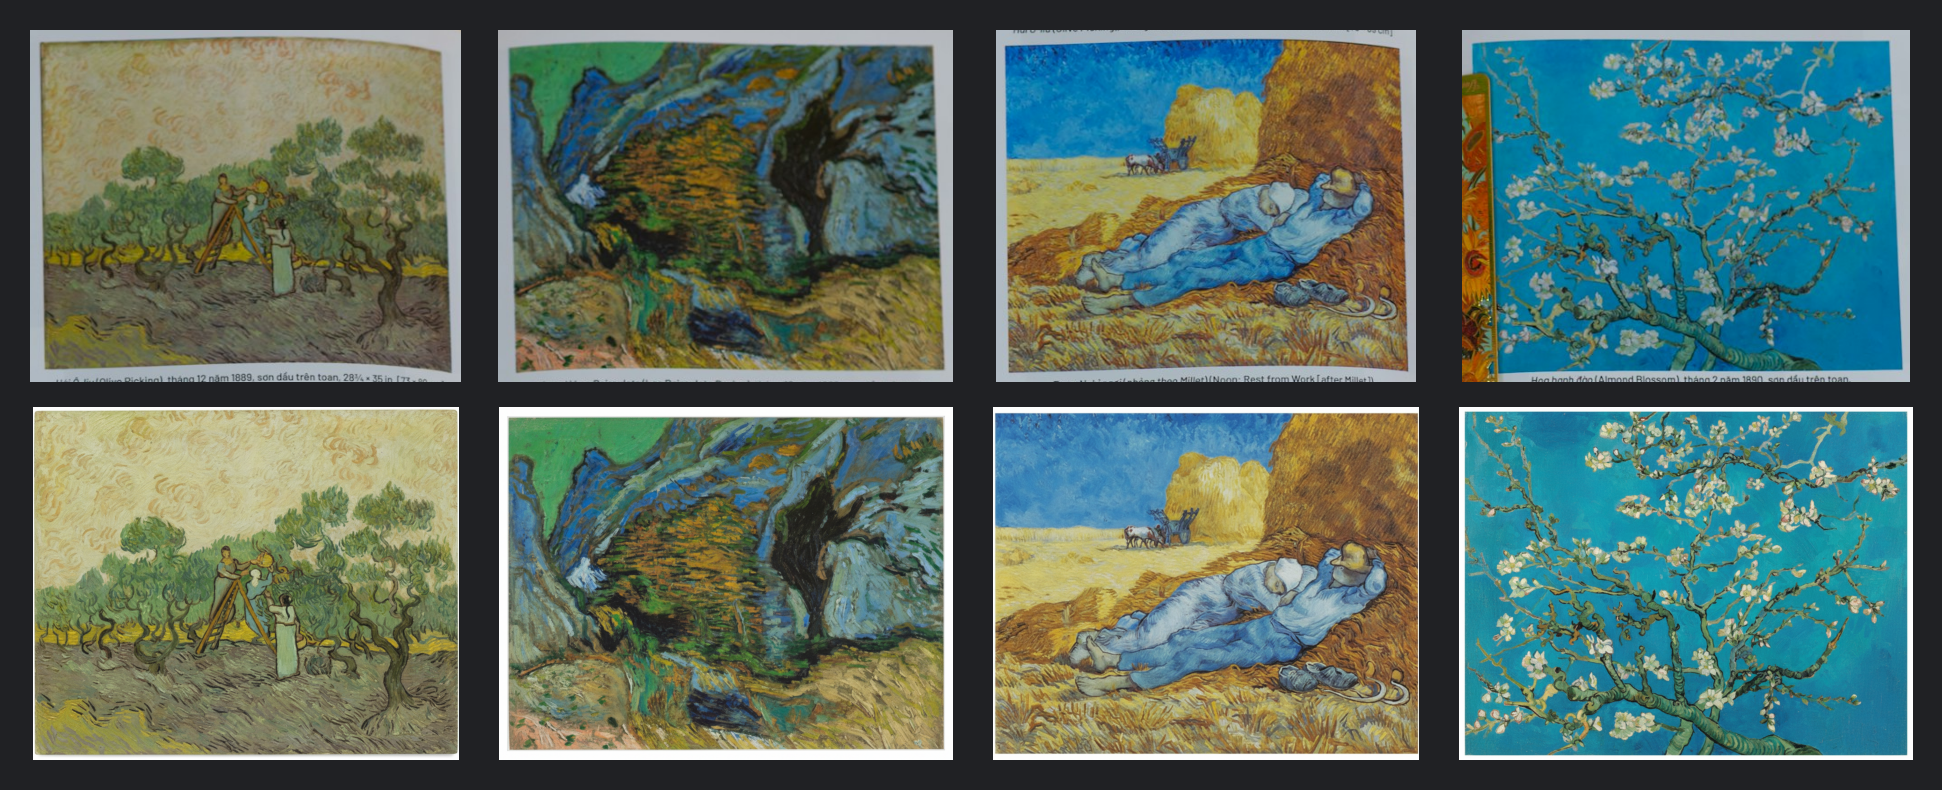
In the book photo showing four paintings, this is perfect too:
```python
display_detection_data(Source.paintings)
```
> _• [Source Image](https://images.unsplash.com/photo-1714146681164-f26fed839692?h=1440) • [Source Page](https://unsplash.com/photos/9hD7qrxICag) • Open book showing paintings by Vincent van Gogh • Photo by Trung Manh cong on Unsplash •_
| box_2d | label | caption |
| :--- | :--- | :--- |
| [378, 203, 837, 575] | painting | "Hái Ô-liu (Olive Picking), tháng 12 năm 1889, sơn dầu trên toan, 28 3/4 x 35 in. [73 x 89 cm]" |
| [913, 207, 1380, 563] | painting | "Hẻm núi Les Peiroulets (Les Peiroulets Ravine), tháng 10 năm 1889, sơn dầu trên toan, 28 3/4 x 36 1/4 in. [73 x 92 cm]" |
| [387, 596, 845, 978] | painting | "Trưa: Nghỉ ngơi (phỏng theo Millet) (Noon: Rest from Work [after Millet]), tháng 1 năm 1890, sơn dầu trên toan, 28 3/4 x 35 7/8 in. [73 x 91 cm]" |
| [921, 611, 1397, 982] | painting | "Hoa hạnh đào (Almond Blossom), tháng 2 năm 1890, sơn dầu trên toan, 28 3/8 x 36 1/4 in. [73 x 92 cm]" |
---
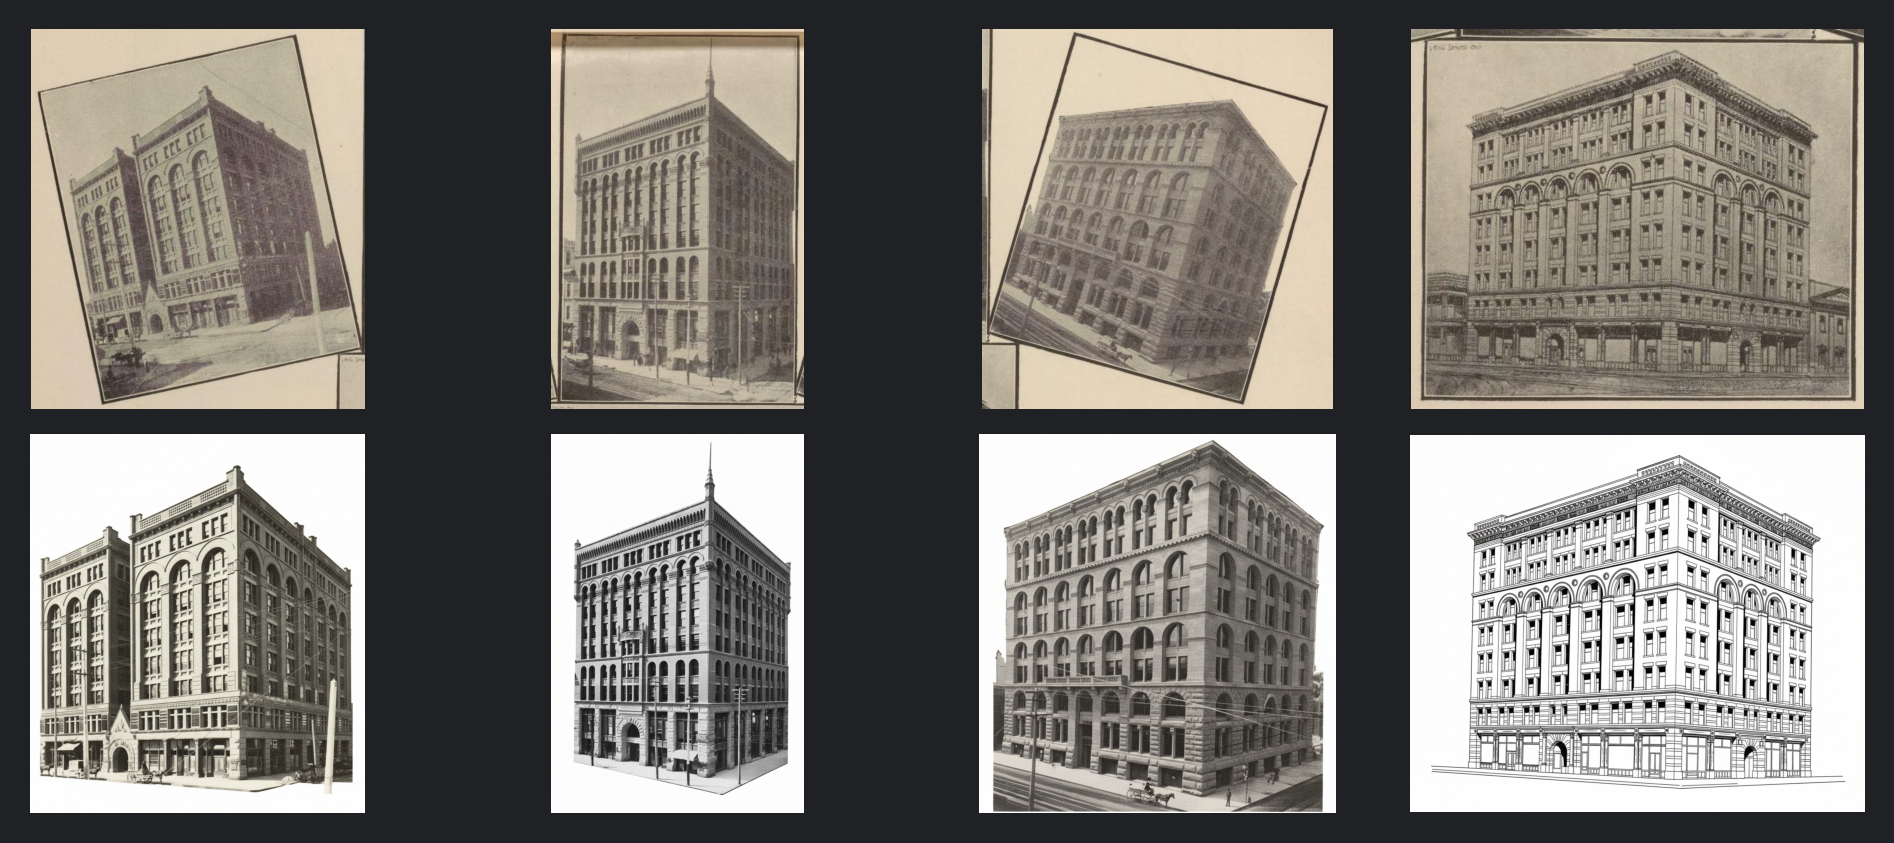
In the Denver architecture book, the four captions are assigned to the correct illustrations, which was not an obvious task:
```python
display_detection_data(Source.denver_illustrated)
```
> _• [Source Image](https://tile.loc.gov/image-services/iiif/service:gdc:gdclccn:rc:01:00:04:94:rc01000494:0051/full/pct:50/0/default.jpg) • [Source Page](https://www.loc.gov/resource/gdclccn.rc01000494/?sp=51) • Denver illustrated (1893) • Library of Congress, Meeting of Frontiers •_
| box_2d | label | caption |
| :--- | :--- | :--- |
| [203, 224, 741, 839] | building | "ERNEST AND CRANMER BUILDING." |
| [743, 73, 1192, 758] | building | "PEOPLE'S BANK BUILDING." |
| [1185, 211, 1787, 865] | building | "BOSTON BUILDING." |
| [699, 754, 1238, 1203] | building | "COOPER BUILDING." |
> 💡 If you have a closer look at the source image, it's hard to tell which caption belongs to which illustration at a glance. Most of us would need to think about it (and might be wrong). Asking Gemini reveals that the results are intentional and not pure luck: _Deciphering vintage layouts can feel a bit like a puzzle, but there is usually a "reading-order" logic at play. In this specific case, the captions are arranged to correspond with the images in a clockwise or Z-pattern starting from the top left._
---
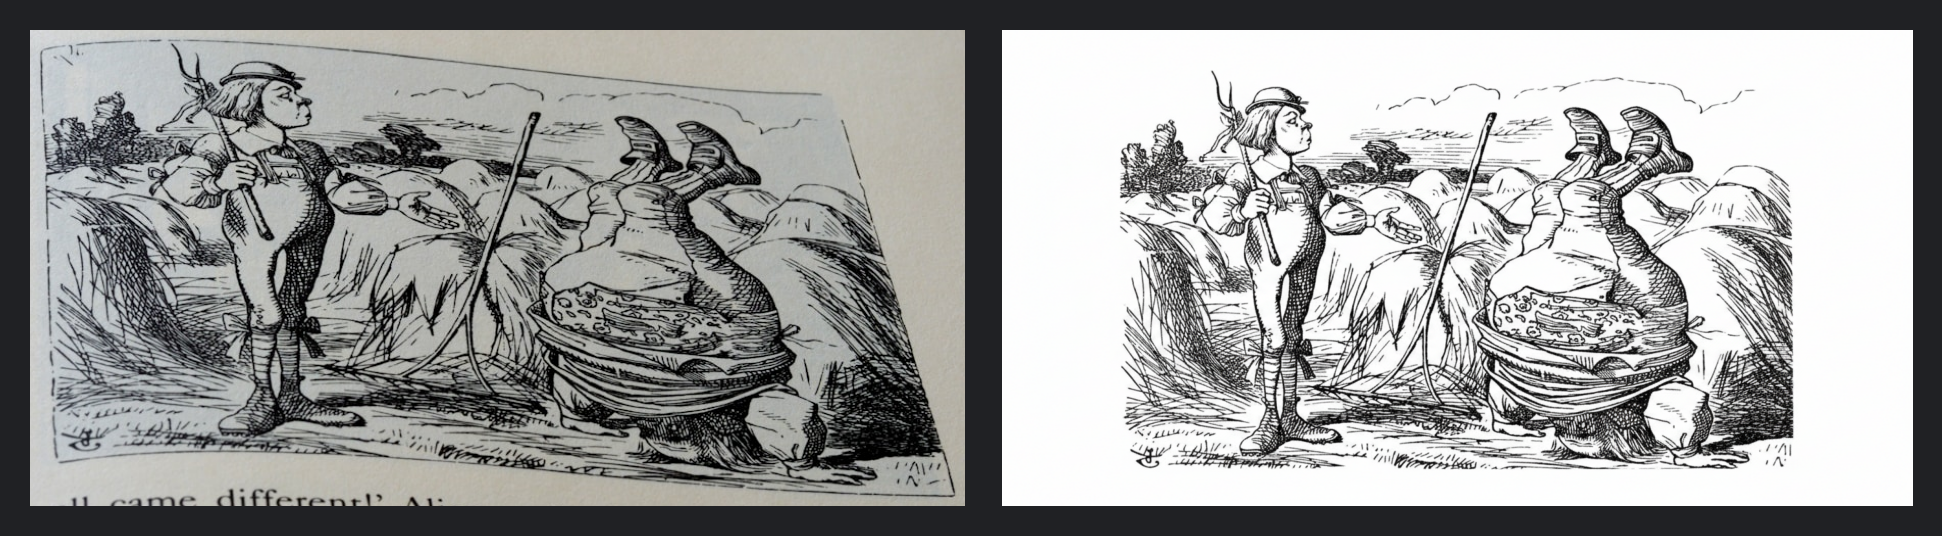
In the "Alice's Adventures in Wonderland" book page, there was a single illustration accompanying the story text. As expected, the caption is empty (i.e., no false positive):
```python
display_detection_data(Source.alice_drawing)
```
> _• [Source Image](https://images.unsplash.com/photo-1630595011903-689853b04ee2?h=800) • [Source Page](https://unsplash.com/photos/bewzr_Q9u2o) • Open book showing an illustration and text from Alice's Adventures in Wonderland • Photo by Brett Jordan on Unsplash •_
| box_2d | label | caption |
| :--- | :--- | :--- |
| [111, 146, 1008, 593] | illustration | "" |
---
## 🔭 Generalizing object detection
We can use the same principles for other object types. We'll generally keep requesting bounding boxes to identify object positions within images. Without changing our current output structure (i.e., no code change), we can use captions and labels to extract different object metadata depending on the input type.
---
🧪 See how we can detect electronic components by adapting the prompt while keeping the exact same code and output structure:
```python
ELECTRONIC_COMPONENT_DETECTION_PROMPT = """
Exhaustively detect all the individual electronic components in the image and provide the following data for each:
- `box_2d`: bounding box coordinates.
- `caption`: Verbatim alphanumeric text visible on the component (including original line breaks), or "" if no text is present.
- `label`: Specific type of component.
"""
detect_objects(
Source.electronics,
ELECTRONIC_COMPONENT_DETECTION_PROMPT,
media_resolution=PartMediaResolutionLevel.MEDIA_RESOLUTION_ULTRA_HIGH,
)
```
> _• [Source Image](https://images.unsplash.com/photo-1757397584789-8b2c5bfcdbc3?h=1440) • [Source Page](https://unsplash.com/photos/Aqa1pHQ57pw) • Circuit board with electronic components • Photo by Albert Stoynov on Unsplash •_

> 💡 Remarks:
>
> - Large and tiny components are detected, thanks to the specific instruction "exhaustively detect…".
> - By using the ultra-high media resolution, we ensure more details are tokenized and the "P" component (a visual outlier) gets detected.
---
Here's a consolidated view of the detected components:
```python
display_detection_data(Source.electronics, show_consolidated=True)
```
> _• [Source Image](https://images.unsplash.com/photo-1757397584789-8b2c5bfcdbc3?h=1440) • [Source Page](https://unsplash.com/photos/Aqa1pHQ57pw) • Circuit board with electronic components • Photo by Albert Stoynov on Unsplash •_
| label | count | captions |
| :--- | ---: | :--- |
| integrated circuit | 3 | "49240↩️020S6K" • "8105↩️0:35" • "P4010↩️9NA0" |
| resistor | 4 | "" • "" • "105" • "R020" |
| inductor | 1 | "n1W" |
| diode | 3 | "K" • "L" • "P" |
| capacitor | 6 | "" • "" • "" • "" • "" • "" |
| transistor | 1 | "41" |
| connector | 1 | "" |
> 💡 Remarks:
>
> - Components are detected along with their text markings, despite the three different text orientations (upright, sideways, and upside down), the blur, and the photo noise.
> - We removed the degree of freedom for multi-line text by specifying the inclusion of "original line breaks" in the prompt: responses now consistently include the line breaks for the three integrated circuits (displayed with the ↩️ emoji for better visibility).
> - The last degree of freedom lies in the labeling. While most components have been properly labeled, it is unclear whether the "P" component is a diode, a resistor, or a fuse. Making the instructions more specific (e.g., listing the possible labels, using an enum for the `label` field in the Pydantic class, or providing guidelines and more details about the expected circuit boards) will make the prompt more "closed" and the results more deterministic and accurate.
> It's also possible to enable/update the `thinking_config` configuration, which will trigger a chain of thought before generating the final answer. In all the detections performed, our code used `ThinkingLevel.MINIMAL`, which didn't consume any thought tokens (with Gemini 3 Flash). Updating the parameter to `ThinkingLevel.LOW`, `ThinkingLevel.MEDIUM`, or `ThinkingLevel.HIGH` will use thought tokens and can lead to better outputs in complex cases.
This demonstrates the versatility of the approach. Without retraining a model, we switched from detecting 15th-century woodcuts and illustrations with vintage layouts to identifying modern electronics just by changing the prompt. Such detections, including caption and label metadata, could be used to auto-crop components for a parts catalog, verify assembly lines, or create interactive schematics… all without a single labeled training image.
---
## 🪄 Editing visual objects
Now that we can detect visual objects, we can envision an automation workflow to extract and reuse them. For this, we'll use Gemini 2.5 Flash Image (also known as Nano Banana 🍌) by default, a state-of-the-art image generation and editing model.
{% details Our object editing functions will follow the same template, taking one step as input and generating an edited image for the output step. Let's define core helpers for this: 🔽 %}
```python
from typing import Protocol
class ObjectEditingFunction(Protocol):
def __call__(
self,
image: InputImage,
prompt: str | None = None,
model: ImageModel | None = None,
config: GenerateContentConfig | None = None,
display_results: bool = True,
) -> None: ...
SourceTargetSteps = tuple[WorkflowStep, WorkflowStep]
registered_functions: dict[SourceTargetSteps, ObjectEditingFunction] = {}
DEFAULT_EDITING_CONFIG = GenerateContentConfig(response_modalities=["IMAGE"])
EMPTY_IMAGE = PIL.Image.new("1", (1, 1), "white")
def object_editing_function(
default_prompt: str,
source_step: WorkflowStep,
target_step: WorkflowStep,
default_model: ImageModel = ImageModel.DEFAULT,
default_config: GenerateContentConfig = DEFAULT_EDITING_CONFIG,
) -> ObjectEditingFunction:
def editing_function(
image: InputImage,
prompt: str | None = default_prompt,
model: ImageModel | None = default_model,
config: GenerateContentConfig | None = default_config,
display_results: bool = True,
) -> None:
workflow, source_images = get_workflow_and_step_images(image, source_step)
if prompt is None:
prompt = default_prompt
prompt = prompt.strip()
if model is None:
model = default_model
# Note: "config is None" is valid and will use the model endpoint default config
target_images: list[PIL_Image] = []
display_image_source_info(image)
obj_count = len(source_images)
for obj_order, source_image in enumerate(source_images, 1):
target_image = generate_image([source_image], prompt, model, config)
save_workflow_image(
source_step,
target_step,
image,
obj_order,
obj_count,
target_image,
dict(prompt=prompt),
)
target_images.append(target_image if target_image else EMPTY_IMAGE)
workflow.images_by_step[target_step] = target_images
if display_results:
display_sources_and_targets(workflow, source_step, target_step)
registered_functions[(source_step, target_step)] = editing_function
return editing_function
def get_workflow_and_step_images(
image: InputImage,
step: WorkflowStep,
) -> tuple[VisualObjectWorkflow, list[PIL_Image]]:
# Objects detected?
if image not in workflow_by_image:
detect_objects(image, display_results=False)
workflow = workflow_by_image.get(image)
assert workflow is not None
# Workflow step objects? (single level, could be extended to a dynamical graph)
operation = (WorkflowStep.CROPPED, step)
if step not in workflow.images_by_step and operation in registered_functions:
source_function = registered_functions[operation]
source_function(image, display_results=False)
# Source images
source_images = workflow.images_by_step.get(step)
assert source_images is not None
return workflow, source_images
def display_sources_and_targets(
workflow: VisualObjectWorkflow,
source_step: WorkflowStep,
target_step: WorkflowStep,
) -> None:
source_images = workflow.images_by_step[source_step]
target_images = workflow.images_by_step[target_step]
if not source_images:
print("❌ No images to display")
return
fig = plt.figure(layout="compressed")
if horizontal := (len(source_images) >= 2):
rows, cols = 2, len(source_images)
else:
rows, cols = len(source_images), 2
gs = fig.add_gridspec(rows, cols)
for i, (source_image, target_image) in enumerate(
zip(source_images, target_images, strict=True)
):
for dim, image in enumerate([source_image, target_image]):
grid_spec = gs[dim, i] if horizontal else gs[i, dim]
ax = fig.add_subplot(grid_spec)
ax.set_axis_off()
ax.imshow(image)
disable_colab_cell_scrollbar()
plt.show()
print("✅ Object editing helpers defined")
```
{% enddetails %}
Now, let's define a first editing step to restore the detected objects that can contain many real-life artifacts…
---
## ✨ Restoring visual objects
For this restoration step, we need to craft a prompt that is generic enough (to cover most use cases) but also specific enough (to take into account restoration needs).
An image editing prompt is based on natural language, typically using imperative or declarative instructions. With an imperative prompt, you describe the actions to perform on the input, while with a declarative prompt, you describe the expected output. Both are possible and will provide equivalent results. Your choice is really a matter of preference, as long as the prompt makes sense.
Our test suite is mostly composed of book photos, which can contain various photographic and paper artifacts. The Nano Banana models understand these subtleties and can edit images accordingly, which simplifies the prompt.
---
Here is a possible restoration function using an imperative prompt:
```python
RESTORATION_PROMPT = """
- Isolate and straighten the visual on a pure white background, excluding any surrounding text.
- Clean up all physical artifacts and noise while preserving every original detail.
- Center the result and scale it to fit the canvas with minimal, symmetrical margins, ensuring no distortion or cropping.
"""
# Default config with low randomness for more deterministic restoration outputs
RESTORATION_CONFIG = GenerateContentConfig(
temperature=0.0,
top_p=0.0,
seed=42,
response_modalities=["IMAGE"],
)
restore_objects = object_editing_function(
RESTORATION_PROMPT,
WorkflowStep.CROPPED,
WorkflowStep.RESTORED,
default_config=RESTORATION_CONFIG,
)
print("✅ Restoration function defined")
```
---
🧪 Let's try to restore the illustration from the 1485 incunable:
```python
restore_objects(Source.incunable)
```
> _• [Source Image](https://tile.loc.gov/image-services/iiif/service:rbc:rbc0001:2014:2014rosen0487:0165/full/pct:25/0/default.jpg) • [Source Page](https://www.loc.gov/resource/rbc0001.2014rosen0487/?sp=165) • Vergaderinge der historien van Troy (1485) • Library of Congress, Rare Book and Special Collections Division •_
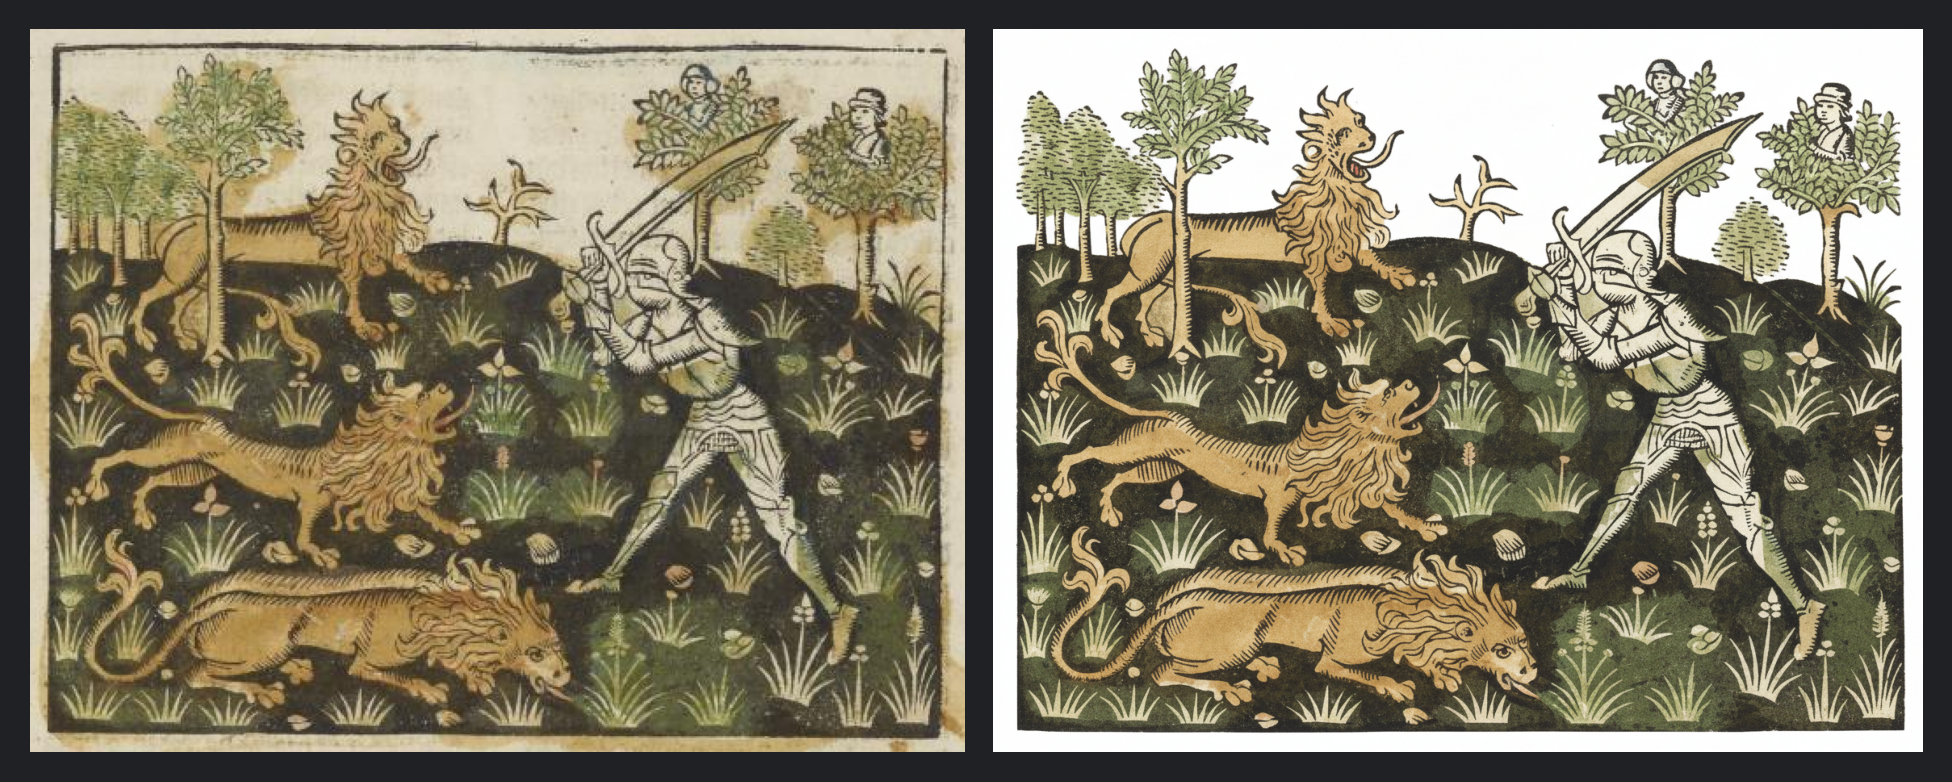
> 💡 We now have a nice restoration of the hand-colored woodcut illustration. Note that our prompt is generic (_"clean up all physical artifacts"_) and could be made more specific to remove more or fewer artifacts. In this example, there are remaining artifacts, such as the paper discoloration in the sword or the bleeding ink in the armor. We'll see if we can fix these in the colorization step.
---
🧪 What about the illustrations from the museum guidebook?
```python
restore_objects(Source.museum_guidebook)
```
> _• [Source Image](https://tile.loc.gov/image-ser_vices/iiif/service:rbc:rbc0001:2014:2014gen34181:0033/full/pct:75/0/default.jpg) • [Source Page](https://www.loc.gov/resource/rbc0001.2014gen34181/?sp=33) • Barnum's American Museum illustrated (1850) • Library of Congress, Rare Book and Special Collections Division •_
> 💡 All good!
---
🧪 What about the slightly warped visuals?
```python
restore_objects(Source.paintings)
```
> _• [Source Image](https://images.unsplash.com/photo-1714146681164-f26fed839692?h=1440) • [Source Page](https://unsplash.com/photos/9hD7qrxICag) • Open book showing paintings by Vincent van Gogh • Photo by Trung Manh cong on Unsplash •_
> 💡 Remarks:
>
> - Notice how, on the last painting, the orange bookmark is properly removed and the hidden part inpainted to complete the painting.
> - We requested to "fit the canvas with minimal, symmetrical margins, without distortion or cropping". Depending on the aspect ratio and type of the visual, this degree of freedom can result in different white margins.
> - This example shows famous paintings by Vincent Van Gogh. Nano Banana does not fetch any reference images and only uses the provided input. If these were photos of private paintings, they would be restored in the same way.
---
In the Denver architecture book, the illustrations can be tilted, which our generic prompt does not fully take into account. When several geometric transformations are involved, it can be challenging to craft an imperative prompt that details all the operations to perform. Instead, a descriptive prompt can be more straightforward by directly describing the expected output.
🧪 Here's an example of a descriptive prompt focusing on the restoration of tilted visuals:
```python
tilted_visual_prompt = """
An upright, high-fidelity rendition of the visual isolated against a pure white background, filling the canvas with minimal uniform margins. The output is clean, sharp, and free of physical artifacts.
"""
restore_objects(Source.denver_illustrated, tilted_visual_prompt)
```
> _• [Source Image](https://tile.loc.gov/image-services/iiif/service:gdc:gdclccn:rc:01:00:04:94:rc01000494:0051/full/pct:50/0/default.jpg) • [Source Page](https://www.loc.gov/resource/gdclccn.rc01000494/?sp=51) • Denver illustrated (1893) • Library of Congress, Meeting of Frontiers •_
> 💡 Remarks:
>
> - To get these results, the prompt focuses on requesting an "upright" visual "filling the canvas", which proves more straightforward to write than trying to account for all possible geometric corrections.
> - The native visual understanding automatically identifies the content type (photo, illustration, etc.) and the different artifacts (photographic, paper, printing, scanning…), allowing for precise restorations out of the box.
> - Notice how the consistency is preserved: the last visual is restored as an illustration, while the first visuals maintain their photographic style.
> - The results, with this rather generic prompt, are impressive. It is, of course, possible to be more specific and request particular lighting, styles, colors…
---
In this last test, the input visual has distortions not only from the page curvature but also from the photo perspective.
🧪 Here's an example of a descriptive prompt focusing on restoring warped illustrations:
```python
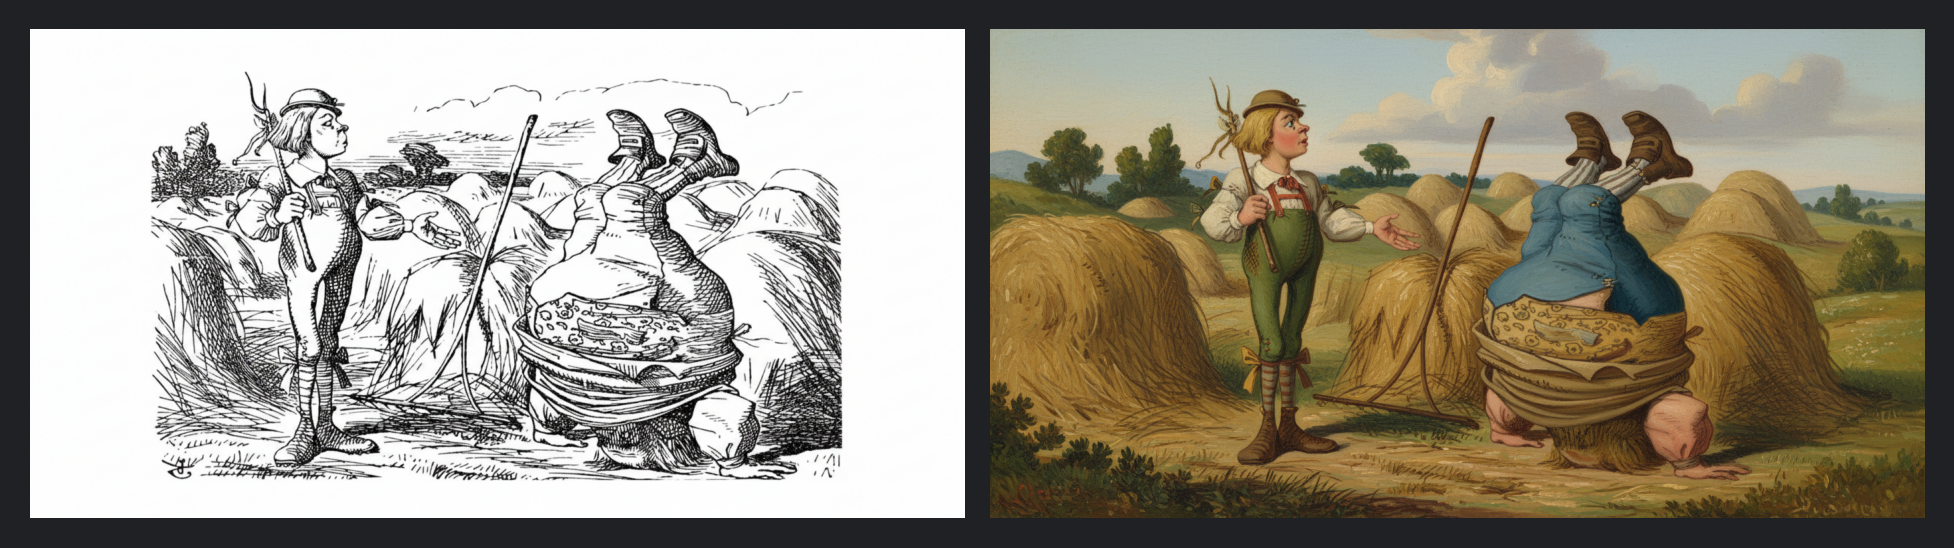
warped_visual_prompt = """
An edge-to-edge digital extraction of the illustration from the provided book photo, excluding any peripheral text. All page curvature and perspective distortions are corrected, resulting in an image framed in a perfect rectangle, on a pure white canvas with minimal margins.
"""
restore_objects(Source.alice_drawing, warped_visual_prompt)
```
> _• [Source Image](https://images.unsplash.com/photo-1630595011903-689853b04ee2?h=800) • [Source Page](https://unsplash.com/photos/bewzr_Q9u2o) • Open book showing an illustration and text from Alice's Adventures in Wonderland • Photo by Brett Jordan on Unsplash •_
> 💡 It is really impressive that such a restoration can be performed in a single step. Note that this prompt is not stable and can generate less optimal results (it would benefit from being more precise). If you have complex transformations, test descriptive prompts iteratively, and you might be pleasantly surprised. In the worst case, it's also possible to process the transformations in successive, easier steps.
Now, let's add a colorization step…
---
## 🎨 Colorization
Our restoration step respected the original styles of the input images. Recent image editing models excel at transforming image styles, starting with colors. This can generally be performed directly with a simple, precise instruction.
Here is a possible colorization function using an imperative prompt:
```python
COLORIZATION_PROMPT = """
Colorize this image in a modern book illustration style, maintaining all original details without any additions.
"""
colorize = object_editing_function(
COLORIZATION_PROMPT,
WorkflowStep.RESTORED,
WorkflowStep.COLORIZED,
)
print("✅ Colorization function defined")
```
---
🧪 Let's modernize our 1485 illustration:
```python
colorize(Source.incunable)
```
> _• [Source Image](https://tile.loc.gov/image-services/iiif/service:rbc:rbc0001:2014:2014rosen0487:0165/full/pct:25/0/default.jpg) • [Source Page](https://www.loc.gov/resource/rbc0001.2014rosen0487/?sp=165) • Vergaderinge der historien van Troy (1485) • Library of Congress, Rare Book and Special Collections Division •_
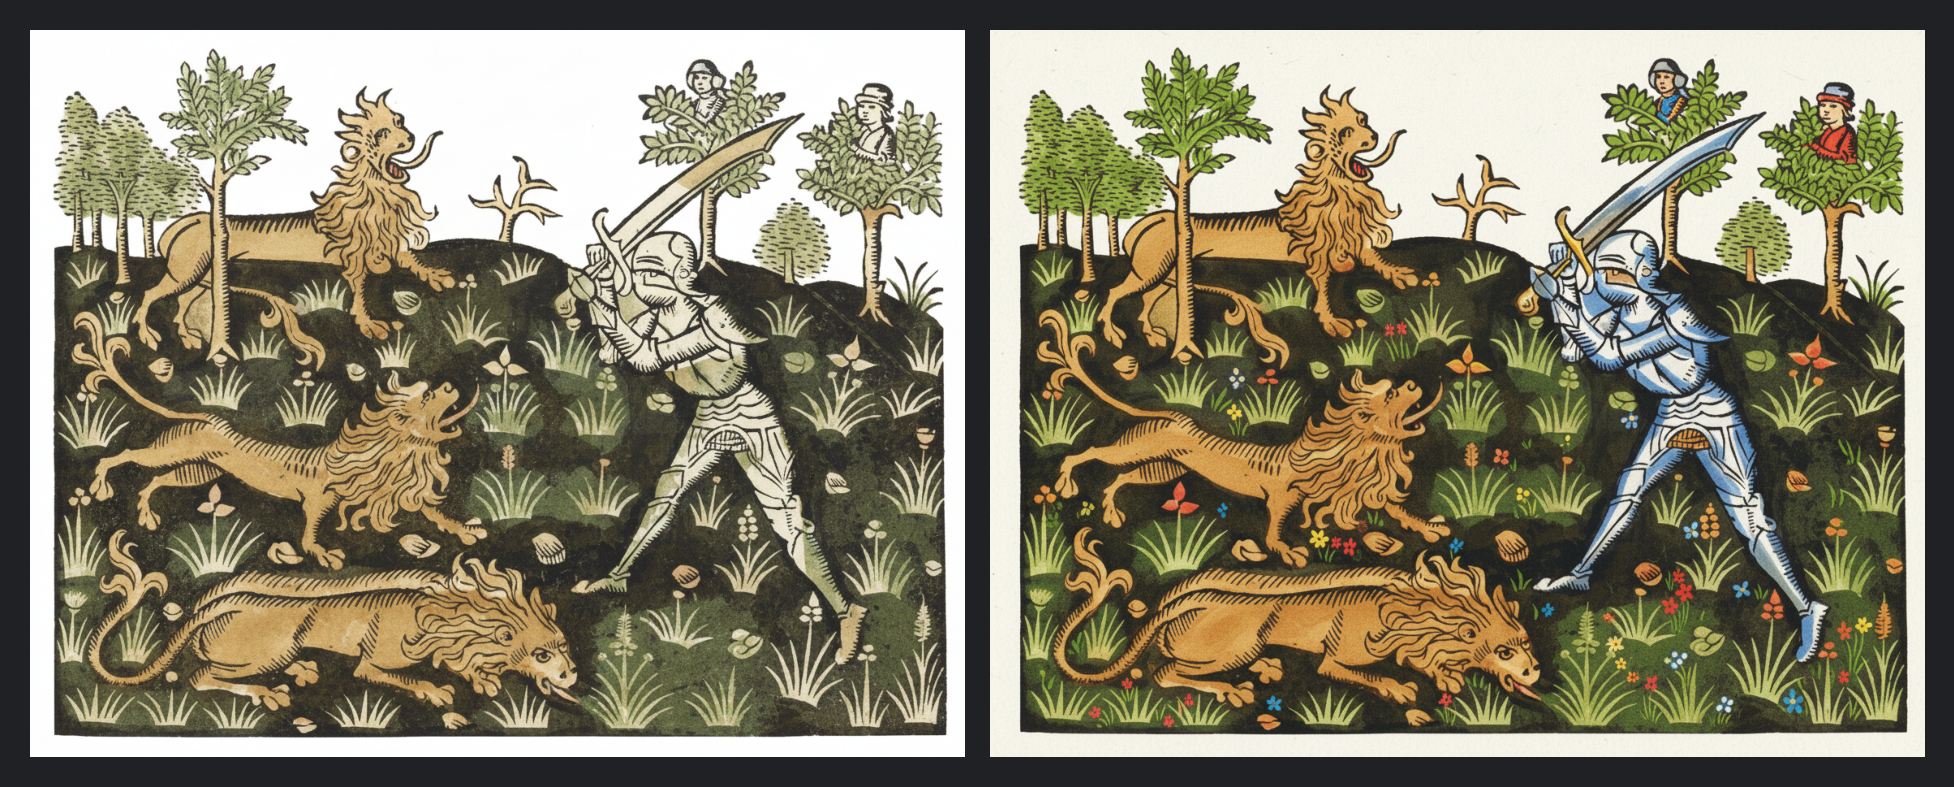
> 💡 All details are preserved, as requested in the prompt. Notice how the colorization can naturally fix some remaining artifacts (e.g., the paper discoloration in the sword or the bleeding ink in the armor).
---
🧪 Let's colorize our museum guidebook illustrations:
```python
colorize(Source.museum_guidebook)
```
> _• [Source Image](https://tile.loc.gov/image-services/iiif/service:rbc:rbc0001:2014:2014gen34181:0033/full/pct:75/0/default.jpg) • [Source Page](https://www.loc.gov/resource/rbc0001.2014gen34181/?sp=33) • Barnum's American Museum illustrated (1850) • Library of Congress, Rare Book and Special Collections Division •_
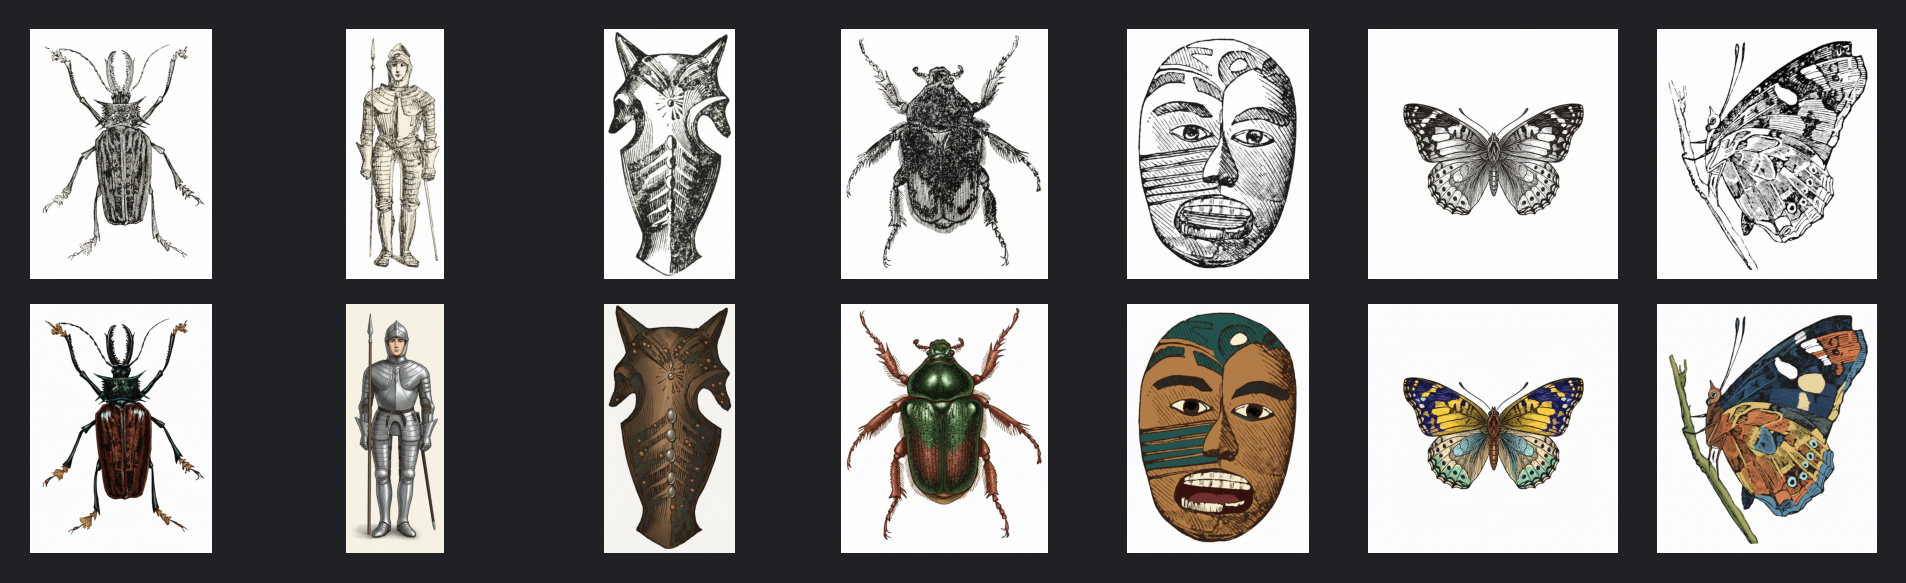
> 💡 Our prompt is very open as it only specifies "modern book illustration style". This can generate very creative colorizations, but they all seem to make perfect sense.
---
🧪 What about our Denver buildings?
```python
colorize(Source.denver_illustrated)
```
> _• [Source Image](https://tile.loc.gov/image-services/iiif/service:gdc:gdclccn:rc:01:00:04:94:rc01000494:0051/full/pct:50/0/default.jpg) • [Source Page](https://www.loc.gov/resource/gdclccn.rc01000494/?sp=51) • Denver illustrated (1893) • Library of Congress, Meeting of Frontiers •_
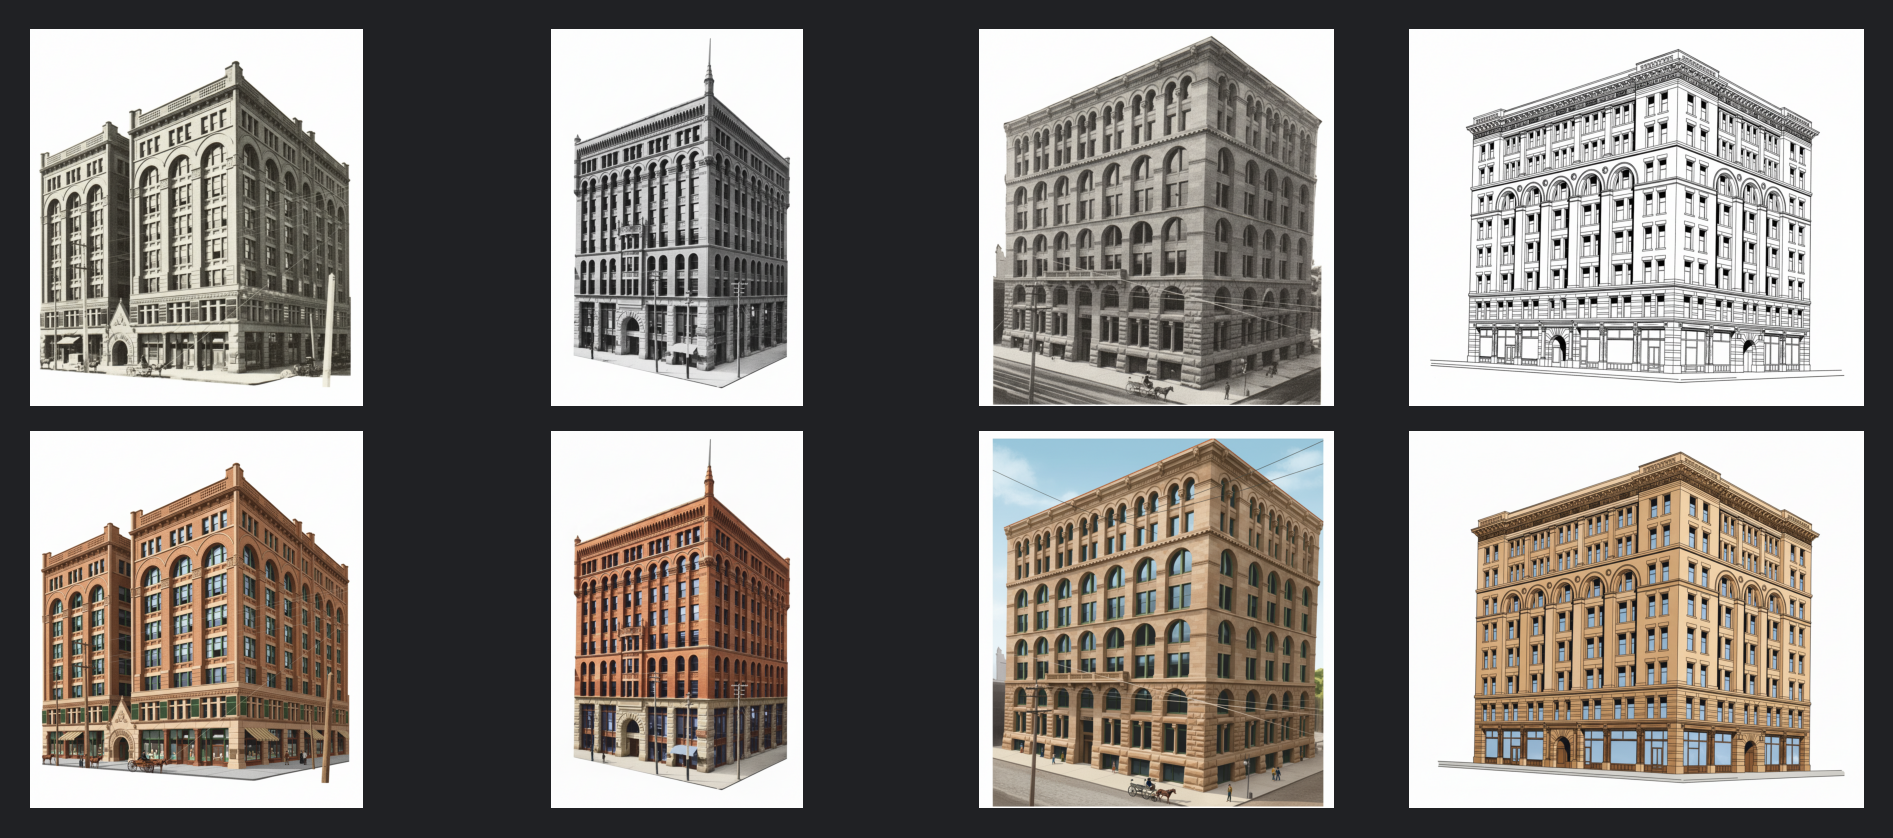
> 💡 As requested, they all look like modern illustrations, including the first visuals (originating from noisy photos).
---
It's possible to go further by not only "colorizing" but also "transforming" the image into a significantly different one.
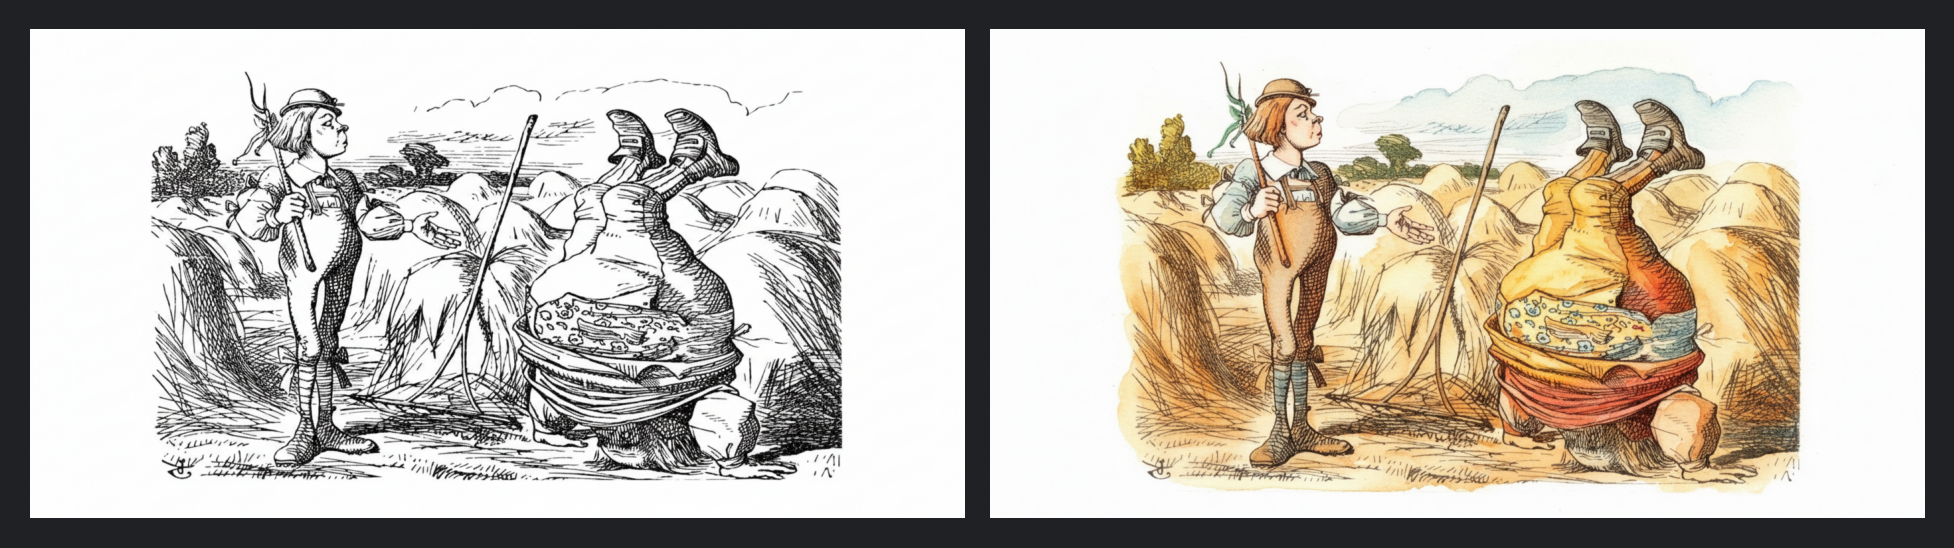
🧪 Let's make our "Alice's Adventures in Wonderland" drawing into a watercolor painting:
```python
watercolor_prompt = """
Transform this visual into a warm, watercolor painting.
"""
colorize(Source.alice_drawing, watercolor_prompt)
```
> _• [Source Image](https://images.unsplash.com/photo-1630595011903-689853b04ee2?h=800) • [Source Page](https://unsplash.com/photos/bewzr_Q9u2o) • Open book showing an illustration and text from Alice's Adventures in Wonderland • Photo by Brett Jordan on Unsplash •_
---
🧪 What about making it a traditional painting?
```python
painting_prompt = """
Transform this visual into a traditional painting.
"""
colorize(Source.alice_drawing, painting_prompt)
```
> _• [Source Image](https://images.unsplash.com/photo-1630595011903-689853b04ee2?h=800) • [Source Page](https://unsplash.com/photos/bewzr_Q9u2o) • Open book showing an illustration and text from Alice's Adventures in Wonderland • Photo by Brett Jordan on Unsplash •_
---
We can also change image compositions. Depending on the context, some compositions are more or less implied by default. For example, illustrations often have margins, while photos generally have edge-to-edge (full-bleed in the printing world) compositions. When possible, it's interesting to refer to a type of visual (which intrinsically brings a lot of semantics to the context) and adjust the instructions accordingly.
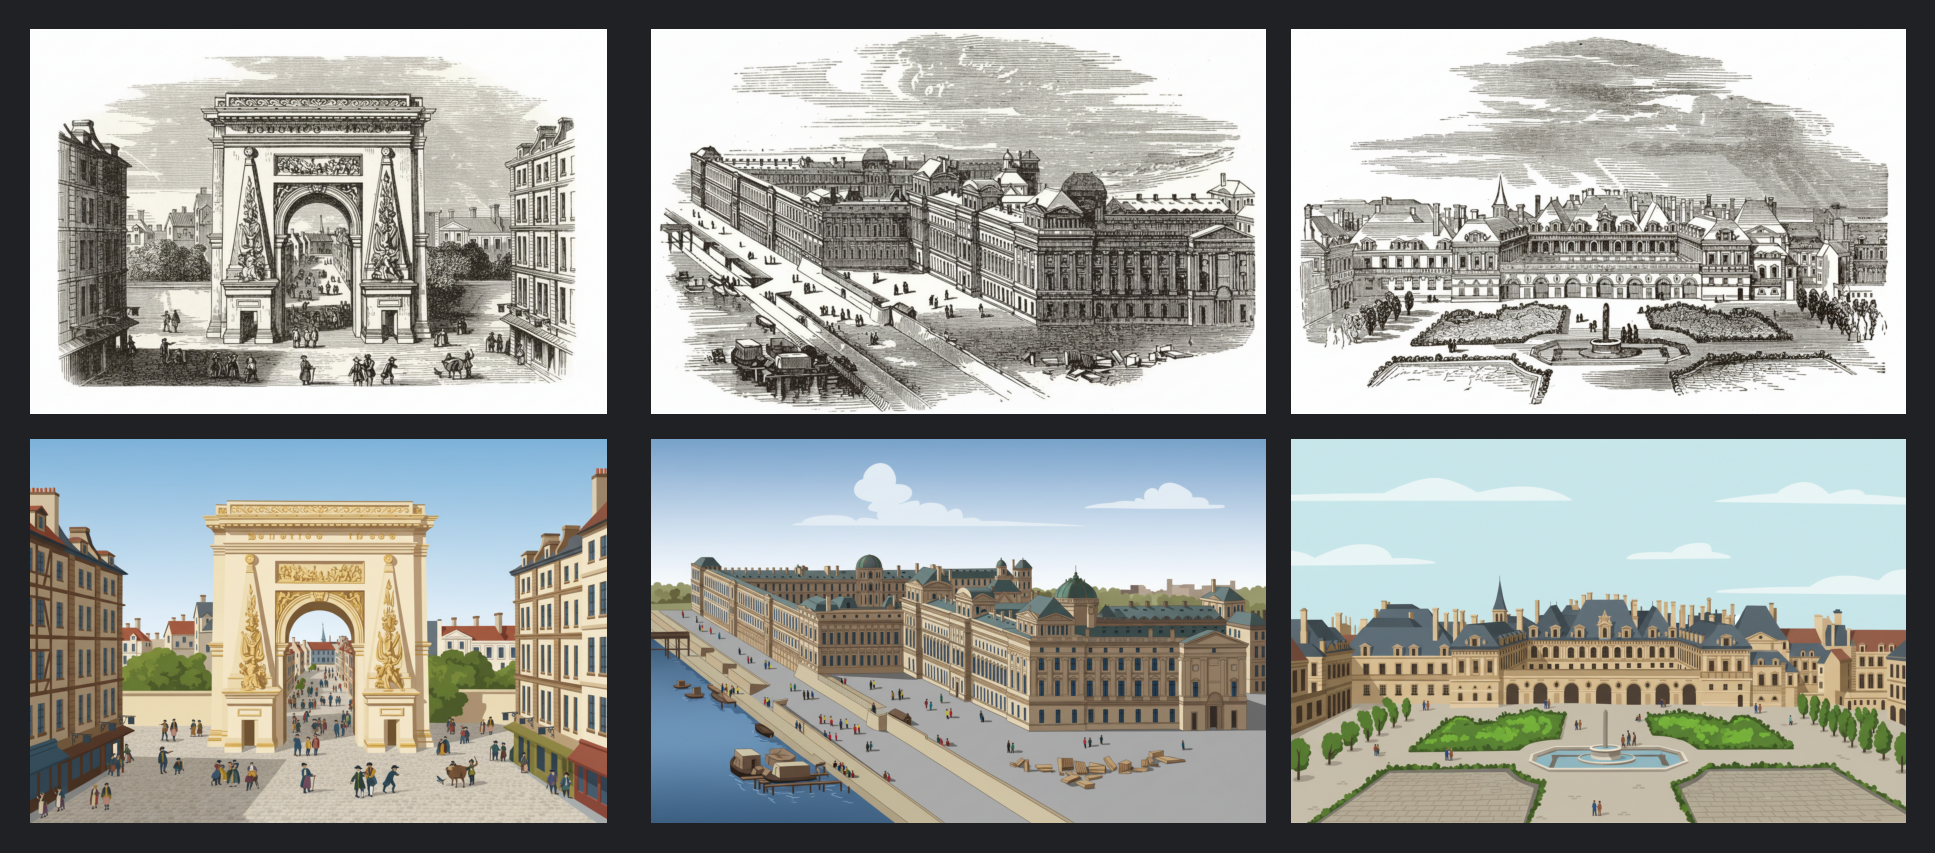
🧪 Let's see how we can detect engravings in this 1847 book, restore them, and transform them into modern digital graphics:
```python
detect_objects(Source.engravings)
```
> _• [Source Image](https://tile.loc.gov/image-services/iiif/service:gdc:gdcscd:00:34:07:66:92:1:00340766921:0121/full/pct:50/0/default.jpg) • [Source Page](https://www.loc.gov/resource/gdcscd.00340766921/?sp=121) • Harper's illustrated catalogue (1847) • Library of Congress •_
```python
restore_objects(Source.engravings)
```
> _• [Source Image](https://tile.loc.gov/image-services/iiif/service:gdc:gdcscd:00:34:07:66:92:1:00340766921:0121/full/pct:50/0/default.jpg) • [Source Page](https://www.loc.gov/resource/gdcscd.00340766921/?sp=121) • Harper's illustrated catalogue (1847) • Library of Congress •_
```python
visual_to_digital_graphic_prompt = """
Transform this visual into a full-color, flat digital graphic, extending the content for a full-bleed effect.
"""
colorize(Source.engravings, visual_to_digital_graphic_prompt)
```
> _• [Source Image](https://tile.loc.gov/image-services/iiif/service:gdc:gdcscd:00:34:07:66:92:1:00340766921:0121/full/pct:50/0/default.jpg) • [Source Page](https://www.loc.gov/resource/gdcscd.00340766921/?sp=121) • Harper's illustrated catalogue (1847) • Library of Congress •_
---
🧪 We can also transform the same engravings into photos with a very simple prompt:
```python
visual_to_photo_prompt = """
Transform this visual into a high-end, modern camera photograph.
"""
colorize(Source.engravings, visual_to_photo_prompt)
```
> _• [Source Image](https://tile.loc.gov/image-services/iiif/service:gdc:gdcscd:00:34:07:66:92:1:00340766921:0121/full/pct:50/0/default.jpg) • [Source Page](https://www.loc.gov/resource/gdcscd.00340766921/?sp=121) • Harper's illustrated catalogue (1847) • Library of Congress •_

---
> 💡 As photos are generally full-bleed, the prompt does not need to specify a composition.
It's really up to our imagination, as Nano Banana seems to grasp every aspect of the visual semantics.
Let's add a final step to see how far we can go, reimagining images as cinematic movie stills…
---
## 🎞️ Cinematization
We've used rather "closed" prompts so far, crafting specific instructions and constraints to control the outputs. It's possible to go even further with "open" prompts and generate images in full creative mode. Notably, it can be interesting to refer to photographic or cinematographic terminology as it encompasses many visual techniques.
Here is a possible generic cinematization function to reimagine images as movie stills:
```python
CINEMATIZATION_PROMPT = """
Reimagine this image as a joyful, modern live-action cinematic movie still featuring professional lighting and composition.
"""
cinematize = object_editing_function(
CINEMATIZATION_PROMPT,
WorkflowStep.RESTORED,
WorkflowStep.CINEMATIZED,
)
```
---
🧪 Let's cinematize the "Alice's Adventures in Wonderland" drawing:
```python
cinematize(Source.alice_drawing)
```
> _• [Source Image](https://images.unsplash.com/photo-1630595011903-689853b04ee2?h=800) • [Source Page](https://unsplash.com/photos/bewzr_Q9u2o) • Open book showing an illustration and text from Alice's Adventures in Wonderland • Photo by Brett Jordan on Unsplash •_
> 💡 This looks like a high-budget movie still. There are lots of degrees of freedom in the prompt, but you're likely to get foreground figures in sharp focus, a gradual background blur, "golden hour" lighting (a magical ingredient for many cinematographers), and detailed textures. Such compositions really evoke different atmospheres compared to the photos generated in the previous test.
---
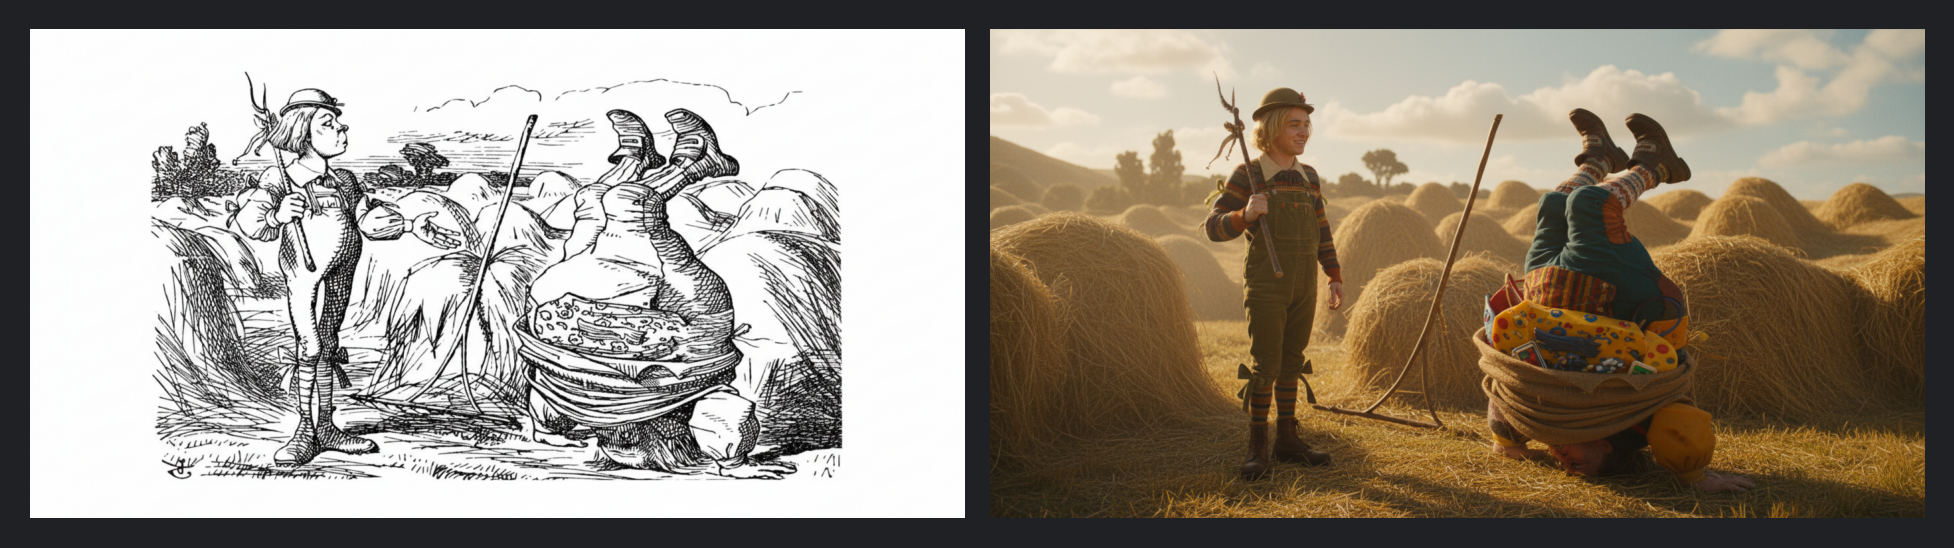
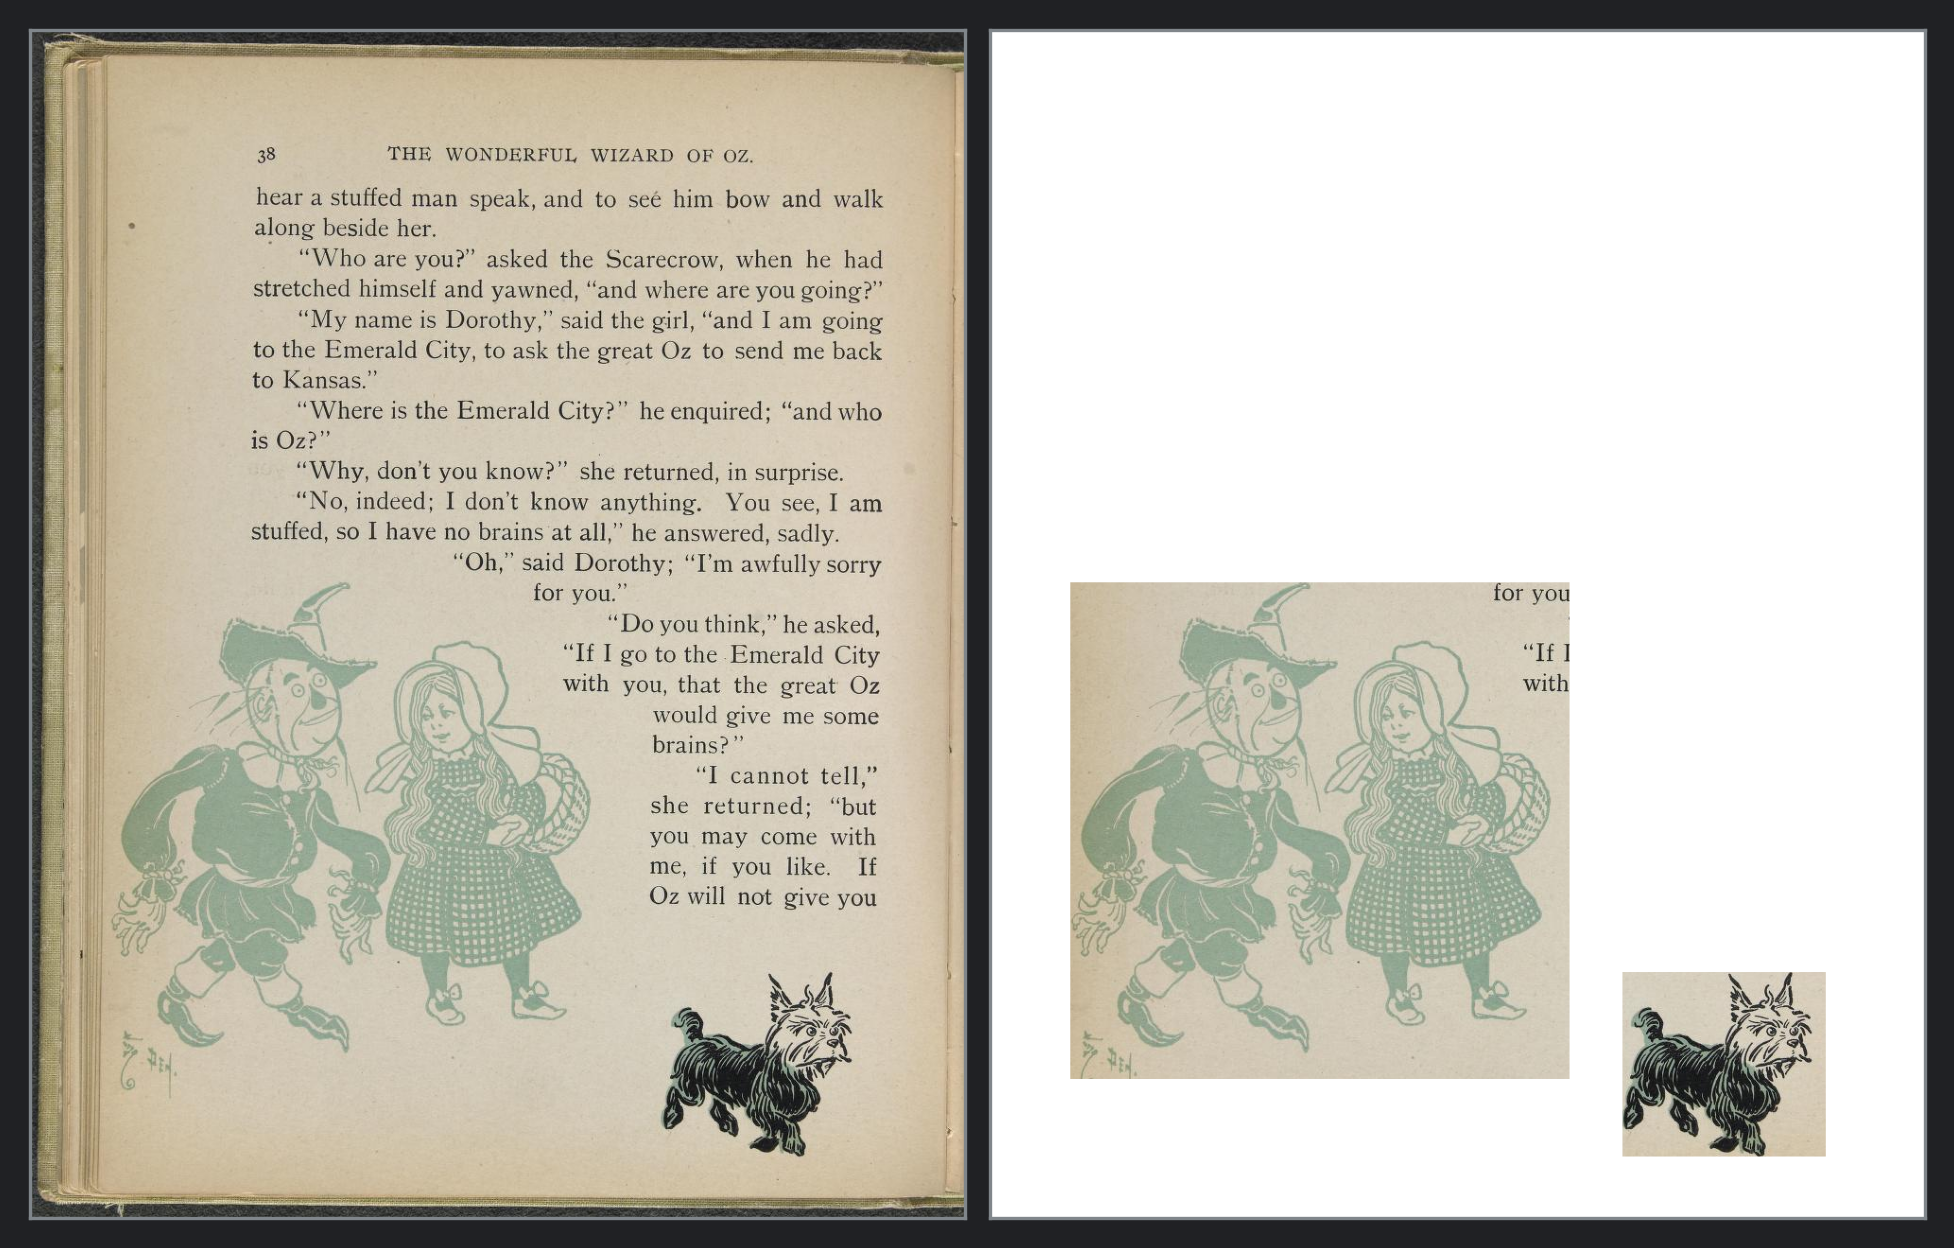
🧪 Let's test the workflow on a page from the Wonderful Wizard of Oz containing three drawings:
```python
detect_objects(Source.wizard_of_oz_drawings)
```
> _• [Source Image](https://tile.loc.gov/image-services/iiif/service:rbc:rbc0001:2006:2006gen32405:0048/full/pct:25/0/default.jpg) • [Source Page](https://www.loc.gov/resource/rbc0001.2006gen32405/?sp=48) • The wonderful Wizard of Oz (1899) • Library of Congress, Rare Book and Special Collections Division •_
---
```python
restore_objects(Source.wizard_of_oz_drawings)
```
> _• [Source Image](https://tile.loc.gov/image-services/iiif/service:rbc:rbc0001:2006:2006gen32405:0048/full/pct:25/0/default.jpg) • [Source Page](https://www.loc.gov/resource/rbc0001.2006gen32405/?sp=48) • The wonderful Wizard of Oz (1899) • Library of Congress, Rare Book and Special Collections Division •_

```python
cinematize(Source.wizard_of_oz_drawings)
```
> _• [Source Image](https://tile.loc.gov/image-services/iiif/service:rbc:rbc0001:2006:2006gen32405:0048/full/pct:25/0/default.jpg) • [Source Page](https://www.loc.gov/resource/rbc0001.2006gen32405/?sp=48) • The wonderful Wizard of Oz (1899) • Library of Congress, Rare Book and Special Collections Division •_
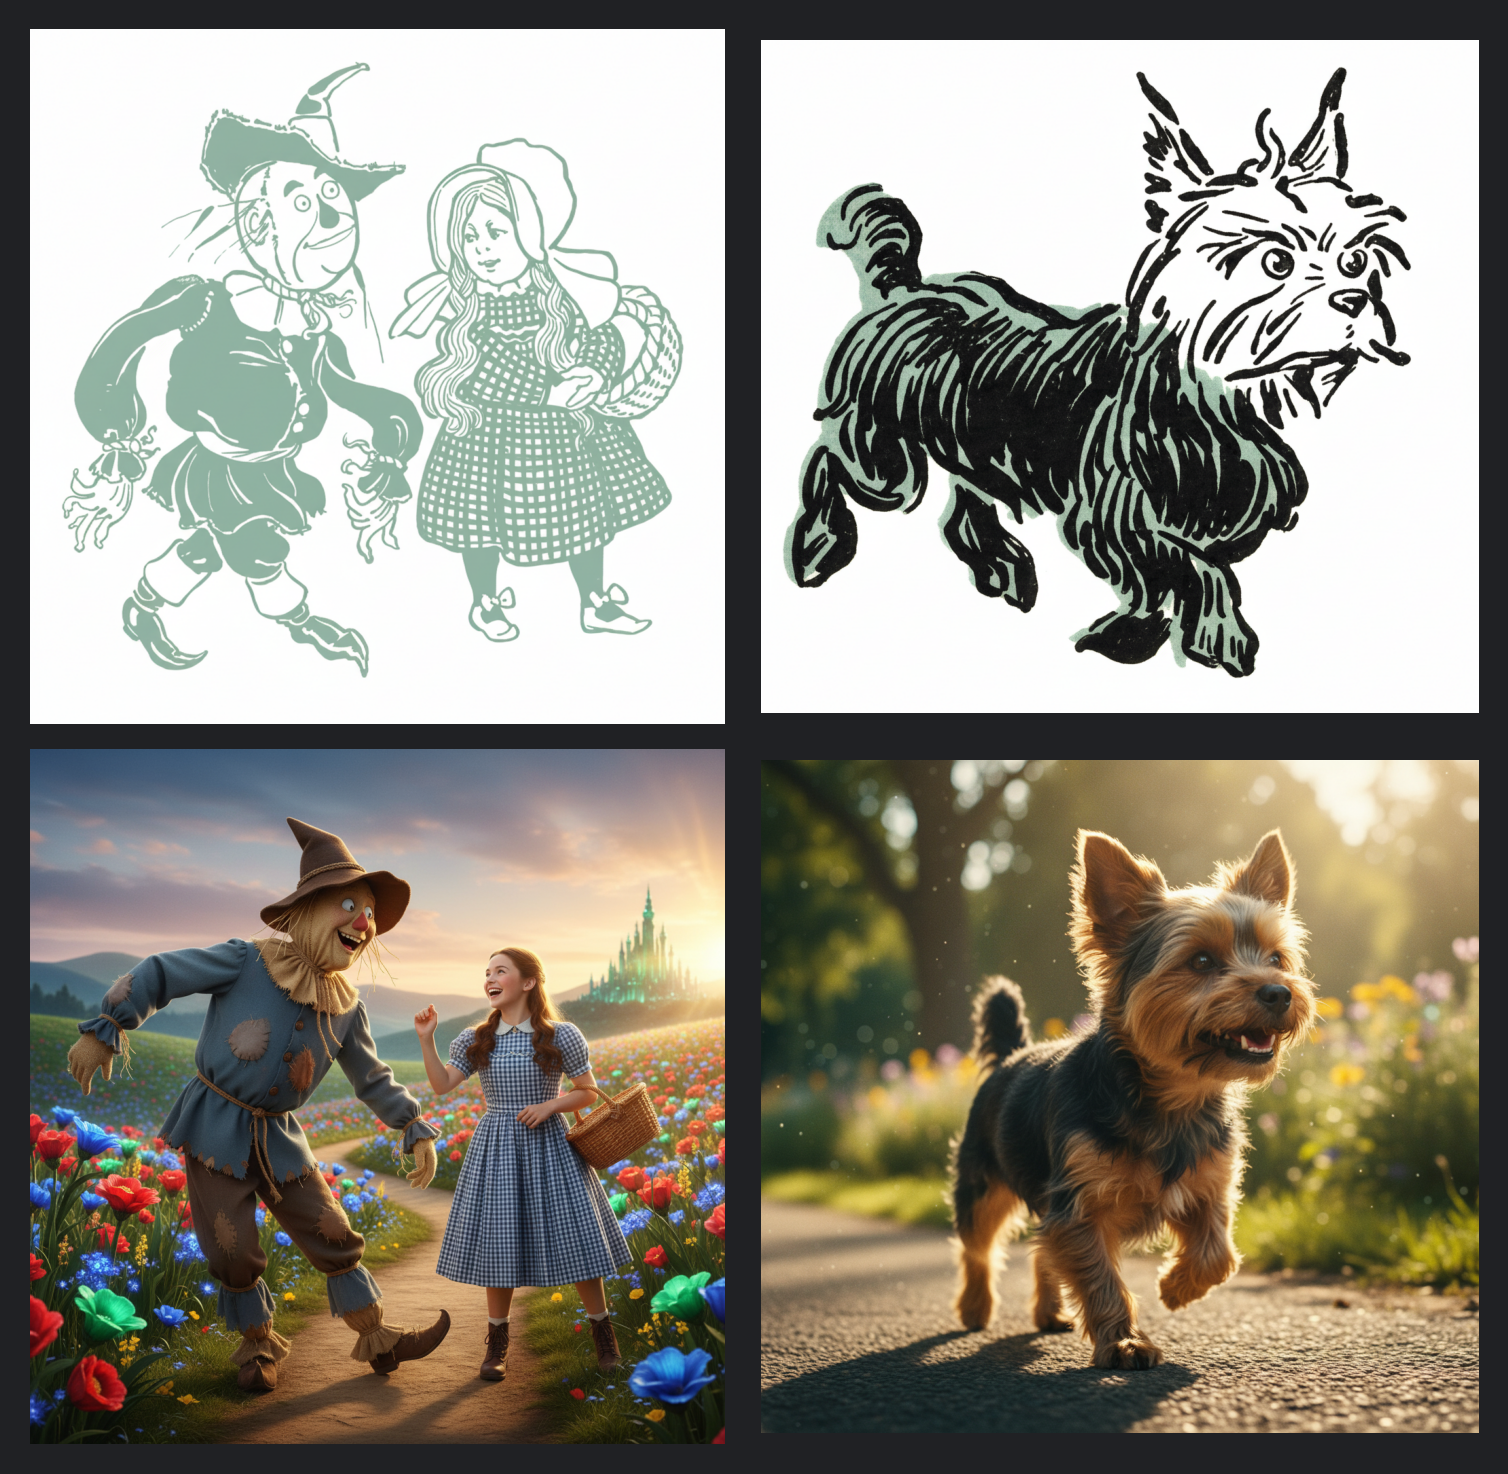
> 💡 The cast for a new movie is ready ;)
---
Cinematic images have various use cases:
- These cinematized stills can be perfect "reference images" for video generation models like Veo. See [Generate Veo videos from reference images](https://docs.cloud.google.com/vertex-ai/generative-ai/docs/video/use-reference-images-to-guide-video-generation#googlegenaisdk_videogen_with_image-python_genai_sdk).
- As they are photorealistic representations, they can also be a source for generating 2D or 3D visuals, in any style, with realistic figures, perfect proportions, advanced lighting, enhanced compositions…
- You can use them in many professional contexts or for high-end products: presentations, magazines, posters, storyboards, brainstorming sessions…
---
## 🏁 Conclusion
- Gemini's native spatial understanding enables the detection of specific visual objects based on a single prompt in natural language.
- We tested the detection of illustrations in book photos, which traditional machine learning (ML) models usually miss, as they are typically trained to detect people, animals, vehicles, food, and a finite set of physical object classes.
- We tested the detection of straight, tilted, and even significantly warped illustrations, and they were always precisely identified.
- The core implementation was straightforward, requiring minimal code using the Python SDK and customized prompts. By comparison, fine-tuning a traditional object detection model is time-consuming: it involves assembling an image dataset, labeling objects, and managing training jobs.
- This solution is very flexible: we could switch from detecting illustrations to electronic components, by adapting the prompt, while keeping the code unchanged.
- Using structured outputs (with a JSON schema or Pydantic classes, and the Python SDK) makes the code both easy to implement and ready to deploy to production.
- Then, Nano Banana allows editing these visual objects in virtually any way imaginable.
- We tested a workflow with restoration, colorization, and even cinematization steps, using imperative and descriptive prompts.
- The possibilities seem really endless, and the principles in this exploration can be reused in different contexts.
---
## ➕ More!
- **Try it yourself:** Use the [companion notebook](https://github.com/GoogleCloudPlatform/generative-ai/blob/main/gemini/use-cases/spatial-understanding/object_detection_and_editing.ipynb) to reproduce the results in this article.
- **Get inspired:** Check out the [Nano Banana recipes notebook](https://github.com/GoogleCloudPlatform/generative-ai/blob/main/gemini/nano-banana/nano_banana_recipes.ipynb) for more practical examples.
- **Follow me:** Connect with me (@PicardParis) on [LinkedIn](https://www.linkedin.com/in/picardparis) or [Twitter-X](https://x.com/PicardParis) for more cloud, applied AI, and Python explorations…
Thanks for reading. Let me know if you create something cool!
Comments
More Blog
View allaiHow to prompt Gemini 3.1's new text to speech model
Gemini 3.1 Flash text to speech (TTS) is a new model that you can direct to get the precise audio...
F
fofrgoogleadkBuilding Multimodal Real Time Agent with ADK, Azure AKS, Gemini CLI, and Gemini Flash Live 3.1
Leveraging the Google Agent Development Kit (ADK) and the underlying Gemini LLM to build cross cloud...
X
xbillgoogleadkBuilding a Multimodal Agent with the ADK, Amazon ECS Express, and Gemini Flash Live 3.1
Leveraging the Google Agent Development Kit (ADK) and the underlying Gemini LLM to build Agentic apps...
X
xbillpythonBuilding a Multimodal Agent with the ADK, Amazon Lightsail, and Gemini Flash Live 3.1
Leveraging the Google Agent Development Kit (ADK) and the underlying Gemini LLM to build Agentic apps...
X
xbillpythonBuilding a Multimodal Cross Cloud Live Agent with ADK, Amazon EKS, and Gemini CLI
Leveraging the Google Agent Development Kit (ADK) and the underlying Gemini LLM to build cross cloud...
X
xbillgoogleadkBuilding a Multimodal Agent with the ADK, Azure ACA, and Gemini Flash Live 3.1
Leveraging the Google Agent Development Kit (ADK) and the underlying Gemini LLM to build Agentic apps...
X
xbill