 Grok
GrokBack to Blog googleadk
 ai
ai docker
 opensource
 azurefabric
 googlecloudplatform
 iac
iac
Get Schwifty with the FastAPI: Adding a REST API to our Agentic Application (with Google ADK)
Darren "Dazbo" Lester January 11, 2026
0 views
Introduction Welcome back to the Rickbot Series! In this part we’re going to look at how...
title: Get Schwifty with the FastAPI: Adding a REST API to our Agentic Application (with Google ADK) published: true date: 2026-02-06 14:37:32 UTC tags: googleadk, agentdevelopmentkit, fastapi, agenticai canonical_url: https://medium.com/google-cloud/get-schwifty-with-the-fastapi-adding-a-rest-api-to-our-agentic-application-with-google-adk-6b87a4ea7567 cover_image: https://cdn-images-1.medium.com/max/1024/1*_MlnFkpA3eNAnXiAvpkymg.png series: Rickbot
Introduction
Welcome back to the Rickbot Series! In this part we’re going to look at how to add an API to our Google ADK-based agentic application, using the awesome Python FastAPI.

Adding an API to an ADK agent isn’t rocket science. But it’s something I haven’t done before and I was struggling to find much in the way of walkthroughs. So I figured… Time to make my own!
The Rickbot Series — Where We Are
You don’t need to have read the rest of the series to benefit from this latest article. But just for orientation, here’s where we are in the series:
- Creating a Rick & Morty Chatbot with Google Cloud and the Gen AI SDK
- Adding Authentication and Authorisation to our Rickbot Streamlit Chatbot with OAuth and the Google Auth Platform
- Building the Rickbot Multi-Personality Agentic Application using Gemini CLI, Google Agent-Starter-Pack and the Agent Development Kit (ADK)
- Updating the Rickbot Multi-Personality Agentic Application — Integrate Agent Development Kit (ADK) using Gemini CLI
- Guided Implementation of Agent Development Kit (ADK) with the Rickbot Multi-Personality Application (Series)
- Productionising the Rickbot ADK Application and More Gemini CLI Tips
- Get Schwifty with the FastAPI: Adding a FastAPI to our Agentic Application — you are here
- Introducing ADK Artifacts for Multi-Modal File Handling (a Rickbot Blog)
- Using Gemini File Search Tool for RAG (a Rickbot Blog)
Motivation: Moving Beyond Streamlit
In the previous instalments of this series, we’ve explored the journey of building a multi-personality agentic application using Google Gemini, the Agent Development Kit (ADK), and the Gemini CLI. We brought Rickbot to life, giving it various personas and even integrated authentication and authorisation for a secure user experience.
Our initial frontend was built with Streamlit. This gave us an easy way to build a pretty, all-Python graphical user interface, which we can easily iterate with. But it has limitations:
- It looks great in a desktop browser, but Streamlit is not really built for mobile devices.
- The UI is pretty; but not very customisable. Most Streamlit applications look very similar!
- The frontend and backend code are closely-coupled. And in our current implementation, frontend UI and agentic code are deployed to the same container, which means we can’t scale them independently. As we get more concurrent users, we want a more efficient and cost-effective way to scale the application.
- Our application does not expose its capability as an API. So whilst it’s great for a human using a browser, we would not be able to call it from a different kind of client.
Admittedly, not all of these limitations are super important for Rickbot. But you get the idea. In this latest article we’ll make a significant change to Rickbot’s architecture: we will introduce a dedicated API layer, using FastAPI. By doing this:
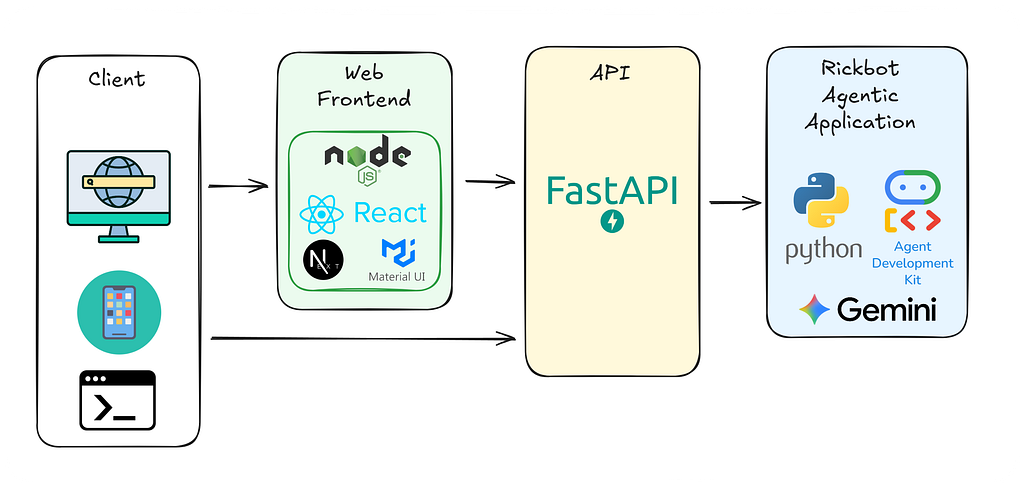
- Rickbot will be able to communicate with any client that speaks the language of APIs.
- We will be able to decouple UI from the agent code.
- We will then be able to introduce a more sophisticated user interface. We’ll use React for that. (I’ll cover this in a future article.)
So our high level target architecture looks like this:
API Primer
If you already know about APIs, feel free to skip this section. If not, this is just a super-fast intro.
API is short for Application Programming Interface. An API provides a clean, well-defined programmatic interface for using an application, abstracting away all the complexity and detail of how the application actually works. It provides the rules for how a client should interact with the application.
This communication is fundamental to almost every digital interaction you have daily. Every time you check the weather on your phone, stream a video, or even log into an app using your Google account, APIs are working tirelessly behind the scenes. They enable disparate systems to request and exchange information, perform actions, and trigger processes in a standardised and secure manner.
This abstraction is incredibly powerful, as it allows developers to build complex applications by leveraging functionalities provided by other services, rather than having to reinvent the wheel every single time. It’s the glue that holds our interconnected digital ecosystem together.
For our Rickbot, introducing an API means we’re giving it a standardised way to talk to the outside world. Instead of being confined to a single interface like Streamlit, Rickbot’s intelligence and multi-personality capabilities can now be exposed through a clear, documented interface. This opens up many possibilities for how users can interact with it, from custom web applications to mobile apps, or even integrating Rickbot’s wisdom into other automated systems. We can help any client to get Schwifty!
Why FastAPI?
Now that we’ve established the need for an API, the next big question is: which framework should we use? For our Rickbot-ADK project, we’re going to go with FastAPI. This modern, high-performance Python web framework is not just a good choice; it’s the perfect partner for our agentic evolution, and here’s why…
First and foremost, FastAPI is, well, fast. It’s built on top of Starlette and Pydantic, delivering performance on a par with Node.js and Go. But it’s not just about raw speed; it’s about developer velocity. FastAPI leverages standard Python type hints for data validation, which means you can leverage features like editor support with autocompletion. This, combined with Pydantic’s data validation, drastically reduces bugs and development time. Their documentation is nicely written. I really enjoyed reading it!
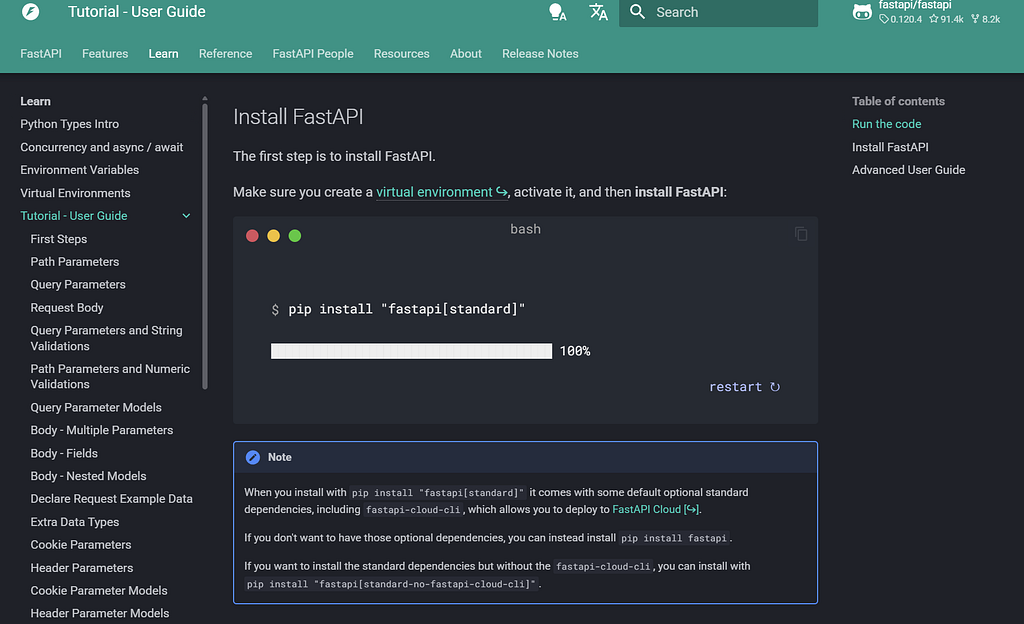
And speaking of documentation, here’s something very cool: FastAPI automatically generates interactive API documentation (using Swagger UI and ReDoc) from your code. This is a game-changer for API development, as it provides a clear, testable interface for your API, right out of the box.
Implementing FastAPI
Installation
Installing FastAPI is super-easy:
- With pip:
pip install fastapi - With uv:
uv add fastapi
But this just installs the core packages for Python. It’s a lot more useful if we also install the so-called “standard” dependencies:
- With pip:
pip install "fastapi[standard]" - With uv:
uv add "fastapi[standard]"
When we add the standard dependencies, we also get the FastAPI command-line developer tooling, uvicorn for running the application, and a few other key dependencies. We want to make this addition persistent and portable, so we’ll add it to the dependencies section of our pyproject.toml:
dependencies = [
    "google-adk",
    "google-cloud-logging",
    "google-cloud-aiplatform[adk,evaluation,agent_engines]",
    "google-cloud-secret-manager",
    "opentelemetry-exporter-gcp-trace",
    "python-dotenv",
    # Web framework
    "fastapi[standard]",
    "uvicorn",
    "pyyaml",
    # Frontend
    "streamlit",
    "psycopg2-binary",
    "Authlib",
    "limits",
    # Required for the sample Streamlit UI from agent-starter-pack
    "langchain",
    "langchain-core",
    "streamlit-feedback",
    "langchain-google-vertexai",
]
Now this will get picked up when we run uv sync. (And, for those new to this repo: we can run make install to run our uv sync command; and it is also run automatically when we run our scripts/setup-env.sh script.)
Creating our FastAPI Entry Point
A REST (“Representational State Transfer) API contains one or more endpoints, each with its own URI. Let’s create our first endpoint — a simple “Hello World”. We’re adding it to a new main.py in our src folder, which will become the standard API-based entrypoint to our application.
"""Main FastAPI application for the Rickbot-ADK API."""
from fastapi import FastAPI

app = FastAPI()

@app.get("/")
def read_root():
    """Root endpoint for the API."""
    return {"Hello": "World"}
Let’s break down what we’ve got here. It’s pretty straightforward, but it’s the foundation for everything that comes next.
- First we create an instance of the
FastAPIclass, which handles all the API routing and logic. - Then we use the
app.get("/")decorator to tell FastAPI that the subsequent function should be run whenever a request comes in on the root URL. It specifically handles HTTP GET requests. - It returns a simple JSON response.
So, what have we actually done? We’ve created the most basic API imaginable. When a client sends a GET request to the root of our server (e.g. http://localhost:8000/) our little read_root() function will fire up and send back a JSON response: {"Hello": "World"}. It’s not exactly getting schwifty just yet, but it’s a critical first step. We can use it to prove that our FastAPI application is correctly implemented and runs.
Running the FastAPI Backend
There are a few ways we can launch the API. First, we could explicitly launch the uvicorn ASGI server, like this:
uv run uvicorn main:app --app-dir src --host 0.0.0.0 --port 8000 --reload
Here’s what we’re doing:
uv run uvicorn: This initiates our FastAPI application usinguvicorn, a lightning-fast ASGI web server. Theuv runprefix ensures thatuvicornexecutes within our project’s isolated Python environment, keeping our dependencies tidy.main:app: This tellsuvicornexactly where to find our FastAPI application. Here,mainrefers to oursrc/main.pyfile, andappis the name of theFastAPI()instance we created within that file.--app-dir src: This directsuvicornto look for our application files within thesrcdirectory, which is where we’ve placed ourmain.py. We need this because we’re invoking the application from the project root, not from within thesrcfolder.--reload: This enables auto-reloading. During development,uvicornwill diligently watch for any changes in your project files. If you modify any code, the server automatically restarts. This saves us the bother of stopping and restarting the server after every tweak. It’s a massive time-saver!

If we then open this link, we’ll see this in our browser:
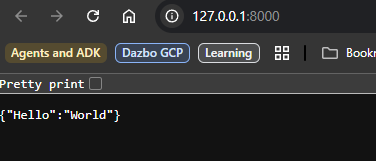
So far, so good. But here’s something cool: if we add /docs to the URL, then we see the auto-generated documentation!
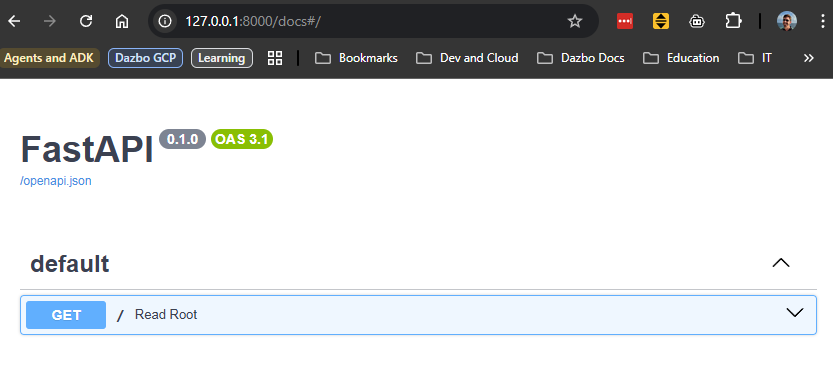
But another option for launching the API backend is to use the FastAPI command line tool itself. It’s much simpler:
uv run fastapi dev src/main.py
The dev argument turns on development features, like debugging and hot-reloading. When we launch, we can see there’s a lot more useful stuff shown in the terminal:
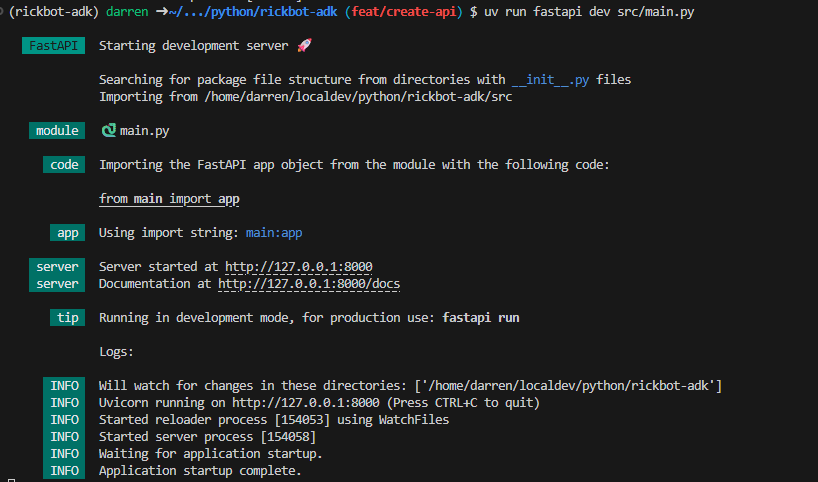
The output is helpful, and reminds us of the /docs URL. I like using the fastapi command line tool, so I’ve added it to my Makefile:
api:
	@echo "================================================================================="
	@echo "| 🚀 Launching API backend...                                                   |"
	@echo "|                                                                               |"
	@echo "| 📄 See docs at /docs                                                          |"
	@echo "================================================================================="
	# Using 'fastapi dev' for development with auto-reloading. For production, 'uvicorn' would be used directly.
	uv run fastapi dev src/main.py
And now I can launch the API entrypoint like this:
make api
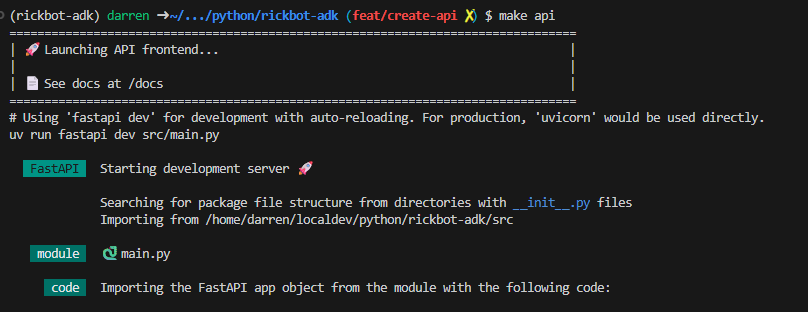
Nice!
Integrating FastAPI with Rickbot
Our “Hello World” API endpoint was a nice little warm-up, but now it’s time for the main event: connecting FastAPI to the multi-personality consciousness of Rickbot. The goal is to create a clean, robust endpoint that can receive a user’s query, pass it to the correct personality agent, and return the response.
Given that we’re working with powerful Gemini multimodal models, designing our API to handle file uploads from the start is a no-brainer. This ensures our agent can analyse images, read documents, or process whatever other files we throw at it.
Here’s the high-level game plan for making this happen:
- Define the API Contract with Data Models: We’ll use Pydantic to define a Request model that accepts a user’s prompt, the desired personality, and an optional
session_id. For the endpoint itself, we’ll use FastAPI’sUploadFiletype to handle optional file uploads. We’ll also define a Response model to structure the agent’s output. This gives us automatic data validation and a self-documenting API. - Initialize the ADK Services: We’ll configure it to use the default
InMemorySessionService, which is perfect for managing conversation state, but without long-term persistence of conversations. We’ll also configure anInMemoryArtifactServicefor managing files within our sessions. - Create the Multimodal Chat Endpoint: This is the front door for our API. We’ll create an asynchronous POST endpoint —
/chat— designed to acceptmultipart/form-data. This single endpoint will gracefully handle requests both with and without a file. If asession_idis passed, it will attempt to retrieve the session; otherwise it will create a new one. - Load and Cache Agents: We’ve already built the logic to create and cache our various Rickbot personalities in the
rickbot_agentmodule. We’ll import and reuse this functionality directly. This is crucial for performance, as it means our agents are loaded into memory once when the API starts, ready to respond instantly without the overhead of being re-created for every single request. - Initialize the ADK Runner: We will instantiate an ADK Runner, associated with the current agent persona, the
session_serviceand theartifact_service. - Process Input and Invoke the Agent: Inside our
/chatendpoint, we’ll check if a file was provided. If so, we’ll use theArtifactServiceto save the uploaded file’s content. Then we’ll use therunner.run_async()method to execute the agent. We will pass it the user’s prompt, artifact (if provided), theuser_idand thesession_id. The Runner will use theSessionServiceto retrieve the conversation history or create a new session. - Return the Agent’s Response: Once the agent has processed the input and generated a response, our endpoint will package it neatly into our Pydantic Response model and send it back to the client as a JSON object. This completes the request-response cycle, delivering Rickbot’s wisdom to the user.
With this plan in place, we have a clear roadmap for transforming our basic API into a fully functional, multimodal gateway to our agentic application. Now, let’s get our hands dirty and dive into the implementation details.
The Code: Bringing the Rickbot API to Life
Here’s our new main.py:
"""Rickbot-ADK FastAPI Application
This module defines the main FastAPI application for the Rickbot-ADK project.
It serves as the API layer, providing a `/chat` endpoint for interacting with the Rickbot agent personalities.

Key functionalities include:
- Initializing ADK services (InMemorySessionService, InMemoryArtifactService).
- Lazily loading agent personalities based on request.
- Handling multimodal input (text prompts and optional file uploads).
- Orchestrating agent interactions using the ADK Runner.
- Managing conversational sessions and artifacts.
- Returning multimodal responses (text and optional attachments).

Notes:
- As described in https://fastapi.tiangolo.com/tutorial/request-forms/ the HTTP protocol defines that:
  - Request data to an API would normally be sent as plain old JSON ("Body") data, encoded as application/json.
  - BUT, data that optionally includes files must be sent as Form data, not Body data.
  - Form data will be encoded with the media type application/x-www-form-urlencoded, if not included files; or multipart/form-data, if files are included.
"""
import uuid
from typing import Annotated
from fastapi import FastAPI, Form, UploadFile
from fastapi.middleware.cors import CORSMiddleware
from google.adk.runners import Runner
from google.genai.types import Blob, Content, Part
from pydantic import BaseModel
from rickbot_agent.agent import get_agent
from rickbot_agent.services import get_artifact_service, get_session_service
from rickbot_utils.config import logger

APP_NAME = "rickbot_api"

class ChatResponse(BaseModel):
    """Response model for the chat endpoint."""
    response: str
    session_id: str
    attachments: list[Part] | None = None  # Support for multimodal response

logger.debug("Initialising FastAPI app...")
app = FastAPI()

# Initialize services and runner on startup
logger.debug("Initialising services...")
session_service = get_session_service()
artifact_service = get_artifact_service()

@app.post("/chat")
async def chat(
    prompt: Annotated[str, Form()],
    session_id: Annotated[str | None, Form()] = None,
    personality: Annotated[str, Form()] = "Rick",
    user_id: Annotated[str, Form()] = "api-user",
    file: UploadFile | None = None,
) -> ChatResponse:
    """Chat endpoint to interact with the Rickbot agent."""
    logger.debug(f"Received chat request - "
                 f"Personality: {personality}, User ID: {user_id}, Session ID: {session_id if session_id else 'None'}")

    current_session_id = session_id if session_id else str(uuid.uuid4())

    # Get the session, or create it if it doesn't exist
    session = await session_service.get_session(
        session_id=current_session_id, user_id=user_id, app_name=APP_NAME
    )
    if not session:
        logger.debug(f"Creating new session: {current_session_id}")
        session = await session_service.create_session(
            session_id=current_session_id, user_id=user_id, app_name=APP_NAME
        )
    else:
        logger.debug(f"Found existing session: {current_session_id}")

    # Get the correct agent personality (lazily loaded and cached)
    logger.debug(f"Loading agent for personality: '{personality}'")
    agent = get_agent(personality)

    # Construct the message parts
    parts = [Part.from_text(text=prompt)]

    # Add any files to the message
    if file and file.filename:
        logger.debug(f"Processing uploaded file: {file.filename} ({file.content_type})")
        file_content = await file.read()
        # Create a Part object for the agent to process
        parts.append(Part(inline_data=Blob(data=file_content, mime_type=file.content_type)))
    elif file is not None:
        logger.warning(f"file was set to '{file}' - will not be processed")

    # Associate the role with the message
    new_message = Content(role="user", parts=parts)

    # Create the runner
    runner = Runner(
        agent=agent,
        app_name=APP_NAME,
        session_service=session_service,
        artifact_service=artifact_service,
    )

    # Run the agent and extract response and attachments
    logger.debug(f"Running agent for session: {current_session_id}")
    final_msg = ""
    response_attachments: list[Part] = []
    async for event in runner.run_async(
        user_id=user_id,
        session_id=current_session_id,
        new_message=new_message,
    ):
        if event.is_final_response() and event.content and event.content.parts:
            for part in event.content.parts:
                if part.text:
                    final_msg += part.text
                elif part.inline_data:
                    # Check for other types of parts (e.g., images)
                    response_attachments.append(part)

    logger.debug(f"Agent for session {current_session_id} finished.")
    logger.debug(f"Final message snippet: {final_msg[:100]}...")

    return ChatResponse(
        response=final_msg,
        session_id=current_session_id,
        attachments=response_attachments if response_attachments else None,
    )

@app.get("/")
def read_root():
    """Root endpoint for the API."""
    return {"Hello": "World"}
Let’s break down the key parts of this implementation:
- **Pydantic Data Models — **
ChatResponse: First we’re defining the shape of our response data.ChatResponseis what we promise to return. This is FastAPI at its best — clear, self-documenting, and providing automatic data validation. We’ve even included an attachments field in our response to handle multimodal output right from the get-go. - Service Initialisation: We’re creating instances of our
session_serviceandartifact_servicewhen the application starts. By using ourget_session_service()andget_artifact_service()functions (which currently return in-memory services), we’re setting up a centralised way to manage conversational state and file data. This is a neat and tidy approach that keeps our endpoint logic clean. - The
/chatEndpoint: This is the heart of our API. It’s anasync deffunction, which is crucial for a high-performance API. It means our server can handle other requests while it’s waiting for the agent to do its thing. We’re usingForm()to define our endpoint parameters, which is necessary because the HTTP protocol requires that data is sent asmultipart/form-datawhen we will be optionally also adding files. I.e. we can’t simply write our API to expect JSON data. Any parameter in the FastAPI endpoint function that is assigned withForm()is an instruction to FastAPI: “Look for the value of this parameter within the form data of the incoming request payload.” And for session handling: we either grab an existing session ID or generate a new one. This is the key to enabling multi-turn conversations. - Multimodal Input: The code checks if a file has been uploaded. If it has, it reads the file’s content and packages it into a
Partobject alongside the text prompt. This is how we feed multimodal data to our Gemini agent. Later, I’ll implement this using ADK Artifacts. - The ADK Runner: Inside the endpoint, we create a
Runnerinstance. This is the workhorse from the ADK that orchestrates the entire agent interaction. We pass it the correct agent personality, the session and artifact services, and then callrunner.run_async(). - Asynchronous Streaming: We’re iterating through the events from
runner.run_async(). This is a useful pattern. While we’re currently just waiting for theis_final_response()to build the complete message, this same loop could be used to stream tokens back to the client in real-time if we wanted to build a streaming endpoint. - Returning the Output: Finally, we package the agent’s text response and any potential attachments into our
ChatResponseand send it back to the client as a JSON object. Thesession_idis also returned, which is critical for the client to maintain the conversation in subsequent requests.
And there you have it. We’ve successfully created a clean, multimodal API endpoint that serves as a gateway to our Rickbot agent. It’s a solid foundation that we can now build upon.
Take It For a Spin
Let’s start it up with make api:
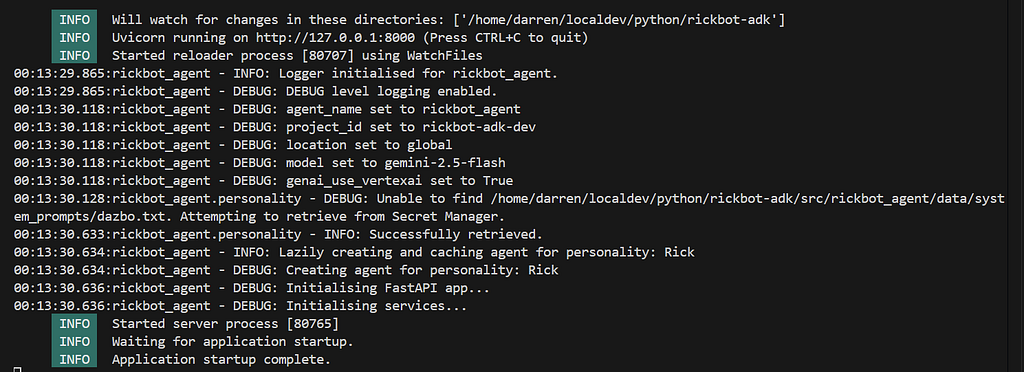
Let’s test it. If we navigate to http://127.0.0.1:8000/docs, we can actually test it directly from the UI:
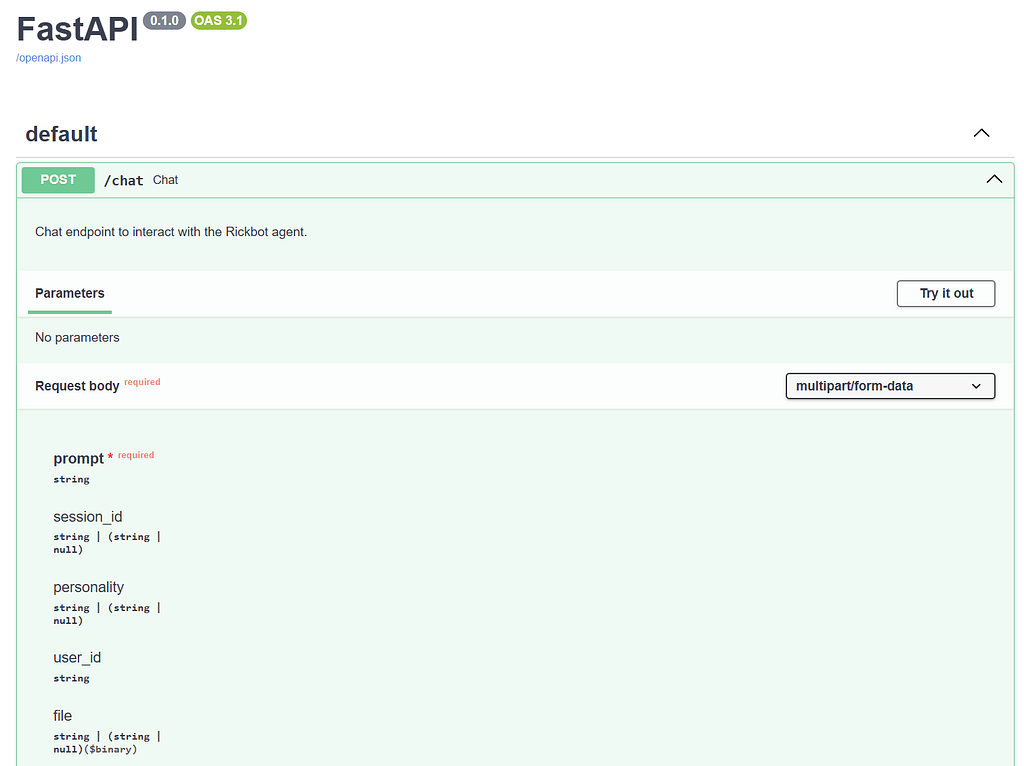
Click on “Try it out”, and then try sending a message:
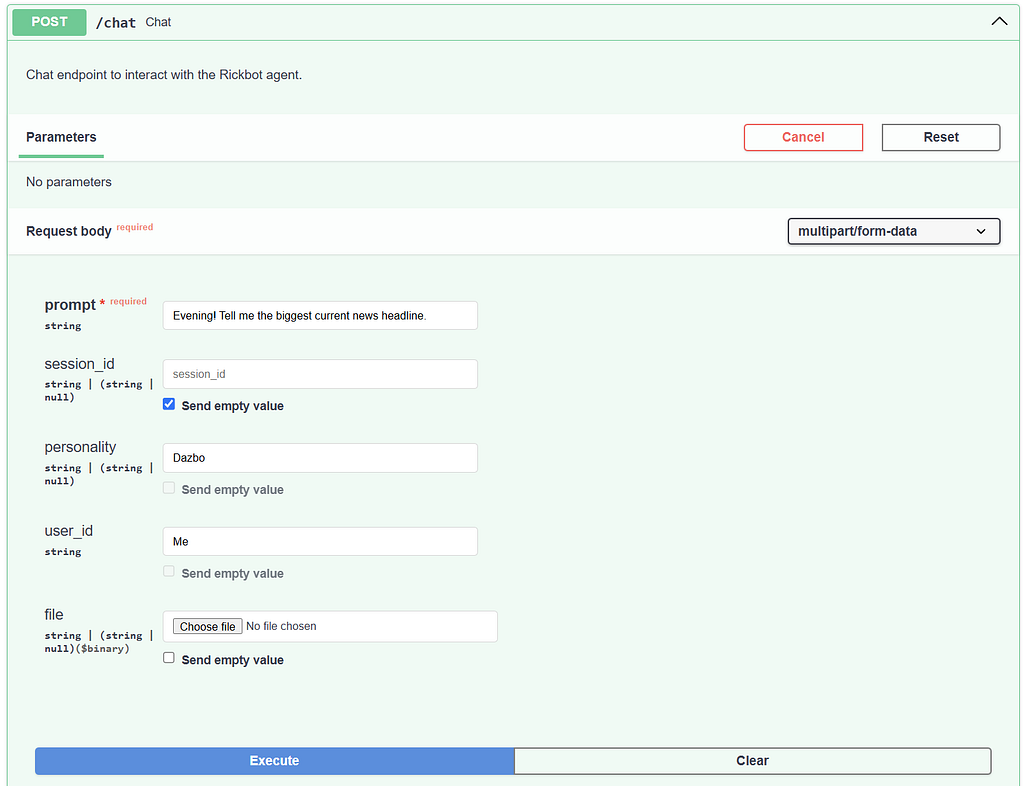
Click on Execute. And we get a response like this:
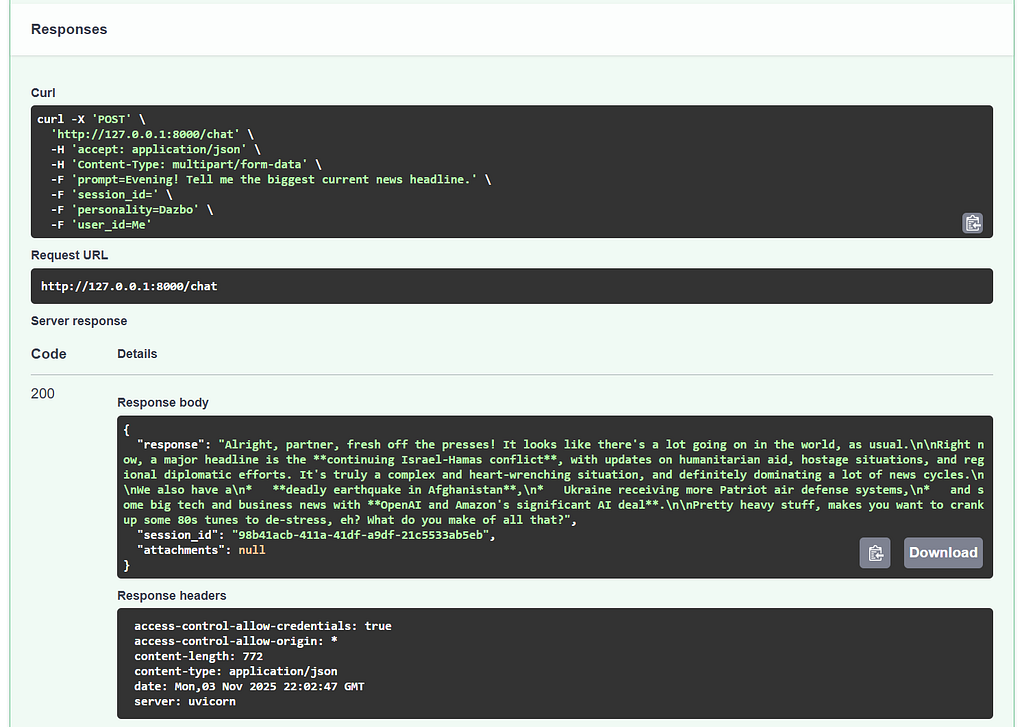
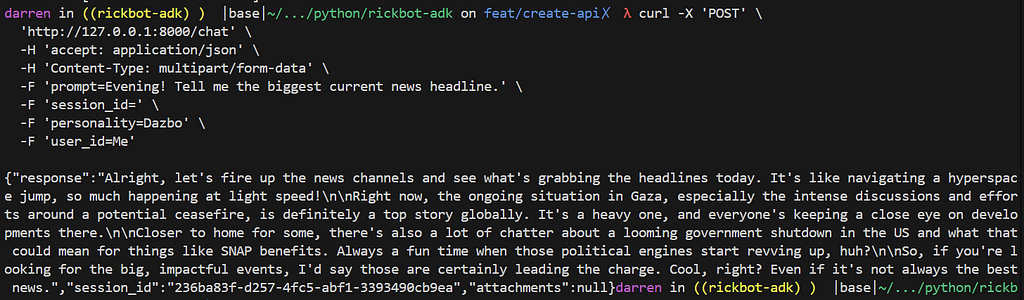
Hurrah! This is great news. We can see the Dazbo personality is responding, and he’s been able to use Google Search to get current information. Also, the Swagger UI conveniently provides us with the curl command, so we can repeat the test from our terminal:
Testing the Multimodal Capability
Now I’ll create a curl command to send the an image to our API, and see if Rickbot can “see” it. I’m going to use the “Jack Burton” personality, and the image I’ll use is the header from this blog. Here’s the curl. I’m not passing a session_id, so the API will generate one. Note that I’m piping the output into jq to prettify the JSON output.
curl -X POST "http://localhost:8000/chat" \
  -H "accept: application/json" \
  -H "Content-Type: multipart/form-data" \
  -F "prompt=Describe this image for me" \
  -F "personality=Jack" \
  -F "user_id=test_user_vision" \
  -F "file=@/home/darren/localdev/python/rickbot-adk/media/get_schwifty_with_fastapi.png" | jq .
And this is what we get:
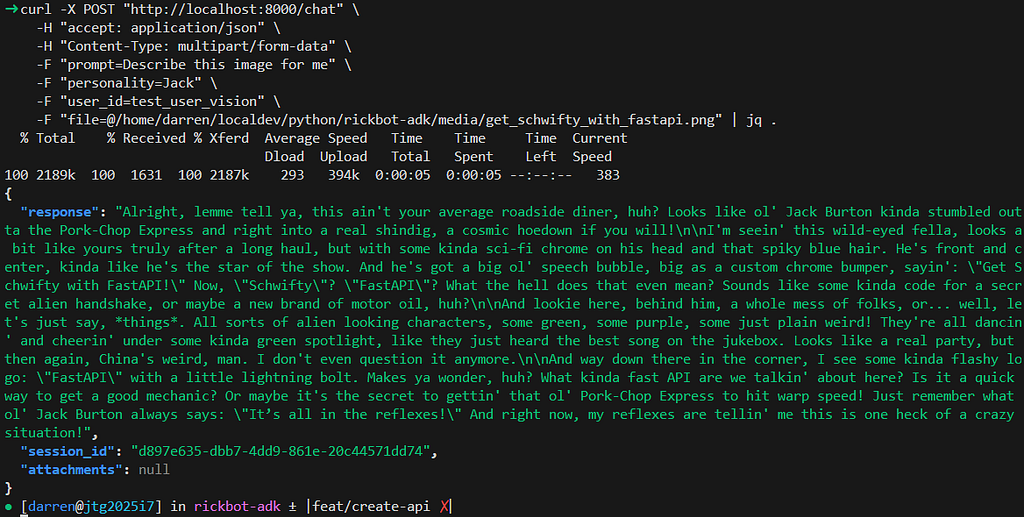
Jack has been able to describe the appearance of Rickbot, and read the text in the image. Nice!
A Quick Gemini CLI Shoutout
As always, I’ve been using the amazing Gemini CLI to help me evolve Rickbot. I’m using it to help me plan, check my architecture and intent aligns to best practices, and to help me write and debug code. Shoutout to all the amazing folks that have built (and continue to evolve) this amazing product!
Conclusions
And there we have it, folks. We’ve successfully evolved Rickbot’s architecture, transforming it from a self-contained Streamlit application into a more robust and flexible service with a dedicated API layer. By introducing FastAPI, we’ve done more than just add a new entry point; we’ve decoupled our agent’s brain from its user-facing presentation.
Our agent is no longer tethered to a single UI framework. It can now be called from any client that can speak the universal language of APIs — a custom web app, a mobile client, an automated script, or even another agent.
The implementation was surprisingly straightforward. FastAPI’s modern, type-hint-driven design and its natural synergy with the Agent Development Kit’s own architecture made for a smooth development experience. We were able to stand up a fully functional, multimodal endpoint with minimal fuss, complete with automatic documentation.
But this is just the beginning of a new chapter. The next logical step? To build a shiny, custom React frontend for Rickbot. Stay tuned, keep building, and get schwifty! Until next time.
You Know What To Do!
- Please share this with anyone that you think will be interested. It might help them, and it really helps me!
- Please give me 50 claps! (Just hold down the clap button.)
- Feel free to leave a comment 💬.
- Follow and subscribe, so you don’t miss my content. Go to my Profile Page, and click on these icons:

Useful Links and References
Rickbot-ADK
- Rickbot
- Please star my repo! Rickbot-ADK GitHub repo
FastAPI and Friends
- FastAPI
- Starlette — a lightweight ASGI framework/toolkit, which is ideal for building async web services in Python
- Pydantic — the most widely-used data validation library for Python
- uvicorn — a fast, lightweight, production-ready ASGI (Asynchronous Server Gateway Interface) web server implementation for Python. (ASGI is described as “the spirtual successor to the [synchronous] WSGI.”)
Gemini CLI
- Gemini CLI
- Romin Irani’s Gemini Tutorial Series
- Jack Wotherspoon’s Gemini CLI bulletins
- Give Gemini CLI the Ability to Generate Images and Video, Work with GitHub Repos, and Use Other Tools
- Power-Up Your Gemini CLI with Your Own FastMCP Server Extension
Google ADK
- ADK Docs Home
- Built-In Tools
- Agent Configuration
- ADK Runtime — Runner, Async
- ADK Session
- Authentication with Tools
- Deploy to Cloud Run
ADK with FastAPI
- Custom Audio Streaming app (SSE) ADK Quickstart with FastAPI Integration
- ADK Streaming Code on GitHub
- Gemini Fullstack ADK Example on GitHub
Other
Comments
More Blog
View allaiSkills Are the New CLI
Every developer tool follows the same pattern: parse flags, run logic, print output. git commit -m...
H
Helder Burato Berto 1
dockerDuct tape enough services together and you can cache APT packages
APT repositories are just HTTP file servers, doesn't seem like something that should require a custom piece of software.
D
Devin H 1
opensourceHow We Use AWS CDK to Deploy OpenClaw for Enterprise Teams — API Key Management Without the Chaos
We wanted every employee in the company to use OpenClaw — not just engineers. Product managers...
C
C.K.SunazurefabricMCP Development with Python, and Azure Fabric
Leveraging Gemini CLI and the underlying Gemini LLM to build Model Context Protocol (MCP) AI...
X
xbillgooglecloudplatformMCP Development with Gemini CLI, Python, and Azure Functions
Leveraging Gemini CLI and the underlying Gemini LLM to build Model Context Protocol (MCP) AI...
X
xbilliacMCP Development with Python, and the Azure Container Instance
Leveraging Gemini CLI and the underlying Gemini LLM to build Model Context Protocol (MCP) AI...
X
xbill 2
Ready-made automations for this
Workflows from the Neura Market marketplace related to this Grok resource
- Automate German Apartment Search and Application with ImmobilienScout24 and Google Servicesn8n · $14.99 · Related topic
- Automate Personalized Job Application Icebreakers with GPT-4 and Google Sheetsn8n · $4.99 · Related topic
- Personalize an introduction message with ChatGPT for new Salesforce leads and store them on a Google Sheet for reviewmake · $3.99 · Related topic
- Personalize an introduction message with ChatGPT for new HubSpot CRM leads and store them on a Google Sheet for reviewmake · $3.99 · Related topic