
Back to Blog googlecloud
 gemma
gemma community
 ai
ai ai
ai githubactions
 ai
ai
Connecting GCP Budget Alerts to AppSheet: A Step-by-Step Guide
Aryan Irani June 12, 2026
0 views
Have you ever woken up to a massive Google Cloud bill because a developer accidentally left a cluster...
Have you ever woken up to a massive Google Cloud bill because a developer accidentally left a cluster running, or an API got stuck in an infinite loop?
Cloud "bill shock" is a rite of passage for many builders, but it can be avoided to a large extent. While Google Cloud allows you to set budget alerts that send you an email when you cross a threshold, an email doesn't stop the bleeding. By the time you see the email, log into your laptop, authenticate, navigate the Google Cloud console, and find the offending resource, you could be out hundreds or thousands of dollars.
What if, instead of an email, you got a push notification on your phone with a big red "Kill Resources" button?
In this comprehensive tutorial, we are going to bridge the gap between enterprise Google Cloud infrastructure and Google Workspace. We will build a serverless architecture using Cloud Functions, Pub/Sub, Google Sheets, and AppSheet to create a custom mobile app that gives you absolute, instant control over your cloud spend.
Whether you are a beginner looking to understand Event-Driven Architecture, or a seasoned architect looking for a rapid Low-Code internal tool, this guide will walk you through every single click and line of code.
The Architecture: How It All Connects
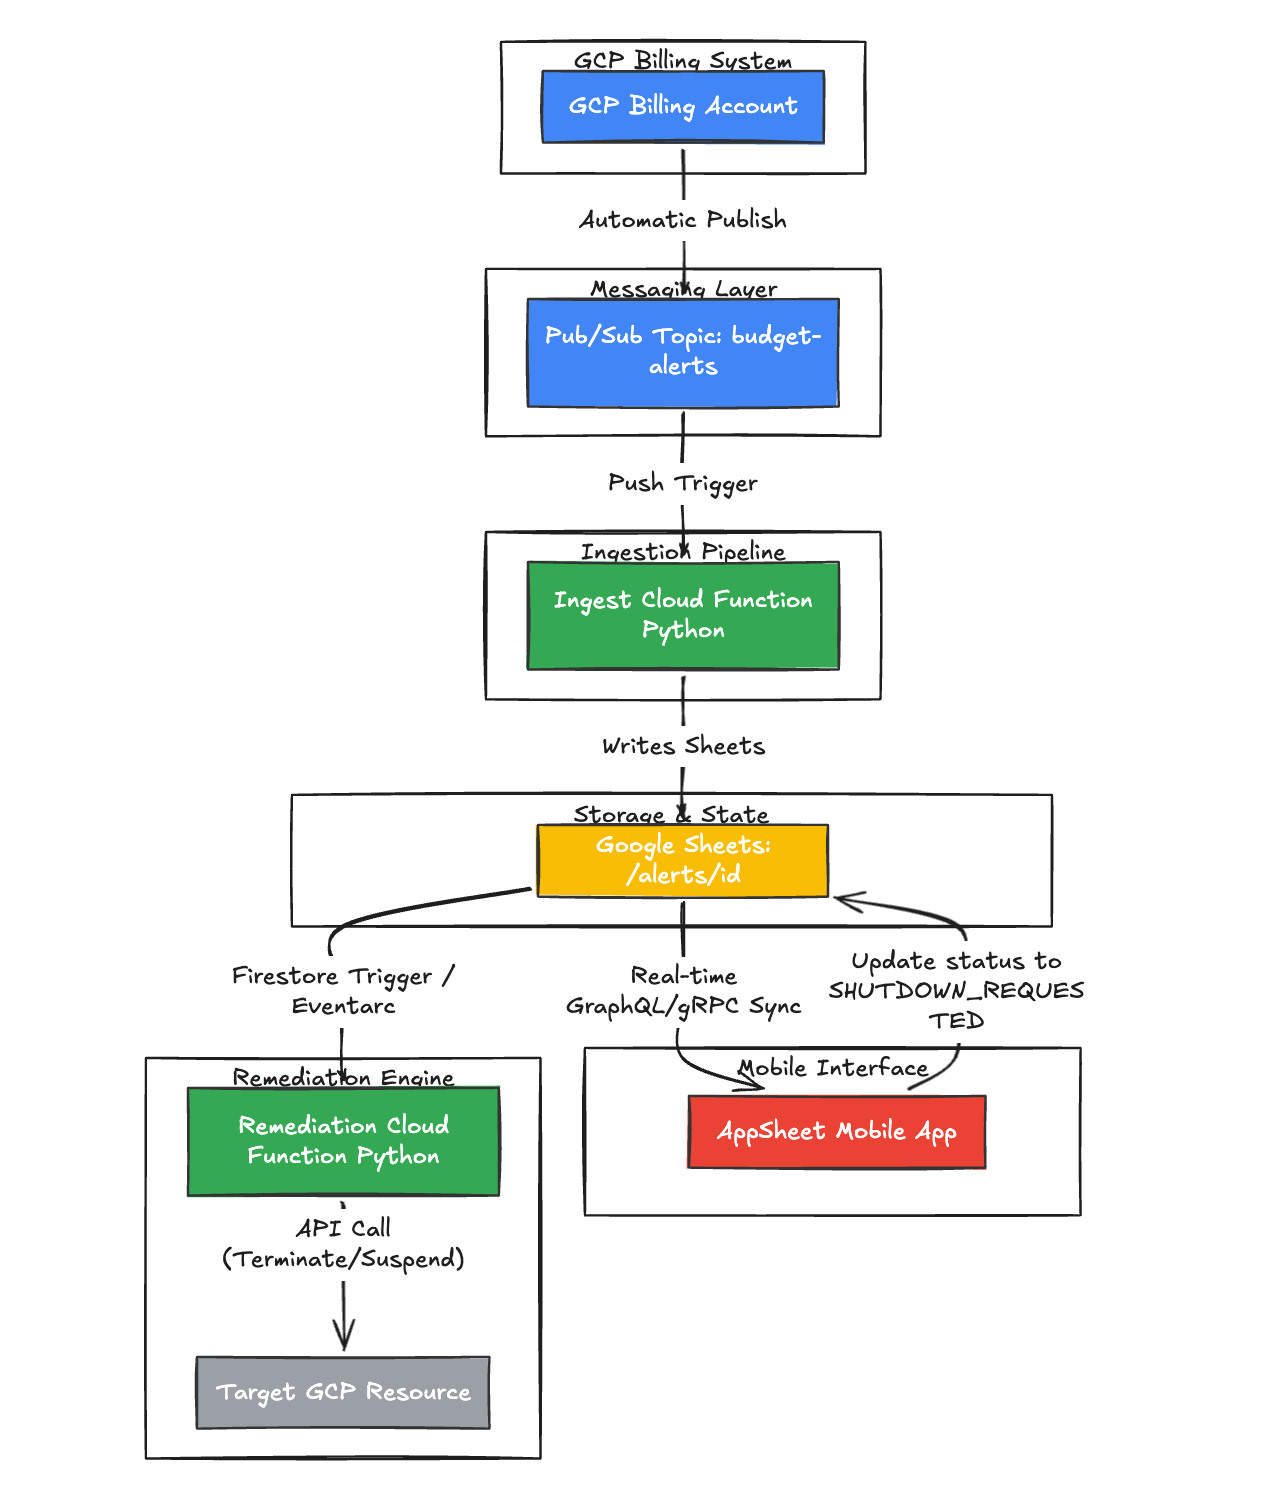
Before we write code, let's understand the flow of data. Event-driven architecture means one system yells into the void, and another system is waiting to catch it.
-
Google Cloud Billing detects a budget anomaly and publishes a payload to a Pub/Sub topic. Think of Pub/Sub as a massive post office.
-
An Ingest Cloud Function (Python) is subscribed to that post office. It catches the payload, parses the metrics, and uses the Google Sheets API to write a row to a Google Sheet.
-
AppSheet (a low-code platform) reads the sheet and instantly generates a mobile UI, sending a Push Notification to your phone. When you tap the "Kill Resources" button in AppSheet, an AppSheet Automation Bot fires a Webhook.
-
A Remediation Cloud Function receives the webhook and executes a secure shutdown command against the target resource using the Google Compute API.
Let's build it step-by-step!
Step 1: Setting up the Database (Google Sheets)
Why Google Sheets? Because for rapid prototyping and internal tools, a spreadsheet is the easiest database to visually debug.
-
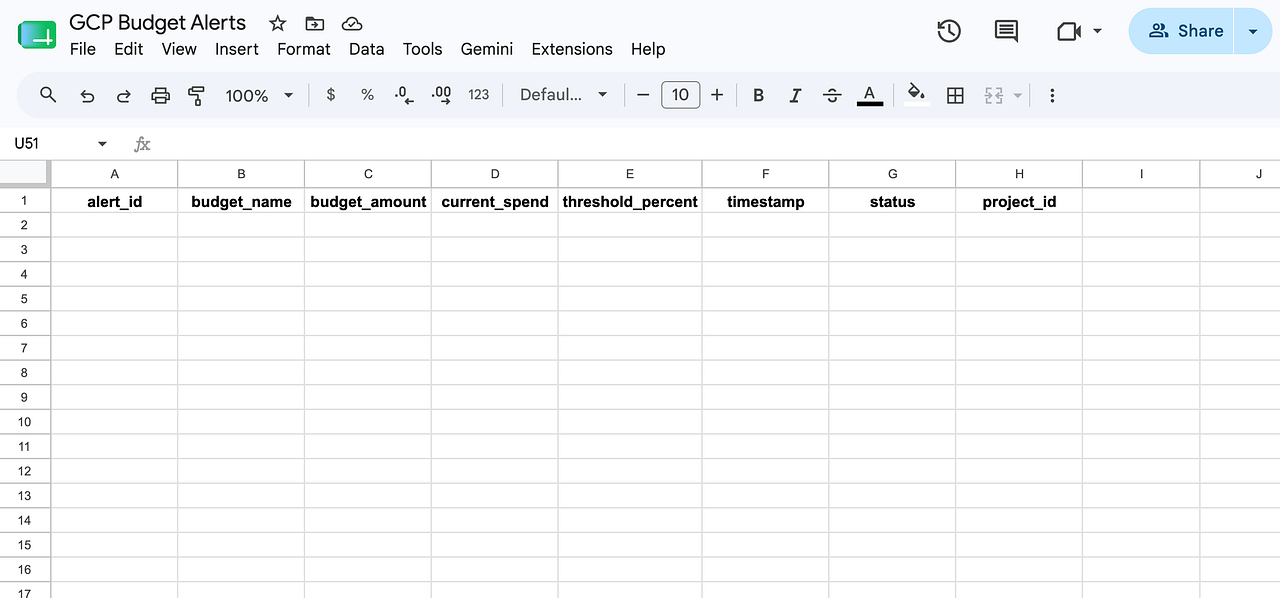
Open Google Sheets and create a new blank spreadsheet. Name it "Google Cloud Budget Alerts".
-
In the first row, create the following headers exactly as written:
alert_id,budget_name,budget_amount,current_spend,threshold_percent,timestamp,status,project_id
Keep this tab open, we will need the Sheet ID from the URL later.
Step 2: The Ingest Pipeline (Pub/Sub & Cloud Functions)
Now we need Google Cloud to send data to our sheet whenever you spend too much money.
1. Create the Pub/Sub Topic
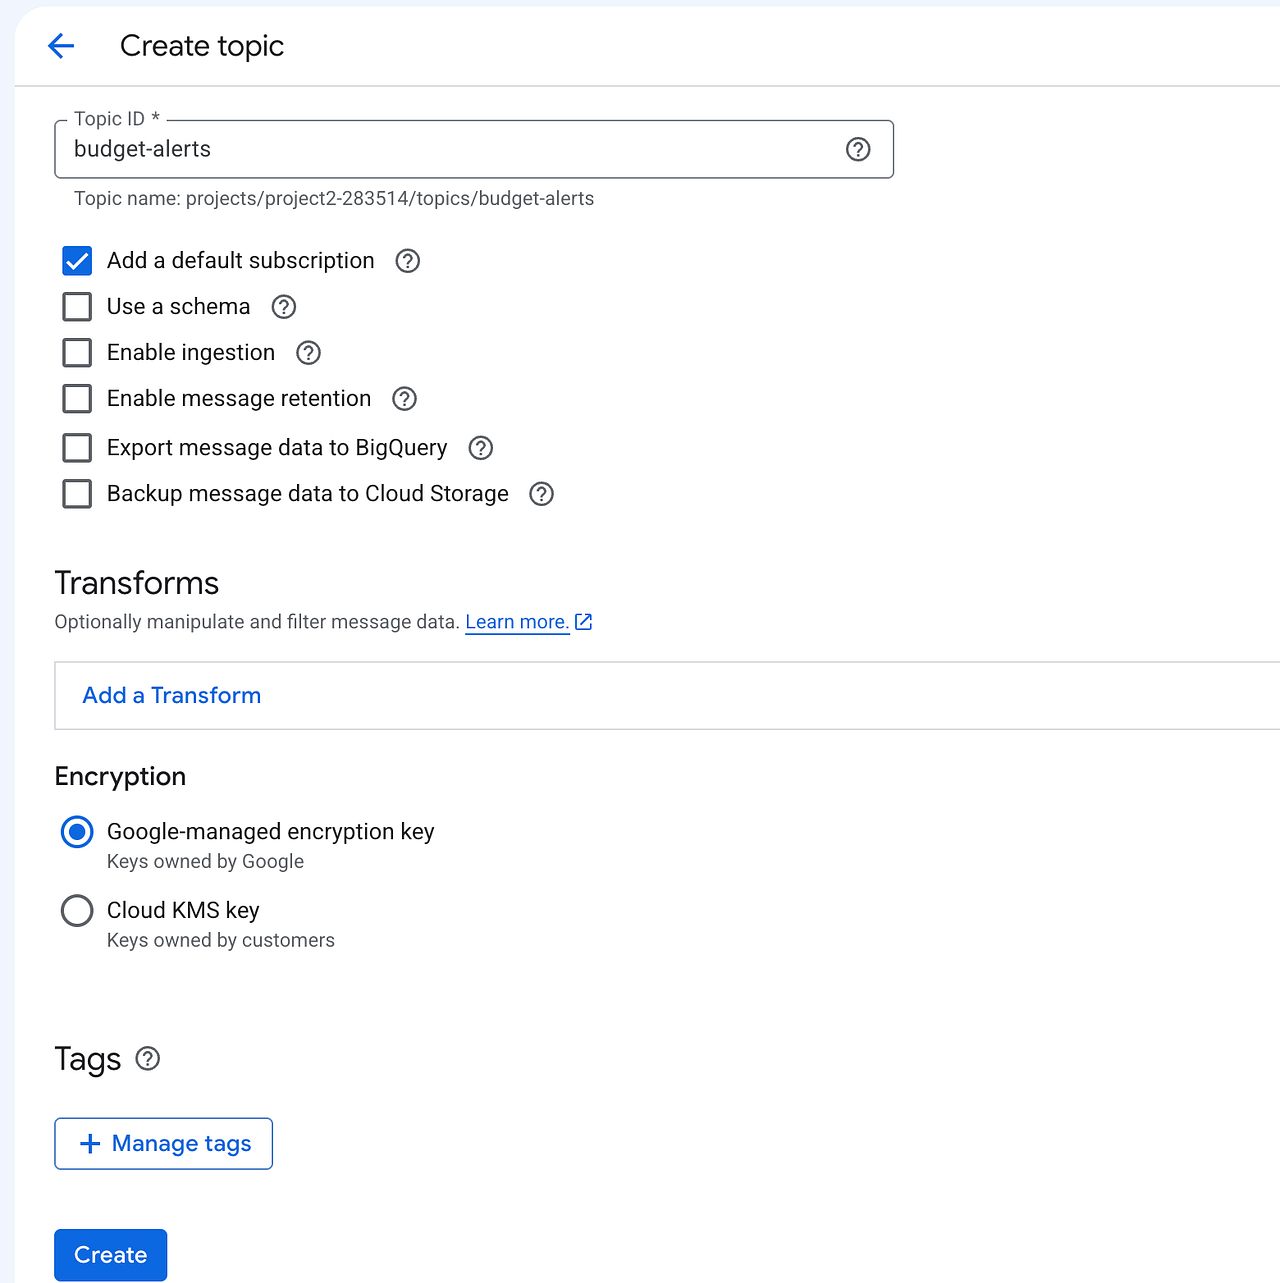
- Open the Google Cloud Console and search for Pub/Sub.
- Click Create Topic and name it budget-alerts. Uncheck "Add a default subscription" (our Cloud Function will create one automatically).
2. Connect Google Cloud Billing to Pub/Sub
This is the most critical link in the chain. We have to tell the Google Cloud Billing system to actually use the post office we just built.
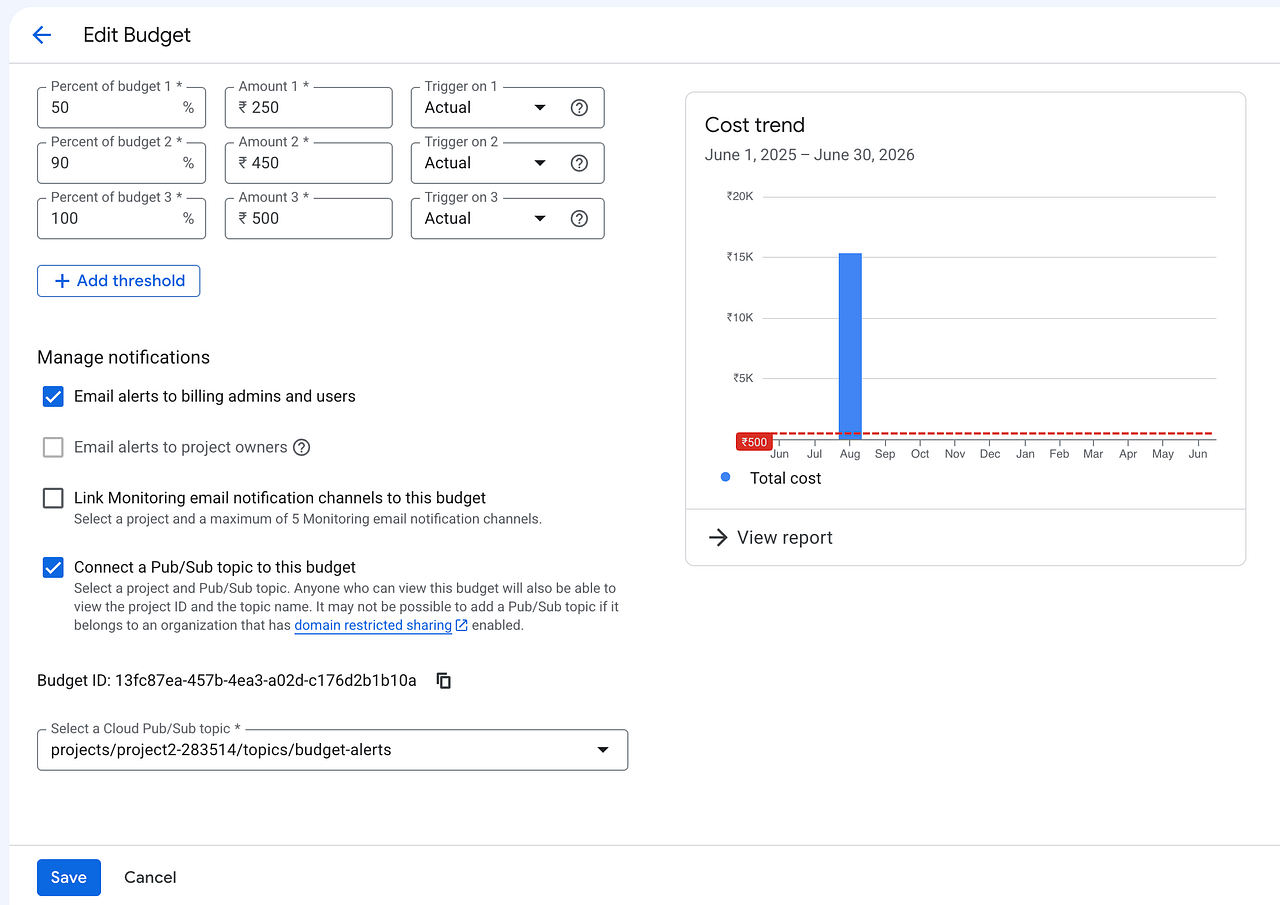
- In the Google Cloud Console, navigate to Billing -> Budgets & alerts.
- Click Create Budget. Name it "development-budget".
- Under Amount, set your target budget (e.g., $100).
- Under Actions (this is the secret sauce), scroll down to the Manage notifications section.
- Check the box for "Connect a Pub/Sub topic to this budget".
- Select your Google Cloud Project and choose the
budget-alertstopic we just created from the dropdown. Save the budget.
3. Deploy the Ingest Cloud Function
This Python script is the "glue" between the Google Cloud Billing alerts and Google Sheets.
- Search for Cloud Functions in the Google Cloud console and click Create Function.
- Select Gen 2. Name it
ingest-budget-alert. - In the Trigger section, select Cloud Pub/Sub and choose your
budget-alertstopic. - Expand the Runtime, build, connections and security settings, and add an Environment Variable named
SPREADSHEET_ID. Paste the ID found in your Google Sheet's URL. - Click Next. Change the Runtime to Python 3.11.
In your requirements.txt, add these libraries so GCP knows what packages to install:
functions-framework==3.*
google-api-python-client==2.*
google-auth==2.*
In your main.py, paste this code.
import base64
import json
import os
import datetime
import uuid
import functions_framework
from googleapiclient.discovery import build
import google.auth

# 1. Initialize Google Sheets client securely
credentials, project = google.auth.default(scopes=['https://www.googleapis.com/auth/spreadsheets'])
sheets_service = build('sheets', 'v4', credentials=credentials)

@functions_framework.cloud_event
def ingest_budget_alert(cloud_event):
    SPREADSHEET_ID = os.environ.get('SPREADSHEET_ID')

    # 2. Decode the incoming message from Pub/Sub
    pubsub_message = base64.b64decode(cloud_event.data['message']['data']).decode('utf-8')
    alert_data = json.loads(pubsub_message)

    # 3. Extract the exact metrics we care about
    cost_amount = float(alert_data.get('costAmount', 0.0))
    budget_amount = float(alert_data.get('budgetAmount', 1.0))
    budget_name = alert_data.get('budgetDisplayName', 'Unknown Budget')

    threshold_percent = cost_amount / budget_amount
    alert_id = str(uuid.uuid4())[:8]
    timestamp = datetime.datetime.utcnow().isoformat()
    project_id = os.environ.get('GCP_PROJECT', 'my-test-project')

    # 4. Format the row and push to Google Sheets
    row_data = [
        alert_id, budget_name, cost_amount, cost_amount,
        threshold_percent, timestamp, "PENDING", project_id
    ]
    body = {'values': [row_data]}

    sheets_service.spreadsheets().values().append(
        spreadsheetId=SPREADSHEET_ID, range="Sheet1!A:H",
        valueInputOption="USER_ENTERED", body=body
    ).execute()

    print(f"✅ Appended alert to Google Sheet.")
Crucial Step: When the function deploys, go to its "Details" page and find the Service Account email it is using (usually looks like 123456789-compute@developer.gserviceaccount.com). You must go to your Google Sheet, click the "Share" button, and add this email as an Editor! Otherwise, the script will get a Permission Denied error.
Step 3: Building the Low-Code Mobile App
We have data flowing into a spreadsheet. Now let's turn that spreadsheet into a mobile app in under 60 seconds without writing a single line of iOS or Android code.
- Go to AppSheet.com and log in with your Google account.
- Click Create -> App -> Start with your own data.
- Select the "Google Cloud Budget Alerts" Google Sheet.
AppSheet will analyze your columns and instantly generate a working mobile app on your screen!
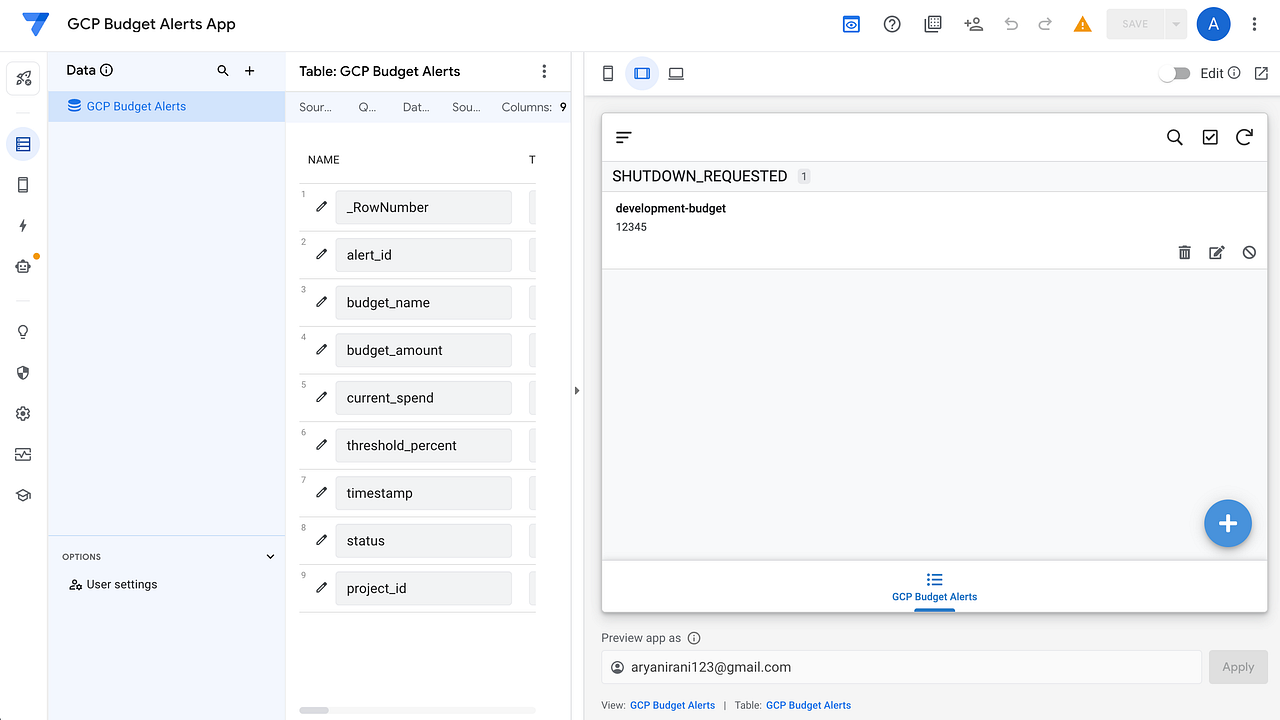
Creating the "Kill Switch" Action
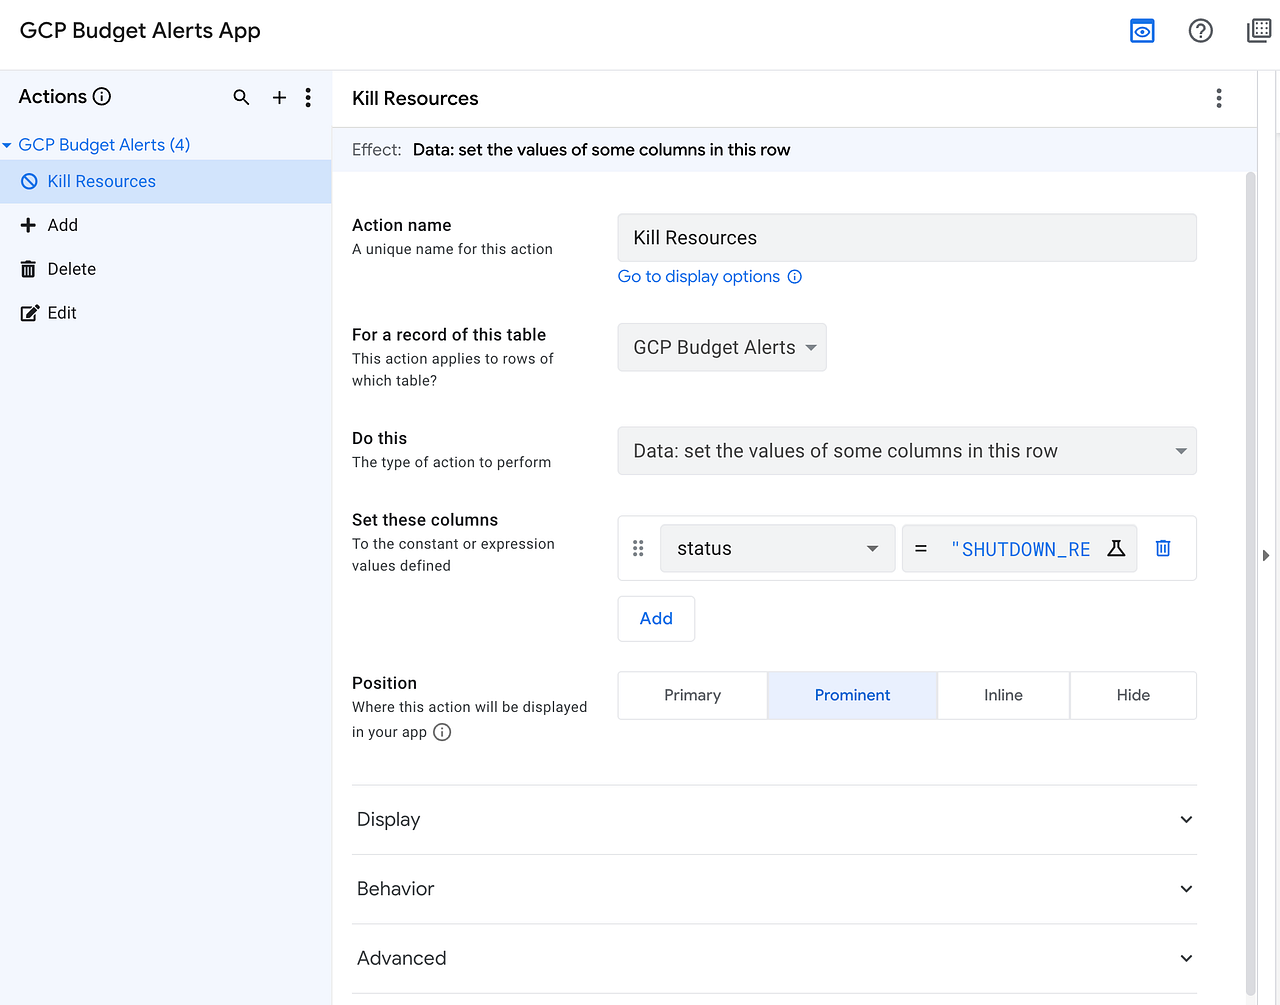
We need a giant red button to press when disaster strikes.
- In the left-hand menu, click on the Actions icon (the lightning bolt).
- Click + New Action.
- Configure it exactly like this:
- Action Name: Kill Resources
- For a record of this table: alerts
- Do this: Data: set the values of some columns in this row
- Set these columns: Choose status from the dropdown, and type "SHUTDOWN_REQUESTED" in the formula box.
4.Go to Appearance, choose a stop sign icon.
Step 4: The Remediation Engine (The Webhook)
Pressing a button in an app doesn't magically turn off a server on Google Cloud. We need Google Cloud to listen to AppSheet. We will deploy a second Cloud Function, this time with an HTTP Trigger, that acts as our Remediation Engine.
- Go back to Cloud Functions and Create a new Function.
- Name it
remediate-budget-alert. - For the trigger, select HTTPS and choose "Allow unauthenticated invocations" (for this tutorial).
- Copy the Trigger URL shown on the screen! You will need this for AppSheet.
Here is the Python code for main.py. This script listens for the HTTP request, verifies you actually pressed the button, and uses the Compute API to forcefully stop a virtual machine.
import os
import functions_framework
from googleapiclient.discovery import build
from google.auth import default

credentials, project = default()
compute = build('compute', 'v1', credentials=credentials)

@functions_framework.http
def remediate_resource(request):
    # 1. Parse the JSON sent by AppSheet
    request_json = request.get_json(silent=True)
    status = request_json.get("status")
    project_id = request_json.get("project_id")

    # 2. Security Check: Ensure the button was actually pressed
    if status != "SHUTDOWN_REQUESTED":
        return 'Ignoring status', 200

    print(f"🚨 SHUTDOWN AUTHORIZED. Commencing remediation...")

    # 3. The Kill Command!
    # (Hardcoded for this tutorial, but can be dynamic based on the payload)
    ZONE = 'us-central1-a'
    INSTANCE_NAME = 'demo-kill-switch-vm'

    request = compute.instances().stop(
        project=project_id, zone=ZONE, instance=INSTANCE_NAME
    )
    request.execute()

    return 'Shutdown successful', 200
Step 5: Closing the Loop (The Automation Bot)
Finally, we tell AppSheet to hit that HTTP URL whenever you press the red Kill Switch button.
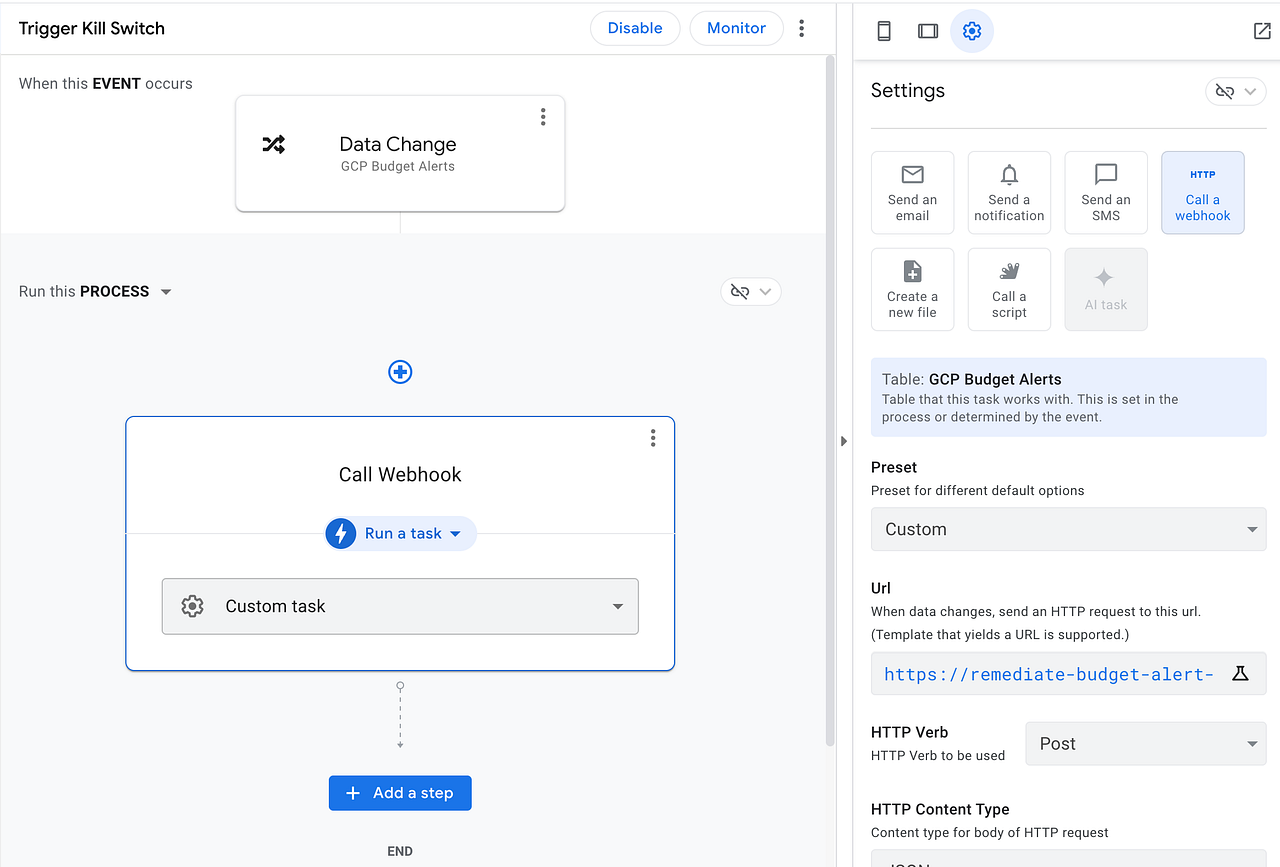
- In AppSheet, go to the Automation tab (the robot icon).
- Click Create my first Bot -> Create a new Bot. Name it "Trigger Kill Switch".
- Event: Select Data Change -> Updates Only on the alerts table.
- Condition: Type exactly [status] = "SHUTDOWN_REQUESTED".
- Action Step: Select Call a webhook.
- Paste your Cloud Function HTTP URL from Step 4. Set the HTTP Verb to POST.
In the JSON Body, paste this:
{
  "status": "<<[status]>>",
  "project_id": "<<YOUR_PROJECT_ID>>",
  "alert_id": "<<[alert_id]>>"
}
Step 6: Testing the End-to-End System (The Demo)
A tutorial isn't complete until we prove that it works! We don't want to actually wait for our cloud bill to skyrocket to test this, so we will simulate a mock billing alert.
1. Send a Mock Payload
Open your terminal or Google Cloud Shell and create a script named test_alert.sh. Paste the following code, replacing YOUR_PROJECT_ID with your actual Project ID:
#!/bin/bash
PROJECT_ID="YOUR_PROJECT_ID"
TOPIC_NAME="budget-alerts"

PAYLOAD='{
  "budgetDisplayName": "development-budget",
  "alertThresholdExceeded": 1.0,
  "costAmount": 150.00,
  "budgetAmount": 100.00
}'
ENCODED_PAYLOAD=$(echo -n "$PAYLOAD" | base64)

gcloud pubsub topics publish $TOPIC_NAME \
    --project=$PROJECT_ID \
    --message="$ENCODED_PAYLOAD"
Run the script. This instantly fires a "100% budget exceeded" alert into our architecture.
2. Watch the Data Flow
Immediately check your Google Sheet. You will see a brand new row pop up instantly with the alert data and a status of PENDING. Check your phone or browser where AppSheet is open. Within seconds, a Push Notification will arrive: "🚨 GCP Budget Alert!".
3. Hit the Kill Switch
Open the AppSheet app. You will see the new development-budget alert in the UI. Tap the alert, and smash that red Kill Resources button we built in Step 3.
4. Verify the Shutdown
The moment you press that button, AppSheet fires the webhook to our Remediation Cloud Function. Navigate to Compute Engine -> VM Instances in your Google Cloud Console. You will see your target test VM's status transition from RUNNING to TERMINATED.
Conclusion
You have successfully built an event-driven, zero-latency cloud control system.
By combining the robustness of Google Cloud Functions with the rapid UI generation of AppSheet and Google Sheets, you've created a powerful internal tool. This architecture is incredibly extensible: in the future, you could modify the Python code to dynamically revoke IAM permissions, disable billing accounts entirely, or integrate with Cloud Monitoring for sub-minute predictive alerting.
The next time your cloud bill starts to spike, you won't need to scramble for your laptop. You just need to reach into your pocket.
Comments
More Blog
View allgemmaFive Gemma-4 models, one accelerator: what porting E2B 31B to AWS Inferentia2 taught me
I ported the whole Gemma-4 family — E2B, E4B, 12B, 31B, and the 26B-A4B MoE — to run on...
X
xbillcommunityHey DEV, I'm Tobore. Let's actually connect.
Hey DEV, I'm Tobore. Let's actually connect. I've been on here for a while now, mostly writing and...
L
Laurina AyarahaiI burned through thousands of AI tokens. Then a friend did it for free
(yep, kinda clickbait, just for the funsies 😊) At the beginning of the year, I relaunched my...
P
Paulo HenriqueaiClaude might be saturating your machine
My laptop was sitting idle with the fan at full tilt. Nothing was running that I knew of. The culprit...
S
Sidhant PandagithubactionsAutomated GitHub Code Reviews Using Google Gemini
I Built a Thing! TL;DR — Google Gemini-based Pull Request reviews and Issue Triaging for...
D
Darren "Dazbo" LesteraiWhat is an "agentic harness," actually?
I've been hearing the word "harness" thrown around a lot lately. I assumed it just meant "the IDE" or...
T
Tilde A. ThuriumReady-made automations for this
Workflows from the Neura Market marketplace related to this Perplexity resource
- Automate SEO-Optimized Blog Creation with GPT-4, Perplexity AI & Multi-Language Supportn8n · $24.99 · Related topic
- Automate SEO Blog Content Creation with GPT-4, Perplexity AI, and WordPressn8n · $24.99 · Related topic
- Automate SEO Blog Creation + Social Media with GPT-4, Perplexity, and WordPressn8n · $24.99 · Related topic
- Auto-Generate SEO Blog Posts with Perplexity, GPT, Leonardo & WordPressn8n · $14.99 · Related topic