 ChatGPT
Back to Guides api
api
Other Models (
Older Models (
 api
api prompting
 api
api api
api api
api api
api
OpenAI Vision API: Processing Images with GPT Models
Neura Market Research July 21, 2026
13 views
Learn how to use the OpenAI Vision API to analyze images with GPT models. Covers setup, sending images via URL, Base64, or file ID, controlling detail levels, cost calculation, and troubleshooting.
This guide covers how to use the OpenAI Vision API to analyze images with GPT models. It is for developers who want to build applications that can understand, describe, and extract information from images using the Chat Completions API or the newer Responses API. You will learn the prerequisites, how to set up your environment, how to send images in different formats, how to control detail levels, how costs are calculated, and how to handle common issues.
What You Need
Before you can send images to a GPT model, you need the following items set up.
An OpenAI API Key
Create an API key in the OpenAI dashboard. Store this key in a safe location. The official quickstart documentation recommends exporting it as an environment variable.
On macOS or Linux, run this command in your terminal:
export OPENAI_API_KEY="your_api_key_here"
On Windows PowerShell, run:
setx OPENAI_API_KEY "your_api_key_here"
Each official OpenAI SDK automatically reads the API key from the OPENAI_API_KEY environment variable. If you prefer, you can pass the key directly in your code, but using an environment variable is the recommended practice for security.
The OpenAI SDK
Install the official OpenAI SDK for your programming language.
Python
pip install openai
JavaScript / TypeScript (Node.js, Deno, Bun)
npm install openai
.NET (C#)
dotnet add package OpenAI
Java
Add the Maven dependency to your pom.xml:
<dependency>
  <groupId>com.openai</groupId>
  <artifactId>openai-java</artifactId>
  <version>4.0.0</version>
</dependency>
Go
import (
    "github.com/openai/openai-go/v3"
)
Ruby
Add the gem to your Gemfile:
gem "openai"
A Supported Model
Vision capabilities are available on several models. The official documentation primarily uses gpt-5.6 in its examples. Other models with vision support include gpt-5.5, gpt-5.4, gpt-5.4-mini, gpt-5.4-nano, gpt-5-mini, gpt-5-nano, gpt-5.2, gpt-5.3-codex, gpt-5-codex-mini, gpt-5.1-codex-mini, gpt-5.2-codex, gpt-5.2-chat-latest, o4-mini, and the gpt-4.1-mini and gpt-4.1-nano 2025-04-14 snapshot variants. Older models like GPT-4o, GPT-4.1, GPT-4o-mini, computer-use-preview, and o-series models except o4-mini also support vision but use a different tokenization method. The guide will note where behavior differs between model families.
Understanding the Vision Capability
Vision is the model's ability to "see" and understand images. The model can identify objects, shapes, colors, textures, and read text within images. According to the official documentation, it can understand most visual elements, though there are some limitations. The model does not perform optical character recognition (OCR) in the traditional sense; it understands the text in an image as part of its visual understanding.
Two API Endpoints for Vision
You can send images to the model using two different API endpoints:
- Chat Completions API (
/v1/chat/completions): The original endpoint for conversational AI. You include images in thecontentarray of a user message. - Responses API (
/v1/responses): A newer, more flexible endpoint. You include images in theinputarray using a different content type structure.
The official documentation provides examples for both. The Responses API is the recommended path for new projects, as it supports a wider range of tools and output types.
How to Send Images to the Model
You can provide images to the model in three ways: by URL, by Base64-encoded data URL, or by file ID (created with the Files API). You can also include multiple images in a single request by adding multiple image objects to the content array. Each image counts as tokens and is billed accordingly.
Method 1: Passing a URL
This is the simplest method. You provide a publicly accessible URL to an image file.
Responses API (Python)
from openai import OpenAI

client = OpenAI()

response = client.responses.create(
    model="gpt-5.6",
    input=[{
        "role": "user",
        "content": [
            {
                "type": "input_text",
                "text": "what's in this image?"
            },
            {
                "type": "input_image",
                "image_url": "https://api.nga.gov/iiif/a2e6da57-3cd1-4235-b20e-95dcaefed6c8/full/!800,800/0/default.jpg",
            },
        ],
    }],
)

print(response.output_text)
Responses API (JavaScript)
import OpenAI from "openai";

const openai = new OpenAI();

const response = await openai.responses.create({
    model: "gpt-5.6",
    input: [
        {
            role: "user",
            content: [
                {
                    type: "input_text",
                    text: "what's in this image?",
                },
                {
                    type: "input_image",
                    image_url: "https://api.nga.gov/iiif/a2e6da57-3cd1-4235-b20e-95dcaefed6c8/full/!800,800/0/default.jpg",
                    detail: "auto",
                },
            ],
        },
    ],
});

console.log(response.output_text);
Responses API (cURL)
curl https://api.openai.com/v1/responses \
  -H "Content-Type: application/json" \
  -H "Authorization: Bearer $OPENAI_API_KEY" \
  -d '{
    "model": "gpt-5.6",
    "input": [
      {
        "role": "user",
        "content": [
          {"type": "input_text", "text": "what is in this image?"},
          {
            "type": "input_image",
            "image_url": "https://api.nga.gov/iiif/a2e6da57-3cd1-4235-b20e-95dcaefed6c8/full/!800,800/0/default.jpg"
          }
        ]
      }
    ]
  }'
Responses API (CLI)
openai responses create \
  --model gpt-5.6 \
  --raw-output \
  --transform 'output.#(type=="message").content.0.text' 'YAML' <<EOF
input:
  - role: user
    content:
      - type: input_text
        text: What is in this image?
      - type: input_image
        image_url: https://api.nga.gov/iiif/a2e6da57-3cd1-4235-b20e-95dcaefed6c8/full/!800,800/0/default.jpg
EOF
Chat Completions API (Python)
from openai import OpenAI

client = OpenAI()

response = client.chat.completions.create(
    model="gpt-5.6",
    messages=[{
        "role": "user",
        "content": [
            {
                "type": "text",
                "text": "What's in this image?"
            },
            {
                "type": "image_url",
                "image_url": {
                    "url": "https://api.nga.gov/iiif/a2e6da57-3cd1-4235-b20e-95dcaefed6c8/full/!800,800/0/default.jpg",
                },
            },
        ],
    }],
)

print(response.choices[0].message.content)
Chat Completions API (cURL)
curl https://api.openai.com/v1/chat/completions \
  -H "Content-Type: application/json" \
  -H "Authorization: Bearer $OPENAI_API_KEY" \
  -d '{
    "model": "gpt-5.6",
    "messages": [
      {
        "role": "user",
        "content": [
          {
            "type": "text",
            "text": "What is in this image?"
          },
          {
            "type": "image_url",
            "image_url": {
              "url": "https://api.nga.gov/iiif/a2e6da57-3cd1-4235-b20e-95dcaefed6c8/full/!800,800/0/default.jpg"
            }
          }
        ]
      }
    ],
    "max_completion_tokens": 300
  }'
Method 2: Passing a Base64-Encoded Image
If your image is stored locally or you want to avoid making it publicly accessible, you can encode it as a Base64 string and include it directly in the request.
Python helper function
import base64

def encode_image(image_path):
    with open(image_path, "rb") as image_file:
        return base64.b64encode(image_file.read()).decode("utf-8")
Responses API (Python)
from openai import OpenAI
import base64

client = OpenAI()

def encode_image(image_path):
    with open(image_path, "rb") as image_file:
        return base64.b64encode(image_file.read()).decode("utf-8")

image_path = "path_to_your_image.jpg"
base64_image = encode_image(image_path)

response = client.responses.create(
    model="gpt-5.6",
    input=[{
        "role": "user",
        "content": [
            {
                "type": "input_text",
                "text": "what's in this image?"
            },
            {
                "type": "input_image",
                "image_url": f"data:image/jpeg;base64,{base64_image}",
            },
        ],
    }],
)

print(response.output_text)
Responses API (JavaScript)
import fs from "fs";
import OpenAI from "openai";

const openai = new OpenAI();

const imagePath = "fixtures/example.jpg";
const base64Image = fs.readFileSync(imagePath, "base64");

const response = await openai.responses.create({
    model: "gpt-5.6",
    input: [
        {
            role: "user",
            content: [
                {
                    type: "input_text",
                    text: "what's in this image?",
                },
                {
                    type: "input_image",
                    image_url: `data:image/jpeg;base64,${base64Image}`,
                    detail: "auto",
                },
            ],
        },
    ],
});

console.log(response.output_text);
Chat Completions API (Python)
from openai import OpenAI
import base64

client = OpenAI()

def encode_image(image_path):
    with open(image_path, "rb") as image_file:
        return base64.b64encode(image_file.read()).decode("utf-8")

image_path = "path_to_your_image.jpg"
base64_image = encode_image(image_path)

response = client.chat.completions.create(
    model="gpt-5.6",
    messages=[{
        "role": "user",
        "content": [
            {
                "type": "text",
                "text": "what's in this image?"
            },
            {
                "type": "image_url",
                "image_url": {
                    "url": f"data:image/jpeg;base64,{base64_image}",
                },
            },
        ],
    }],
)

print(response.choices[0].message.content)
Chat Completions API (cURL)
BASE64_IMAGE=$(base64 -i path_to_your_image.jpg)

curl https://api.openai.com/v1/chat/completions \
  -H "Content-Type: application/json" \
  -H "Authorization: Bearer $OPENAI_API_KEY" \
  -d @- <<EOF
{
  "model": "gpt-5.6",
  "messages": [
    {
      "role": "user",
      "content": [
        {
          "type": "text",
          "text": "What is in this image?"
        },
        {
          "type": "image_url",
          "image_url": {
            "url": "data:image/jpeg;base64,$BASE64_IMAGE"
          }
        }
      ]
    }
  ],
  "max_completion_tokens": 300
}
EOF
Method 3: Passing a File ID
For larger images or when you want to reuse an image across multiple requests, you can upload the file once using the Files API and then reference it by its file ID.
Python
from openai import OpenAI

client = OpenAI()

def create_file(file_path):
    with open(file_path, "rb") as file_content:
        result = client.files.create(
            file=file_content,
            purpose="vision",
        )
        return result.id

file_id = create_file("path_to_your_image.jpg")

response = client.responses.create(
    model="gpt-5.6",
    input=[{
        "role": "user",
        "content": [
            {
                "type": "input_text",
                "text": "what's in this image?"
            },
            {
                "type": "input_image",
                "file_id": file_id,
            },
        ],
    }],
)

print(response.output_text)
JavaScript
import OpenAI from "openai";
import fs from "fs";

const openai = new OpenAI();

async function createFile(filePath) {
    const fileContent = fs.createReadStream(filePath);
    const result = await openai.files.create({
        file: fileContent,
        purpose: "vision",
    });
    return result.id;
}

const fileId = await createFile("fixtures/example.jpg");

const response = await openai.responses.create({
    model: "gpt-5.6",
    input: [
        {
            role: "user",
            content: [
                {
                    type: "input_text",
                    text: "what's in this image?",
                },
                {
                    type: "input_image",
                    file_id: fileId,
                    detail: "auto",
                },
            ],
        },
    ],
});

console.log(response.output_text);
Important note on file purpose: When uploading a file for vision, the purpose must be set to "vision". The official quickstart documentation also shows a "user_data" purpose for file uploads, but that is for general file analysis (like PDFs), not for image analysis via the input_image content type. Use "vision" for images you intend to analyze with the vision model.
Image Input Requirements
Images must meet specific requirements to be accepted by the API.
Supported File Types
- PNG (
.png) - JPEG (
.jpegand.jpg) - WEBP (
.webp) - Non-animated GIF (
.gif)
Size Limits
- Maximum total payload size per request: 512 MB
- Maximum number of individual image inputs per request: 1500
Other Requirements
- No watermarks or logos
- No NSFW content
- The image must be clear enough for a human to understand
Controlling Image Detail Level
The detail parameter controls how the model processes and understands the image. It can be set to low, high, original, or auto. If you omit the parameter, the model defaults to auto. This behavior is the same in both the Responses API and the Chat Completions API.
Detail Level Options
| Detail Level | Best For | Description |
|---|---|---|
low | Fast, low-cost understanding when fine visual detail is not important. | The model receives a low-resolution 512px x 512px version of the image. This uses fewer tokens and is faster. |
high | Standard high-fidelity image understanding. | The model processes the image at a higher resolution, capturing more detail. |
original | Large, dense, spatially sensitive, or computer-use images. | The model uses the original image dimensions without resizing to a patch budget. Available on gpt-5.4 and future models. |
auto | Automatic detail selection. | On gpt-5.5 and GPT-5.6 models, auto and the default omitted behavior are equivalent to original. On gpt-5.4, auto and omitted detail use the same sizing behavior as high. |
Setting the Detail Level
Responses API
{
  "type": "input_image",
  "image_url": "https://api.nga.gov/iiif/a2e6da57-3cd1-4235-b20e-95dcaefed6c8/full/!800,800/0/default.jpg",
  "detail": "original"
}
Chat Completions API
"image_url": {
  "url": "https://api.nga.gov/iiif/a2e6da57-3cd1-4235-b20e-95dcaefed6c8/full/!800,800/0/default.jpg",
  "detail": "original"
}
Model Sizing Behavior
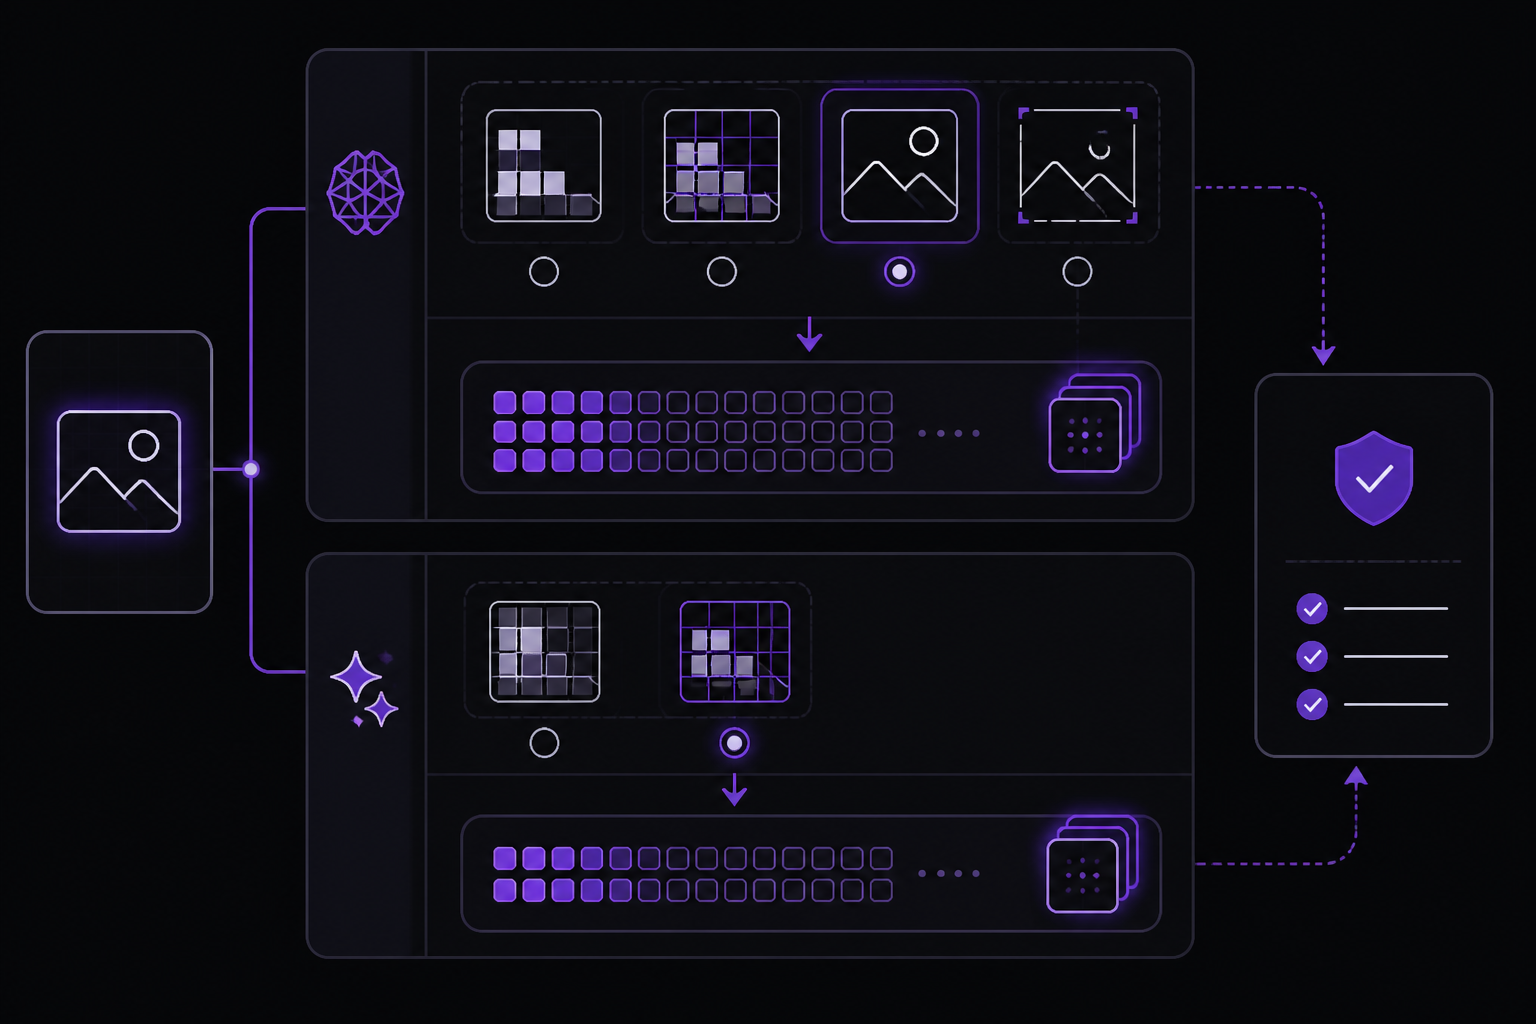
Different models use different rules for resizing images before tokenization. Understanding this helps you predict how many tokens an image will consume.
GPT-5.6 Family
- Supported detail levels:
low,high,original,auto - Behavior:
lowandhighcan resize images under their finite limits.originalpreserves the input dimensions and does not resize the image to a pixel-dimension or patch-budget limit.autoand omitteddetailuse the same sizing behavior asoriginal. Request payload and other image-input limits still apply.
gpt-5.5
- Supported detail levels:
low,high,original,auto - Behavior:
highallows up to 2,500 patches or a 2048-pixel maximum dimension.originalallows up to 10,000 patches or a 6000-pixel maximum dimension. If either limit is exceeded, the image is resized while preserving aspect ratio to fit within the lesser of those two constraints for the selected detail level.autoand omitteddetailuse the same sizing behavior asoriginal.
gpt-5.4
- Supported detail levels:
low,high,original,auto - Behavior:
highallows up to 2,500 patches or a 2048-pixel maximum dimension.originalallows up to 10,000 patches or a 6000-pixel maximum dimension. If either limit is exceeded, the image is resized while preserving aspect ratio to fit within the lesser of those two constraints for the selected detail level.autoand omitteddetailuse the same sizing behavior ashigh.
Other Models (gpt-5.4-mini, gpt-5.4-nano, gpt-5-mini, gpt-5-nano, gpt-5.2, gpt-5.3-codex, gpt-5-codex-mini, gpt-5.1-codex-mini, gpt-5.2-codex, gpt-5.2-chat-latest, o4-mini, and the gpt-4.1-mini and gpt-4.1-nano 2025-04-14 snapshot variants)
- Supported detail levels:
low,high,auto - Behavior:
highallows up to 1,536 patches or a 2048-pixel maximum dimension. If either limit is exceeded, the image is resized while preserving aspect ratio to fit within the lesser of those two constraints.
Older Models (GPT-4o, GPT-4.1, GPT-4o-mini, computer-use-preview, and o-series models except o4-mini)
- Supported detail levels:
low,high,auto - Behavior: These models use a tile-based resizing behavior, which is different from the patch-based approach used by newer models.
Calculating Costs
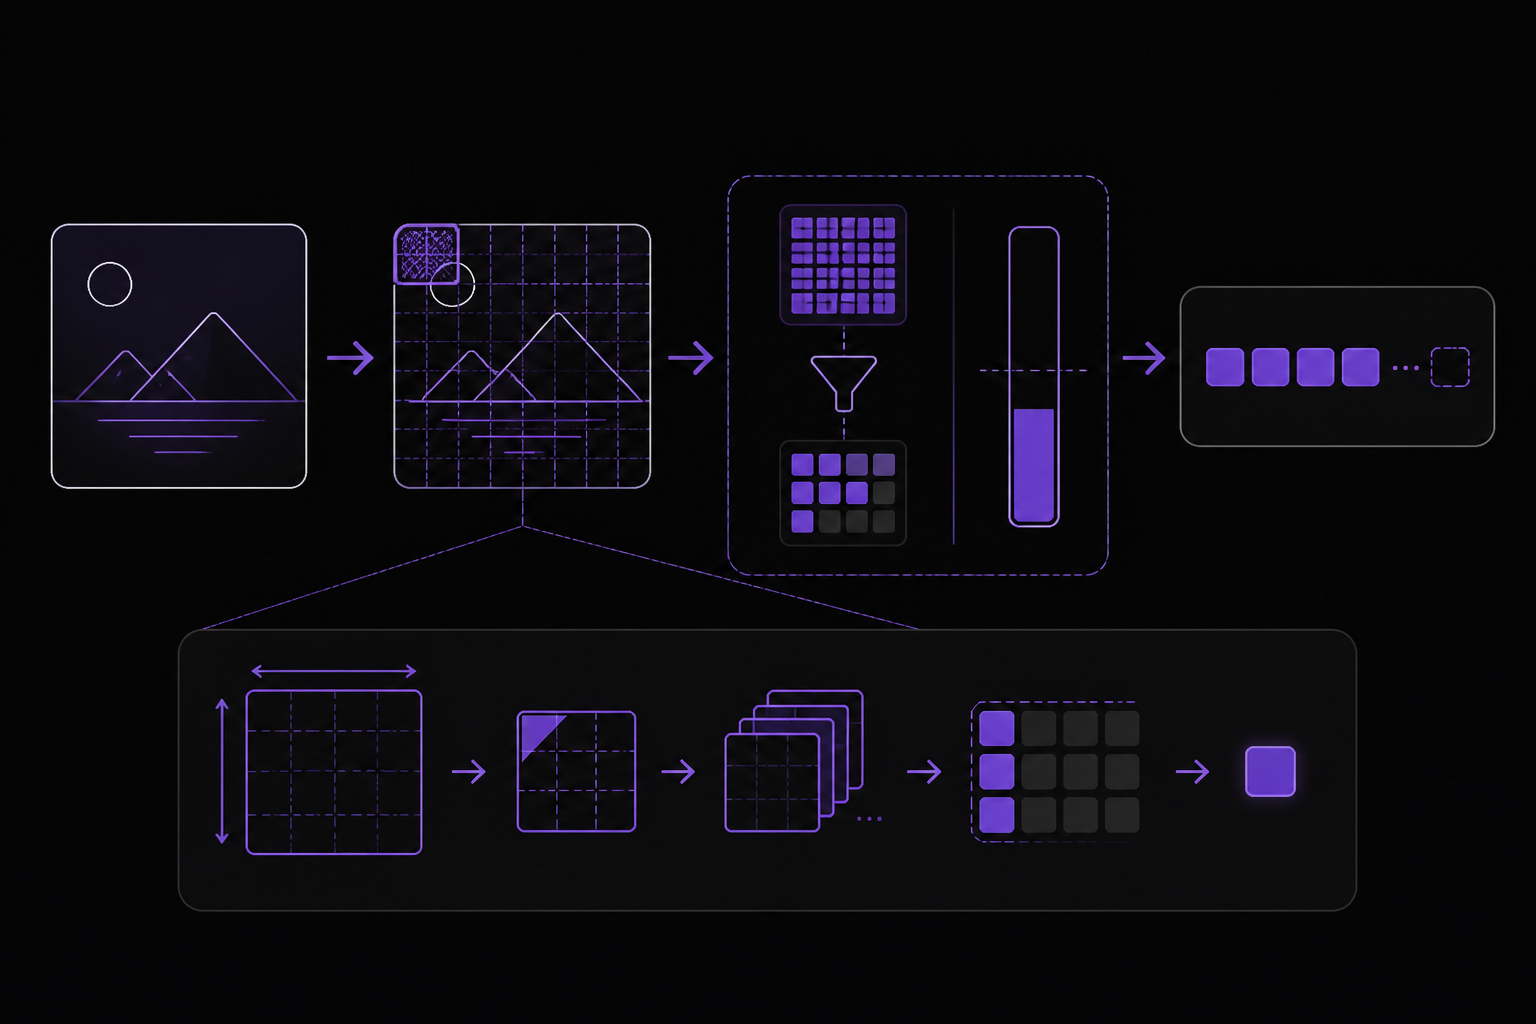
Image inputs are metered and charged in token units, similar to text inputs. The way images are converted to text token inputs varies based on the model. The official documentation provides a vision pricing calculator in the FAQ section of the pricing page.
Patch-Based Image Tokenization
Some models tokenize images by covering them with 32px x 32px patches. Many model and detail-level combinations define a maximum patch budget. The token cost of an image is determined through a multi-step process.
Step A: Compute the original patch count.
Calculate how many 32px x 32px patches are needed to cover the original image. A patch may extend beyond the image boundary.
original_patch_count = ceil(width/32) * ceil(height/32)
For GPT-5.6 models with detail set to original or auto, the service uses the original patch count without resizing the image to a patch budget or pixel-dimension limit. This means large images can use more input tokens than they did with earlier models. To control token use and latency, resize the image before sending it or select low or high detail.
Step B: Scale down if the patch budget is exceeded.
If the original image would exceed the model's patch budget, it is scaled down proportionally until it fits within that budget. The scale is then adjusted so the final resized image stays within budget after converting to integer pixel dimensions and computing patch coverage.
shrink_factor = sqrt((32^2 * patch_budget) / (width * height))
adjusted_shrink_factor = shrink_factor * min(
    floor(width * shrink_factor / 32) / (width * shrink_factor / 32),
    floor(height * shrink_factor / 32) / (height * shrink_factor / 32)
)
Step C: Compute the resized patch count.
Convert the adjusted scale into integer pixel dimensions, then compute the number of patches needed to cover the resized image. This resized patch count is the image-token count.
Practical Cost Management Tips
- Use
lowdetail when possible: This forces the model to use a 512px x 512px version of the image, which drastically reduces token consumption. - Resize images client-side: If you know your images are larger than needed, resize them before sending them to the API. This gives you direct control over the token cost.
- Monitor your usage: The OpenAI dashboard provides usage metrics that can help you track how many tokens your image requests are consuming.
Advanced Usage: Analyzing Files and PDFs
The Responses API also supports analyzing files, including PDFs, by using the input_file content type. This is useful for extracting text, classifying content, or detecting visual elements in documents.
Using a File URL
You can provide a URL to a file (e.g., a PDF) and ask the model to analyze it.
Python
from openai import OpenAI

client = OpenAI()

response = client.responses.create(
    model="gpt-5.6",
    input=[{
        "role": "user",
        "content": [
            {
                "type": "input_text",
                "text": "Analyze the letter and provide a summary of the key points."
            },
            {
                "type": "input_file",
                "file_url": "https://www.berkshirehathaway.com/letters/2024ltr.pdf"
            },
        ],
    }],
)

print(response.output_text)
JavaScript
import OpenAI from "openai";

const client = new OpenAI();

const response = await client.responses.create({
    model: "gpt-5.6",
    input: [
        {
            role: "user",
            content: [
                {
                    type: "input_text",
                    text: "Analyze the letter and provide a summary of the key points.",
                },
                {
                    type: "input_file",
                    file_url: "https://www.berkshirehathaway.com/letters/2024ltr.pdf",
                },
            ],
        },
    ],
});

console.log(response.output_text);
Uploading a File
You can upload a file using the Files API and then reference it by its file ID.
Python
from openai import OpenAI

client = OpenAI()

file = client.files.create(
    file=open("draconomicon.pdf", "rb"),
    purpose="user_data"
)

response = client.responses.create(
    model="gpt-5.6",
    input=[{
        "role": "user",
        "content": [
            {
                "type": "input_file",
                "file_id": file.id,
            },
            {
                "type": "input_text",
                "text": "What is the first dragon in the book?"
            },
        ],
    }],
)

print(response.output_text)
JavaScript
import fs from "fs";
import OpenAI from "openai";

const client = new OpenAI();

const file = await client.files.create({
    file: fs.createReadStream("fixtures/draconomicon.pdf"),
    purpose: "user_data",
});

const response = await client.responses.create({
    model: "gpt-5.6",
    input: [
        {
            role: "user",
            content: [
                {
                    type: "input_file",
                    file_id: file.id,
                },
                {
                    type: "input_text",
                    text: "What is the first dragon in the book?",
                },
            ],
        },
    ],
});

console.log(response.output_text);
Important note on file purpose: When uploading a file for general analysis (like a PDF), the purpose should be set to "user_data". This is different from the "vision" purpose used for image files.
Troubleshooting
Image Not Being Analyzed Correctly
If the model is not returning the expected analysis, check the following:
- Image quality: Ensure the image is clear enough for a human to understand. Blurry, very dark, or very small images may not be analyzed correctly.
- Detail level: If you need fine-grained analysis, use
"detail": "high"or"detail": "original". Thelowsetting may lose important details. - Model choice: Some older models may not support the
originaldetail level. Check the model sizing behavior table to ensure your model supports the detail level you are using.
High Token Consumption
If your costs are higher than expected:
- Use
lowdetail: This is the most effective way to reduce token consumption for images where fine detail is not important. - Resize images before sending: If you are using
originaldetail on GPT-5.6, the model does not resize the image. You can resize it client-side to a smaller dimension to reduce token usage. - Check the number of images: You can send up to 1500 images per request, but each one consumes tokens. Sending fewer images per request can help manage costs.
API Errors
- Invalid file type: Ensure your image is one of the supported types: PNG, JPEG, WEBP, or non-animated GIF.
- File too large: The total payload size must be under 512 MB. If you are sending many large images, consider reducing their size or sending them in separate requests.
- Invalid file purpose: When using the Files API, ensure you set the correct
purpose. Use"vision"for images you will analyze with theinput_imagecontent type, and"user_data"for files you will analyze with theinput_filecontent type.
Going Further
Once you are comfortable with basic image analysis, you can explore more advanced capabilities.
Image Generation
The OpenAI API also supports generating images using the gpt-image-2 model. You can use the Responses API with the image_generation tool to create images from text descriptions. The model can use visual understanding of the world to generate lifelike images including real-life details without a reference. For example, if you prompt it to generate an image of a glass cabinet with the most popular semi-precious stones, the model knows enough to select gemstones like amethyst, rose quartz, jade, and depict them in a realistic way.
Building Agents with Vision
You can combine vision with other tools like web search, file search, and code interpreter to build powerful agents. For example, an agent could take a screenshot of a webpage, analyze it with vision, and then use web search to find more information about what it sees.
Computer Use
For computer use, localization, and click-accuracy use cases on gpt-5.4 and future models, the official documentation recommends using "detail": "original". See the Computer use guide for more detail.
Further Reading
- Image generation guide
- File inputs guide
- Computer use guide
- Models page for a complete list of models and their capabilities
- Pricing page for the vision pricing calculator
Comments
More Guides
View allapiOpenAI Batch API: Cut Costs for Bulk Processing
Learn how to use the OpenAI Batch API to cut costs by 50% for bulk processing tasks. Covers setup, request formatting, job creation, monitoring, error handling, and troubleshooting.
N
Neura Market Research 14
promptingChatGPT for Coding: Prompt Patterns That Produce Working Code
Learn how to write prompts for ChatGPT that reliably generate working code. Covers core concepts, setup, and specific patterns for different coding tasks.
N
Neura Market Research 4
apiStreaming ChatGPT Responses in Web Applications: A Complete Guide
Learn how to stream ChatGPT responses in web applications using the OpenAI API. This guide covers setup, implementation in JavaScript and Python, event handling, and troubleshooting for real-time text generation.
N
Neura Market Research 6
apiOpenAI Embeddings for Semantic Search: A Practical Guide
Learn how to use OpenAI's text embedding models for semantic search, clustering, recommendations, and classification. This guide covers concepts, setup, API usage, dimension reduction, and practical tips from official documentation and community experience.
N
Neura Market Research 6
apiHandling OpenAI API Rate Limits and Quota Errors: A Complete Guide
Learn how to handle OpenAI API rate limits (429) and quota errors. Covers error types, exponential backoff, Python library exceptions, and troubleshooting steps for production applications.
N
Neura Market Research 21
apiOpenAI Structured Outputs: Guaranteed JSON Schemas with Function Calling
Learn how to use OpenAI Structured Outputs to guarantee JSON schema conformance from GPT models. Covers function tool definitions, strict mode, tool call handling, and best practices for both Chat Completions and Responses APIs.
N
Neura Market Research 2
Ready-made automations for this
Workflows from the Neura Market marketplace related to this ChatGPT resource
- Convert JSON Objects to Base64 Strings with File Processingn8n · $9.99 · Related topic
- AI-Powered RAG Document Processing & Chatbot with Google Drive, Supabase, OpenAIn8n · $24.99 · Related topic
- Learn JavaScript Data Processing with CodeNode: Filtering, Analysis, & Export Examplesn8n · $9.99 · Related topic
- Automate Telegram Message Processing with AI for Text, Audio, and Imagesn8n · $24.99 · Related topic