
Back to Blog nvidia
 ai
ai googlecloud
 discuss
 agents
 agenticarchitect
 ai
ai
Fine-Tuning Gemma 3 with Cloud Run Jobs: Serverless GPUs (NVIDIA RTX 6000 Pro) for pet breed classification 🐈🐕
Shir Meir Lador March 11, 2026
0 views
Architectural worklow: fine tuning Gemma 3 27B on Cloud Run Jobs Recently, I was inspired by a...
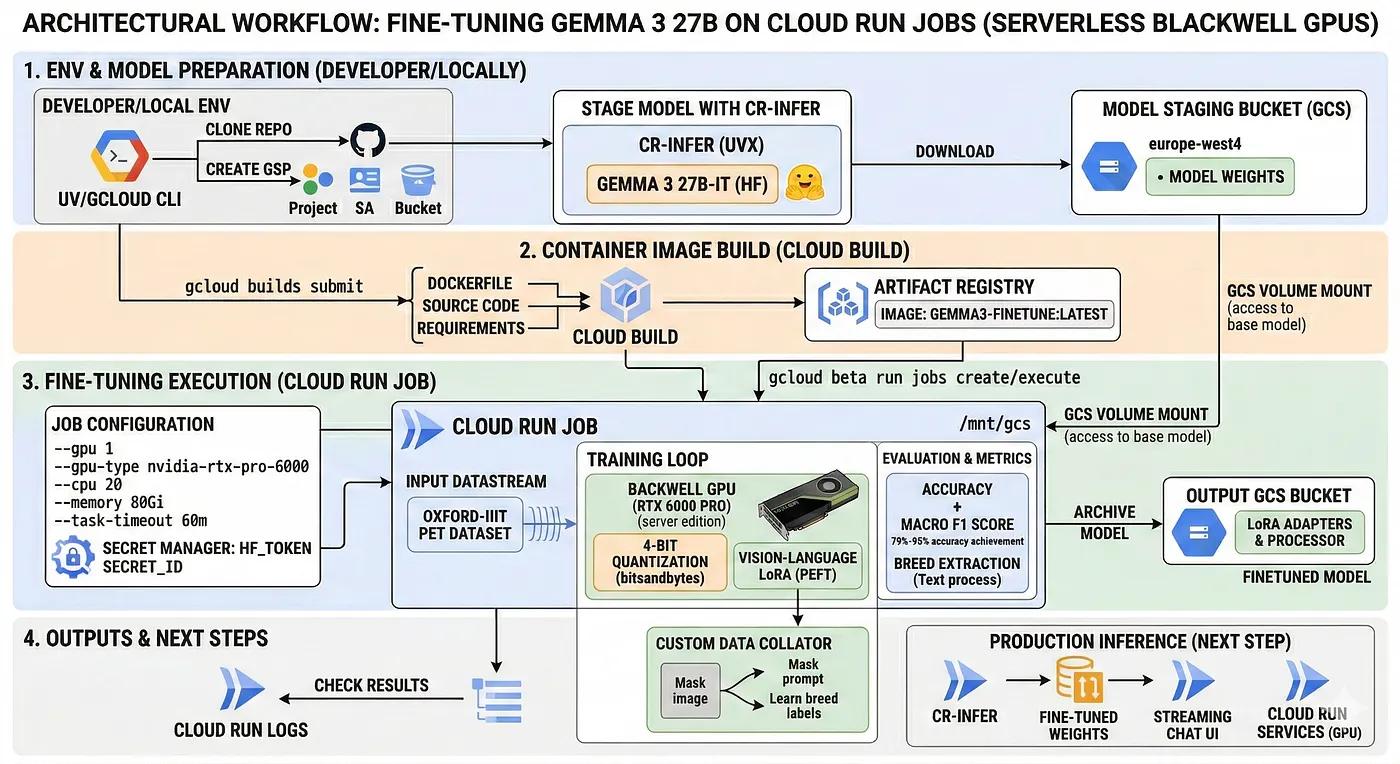
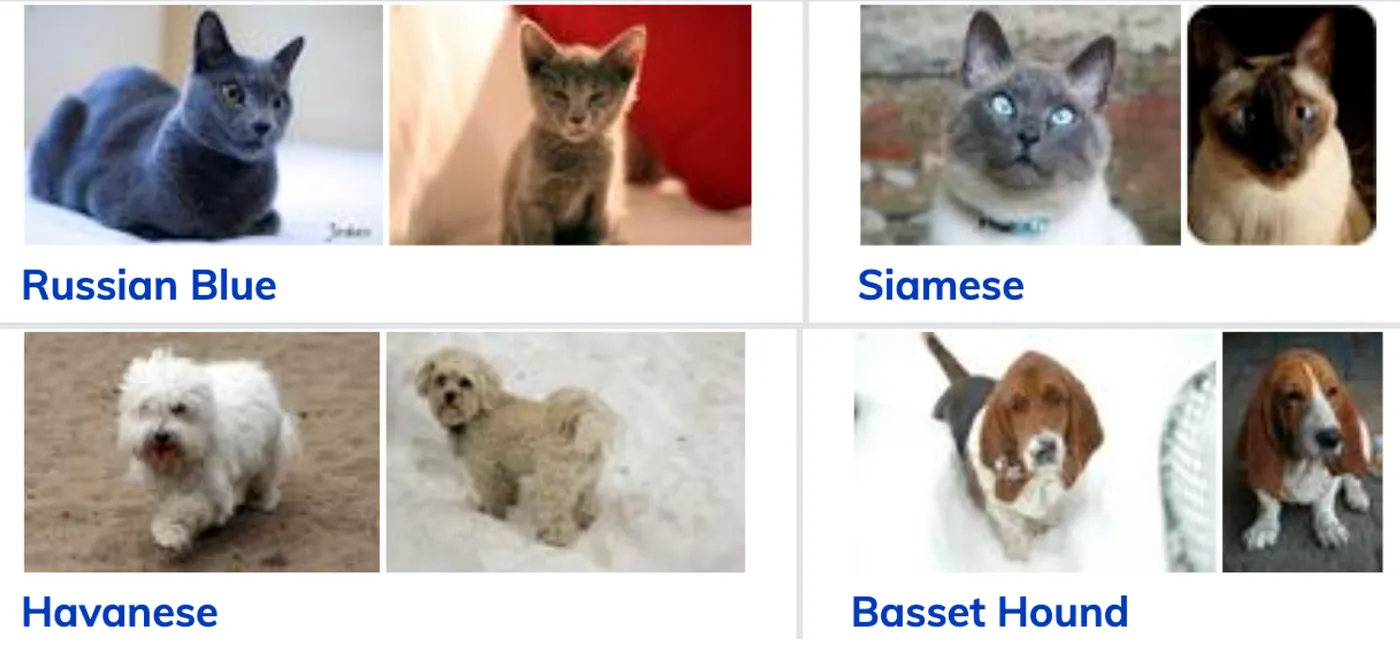
Recently, I was inspired by a major new release on Google Cloud: the availability of NVIDIA RTX PRO 6000 Blackwell Server Edition GPUs on Cloud Run Jobs. This launch is important because it unlocks the ability to tackle fine-tuning workloads for open models with the simplicity of a serverless batch job. To put this new hardware to the test in a fun way, I fine tuned a multi-modal model to identify a pet’s breed from a photo using The Oxford-IIIT Pet Dataset. This model could be used for a “Smart pet care” — an AI application that identifies a pet’s breed from a photo and provides tailored health and nutrition advice.
Why Fine-Tuning?
In a recent Agent Factory episode, we discussed that while foundational models are a powerful ‘one-size-fits-all’ starting point, they essentially remain generalists. You should consider fine-tuning when you have a problem that requires high specialization that a generalist model might not excel in on its own, or when you need more control and cost-efficiency over your own hosting.
For this pet-care use case, distinguishing between 37 different breeds isn’t just about ‘knowledge’, it’s about taking that foundational reasoning and adding a specific capability based on a unique dataset. As we explored in the episode and as mentioned in this Nvidia paper, this kind of specialization is what allows smaller, focused models to become sufficiently powerful and economical for production agentic systems. Fine-tuning acts as the necessary bridge, transforming a broad reasoner into a high-precision classification expert.
Bridging Reasoning and Precision
For this project, I chose the multimodal breadth of Gemma 3 27B. While specialized vision models often provide superior accuracy for narrow identification tasks, I wanted to use a model capable of both identifying breeds and reasoning about the specific health and dietary needs associated with them. By leveraging the power of the new Blackwell GPUs, I was able to fine-tune this model to bridge the performance gap, all while keeping the setup reproducible, cost-effective, and entirely container-native.
From Batch to Production: Economically Efficient Hosting
The true ‘deploy and forget’ magic happens after the weights are saved. With high-performance inference now supported on Cloud Run, you can host your fine-tuned Gemma 3 27B model on the same NVIDIA RTX PRO 6000 Blackwell GPU without managing any underlying infrastructure. This setup delivers a highly economical production environment: Cloud Run automatically scales your GPU instances to zero when they aren’t in use, ensuring you only pay for the exact minutes your model is active.
In this guide, I’m excited to show you how this new hardware release transforms complex fine-tuning into a scalable, serverless experience without the need to manage complex clusters or maintain idle instances.
Simplifying 27B Fine-Tuning on Cloud Run
Fine-tuning an open model can seem like a daunting task that requires complex orchestration, from provisioning high-capacity VMs and manually installing CUDA drivers to managing tedious data transfers and scaling down manually to control costs. Cloud Run Jobs elegantly solves this by allowing you to package your training logic as a container, now backed by the fully managed environment of NVIDIA RTX PRO 6000 Blackwell GPUs and their 96GB of VRAM.
This setup delivers on-demand availability without the need for reservations, rapid 5-second startup times with drivers pre-installed, and automatic scale-to-zero efficiency that ensures you only pay for the minutes your model is training. By leveraging built-in GCS volume mounting for high-speed access to model weights, we can now move past infrastructure hurdles and focus on the core task: fine-tuning Gemma 3 27B to achieve high-precision results for Pet Breed Classification on the Oxford-IIIT Pet Dataset.
If you’d like to dive straight into the code, you can clone the repository here.
Prerequisites
Before you begin the fine-tuning process, ensure you have the following software and environment configurations in place.
- Python 3.12+
- uv (Python package manager): will be used to manage our local Python environment and speed up our Docker builds. Use curl to download the script and execute it with sh:
curl -LsSf https://astral.sh/uv/install.sh | sh
- Google Cloud SDK (gcloud CLI) installed and authenticated.
- A Google Cloud Project with billing enabled.
- APIs Enabled Ensure the following APIs are active in your project: Cloud Run Admin API, Artifact Registry API, Cloud Build API, Secret Manager API, Compute Engine API (for GPU provisioning)
- Hugging Face Token: A valid token with access to the Gemma 3 27B-IT model weights.
Access to gated models: Gemma 3 27B-IT is a gated model, which means you must explicitly accept the terms of use before you can download or fine-tune the weights.
- Accept the License: Visit the Gemma 3 27B-IT model page on Hugging Face and click the “Agree and access repository” button.
- Generate a Token: Once access is granted, ensure your Hugging Face Token has “read” permissions (or “write” if you plan to push your fine-tuned model back to the Hub) to authenticate your training job.
Step 1 — Setting the stage: Your environment
Step 1.1 — Prepare your Google Cloud environment
Set environment variables.
[!IMPORTANT] Regional Alignment is Critical: To use Cloud Storage volume mounting, your GCS bucket must be in the same region as your Cloud Run job. We recommend using europe-west4 (Netherlands) as it supports the RTX PRO 6000 Blackwell GPU and ensures zero-latency access to your model weights.
export PROJECT_ID=YOUR_PROJECT_ID
export REGION=europe-west4
export HF_TOKEN=YOUR_HF_TOKEN
export SERVICE_ACCOUNT="finetune-gemma-job-sa"
export BUCKET_NAME=$PROJECT_ID-gemma3-finetuning-eu
export AR_REPO=gemma3-finetuning-repo
export SECRET_ID=HF_TOKEN
export IMAGE_NAME=gemma3-finetune
export JOB_NAME=gemma3-finetuning-job
Step 1.2 — Get the code
Whether you’re running locally or on the cloud, you’ll need the code. After you open Cloud Shell or install your local Google Cloud CLI, you need to clone the repository. The finetune_gemma repository contains the finetune_and_evaluate.py script, a Dockerfile, and the requirements.txt file to your machine.
git clone https://github.com/GoogleCloudPlatform/devrel-demos
cd devrel-demos/ai-ml/finetune_gemma/
Login to gcloud (this is required to run gcloud commands authorize the CLI tool):
gcloud auth login
Set your Project:
gcloud config set project $PROJECT_ID
Create the service account and grant storage permissions:
gcloud iam service-accounts create $SERVICE_ACCOUNT \
  --display-name="Service Account for Gemma 3 fine-tuning"

gcloud storage buckets create gs://$BUCKET_NAME --location=$REGION

gcloud storage buckets add-iam-policy-binding gs://$BUCKET_NAME \
  --member=serviceAccount:$SERVICE_ACCOUNT@$PROJECT_ID.iam.gserviceaccount.com \
  --role=roles/storage.objectAdmin
Create an Artifact Registry repository and store your HF Token in Secret Manager:
gcloud artifacts repositories create $AR_REPO \
    --repository-format=docker \
    --location=$REGION \
    --description="Gemma 3 finetuning repository"

# Create the secret (ignore error if it already exists)
gcloud secrets create $SECRET_ID --replication-policy="automatic" || true

printf $HF_TOKEN | gcloud secrets versions add $SECRET_ID --data-file=-

gcloud secrets add-iam-policy-binding $SECRET_ID \
  --member serviceAccount:$SERVICE_ACCOUNT@$PROJECT_ID.iam.gserviceaccount.com \
  --role='roles/secretmanager.secretAccessor'
Step 2 — Staging the Model with cr-infer (Recommended)
To avoid downloading the model every time the job runs, we’ll stage the Gemma 3 27B weights in Google Cloud Storage. We’ll use cr-infer, which allows you to run model transfers directly via uvx without needing a local installation.
Before running the transfer, you must set up your Application Default Credentials. This is required for running scripts locally. In this case it allows the cr-infer tool to use your local identity to write the weights to your GCS bucket.
gcloud auth application-default login
Download Gemma 3 27B to GCS: Now, execute the transfer using uvx. This clones the model into gs://$BUCKET_NAME/google/gemma-3–27b-it/, allowing our Cloud Run job to mount the weights as a local volume and save gigabytes of container startup time
uvx — from git+https://github.com/oded996/cr-infer.git cr-infer model download \- source huggingface \
 - model-id google/gemma-3–27b-it \
 - bucket $BUCKET_NAME \
 - token $HF_TOKEN
Step 3 — Build and push the container image
Our Dockerfile leverages uv for fast dependency installation.
Option A: Use Google Cloud Build (Recommended — No local Docker needed)
This is the easiest way to build your image directly in the cloud and push it to Artifact Registry. (The build typically takes 10–15 minutes as it downloads large ML dependencies like PyTorch).
gcloud builds submit — tag $REGION-docker.pkg.dev/$PROJECT_ID/$AR_REPO/$IMAGE_NAME:latest .
[!TIP] You can track the real-time progress of your build in the Cloud Build console.
Option B: Build locally with Docker
If you have Docker Desktop installed locally:
Install uv locally (if you haven’t already):
curl -LsSf https://astral.sh/uv/install.sh | sh
Build the image:
docker build -t $IMAGE_NAME .
Push to AR:
docker tag $IMAGE_NAME $REGION-docker.pkg.dev/$PROJECT_ID/$AR_REPO/$IMAGE_NAME
docker push $REGION-docker.pkg.dev/$PROJECT_ID/$AR_REPO/$IMAGE_NAME
Step 3.1 — Test locally (Optional)
I like to start with a quick local test run to validate the setup. It serves as a sanity check for your environment and scripts before moving the workload to Cloud Run. For this test, we use parameters optimized for speed and a smaller model, google/gemma-3–4b-it, to ensure the model correctly learns the task format:
python3 finetune_and_evaluate.py \
- model-id google/gemma-3–4b-it \
 - train-size 20 \
 - eval-size 20 \
 - gradient-accumulation-steps 2 \
 - learning-rate 2e-4 \
 - batch-size 1 \
 - num-epochs 3
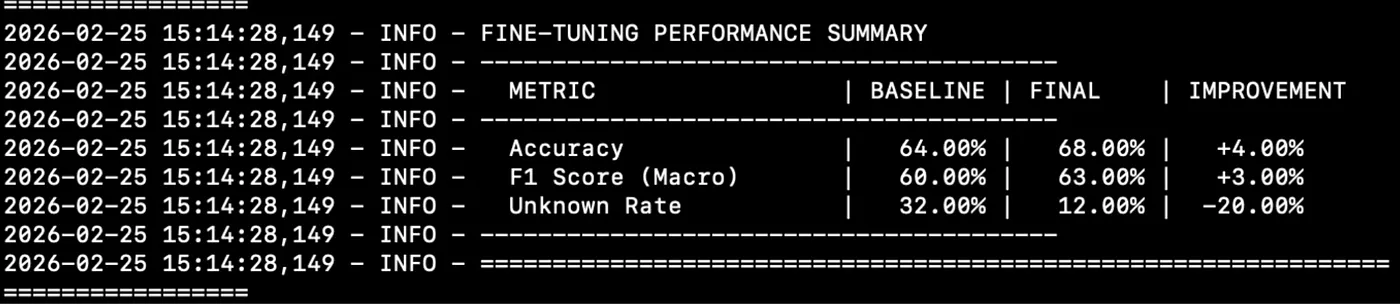
On my Apple M4 Pro, running this on the CPU took about 20–30 minutes. If you want to see early signs of progress locally, you can increase the sample size — I found that a one-hour run on my Mac with 50 training and testing samples already yielded a 4% improvement in accuracy and a 3% boost in F1-score.
Inside the Fine-Tuning Script: How it Works
The finetune_and_evaluate.py script is designed to be a complete, self-contained pipeline, handling everything from data preparation to hardware-aware optimization and evaluation. Here is a look at the core logic that makes this possible:
1. Memory-Efficient Model Loading
To fit a 27B parameter model into the 96GB VRAM of the Blackwell GPU, the script uses 4-bit quantization via the bitsandbytes library. By setting low_cpu_mem_usage=True, it also ensures the model is loaded efficiently without exhausting the system RAM.
2. Vision-Language LoRA Configuration
Instead of updating all 27 billion parameters, we use LoRA (Low-Rank Adaptation). We target all the primary projection layers in the transformer blocks, allowing the model to adapt its internal representations to the visual nuances of the pet breeds while keeping the total trainable parameter count extremely low. More details on efficient GPU memory usage can be found in this blog.
3. The Custom Data Collator
This is a crucial part for fine-tuning vision-language models (VLMs). Because VLMs process a mix of image and text tokens, the data_collator ensures that the model only learns from the breed label (the model’s response). The turn marker is a structural boundary that signals the exact point where the user stops speaking and the model’s response begins. The script ensures the model learns only from the breed label by searching for the model’s turn marker in the token sequence and masking out the user’s prompt and image tokens, so they don’t contribute to the training loss.
4. Breed Extraction
Generative models often add conversational filler (e.g., “The animal in this image is a Samoyed”). Our evaluation logic includes a robust extraction heuristic that sorts class names by length. This ensures that if the model mentions “English Cocker Spaniel,” it correctly identifies the full breed rather than just matching “Cocker Spaniel”.
5. Automated GCS Archiving
Once the training completes and the final evaluation is calculated, the script doesn’t just stop. It bundles the fine-tuned LoRA adapters with the original model processor and automatically uploads the entire directory to your Google Cloud Storage bucket. This ensures your model is immediately ready for deployment or serving.
Step 4 — Create and execute the Cloud Run job
Now, we harness the power of the NVIDIA RTX PRO 6000 Blackwell GPU. Our container is built with CUDA 12.8 for full Blackwell/PyTorch 2.7 compatibility and uses an ENTRYPOINT configuration, allowing you to pass script arguments directly via the — args flag.
[!TIP] If the job already exists, use gcloud beta run jobs update instead of create.
gcloud beta run jobs create $JOB_NAME \
 - region $REGION \
 - image $REGION-docker.pkg.dev/$PROJECT_ID/$AR_REPO/$IMAGE_NAME:latest \
 - set-env-vars BUCKET_NAME=$BUCKET_NAME \
 - set-secrets HF_TOKEN=$SECRET_ID:latest \
 - no-gpu-zonal-redundancy \
 - cpu 20.0 \
 - memory 80Gi \
 - task-timeout 60m \
 - gpu 1 \
 - gpu-type nvidia-rtx-pro-6000 \
 - service-account $SERVICE_ACCOUNT@$PROJECT_ID.iam.gserviceaccount.com \
 - add-volume name=model-volume,type=cloud-storage,bucket=$BUCKET_NAME \
 - add-volume-mount volume=model-volume,mount-path=/mnt/gcs \
 - network=default \
 - subnet=default \
 - vpc-egress=private-ranges-only \
 - args=" - model-id","/mnt/gcs/google/gemma-3–27b-it/"," - output-dir","/tmp/gemma3-finetuned"," - gcs-output-path","gs://$BUCKET_NAME/gemma3-finetuned"," - train-size","800"," - eval-size","200"," - learning-rate","5e-5"
Note on Execution Limits: Tasks using GPUs on Cloud Run Jobs currently have a maximum execution time of 60 minutes. To ensure this training job completes within the standard public limit, we have set the — num_epochs to 3 and restricted the — train-size to 800 samples. If your specific fine-tuning workload requires more time, you can sample your training dataset into segments that fit in under 60 minutes (like 800 samples in our case) and process them as a sequence of independent tasks while using checkpointing for the model training.
###Understanding the Deployment Flags
To ensure a stable and production-ready environment, we use several specialized flags:
- — gpu-type nvidia-rtx-pro-6000: Targets the NVIDIA RTX PRO 6000 Blackwell GPU. With 96GB of GPU memory (VRAM), 1.6 TB/s bandwidth, and support for FP4/FP6 precision, it provides the ample overhead and high-speed throughput needed for multimodal fine-tuning.
- — memory 80Gi: We allocate high system RAM (scalable up to 176GB) to handle the low_cpu_mem_usage model loading and our memory-efficient streaming data generator.
- — cpu 20.0: Cloud Run Jobs allows scaling up to 44 vCPUs per instance, ensuring that preprocessing and data loading never become a bottleneck for the GPU.
- — add-volume & — add-volume-mount: This mounts your GCS bucket as a local directory at /mnt/gcs. Note: This requires the bucket and the job to be in the same region (europe-west4). It allows the script to read the base model weights at data-center speeds without copying them into the container’s writable layer.
- — network & — subnet: Configures Direct VPC Egress, allowing the job to communicate securely with other resources in your VPC. To make sure this works you need to enable “Private Google Access”.
- — vpc-egress=all-traffic: Ensures all outgoing traffic, including requests to Hugging Face, is routed through your VPC for enhanced security and monitoring.
[!TIP] If you skipped Step 2 and didn’t stage the model in your GCS bucket, you must change the — model-id in the — args to google/gemma-3–27b-it. This tells the script to download the weights directly from Hugging Face at runtime, though this will be significantly slower than using the GCS mount
Execute the job:
gcloud beta run jobs execute $JOB_NAME — region $REGION — async
Step 5 — Check Results and Evaluate Performance
Once your job finishes, you can jump into the Google Cloud Console to inspect the detailed logs. You’ll find your newly fine-tuned model waiting for you in your Cloud Storage bucket at gs://$BUCKET_NAME/gemma3-finetuned.
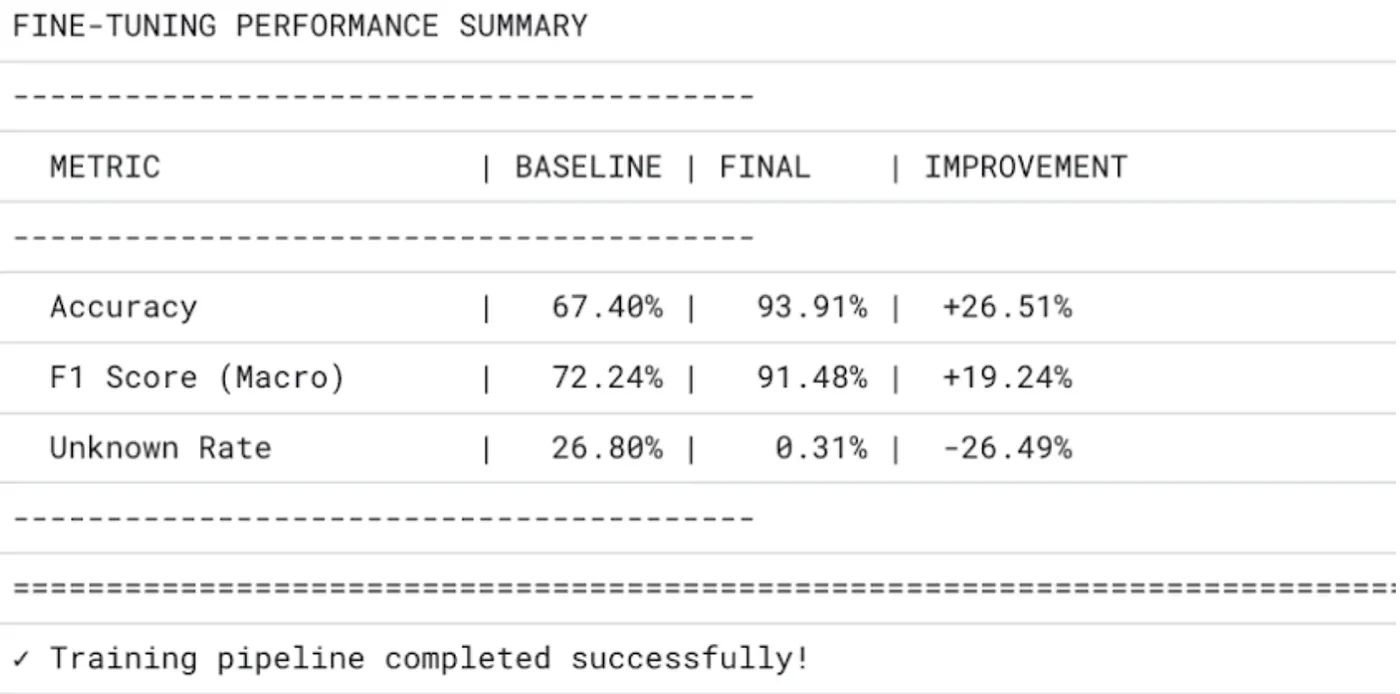
To rigorously quantify how well Gemma 3 learned to identify these breeds, we used Accuracy and Macro F1 Score as our primary metrics. While accuracy gives us a clear overall percentage, the F1 score ensures the model is accurate across all 37 breeds, not just the most common ones.
In my testing, I saw a clear progression as we scaled our data and compute:
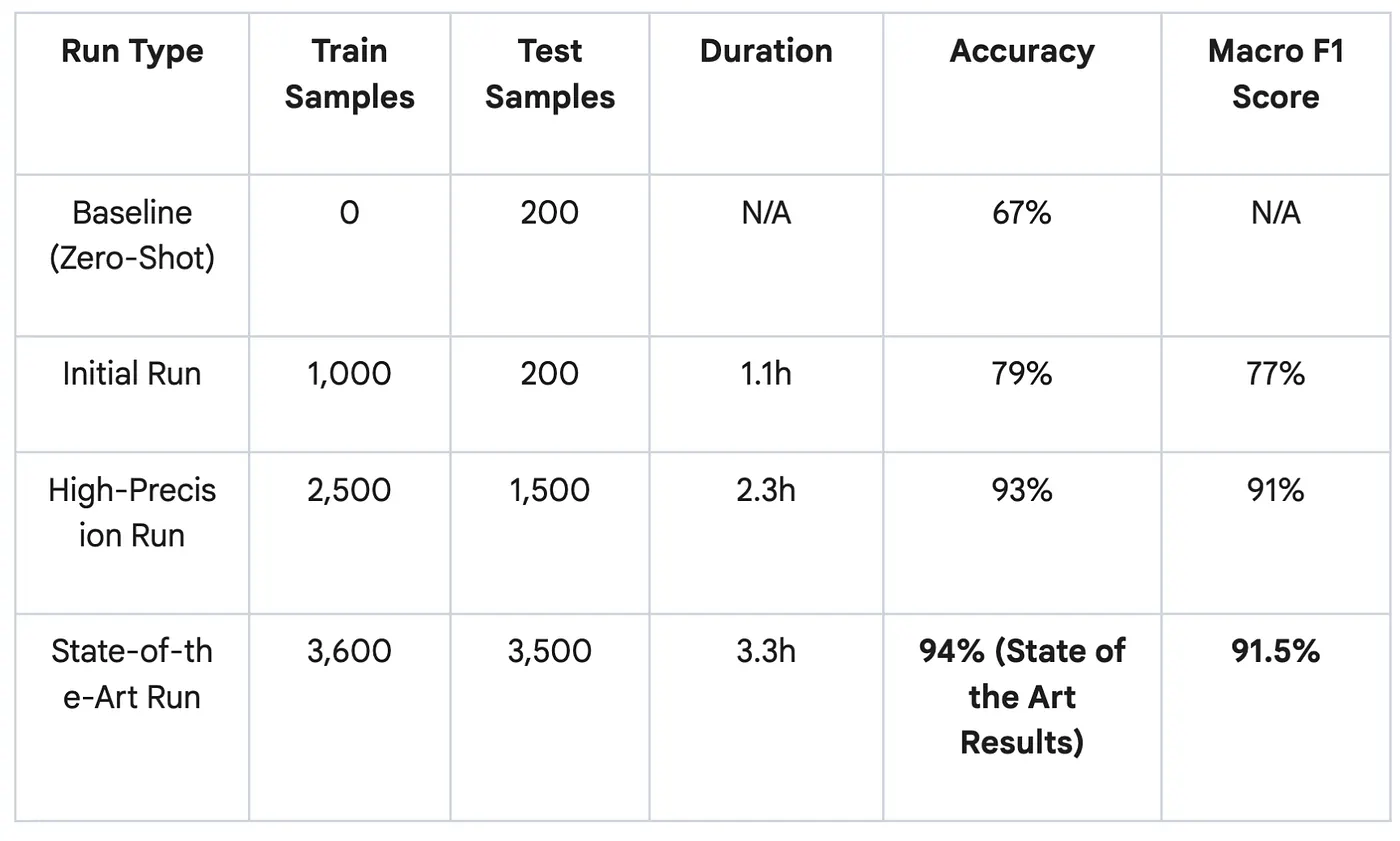
- 79% Accuracy, 77% F1-score (1.1h run): Trained on 1,000 samples and evaluated against 200 test samples, this was a significant jump from the zero-shot baseline of 66%.
- 93% Accuracy, 91% F1-score (2.3h run): By scaling up to 2,500 training samples (and 1,500 test samples), the model reached nearly state-of-the-art performance.
- 94% Accuracy & 91.5% F1 (3.3h run): With a larger run on 3,600 training samples (evaluated against 3,500 test samples), the model effectively hit the state-of-the-art benchmark for this dataset.
It is important to note that the standard public limit for GPU jobs is currently 60 minutes. As mentioned in step 4, sampling and checkpointing can help overcome this limitation.
These results prove that fine-tuning is the necessary bridge for generalist models, by leveraging serverless Blackwell GPUs, we’ve transformed a massive reasoner into a high-precision expert ready for production
Next Steps: Serving your fine-tuned model on Cloud Run
Now that you’ve fine-tuned Gemma 3, the next challenge is serving it efficiently for production-grade inference.
The true “deploy and forget” magic happens when you transition your saved weights into a serving environment. By hosting your fine-tuned model on Cloud Run with serverless Blackwell GPUs, you get a highly economical production environment where your GPU instances automatically scale to zero when they aren’t in use. This setup eliminates the operational toil of cluster management and manual maintenance, allowing you to serve massive models with no reservations, you only pay for the exact minutes your model is active.
To get started with inference, explore this codelab: Run inference using a Gemma model on Cloud Run with RTX 6000 Pro GPU.
To learn more about production serving, refer to the official guide on Running Gemma 3 on Cloud Run. The documentation provides a comprehensive roadmap for building a robust inference service, including:
- Optimized Deployment: Instructions for serving Gemma models using GPU accelerators and loading model weights via high-speed Cloud Storage volume mounts.
- Secure Interaction: Guidance on using IAM authentication to securely call your deployed service with the Google Gen AI SDK.
- Performance Configuration: Best practices for setting concurrency to achieve optimal request latency and high GPU utilization
Special thanks to Sara Ford and Oded Shahar from the Cloud Run team for the helpful review and feedback on this article.
Comments
More Blog
View allaiContext bankruptcy: The case for strategic forgetting for AI Agents
Most of us have seen a coding agent fail to complete a task we know it can do. We just don't...
J
James O'ReillygooglecloudParallel Compliance Engine: Drive-to-Sheets Multi-Agent Orchestration
When building Generative AI applications, developers often encounter a massive bottleneck: sequential...
A
Aryan IranidiscussIs It Ethical to Post and Ask About Circuits on Dev.to?
I’ve been thinking about sharing some electronic circuit posts on Dev.to — small circuits, DIY...
C
codebunny20agentsThe One-Click Exporter: AI Studio Antigravity, Probed to Its Limits
What nobody tells you about exporting your multi-agent prototype to a local workspace. Every...
L
leslysandraagenticarchitectGuarding the till while autonomous data agents do the digging
Autonomous agents are genuinely good at answering messy business questions. Give one an LLM and a set...
S
Sireesha PulipatiaiReturn on Attention: Why AI Code Reviews Are Wearing Us Out
PR volume went up, ticket quality didn't, and the gap got filled with LLMs on both sides of the review: bots reviewing, bots replying, bots occasionally arguing with bots about priorities that only existed in a teammate's head. Our CEO named the actual problem, and it's bigger than code review.
C
christineReady-made automations for this
Workflows from the Neura Market marketplace related to this Stable Diffusion resource
- Automate Lemlist Reply Classification and Handling with OpenAIn8n · $15.94 · Related topic
- Automate Text Classification with AI and Webhooksn8n · $7.94 · Related topic
- Automated Crop Dataset Upload and Classification Workflown8n · $17.73 · Related topic
- Automated Ticket Urgency Classification Workflown8n · $13.8 · Related topic