
Back to Blog beginners
 ai
ai googlecloud
 discuss
 agents
 agenticarchitect
 ai
ai
Build your own blog post view counter on AWS Free Tier
Esin Saribudak April 20, 2026
0 views
Your blog deserves to know it's being read. A Lambda function counts the views, DynamoDB remembers...
Your blog deserves to know it's being read. A Lambda function counts the views, DynamoDB remembers them, and it's all eligible for the Free Tier.
Last updated: April 20, 2026
Most analytics tools require an account, a script tag, and a separate dashboard you have to check outside your infrastructure. If you're already on AWS, you can build a view counter that lives in your own account and stores data in a table you control. It takes about an hour, and all three services it uses are eligible for the AWS Free Tier.
This tutorial walks you through building that counter. You add one <script> tag to your blog, and every time someone reads a post, the count goes up in a DynamoDB table you own.
Along the way, you'll wire together Lambda, DynamoDB, and API Gateway into something that goes beyond "Hello World." By the end, you'll have working software on your blog and hands-on experience with the same services that power production applications.
If you've already set up your AWS account and deployed something to the cloud before, this is a good next project. If you haven't, start with a free AWS account and come back.
What you're building
Here's the application flow:
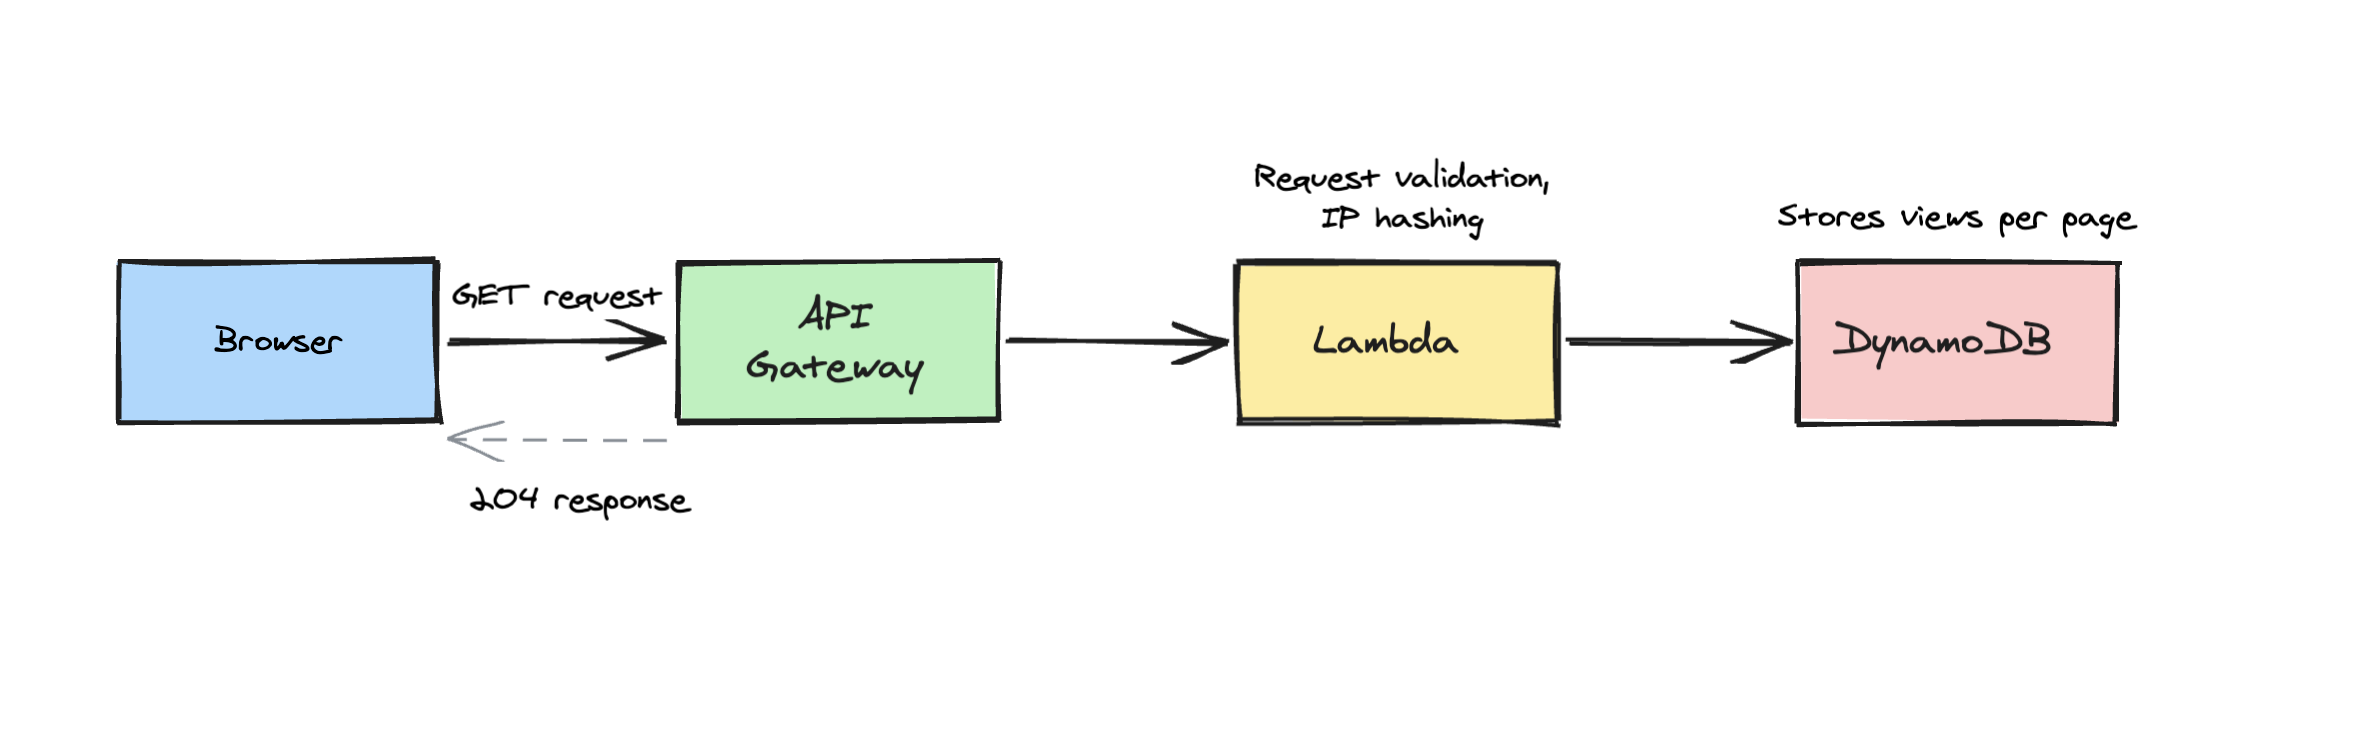
- A visitor loads your blog post in a browser
- A small script on your page sends a request to API Gateway
- API Gateway invokes a Lambda function
- Lambda checks DynamoDB to see if this visitor has already been counted today
- If they're new, it increments the counter
- API Gateway returns a 204 response to the client
Two serverless services for compute and storage, one API layer in front, about 100 lines of TypeScript.
The counter deduplicates by IP address (hashed, so you're not storing raw IPs) and auto-cleans old records with DynamoDB's TTL feature. You add it to your blog with a single <script> tag, and it automatically tracks every page.
Prerequisites
- An AWS account. If you don't have one yet, the Creating an AWS account guide walks you through it. You'll need a credit card on file, but this project stays within Free Tier limits.
- Node.js 24 or later
- AWS CLI installed and configured. Follow the AWS CLI quickstart if this is your first time.
- AWS CDK bootstrapped in your account:
npx cdk bootstrap aws://YOUR_ACCOUNT_ID/us-east-1
If you haven't used CDK before, it's an AWS infrastructure-as-code tool. You write TypeScript that describes your AWS resources, and CDK turns it into CloudFormation and deploys it. The bootstrap command creates a staging bucket CDK needs to upload your code. The CDK getting started guide has more information if you want it.
Project setup
Create a new directory and initialize the project:
mkdir blog-post-view-counter && cd blog-post-view-counter
npm init -y
npm install aws-cdk-lib constructs @aws-sdk/client-dynamodb @aws-sdk/lib-dynamodb
npm install -D aws-cdk tsx typescript @types/node
Create a cdk.json file in the project root. This tells CDK how to run your app:
{
  "app": "npx tsx cdk/app.ts"
}
And a tsconfig.json:
{
  "compilerOptions": {
    "target": "ES2022",
    "module": "NodeNext",
    "moduleResolution": "NodeNext",
    "lib": ["ES2022"],
    "outDir": "dist",
    "rootDir": ".",
    "strict": true,
    "types": ["node"],
    "esModuleInterop": true,
    "skipLibCheck": true,
    "declaration": true
  },
  "include": ["lambda/**/*", "cdk/**/*"]
}
Your project structure will look like this:
blog-post-view-counter/
├── cdk/
│   ├── app.ts          # CDK entry point
│   └── stack.ts        # Infrastructure definition
├── lambda/
│   └── index.ts        # Lambda function code
├── cdk.json
├── package.json
└── tsconfig.json
Step 1: The DynamoDB table
DynamoDB is a key-value database. You give it a key, it gives you back the data. No servers to manage, no connection strings to configure.
Our table stores two kinds of records using a composite key (pk + sk):
Counter records track views per page:
| pk | sk | views |
|---|---|---|
/blog/my-first-post | counter | 42 |
/about | counter | 17 |
Dedup records prevent the same person from being counted twice:
| pk | sk | ttl |
|---|---|---|
/blog/my-first-post#a1b2c3d4... | dedup | 1745208000 |
The dedup key combines the page path with a hash of the visitor's IP. The ttl field is a Unix timestamp 24 hours in the future. DynamoDB automatically deletes expired records, so the same visitor gets counted again the next day.
Think of it like a filing cabinet. Each drawer is labeled with a page path. Inside, there's a counter folder with the view count, and temporary visitor sign-in sheets that get shredded after 24 hours.
Step 2: The Lambda function
Create lambda/index.ts. This is the code that runs every time someone visits your blog:
import { createHash } from 'node:crypto';
import { DynamoDBClient } from '@aws-sdk/client-dynamodb';
import { DynamoDBDocumentClient, GetCommand, PutCommand, UpdateCommand } from '@aws-sdk/lib-dynamodb';

// DynamoDB document client — lets us read/write JS objects instead of raw DynamoDB types
const client = DynamoDBDocumentClient.from(new DynamoDBClient({}));
const TABLE_NAME = process.env.TABLE_NAME!;
const DEDUP_HOURS = 24;

// These come from environment variables set in the CDK stack
const ALLOWED_ORIGIN = process.env.ALLOWED_ORIGIN || '*';
const ALLOWED_HOSTNAME = ALLOWED_ORIGIN !== '*' ? new URL(ALLOWED_ORIGIN).hostname : null;

// CORS headers — browsers require these when your blog (yourdomain.com)
// makes a fetch() to a different domain (your API Gateway URL)
const CORS_HEADERS = {
  'Access-Control-Allow-Origin': ALLOWED_ORIGIN,
  'Access-Control-Allow-Methods': 'GET,OPTIONS',
  'Access-Control-Allow-Headers': 'Content-Type',
};

// Only allow typical blog URL paths — letters, numbers, hyphens, slashes, dots
const VALID_PATH = /^\/[\w\-./]{0,199}$/;

// Hash an IP so we never store raw addresses in DynamoDB (GDPR-friendly)
function hashIp(ip: string): string {
  return createHash('sha256').update(ip).digest('hex').slice(0, 16);
}

export const handler = async (event: any) => {
  // Handle CORS preflight — browsers send this before the real request
  if (event.httpMethod === 'OPTIONS') {
    return { statusCode: 204, headers: CORS_HEADERS, body: '' };
  }

  const page = event.queryStringParameters?.page || '/';

  // Reject paths that don't look like blog URLs
  if (!VALID_PATH.test(page)) {
    return { statusCode: 400, headers: CORS_HEADERS, body: '' };
  }

  // If a Referer header exists, make sure it's from your site
  if (ALLOWED_HOSTNAME) {
    const referer = event.headers?.referer || event.headers?.Referer || '';
    if (referer && !referer.includes(ALLOWED_HOSTNAME)) {
      return { statusCode: 403, headers: CORS_HEADERS, body: '' };
    }
  }

  // Combine page path + hashed IP to create a unique dedup key
  const ip = event.requestContext?.identity?.sourceIp || 'unknown';
  const dedupKey = `${page}#${hashIp(ip)}`;
  const now = Math.floor(Date.now() / 1000);
  const ttl = now + DEDUP_HOURS * 3600; // DynamoDB TTL auto-deletes after 24h

  // Check if this visitor was already counted for this page today
  let isNewView = true;
  try {
    const existing = await client.send(new GetCommand({
      TableName: TABLE_NAME,
      Key: { pk: dedupKey, sk: 'dedup' },
    }));
    if (existing.Item) isNewView = false;
  } catch {
    // If lookup fails, count it as a new view
  }

  if (isNewView) {
    // Write a dedup record so this IP won't be counted again for 24h
    await client.send(new PutCommand({
      TableName: TABLE_NAME,
      Item: { pk: dedupKey, sk: 'dedup', ttl },
    }));

    // Increment the page's view counter (ADD creates the item if it doesn't exist)
    await client.send(new UpdateCommand({
      TableName: TABLE_NAME,
      Key: { pk: page, sk: 'counter' },
      UpdateExpression: 'ADD #v :inc',
      ExpressionAttributeNames: { '#v': 'views' },
      ExpressionAttributeValues: { ':inc': 1 },
    }));
  }

  // 204 No Content — the browser doesn't need a response body
  return { statusCode: 204, headers: CORS_HEADERS, body: '' };
};
The code comments cover the details, but here's the high-level flow: the function validates the incoming page path, checks the Referer header, then hashes the visitor's IP with SHA-256 so no raw addresses end up in your database. It looks up the hashed IP in DynamoDB to see if this visitor was already counted today. If not, it writes a dedup record (which DynamoDB auto-deletes after 24 hours via TTL) and atomically increments the page's view counter. The browser gets back a 204 No Content, meaning "got it, nothing to show you."
Step 3: The infrastructure
Create cdk/stack.ts. This defines all three AWS resources:
import * as cdk from 'aws-cdk-lib';
import * as dynamodb from 'aws-cdk-lib/aws-dynamodb';
import * as apigateway from 'aws-cdk-lib/aws-apigateway';
import { NodejsFunction } from 'aws-cdk-lib/aws-lambda-nodejs';
import { Runtime } from 'aws-cdk-lib/aws-lambda';
import * as path from 'path';
import { fileURLToPath } from 'url';
import { Construct } from 'constructs';

const __dirname = path.dirname(fileURLToPath(import.meta.url));

export class ViewCounterStack extends cdk.Stack {
  constructor(scope: Construct, id: string) {
    super(scope, id);

    // Read your blog's domain from the deploy command:
    //   npx cdk deploy -c blogOrigin=https://yourdomain.com
    const blogOrigin = this.node.tryGetContext('blogOrigin');
    if (!blogOrigin) {
      throw new Error('Missing required context: -c blogOrigin=https://yourdomain.com');
    }

    // DynamoDB table — stores page view counts and IP dedup records
    const table = new dynamodb.Table(this, 'ViewCounterTable', {
      partitionKey: { name: 'pk', type: dynamodb.AttributeType.STRING },
      sortKey: { name: 'sk', type: dynamodb.AttributeType.STRING },
      billingMode: dynamodb.BillingMode.PROVISIONED,
      readCapacity: 25,  // 25 RCU is within the always-free tier
      writeCapacity: 25, // 25 WCU is within the always-free tier
      timeToLiveAttribute: 'ttl', // Auto-delete dedup records after 24h
      removalPolicy: cdk.RemovalPolicy.DESTROY, // Clean up on `cdk destroy`
    });

    // Lambda function — NodejsFunction bundles TypeScript with esbuild automatically
    const fn = new NodejsFunction(this, 'CounterFunction', {
      runtime: Runtime.NODEJS_24_X,
      entry: path.join(__dirname, '../lambda/index.ts'),
      handler: 'handler',
      environment: {
        TABLE_NAME: table.tableName,
        ALLOWED_ORIGIN: blogOrigin, // Passed to Lambda for CORS and Referer checks
      },
      timeout: cdk.Duration.seconds(10),
      memorySize: 128,
    });

    // Give the Lambda read/write access to the DynamoDB table
    table.grantReadWriteData(fn);

    // API Gateway — public HTTPS endpoint that triggers the Lambda
    const api = new apigateway.RestApi(this, 'CounterApi', {
      restApiName: 'blog-post-view-counter',
      deployOptions: {
        throttlingRateLimit: 10,   // Max 10 requests/second sustained
        throttlingBurstLimit: 20,  // Allow short bursts up to 20/second
      },
    });

    const integration = new apigateway.LambdaIntegration(fn);

    // CORS — only allow requests from your blog domain
    const corsOptions: apigateway.CorsOptions = {
      allowOrigins: [blogOrigin],
      allowMethods: ['GET', 'OPTIONS'],
    };

    // GET /counter?page=/some-path — record a page view
    const counter = api.root.addResource('counter');
    counter.addMethod('GET', integration);
    counter.addCorsPreflight(corsOptions);

    // Print the tracking URL after deploy
    new cdk.CfnOutput(this, 'CounterUrl', {
      value: `${api.url}counter`,
      description: 'Tracking endpoint',
    });
  }
}
A few things to notice:
NodejsFunctioninstead ofFunction. You're writing TypeScript, but Lambda runs JavaScript. The regularlambda.Functionconstruct would deploy your.tsfiles as-is, and Lambda wouldn't know what to do with them.NodejsFunctioncompiles your TypeScript to JavaScript with esbuild at deploy time. You write TypeScript, Lambda gets JavaScript, and you don't need a separate build step.- Provisioned capacity at 25/25. DynamoDB's always-free tier gives you 25 read capacity units and 25 write capacity units at no cost. That's 25 reads and 25 writes per second, which is way more than a personal blog needs. We're using provisioned mode instead of on-demand specifically to stay within this free allocation.
removalPolicy: DESTROY. By default, CDK protects your DynamoDB table from accidental deletion. Since this is a learning project, we set it to DESTROY socdk destroycleans everything up. For a production table, you'd leave the default.- Throttling. API Gateway is set to 10 requests per second with bursts up to 20. This caps how much traffic can hit your Lambda and DynamoDB, which limits your bill if someone discovers your endpoint and tries to hammer it.
Now create the CDK entry point at cdk/app.ts:
#!/usr/bin/env node
import * as cdk from 'aws-cdk-lib';
import { ViewCounterStack } from './stack.js';

const app = new cdk.App();
new ViewCounterStack(app, 'BlogPostViewCounterSampleForAws');
Step 4: Deploy
One command:
npx cdk deploy -c blogOrigin=https://yourdomain.com
Replace yourdomain.com with your actual blog domain. CDK will show you a summary of the resources it's about to create and ask for confirmation. Type y.
After about a minute, you'll see output that looks something like this:
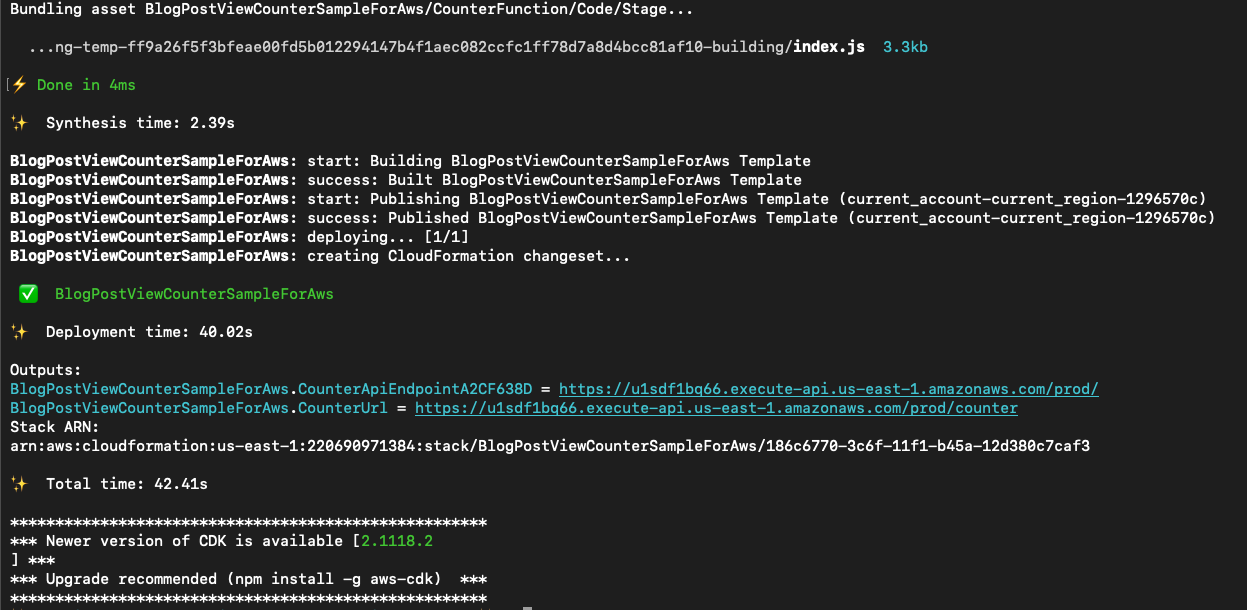
Pay special attention to the Outputs section with the CounterUrl endpoint.
Outputs:
BlogPostViewCounterSampleForAws.CounterUrl = https://abc123.execute-api.us-east-1.amazonaws.com/prod/counter
That's your tracking endpoint. Save that URL.
Step 5: Add it to your blog
Add this script tag to your site's base layout. In Astro, that's your layout component. In Hugo, it's baseof.html. In plain HTML, put it before the closing </body> tag.
<script>
  fetch(`https://YOUR_COUNTER_URL?page=${encodeURIComponent(window.location.pathname)}`);
</script>
Replace YOUR_COUNTER_URL with the URL from the deploy output.
Here's what it looks like in an Astro blog layout, with the real endpoint URL:
<BaseLayout {title} {description} {image} type="article" {pubDate}>
<script type="application/ld+json" set:html={JSON.stringify(schemaData)} slot="head" />
<script>
fetch(`https://u1sdf1bq66.execute-api.us-east-1.amazonaws.com/prod/counter?page=${encodeURIComponent(window.location.pathname)}`);
</script>
<a href="/blog" class="back-link">← all posts</a>
<article>
<header class="post-header">
<h1 class="post-header__title">{title}</h1>
<p class="post-header__meta">
<time datetime={pubDate.toISOString()}>{formattedDate}</time>
{formattedUpdated && (
<span> · updated {formattedUpdated}</span>
)}
</p>
</header>
<div class="post-body">
<slot />
</div>
</article>
</BaseLayout>
Now every page load fires a request to your API, which counts the view and returns a 204. The window.location.pathname part means it automatically sends the current page's path, so you don't need to configure anything per post.
Step 6: Check your view counts
Open the DynamoDB console, find your table, and click "Explore table items." If you have a lot of items, filter for items where sk equals counter. You'll see each page path and its view count.
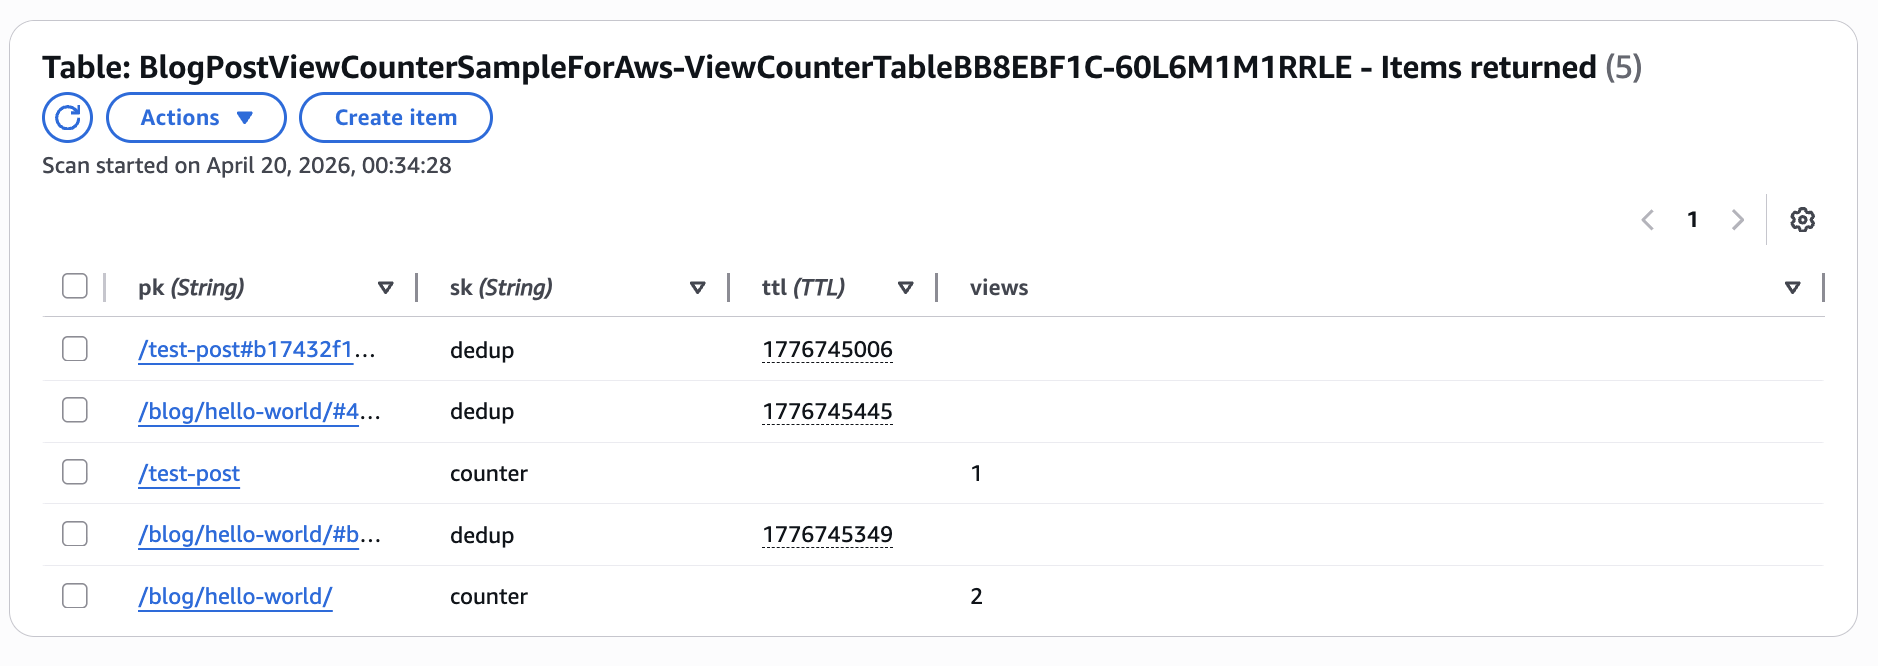
You can also run this from the CLI:
aws dynamodb scan \
  --table-name YOUR_TABLE_NAME \
  --filter-expression "sk = :sk" \
  --expression-attribute-values '{":sk": {"S": "counter"}}'
How much does this cost?
This project uses services eligible for the AWS Free Tier. Depending on your usage and account status, charges may apply. Here's the breakdown:
- DynamoDB provisioned at 25 WCU/25 RCU is within the always-free tier. No cost regardless of account age.
- Lambda gives you 1 million requests per month free. Most personal blogs will stay within these limits.
- API Gateway is the only service with a direct cost: $3.50 per million requests for REST APIs in us-east-1. A blog getting 10,000 views per month would cost about $0.035, which comes out of your Free Tier credits if you're a new customer.
I'd recommend setting up a billing alarm at $5 as a best practice in new sandbox accounts.
What you just learned
If you followed along, you now have hands-on experience with:
- DynamoDB: composite keys, TTL for automatic cleanup, atomic counters with
UpdateExpression - Lambda: handling HTTP events, environment variables, working with the AWS SDK
- API Gateway: REST endpoints, CORS configuration, throttling
- CDK: defining infrastructure in TypeScript, deploying with a single command
And you have something running on your blog that you built from scratch.
Cleanup
If you want to tear everything down:
npx cdk destroy -c blogOrigin=https://yourdomain.com
This deletes the Lambda, the DynamoDB table, and the API Gateway endpoint. All your view count data will be gone, so make sure you're done with it.
What to try next
- Add a billing alarm so you get an email if your AWS charges go above $5
- Build a small dashboard that reads from DynamoDB and displays your view counts
- Track views over time by adding a date field to the counter records
The source code for this project is on GitHub if you want to fork it and make it your own. Let me know in the comments what you're building this week!
Comments
More Blog
View allaiContext bankruptcy: The case for strategic forgetting for AI Agents
Most of us have seen a coding agent fail to complete a task we know it can do. We just don't...
J
James O'ReillygooglecloudParallel Compliance Engine: Drive-to-Sheets Multi-Agent Orchestration
When building Generative AI applications, developers often encounter a massive bottleneck: sequential...
A
Aryan IranidiscussIs It Ethical to Post and Ask About Circuits on Dev.to?
I’ve been thinking about sharing some electronic circuit posts on Dev.to — small circuits, DIY...
C
codebunny20agentsThe One-Click Exporter: AI Studio Antigravity, Probed to Its Limits
What nobody tells you about exporting your multi-agent prototype to a local workspace. Every...
L
leslysandraagenticarchitectGuarding the till while autonomous data agents do the digging
Autonomous agents are genuinely good at answering messy business questions. Give one an LLM and a set...
S
Sireesha PulipatiaiReturn on Attention: Why AI Code Reviews Are Wearing Us Out
PR volume went up, ticket quality didn't, and the gap got filled with LLMs on both sides of the review: bots reviewing, bots replying, bots occasionally arguing with bots about priorities that only existed in a teammate's head. Our CEO named the actual problem, and it's bigger than code review.
C
christineReady-made automations for this
Workflows from the Neura Market marketplace related to this Stable Diffusion resource