
Back to Blog vim
vim
 ai
ai googlecloud
 discuss
 agents
 agenticarchitect
 ai
ai
Build Customizable Dialogs in Vim/NeoVim — No Python, No Dependencies
Linwei April 29, 2026
0 views
A tutorial on building multi-control dialogs in Vim using vim-quickui's data-driven dialog system. Pure VimScript, works on Vim 8.2+ and NeoVim 0.4+.
title: Build Customizable Dialogs in Vim/NeoVim — No Python, No Dependencies published: true description: A tutorial on building multi-control dialogs in Vim using vim-quickui's data-driven dialog system. Pure VimScript, works on Vim 8.2+ and NeoVim 0.4+. tags: vim, neovim, tui, vimscript cover_image:
Vim is incredibly powerful. But that power comes with a tax: you have to remember it.
The Memory Tax
Take the substitute command. "Find and replace" — one of the most common editing operations — has a dizzying number of variations in Vim:
- Replace all occurrences, not just the first? Add
g. - Confirm before each replacement? Add
c. - Case-insensitive? Add
i. Or put\cin the pattern. - Using regex? That's the default. But which flavor?
\vfor very-magic,\Vfor literal, or the default magic mode with its own escaping rules. - Match whole words only? Wrap the pattern with
\<and\>. Easy to forget, easy to mistype. - Replace in the whole file? Prepend
%. Visual selection only? Use'<,'>. A line range? Type the numbers.
That gives you commands like:
:%s/\v(foo|bar)/baz/gci
Beginners struggle to memorize all the flags. Experienced users forget the ones they rarely need.
And substitute is just one built-in command. The real problem multiplies with plugins. Every plugin brings its own commands with its own flags and syntax. The ones you use daily become muscle memory. The ones you use once a month? Back to the docs, every time.
This is the fundamental tension in Vim's interface. The command line is optimized for speed, not discoverability. If you already know the command, it's the fastest way. If you don't — or you've forgotten a flag — you're stuck.
What if, instead of memorizing flags, the user could see all available options at once? Not buried in :help, but right there on screen:
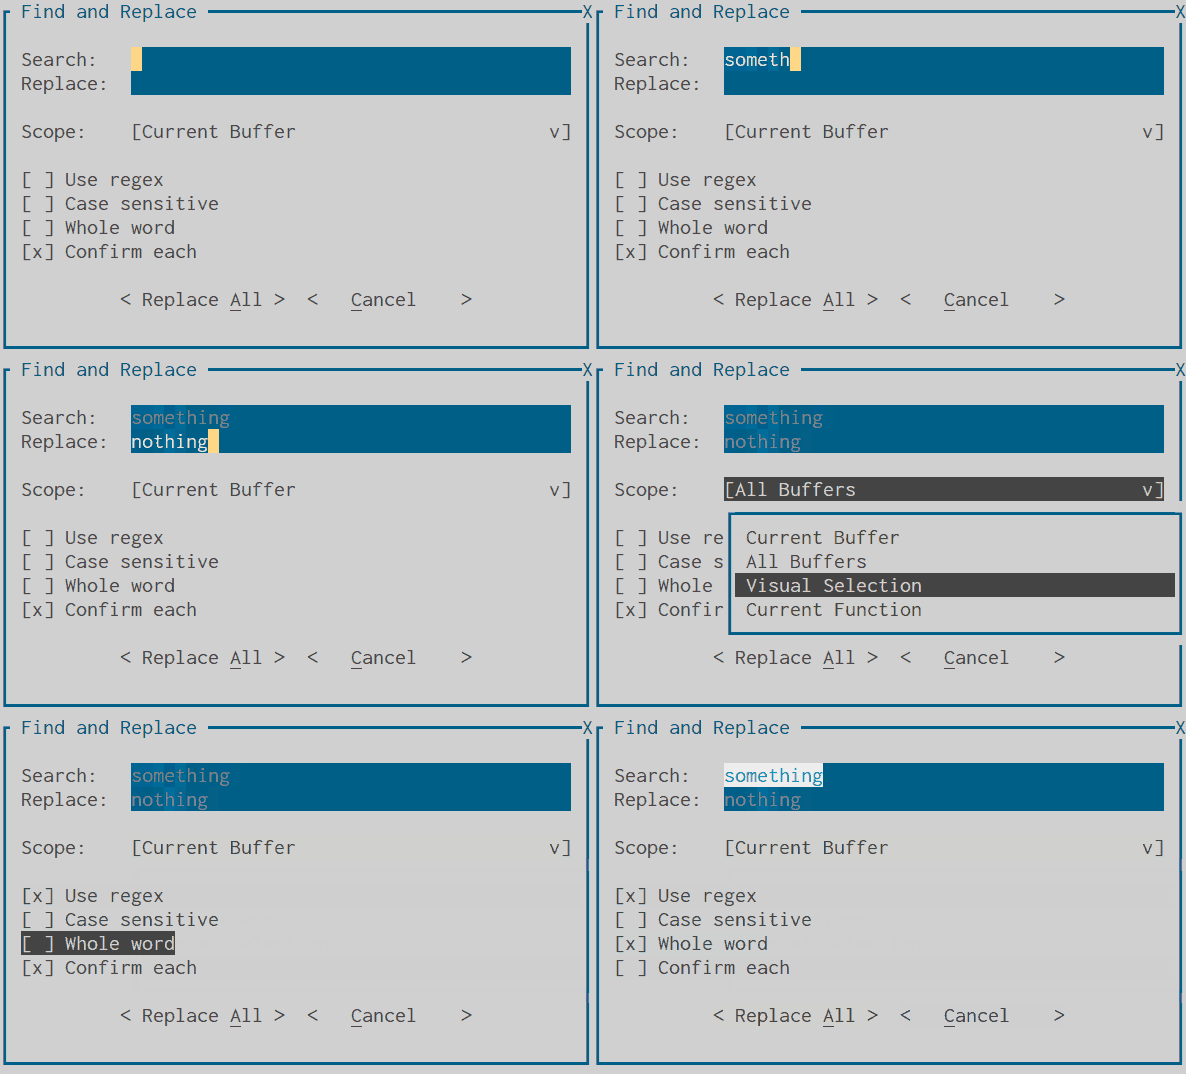
This is a search-and-replace dialog built with vim-quickui. Every option is visible: regex mode, case sensitivity, whole word matching, confirmation, replace scope. Whether it's your first time or you're coming back after months, there's zero memory burden. You see what's available, you pick what you need, you go.
So how do you build something like this in Vim?
The built-in tools won't get you far. Vim gives you input() for single-line prompts and inputlist() for simple list selection. That's it — no text fields, no checkboxes, no radio buttons, no way to show multiple controls in one window. If you need a multi-field form, you end up chaining blocking input() calls one after another, with no way to go back and fix a previous answer.
This does not scale.
A Better Way: vim-quickui Dialog
vim-quickui is a TUI widget library for Vim and NeoVim. It provides menus, listboxes, textboxes, and more — all in pure VimScript with no external dependencies.
In version 1.5.0, it ships a data-driven dialog system. You declare your controls as a list of dictionaries. QuickUI renders them in a popup window. When the user is done, you get all values back as a single dictionary.
No +python. No Lua. No external tools. Just VimScript.
For newcomers, this lowers the barrier to getting productive in Vim — you don't need to memorize every command and flag before you can use a feature. For experienced users, it cuts down the time spent re-reading docs for rarely-used commands and lets you stay in the flow.
Install
With vim-plug:
Plug 'skywind3000/vim-quickui'
Or use Vim's built-in packages:
cd ~/.vim/pack/vendor/start && git clone https://github.com/skywind3000/vim-quickui
Optional step, you can tell quickui to use Unicode borders:
let g:quickui_border_style = 2
That's it. No build step. No dependencies.
Your First Dialog
Let's build a simple settings dialog. Put this in a function and call it:
function! MySettings()
    let items = [
        \ {'type': 'label', 'text': 'Settings:'},
        \ {'type': 'input', 'name': 'name', 'prompt': 'Name:',
        \  'value': 'test'},
        \ {'type': 'radio', 'name': 'choice', 'prompt': 'Pick:',
        \  'items': ['A', 'B', 'C']},
        \ {'type': 'check', 'name': 'flag',
        \  'text': 'Enable Feature'},
        \ {'type': 'button', 'name': 'confirm',
        \  'items': [' &OK ', ' &Cancel ']},
        \ ]
    let result = quickui#dialog#open(items, {'title': 'Settings'})
    echo result
endfunc
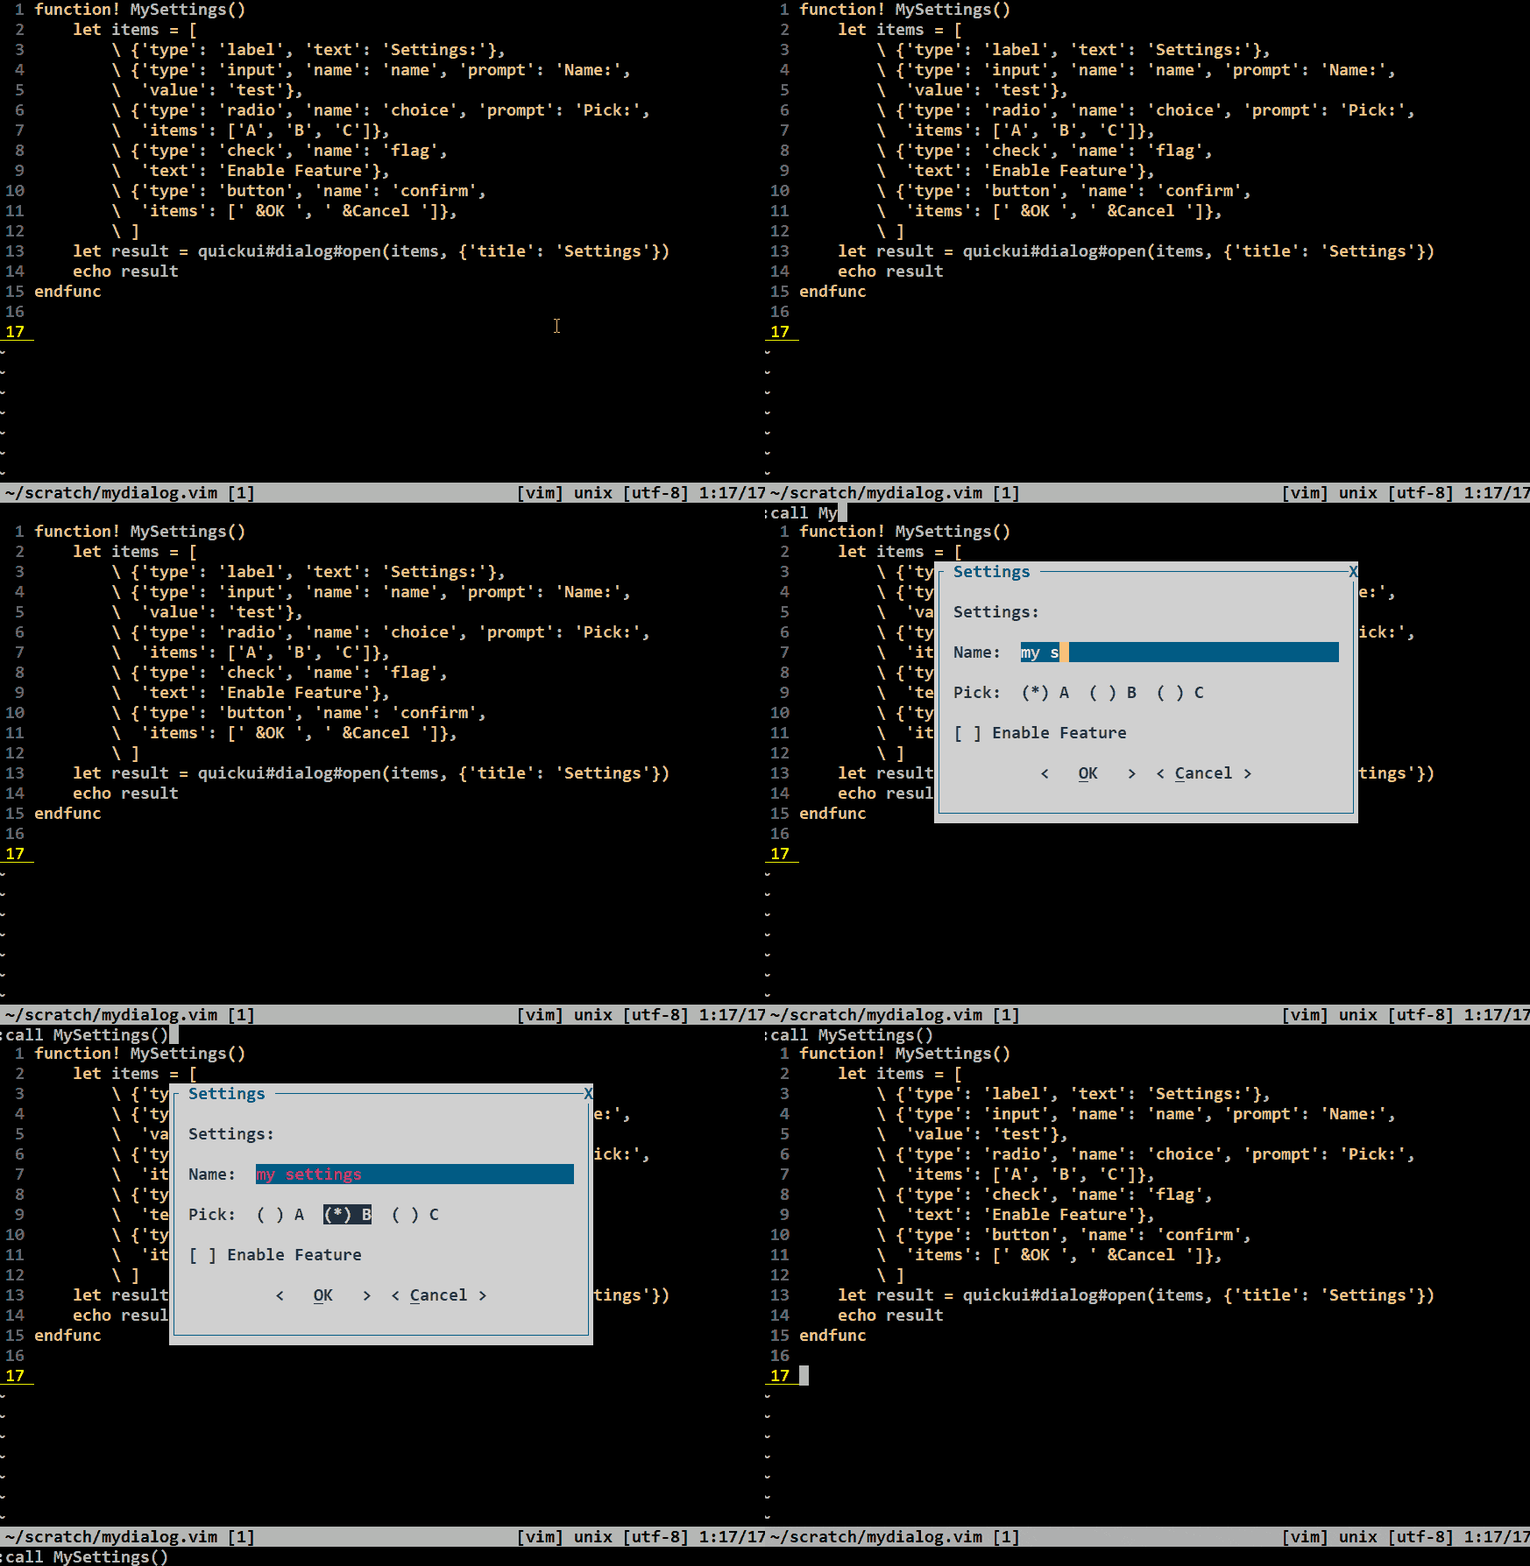
Call :call MySettings() and you get this:
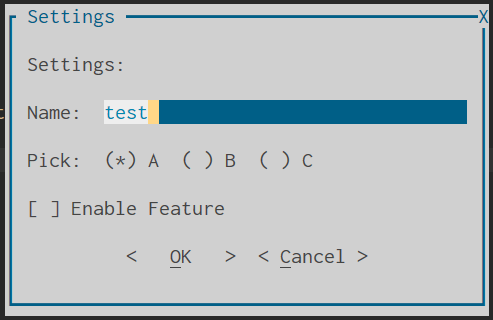
A real dialog. In Vim. With multiple controls.
Let's break down what happened:
label— static text at the top, not focusableinput— a text field with a prompt label and a default valueradio— a group of options, only one can be selectedcheck— a checkbox you can toggle on or offbutton— a row of buttons at the bottom
You navigate with Tab and Shift-Tab. You type in input fields. You press Space to toggle checkboxes or switch radio options. You press Enter or click a button to confirm.
All values come back in the result dictionary.
How Did the User Exit?
When the dialog closes, you need to know: did the user confirm or cancel? And if they confirmed, did they press a button or hit Enter from an input field?
The return value has two key fields:
button_index— which button was pressed (0-based), or-1for cancelbutton— the name of the button control, or''if Enter was pressed on a non-button control or dialog was cancelled
Here is the pattern you will use in every dialog:
let r = quickui#dialog#open(items, opts)

if r.button_index == -1
    " User pressed ESC, Ctrl-C, or clicked the close button.
    " Dialog was cancelled.
    echo 'Cancelled'
elseif r.button == ''
    " User pressed Enter while on an input, radio, or checkbox.
    " No button was clicked. Treat this as a confirm.
    echo 'Confirmed (Enter): name=' . r.name
else
    " User clicked a button. button_index is 0-based:
    " 0 = first button, 1 = second button, etc.
    echo 'Button pressed: ' . r.button . ' #' . r.button_index
endif
A few things to note:
button_indexis 0-based. The first button returns0, the second returns1, and so on.- Distinguish Enter from button click using
button. Whenbutton_indexis0, checkr.button: if it is'', the user pressed Enter on a non-button control; if it is non-empty, the first button was clicked. - Cancel still returns values. Even after ESC,
r.nameand other fields contain whatever the user typed before cancelling. This is useful if you want to restore state when reopening the dialog. buttontells you which button row was clicked. If you have multiple button rows with different names, this field tells you which group the click came from.
In most cases, you just need this:
let r = quickui#dialog#open(items, opts)

if r.button_index >= 0 && r.button != ''
    " User clicked a button — do something with the values
    echo 'Name: ' . r.name
endif
Or if you have OK and Cancel buttons:
" ' &OK ' is button 0, ' &Cancel ' is button 1
if r.button_index == 0 && r.button != ''
    echo 'Accepted: ' . r.name
endif
A Real-World Example
Let's build something closer to a real plugin. A "New Project" form with all the control types:
function! NewProject()
    let items = [
        \ {'type': 'label', 'text': 'Create New Project:'},
        \ {'type': 'input', 'name': 'project_name', 'prompt': 'Project:'},
        \ {'type': 'input', 'name': 'email', 'prompt': 'Email:'},
        \ {'type': 'dropdown', 'name': 'language', 'prompt': 'Language:',
        \  'items': ['Python', 'JavaScript', 'Go', 'Rust', 'C++'],
        \  'value': 0},
        \ {'type': 'dropdown', 'name': 'build', 'prompt': 'Build:',
        \  'items': ['Make', 'CMake', 'Cargo', 'npm', 'pip'],
        \  'value': 0},
        \ {'type': 'radio', 'name': 'license', 'prompt': 'License:',
        \  'items': ['&MIT', '&Apache', '&GPL', '&Proprietary'],
        \  'value': 0},
        \ {'type': 'check', 'name': 'git_init',
        \  'text': 'Initialize git repo', 'value': 1},
        \ {'type': 'check', 'name': 'ci',
        \  'text': 'Add CI config'},
        \ {'type': 'button', 'name': 'confirm',
        \  'items': [' &Create ', '  Cancel  ']},
        \ ]

    let opts = {'title': 'New Project', 'w': 50, 'focus': 'project_name'}
    let result = quickui#dialog#open(items, opts)

    " Check if the user clicked "Create" (button 0)
    if result.button_index == 0 && result.button != ''
        " dropdown returns an index — convert it to text
        let languages = ['Python', 'JavaScript', 'Go', 'Rust', 'C++']
        let builds = ['Make', 'CMake', 'Cargo', 'npm', 'pip']

        echo 'Project:  ' . result.project_name
        echo 'Email:    ' . result.email
        echo 'Language: ' . languages[result.language]
        echo 'Build:    ' . builds[result.build]
        echo 'License:  ' . result.license
        echo 'Git:      ' . (result.git_init ? 'yes' : 'no')
        echo 'CI:       ' . (result.ci ? 'yes' : 'no')
    else
        echo 'Cancelled'
    endif
endfunc
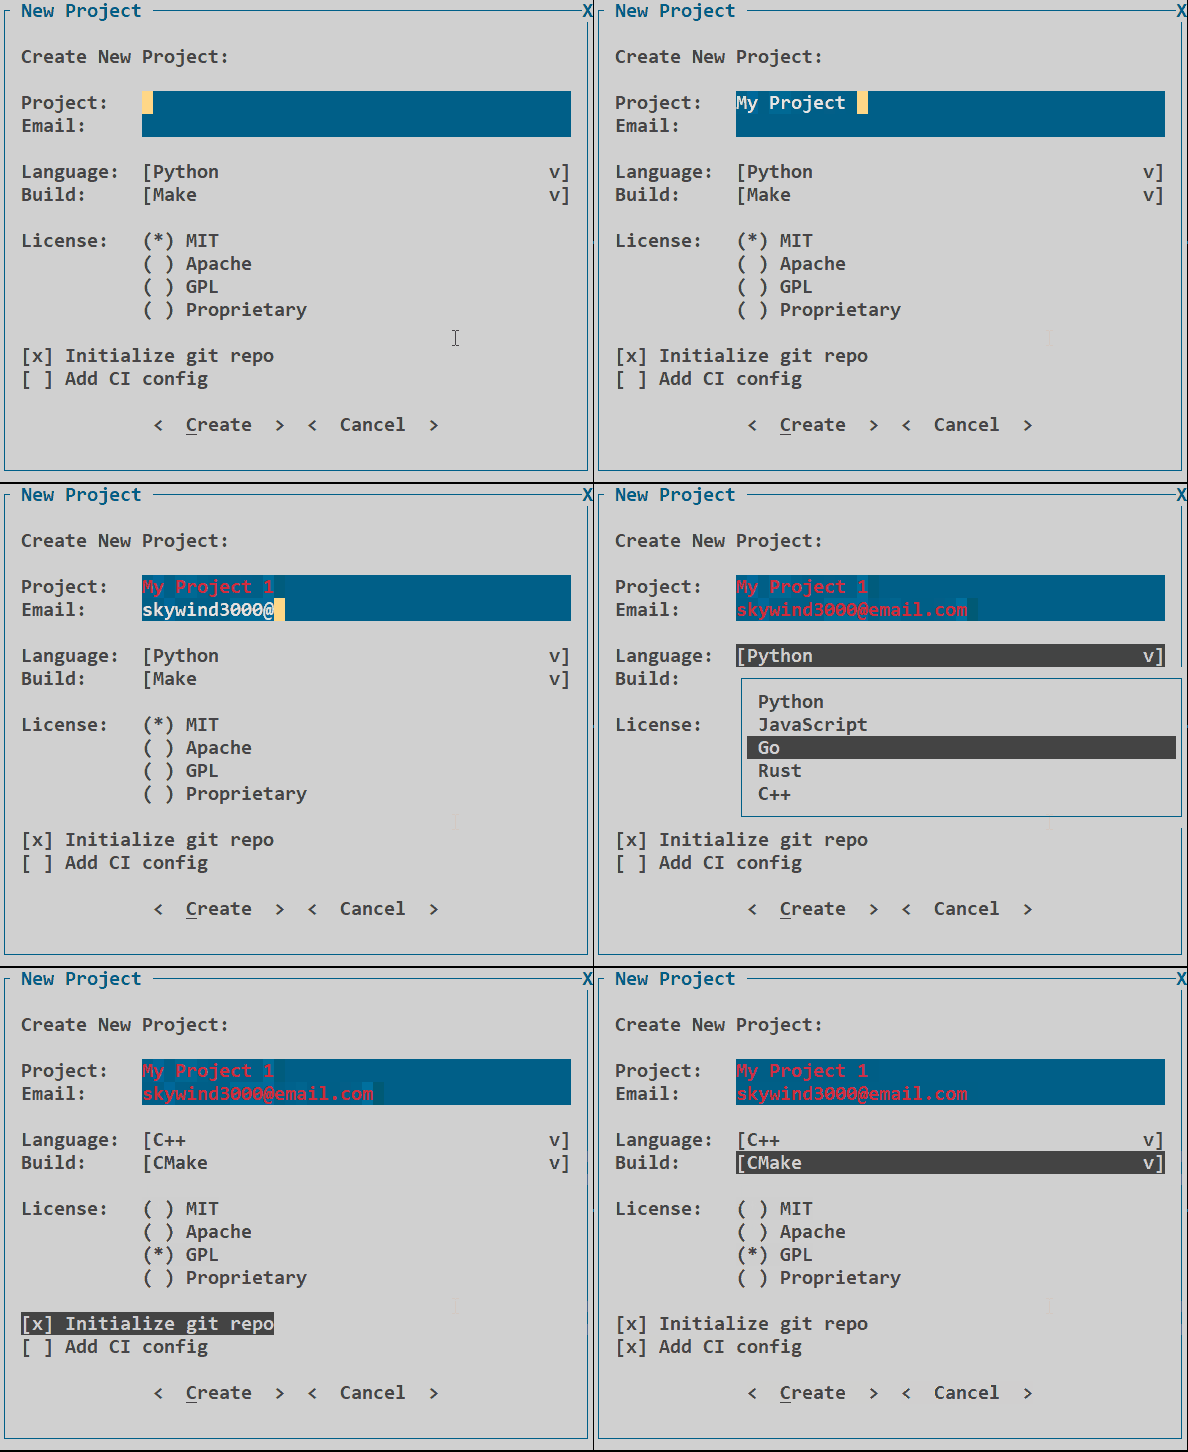
Screenshot:
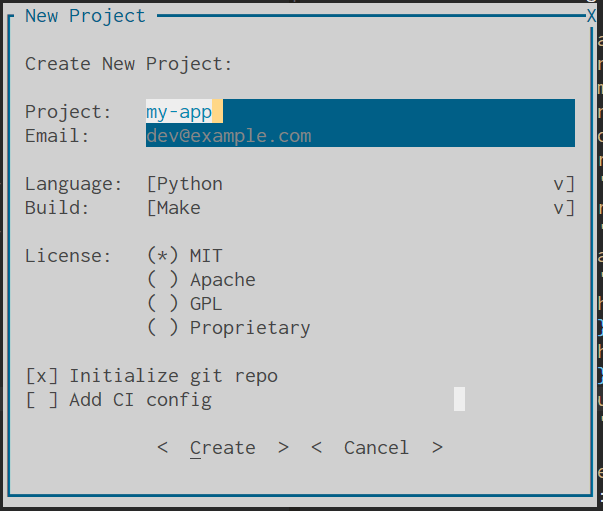
This example shows several things:
Dropdown controls display a collapsed selection field. Press Enter or Space to open a popup list and pick an option. The return value is a 0-based index — you need to map it back to the text yourself.
opts.focus sets the initial focus to the project_name input, so the user can start typing right away.
Prompt alignment happens automatically. Notice how Project:, Email:, Language:, Build:, and License: are all left-aligned, and their controls start at the same column. QuickUI calculates the longest prompt and pads the rest.
Hotkeys are marked with & in button, radio, and checkbox text. &Create makes C a hotkey — press C anywhere in the dialog (when not typing in an input) to activate that button. Same for &MIT, &Apache, etc. in the radio group.
Tips
A few things I learned while building dialogs:
Start with opts.w. If you don't set a width, QuickUI auto-calculates one. This works for simple dialogs, but for forms with multiple fields, setting an explicit width (like 50) gives a more consistent layout.
Use 'value' for defaults. Every control accepts a value field. Inputs take a string, radios/dropdowns/checkboxes take a number. Pre-filling defaults saves the user time.
Checkboxes don't need prompts. Unlike input and radio, checkboxes look natural without a prompt — the text is the label. But if you want them to align with other prompted controls, you can add a 'prompt' field.
Name your button rows. If you have one button row, the default name 'button' is fine. But if you have two rows (e.g., "Apply/Reset" and "OK/Cancel"), give them different names so you can tell which row was clicked.
What's Next
This tutorial covered the basics. The dialog system has more to offer:
- Input history — inputs can share history across calls with the
historyfield - Vertical radio — when options are long, radio groups auto-switch to vertical layout
- Validator — a callback function that checks values before the dialog closes
- Mouse support — click on any control to focus, toggle, or activate it
- Custom colors and borders — match your Vim color scheme
For the full reference, see the Dialog Guide in the vim-quickui repository.
Beyond Dialogs
vim-quickui is more than just dialogs. It also provides:
- Menu bar — a dropdown menu at the top of the screen, like Borland/Turbo C++
- Context menu — a right-click style popup menu
- Listbox — a scrollable list with search
- Textbox — display text in a popup window
- Preview window — peek at file contents near the cursor
- Input box — a simple single-line prompt (lighter than a full dialog)
- Terminal — run shell commands in a popup
All in pure VimScript. All working on both Vim and NeoVim.
Check out the full documentation for details.
If you find vim-quickui useful, star it on GitHub. It helps others discover the project.
Questions or ideas? Open an issue or leave a comment below.
Comments
More Blog
View allaiContext bankruptcy: The case for strategic forgetting for AI Agents
Most of us have seen a coding agent fail to complete a task we know it can do. We just don't...
J
James O'ReillygooglecloudParallel Compliance Engine: Drive-to-Sheets Multi-Agent Orchestration
When building Generative AI applications, developers often encounter a massive bottleneck: sequential...
A
Aryan IranidiscussIs It Ethical to Post and Ask About Circuits on Dev.to?
I’ve been thinking about sharing some electronic circuit posts on Dev.to — small circuits, DIY...
C
codebunny20agentsThe One-Click Exporter: AI Studio Antigravity, Probed to Its Limits
What nobody tells you about exporting your multi-agent prototype to a local workspace. Every...
L
leslysandraagenticarchitectGuarding the till while autonomous data agents do the digging
Autonomous agents are genuinely good at answering messy business questions. Give one an LLM and a set...
S
Sireesha PulipatiaiReturn on Attention: Why AI Code Reviews Are Wearing Us Out
PR volume went up, ticket quality didn't, and the gap got filled with LLMs on both sides of the review: bots reviewing, bots replying, bots occasionally arguing with bots about priorities that only existed in a teammate's head. Our CEO named the actual problem, and it's bigger than code review.
C
christineReady-made automations for this
Workflows from the Neura Market marketplace related to this Stable Diffusion resource
- No-Code Random Mock Data Generator - Zero Dependenciesn8n · $9.99 · Related topic
- POML to AI Prompts & Chat Messages Converter (Zero Dependencies)n8n · $12.99 · Related topic
- Generate Random Mock Data with No Code and Zero Dependenciesn8n · Free · Related topic
- Build AI Agents with Think-Plan-Act Architecture Using Llama-4 Reasoningn8n · Free · Related topic