 Stable Diffusion
Back to Blog antigravity
 flutter
 googleappsscript
 flutter
 kubernetes
 kubernetes
 ai
ai
Google Antigravity Comes to VS Code: Agentic Coding Without Leaving Your Editor
Caleb Duff August 23, 2026
0 views
If you've tried an "agentic" AI coding tool recently, there's a good chance it asked you to switch...
If you've tried an "agentic" AI coding tool recently, there's a good chance it asked you to switch editors entirely. Google's own agent-first IDE, Antigravity, launched in November 2025 with exactly that trade-off: full agentic power, but only inside its own dedicated desktop application.
That trade-off just went away. Google has shipped Antigravity extensions for VS Code, Visual Studio, JetBrains, and Zed, bringing the same agent, the same review workflow, and the same account into the editor you've already spent years configuring exactly the way you like it.
This post walks through what the VS Code extension actually is, how it fits into Antigravity's broader architecture, how to install and configure it, and most importantly; how its permission system keeps an agent that can read files, run terminal commands, and drive a real browser from doing anything you haven't explicitly allowed.
By the end of this article, you will be able to:
- Explain how the extension relates to the full Antigravity 2.0 desktop app and the
agyCLI - Install and authenticate the extension inside VS Code
- Work through the agent side panel, implementation plans, and walkthroughs
- Configure the permission engine so the agent only does what you approve
- Lock down its browser subagent so it never touches your personal Chrome data
New to Antigravity generally? Start with Google's own primer: Antigravity 2.0 Overview
Prerequisites
To follow along hands-on, you'll need:
- VS Code version 1.90 or later, on macOS, Linux, or Windows
- A Google Account on any Antigravity plan (the free tier is enough), or an enterprise account enabled for Gemini Enterprise
- About five minutes for the first-time sign-in and backend install
You can also read this purely as an architecture and workflow walkthrough; every step is explained, not just shown.
1. Where the Extension Fits in Antigravity's Architecture
It helps to know there are actually three doors into the same house:
[ Antigravity 2.0 ] ── the full desktop app, a dedicated fork of VS Code
[ Antigravity CLI (agy) ] ── the same agent, driven from your terminal
[ IDE Extensions ] ── the same agent, embedded in an editor you already run
        │
        ▼
[ Local `agy` backend service ] (installed automatically on first launch)
        │
        ▼
[ Antigravity Agent Runtime ]
   (planning, terminal execution, browser subagent — powered by Gemini)
The extension itself is deliberately thin: a side panel, an inline diff viewer, and a renderer for the agent's plans and artifacts, all sitting on top of your existing VS Code install. On first launch, it silently installs a local agy backend service on your machine, the same engine that powers the standalone desktop app and the CLI. Because of that shared backend, sign-in is unified across every surface: authenticate once, and the same entitlement, permissions, and conversation history follow you whether you open Antigravity from VS Code, JetBrains, or a terminal.
Worth knowing: the full Antigravity 2.0 app is a genuine fork of VS Code, so if you ever outgrow the extension, migrating is mostly a matter of importing your settings. But if your editor setup is already exactly how you want it, the extension gets you the same agent without asking you to leave.
2. Install and Sign In
Getting running takes two short steps.
Step A: Install from the Marketplace
- Open the Extensions view (
Ctrl+Shift+Xon Windows/Linux,Cmd+Shift+Xon macOS) - Search for Google Antigravity, published by Google
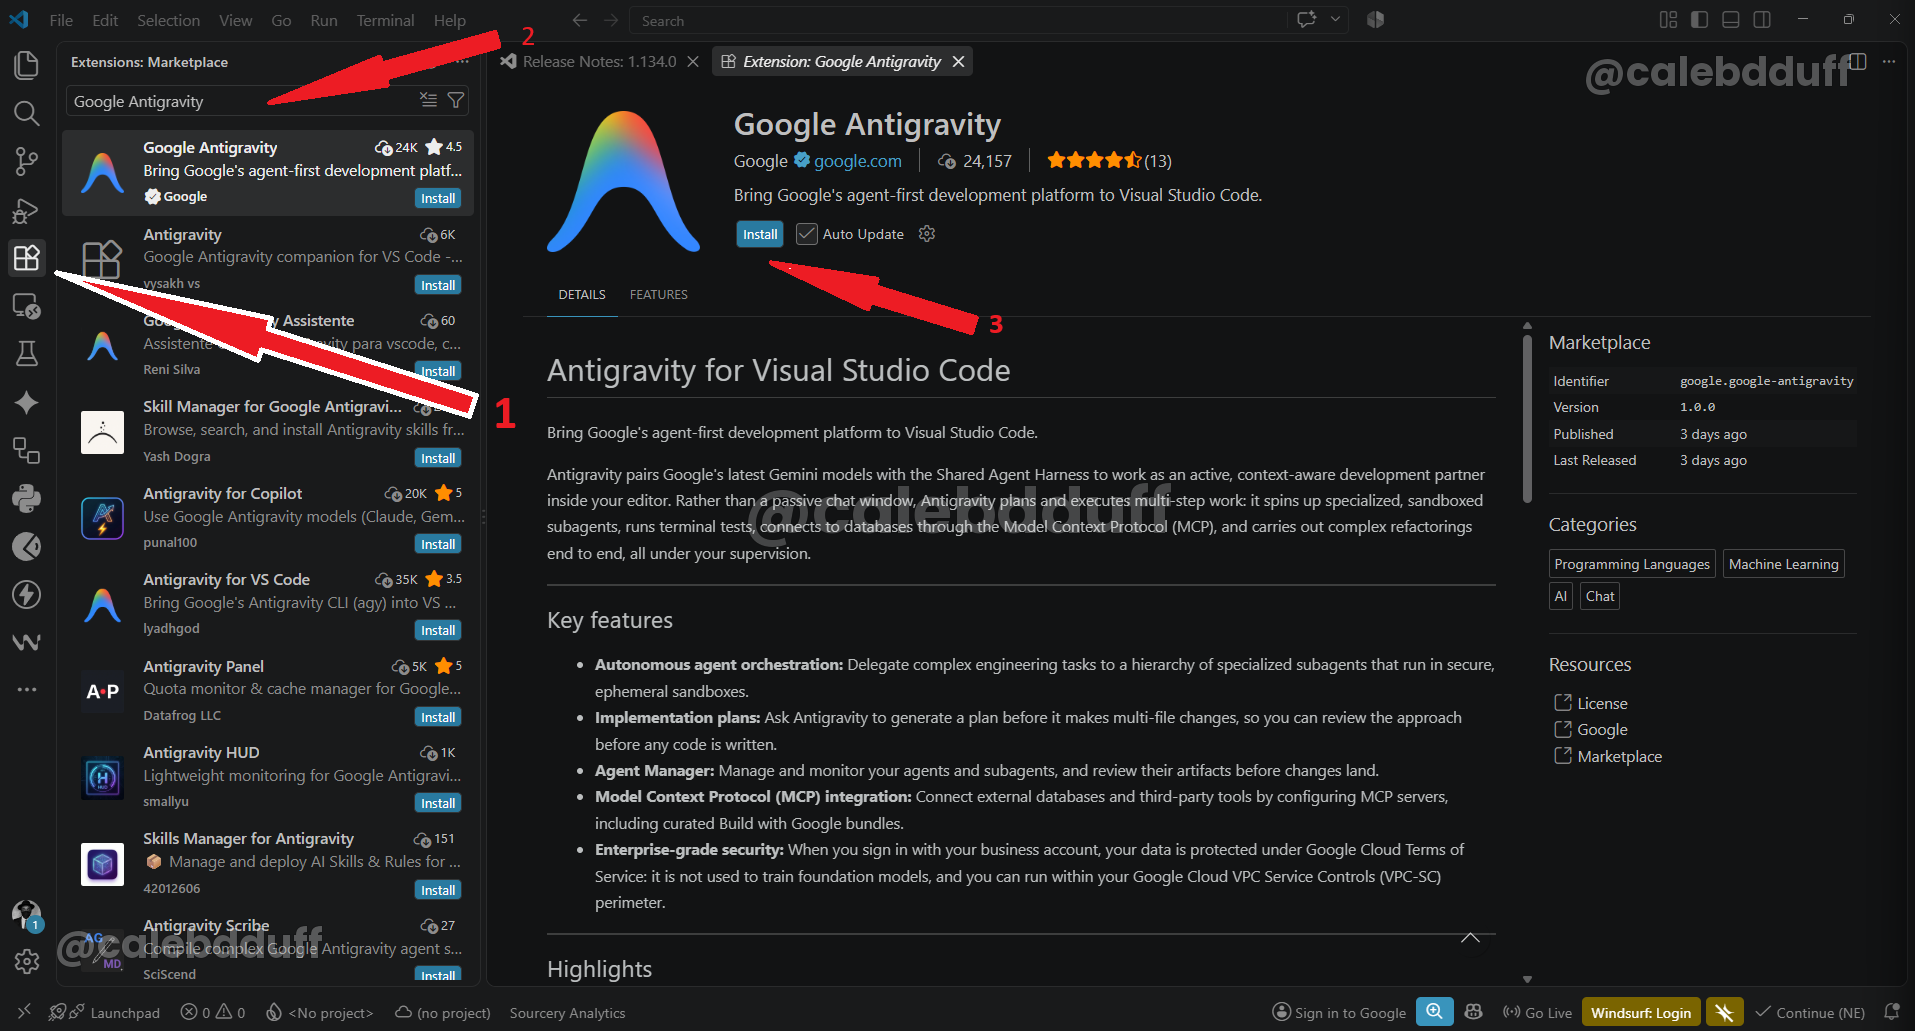 3. Click Install
Step B: Sign In and Let Setup Finish
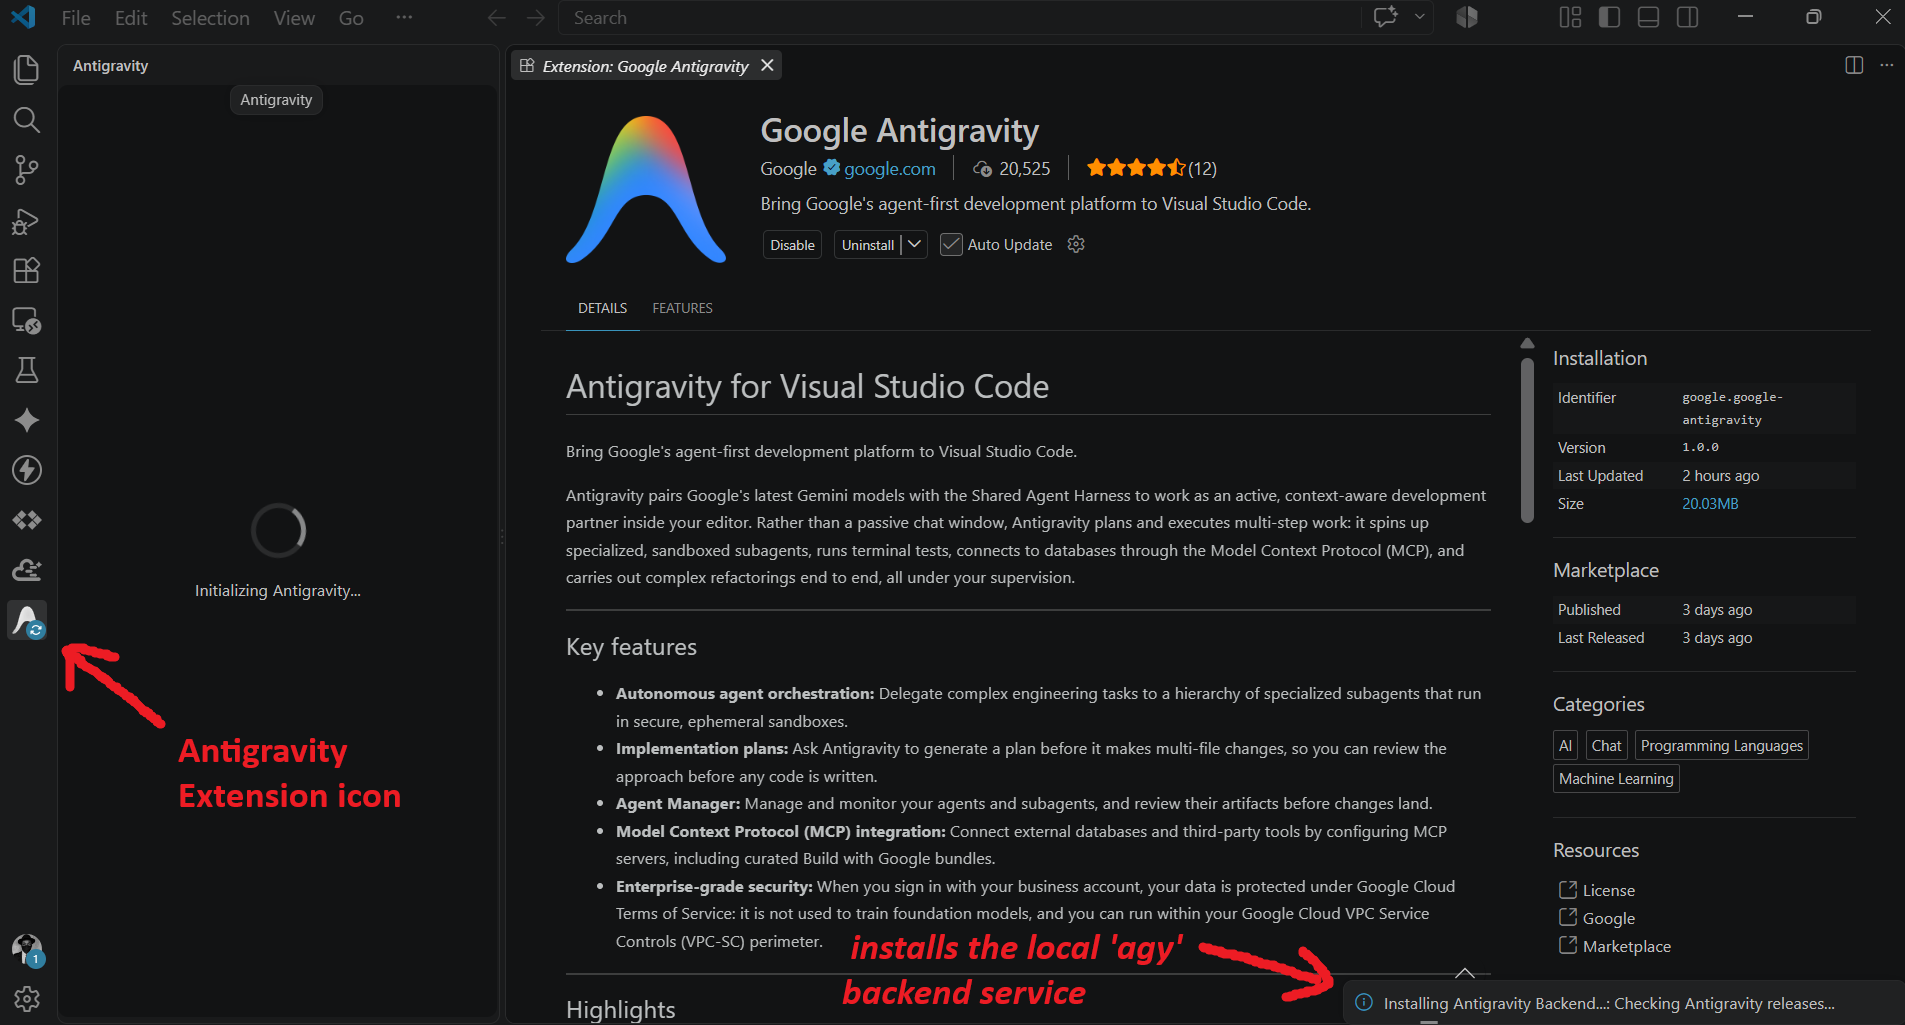
- Click the Antigravity icon in the Activity Bar
- Sign in with your Google Account
- The extension automatically installs the local
agybackend service in the background, there's no separate terminal setup to do yourself
Note: you don't need a paid plan to try this. The free tier is enough to install and start using the extension. Enterprise teams instead authenticate against a Gemini Enterprise–enabled account, which ties usage to org-level budgets and IAM policies rather than a personal quota, useful if you want every developer's agent usage centrally governed from day one.
3. Working With the Agent, Not Just Prompting It
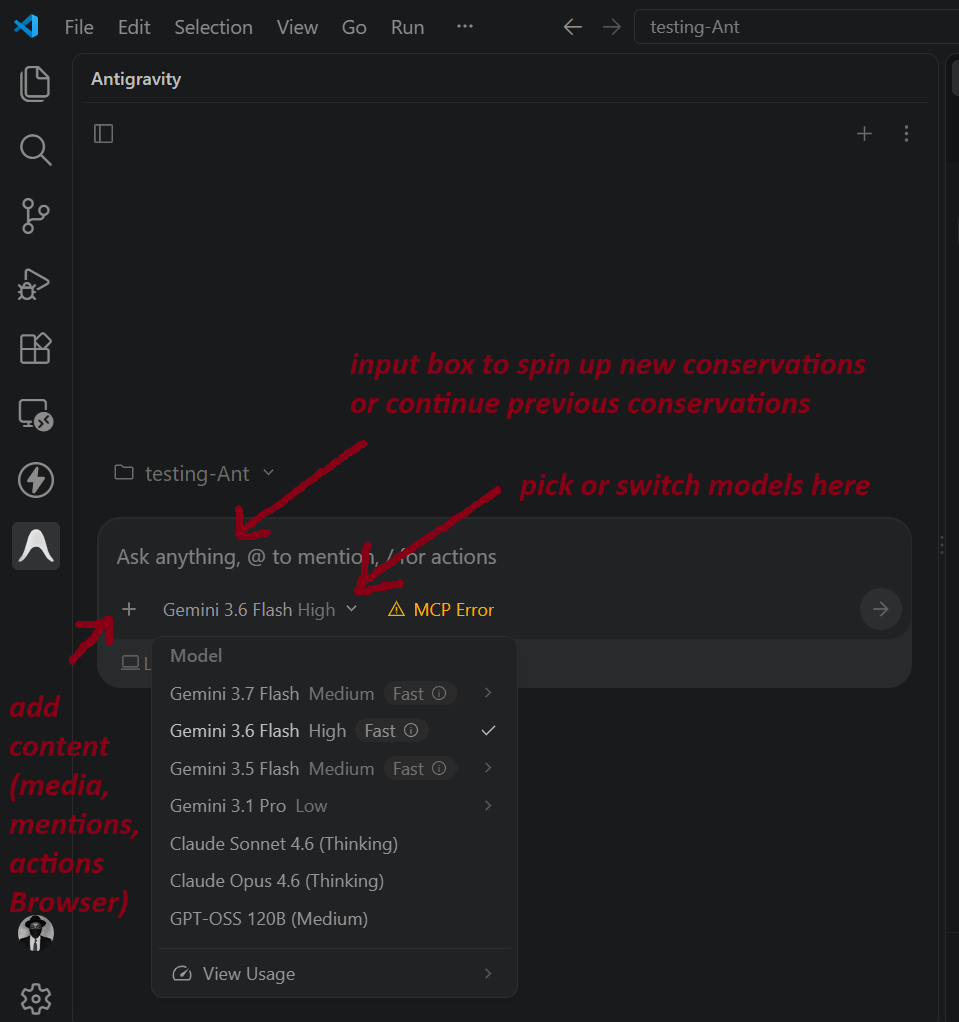
Once you're signed in, a panel on the right side of the editor becomes your main workspace. From there you can spin up new conversations, attach images, switch agent modes, and pick between models; all without a context switch away from your code. As a task runs, a toolbar above the input tracks open file changes, running terminal processes, and any artifacts the agent has produced, so you always know what it's currently touching.
Implementation Plans: Review Before Anything Changes
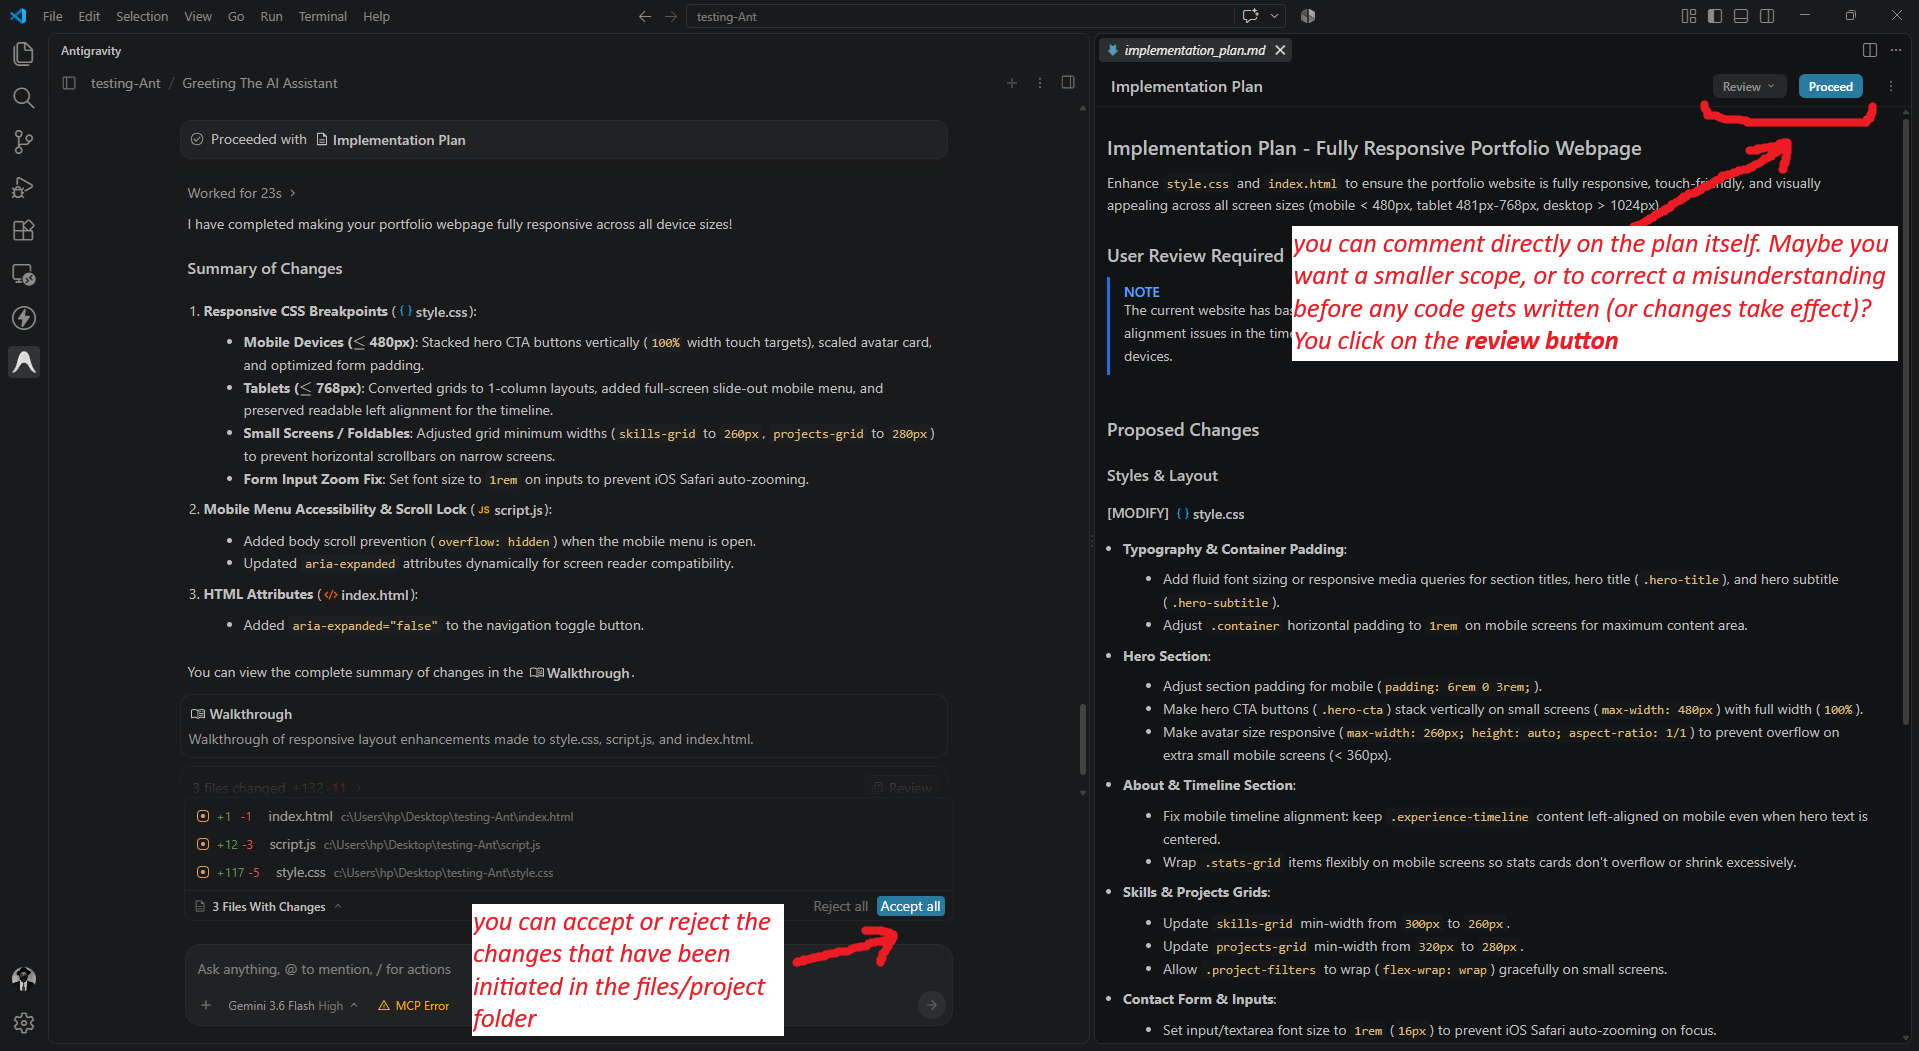
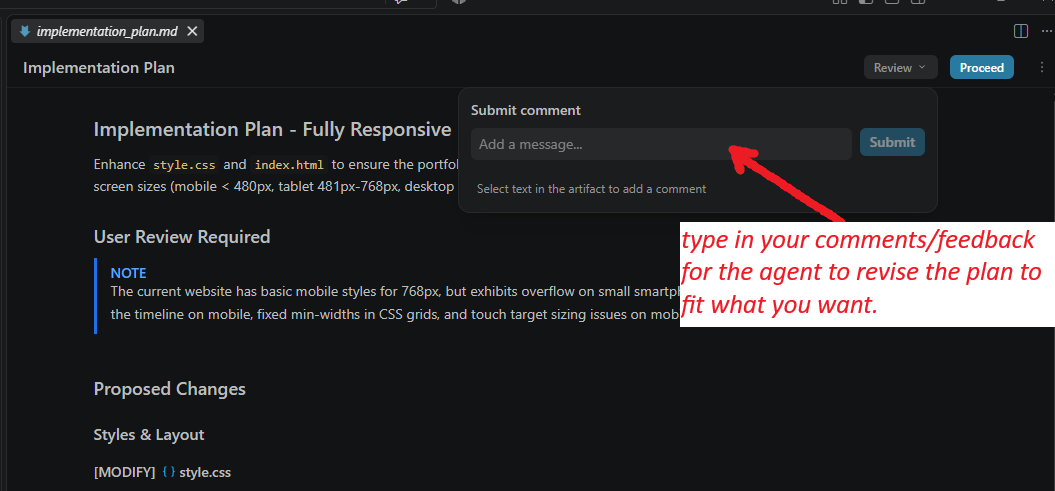
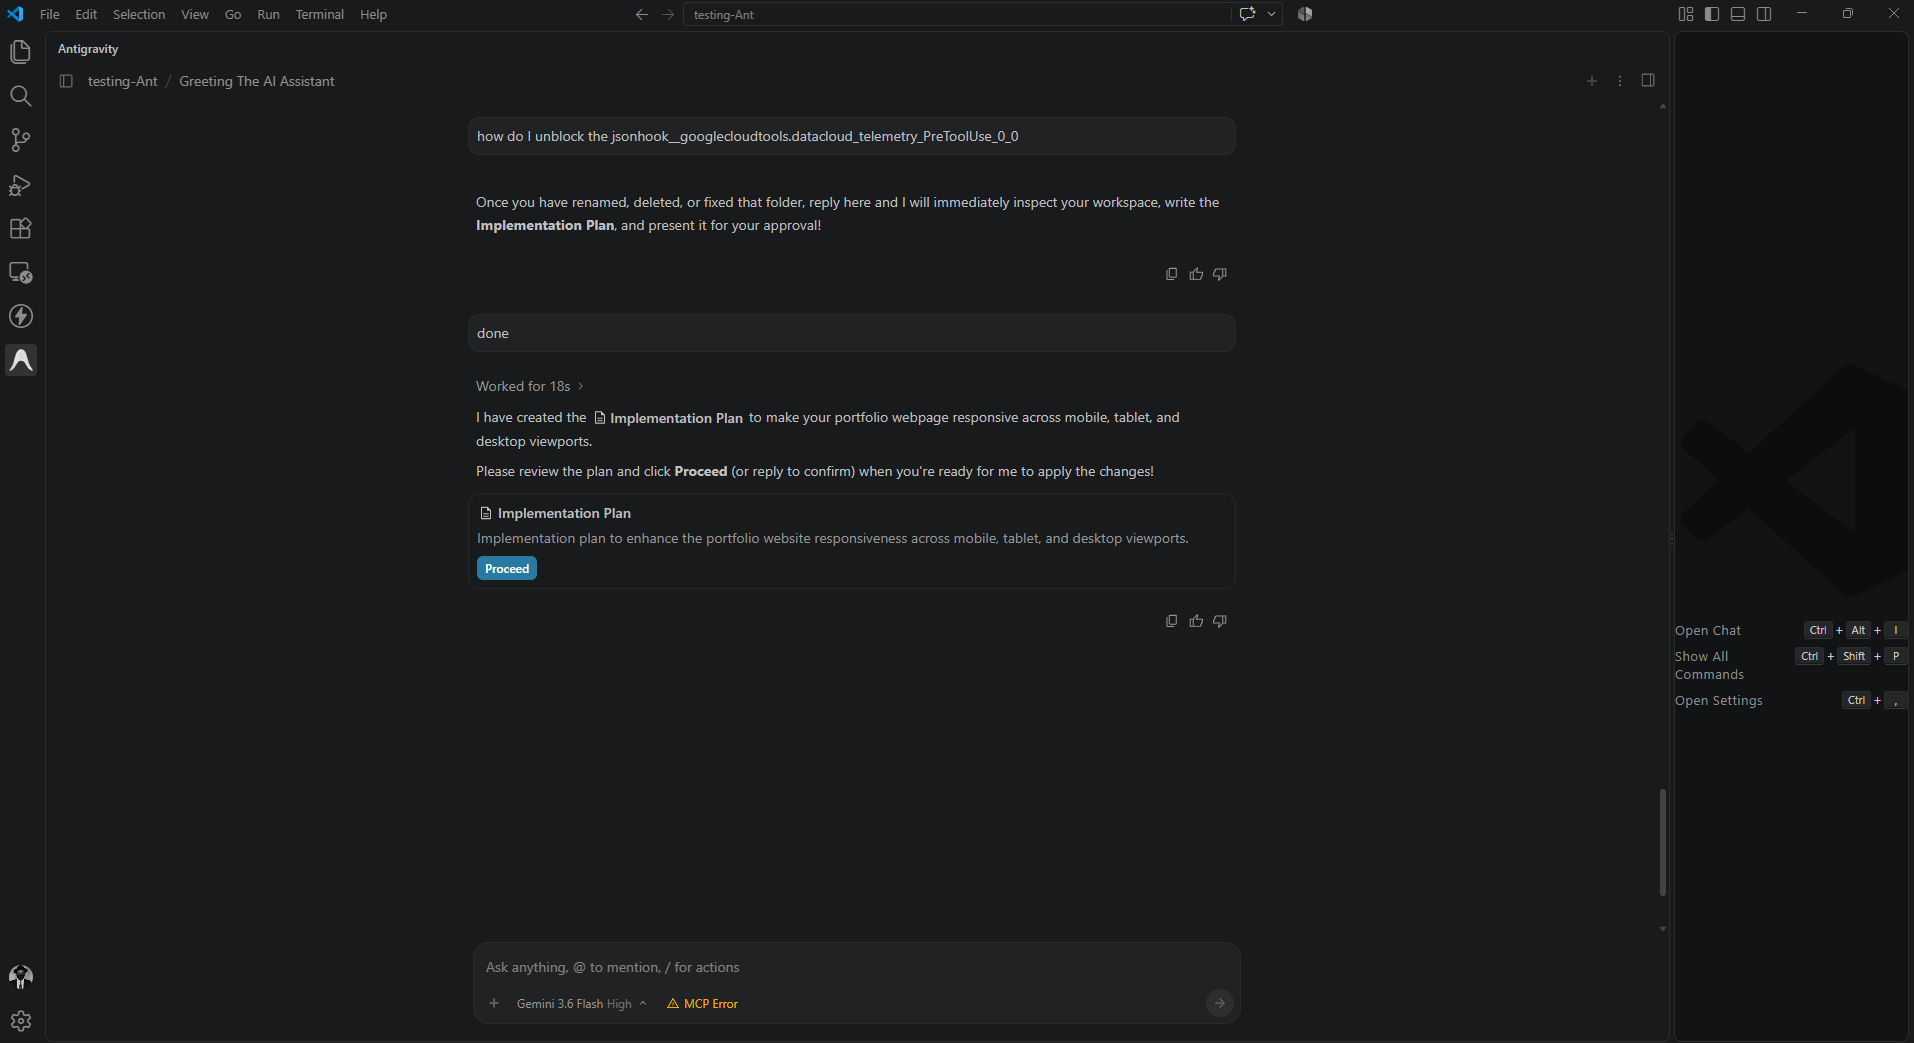
For any non-trivial request, the agent doesn't jump straight to editing files. The standard workflow will be to first produce an implementation plan, which is basically an artifact describing exactly what it intends to change and why and, unless your review policy is set to always proceed, it pauses for your sign-off (permission) before touching a single line.
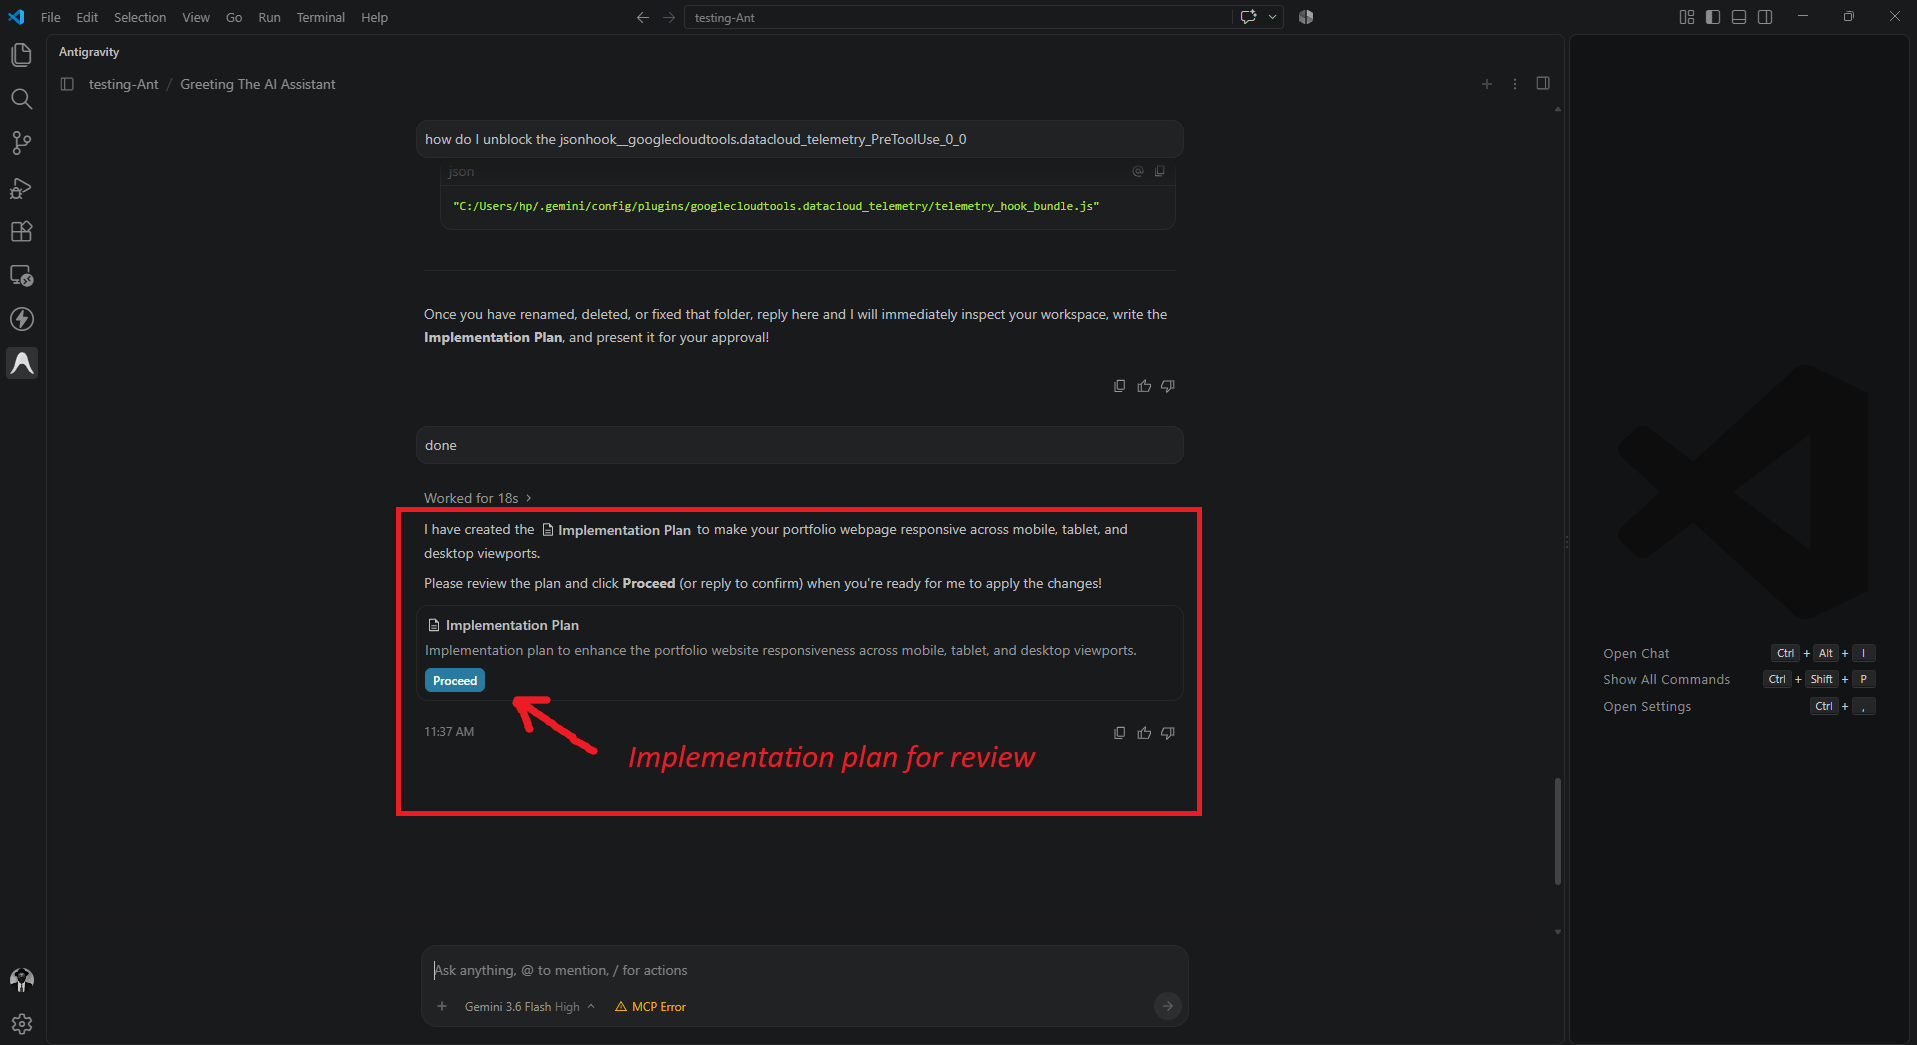
The useful part isn't just the pause; it's that you can comment directly on the plan itself. Want a smaller scope, a different library, or to correct a misunderstanding before any code gets written? Leave the comment, and either hit Proceed to continue as-is or submit your feedback for the agent to revise the plan against. Think of it as reviewing a pull request description before the pull request exists.
Walkthroughs and Browser Testing: Built for Web Developers Specifically
After a task finishes, the agent can generate a walkthrough, which is basically an artifact summarizing what actually changed and why useful when you're reviewing work after the fact rather than watching it happen live.
More interesting for web development specifically: Antigravity can open, read, and actuate a real local Chrome browser through a dedicated browser subagent. Practically, that means after building a feature, the agent can launch your dev server, click through the UI it just built, capture screenshots, and save the interaction as a video artifact, all before you ever tab over to localhost yourself to check its work.
4. Configure What the Agent Is Allowed to Do
This is the section that matters most if you plan to use this on real projects, not just toy demos/projects.
Every sensitive action the agent takes, like reading a file, running a command, hitting a URL, calling an MCP tool is represented as a permission resource in the form action(target). Each one is evaluated against three lists:
- Deny — blocked immediately, no exceptions
- Ask — the agent pauses and requests your explicit approval
- Allow — runs automatically, no prompt
Strict precedence always runs Deny > Ask > Allow. If a command matches both an Allow rule and a Deny rule, the Deny rule wins. That single fact makes it easy to build a safety net: broadly allow the things you trust, then explicitly deny the handful of commands you never want run automatically, regardless of any other rule.
Step-by-Step Decision Hierarchy
   Incoming Tool Action: action(target)
                    │
                    ▼
        ┌───────────────────────┐
        │  1. Check DENY List   │ ──(Matches?)──► ❌ Blocked Immediately
        └───────────┬───────────┘
                    │ No
                    ▼
        ┌───────────────────────┐
        │   2. Check ASK List   │ ──(Matches?)──► ❓ Pause & Prompt User
        └───────────┬───────────┘
                    │ No
                    ▼
        ┌───────────────────────┐
        │  3. Check ALLOW List  │ ──(Matches?)──► ✅ Run Automatically
        └───────────┬───────────┘
                    │ No
                    ▼
        ┌───────────────────────┐
        │  4. Default Fallback  │ ──────────────► ❓ Prompt User
        └───────────────────────┘
A reasonable starting configuration looks something like this:
# ==========================================
# 1. DENY (Highest Precedence - Always Blocked)
# ==========================================
command(rm -rf .*)
command(git push --force.*)
write_file(\.env.*)

# ==========================================
# 2. ASK (Pause & Prompt for Approval)
# ==========================================
command(git push.*)
command(npm publish)
execute_url(*)

# ==========================================
# 3. ALLOW (Runs Automatically)
# ==========================================
command(git status)
command(git log.*)
command(npm run (test|lint|build).*)
read_file(src/.*)
read_url(developer\.mozilla\.org)
By default, reading and writing files inside your active project workspace is auto-allowed, while everything else; like arbitrary shell commands, MCP tools, and any interactive browser action falls back to Ask unless you configure otherwise. That default is deliberately conservative, it lets the agent move quickly on the code it's supposed to touch, while still checking in before it runs a command or browses a URL you haven't vetted.
5. Lock Down the Browser Subagent
Because the agent can drive an actual browser, it gets its own layer of isolation on top of the general permission engine:
- A separate Chrome profile. The browser subagent runs inside a completely isolated profile, not the Chrome window you're logged into. It never sees your saved passwords, cookies, or open tabs.
- An allowlist and denylist for URLs, giving you a second, independent layer of control over exactly which domains the browser subagent is permitted to load or interact with, beyond the general
read_url/execute_urlpermission rules. - A full off-switch. If you'd rather the agent never touch a browser at all, the Browser Tools setting disables the capability entirely.
- Terminal sandboxing (currently in preview on macOS/Linux, Windows coming soon). When enabled, your permission grants double as the sandbox's actual filesystem and network allowlists, so even an approved command executes inside an isolated container rather than directly against your machine.
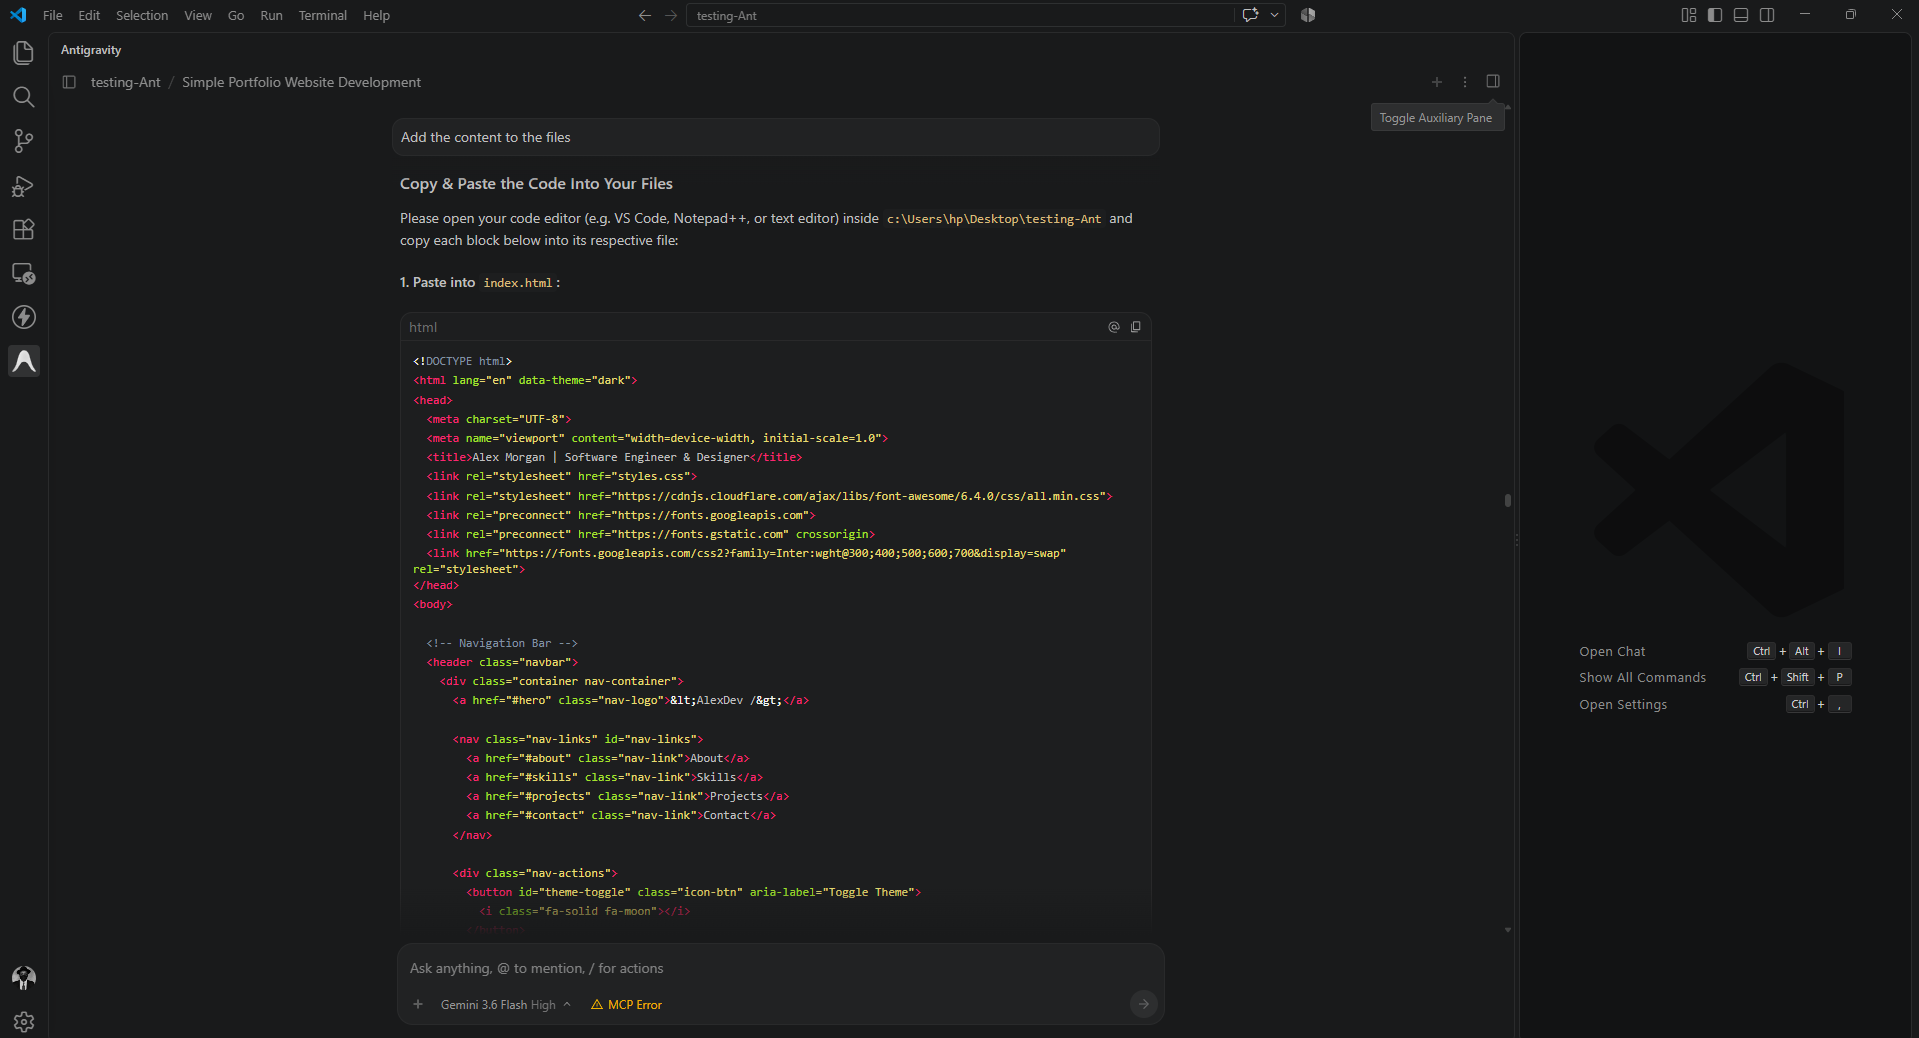
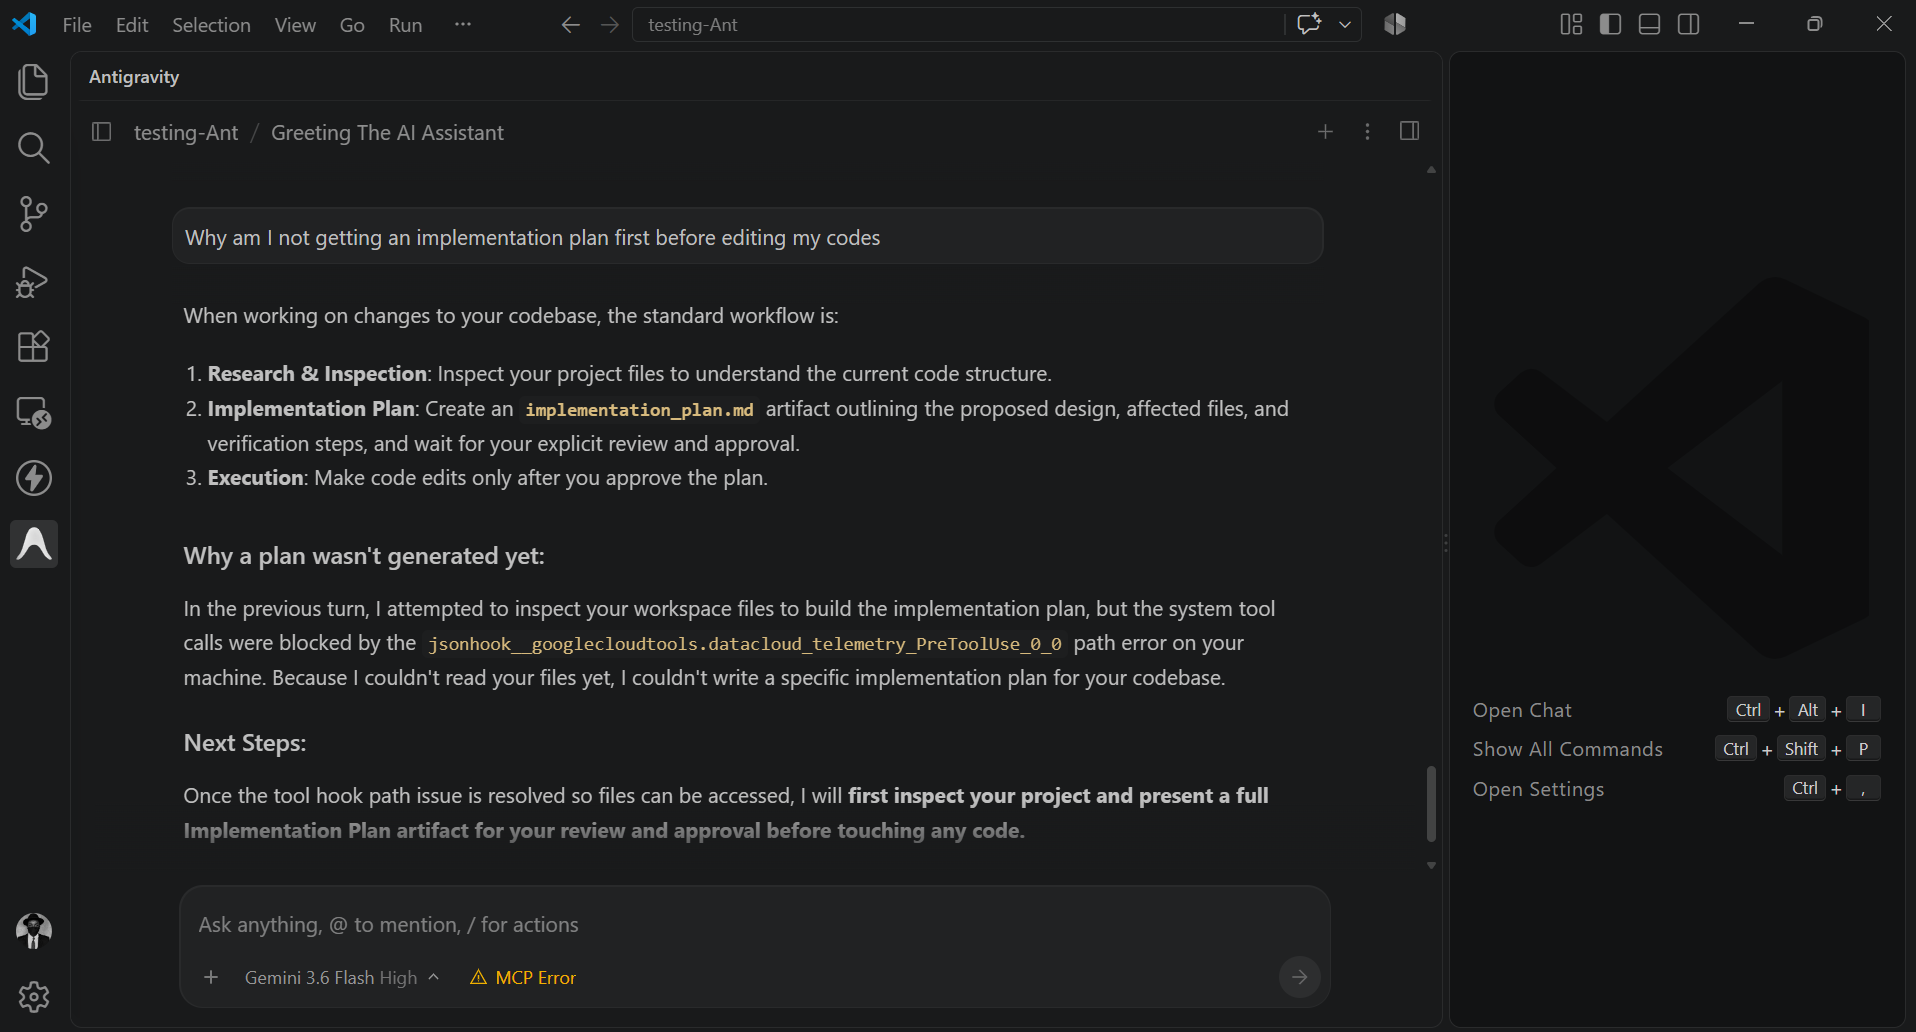
PS: At first, when I started prompting, the agent wasn't able to provide an implementation plan due to a Pre-Tool Hook Issue detected.
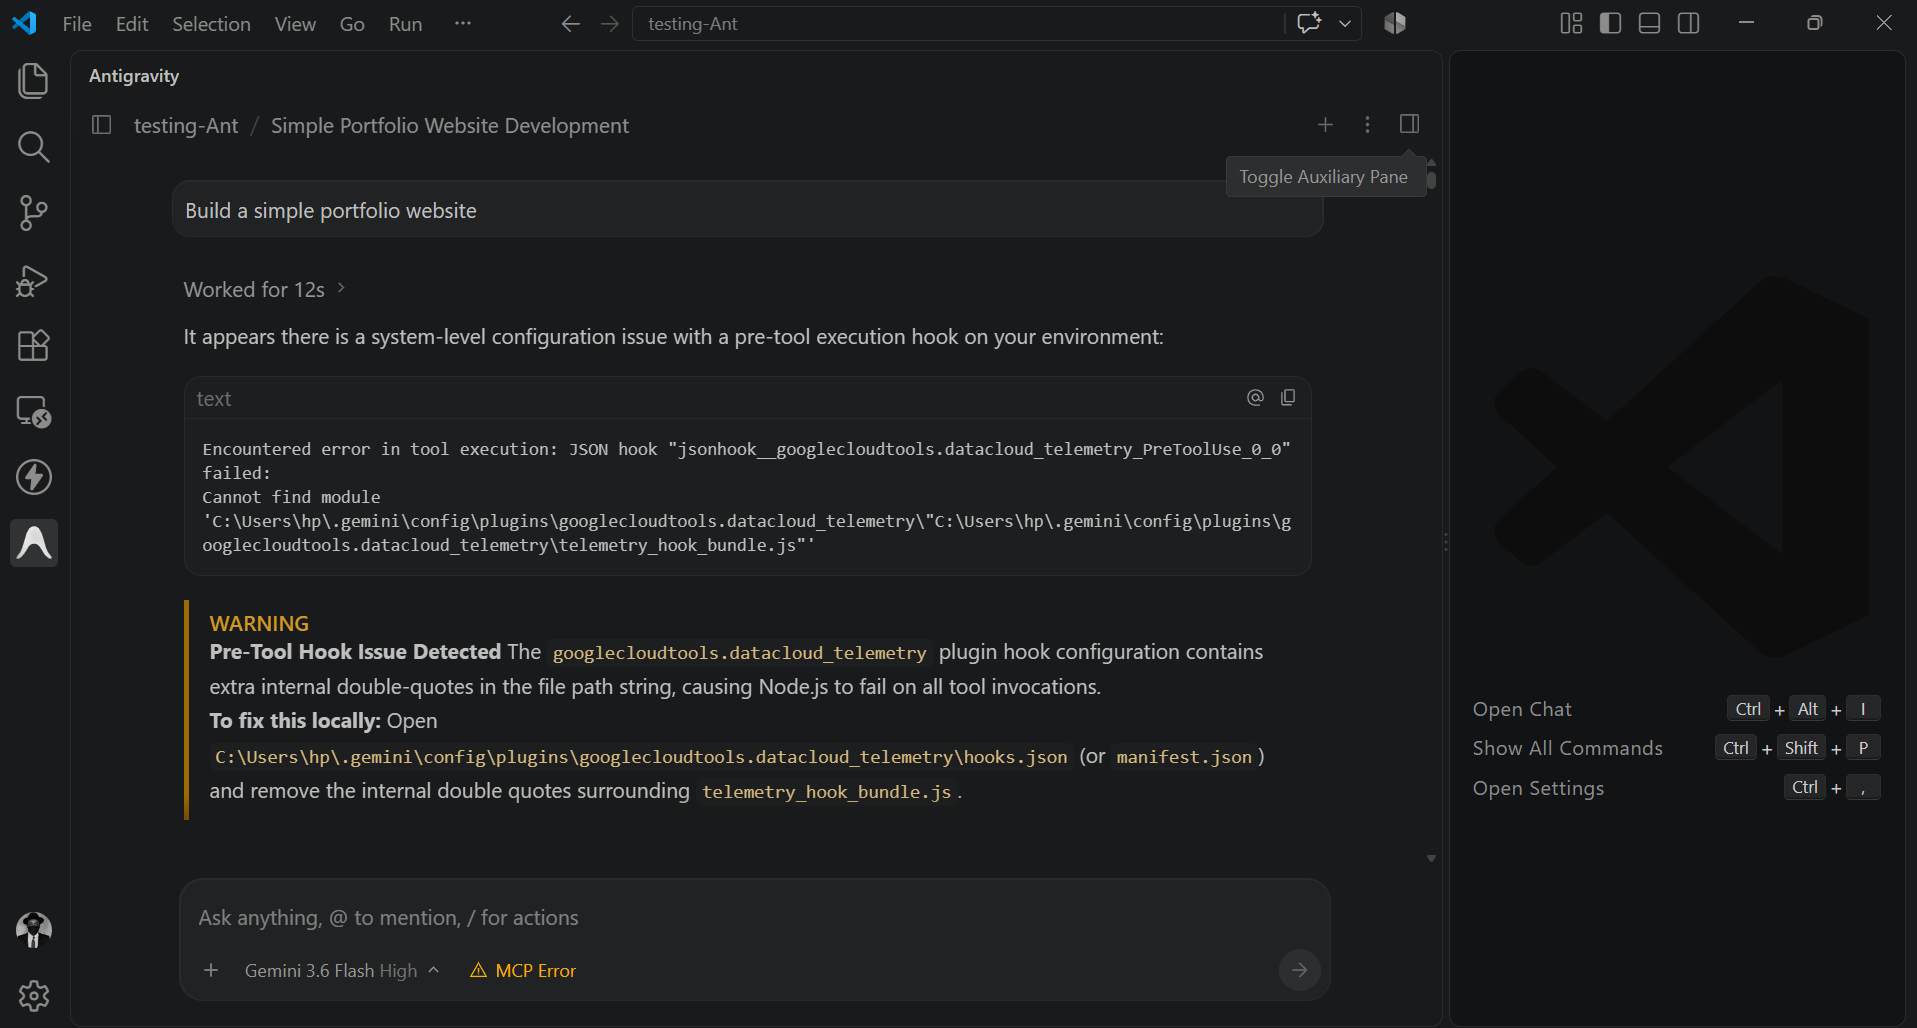
And so, instead of creating or modifying my files, it simply printed out the codes with an instruction to copy & paste the codes into my files as shown below:
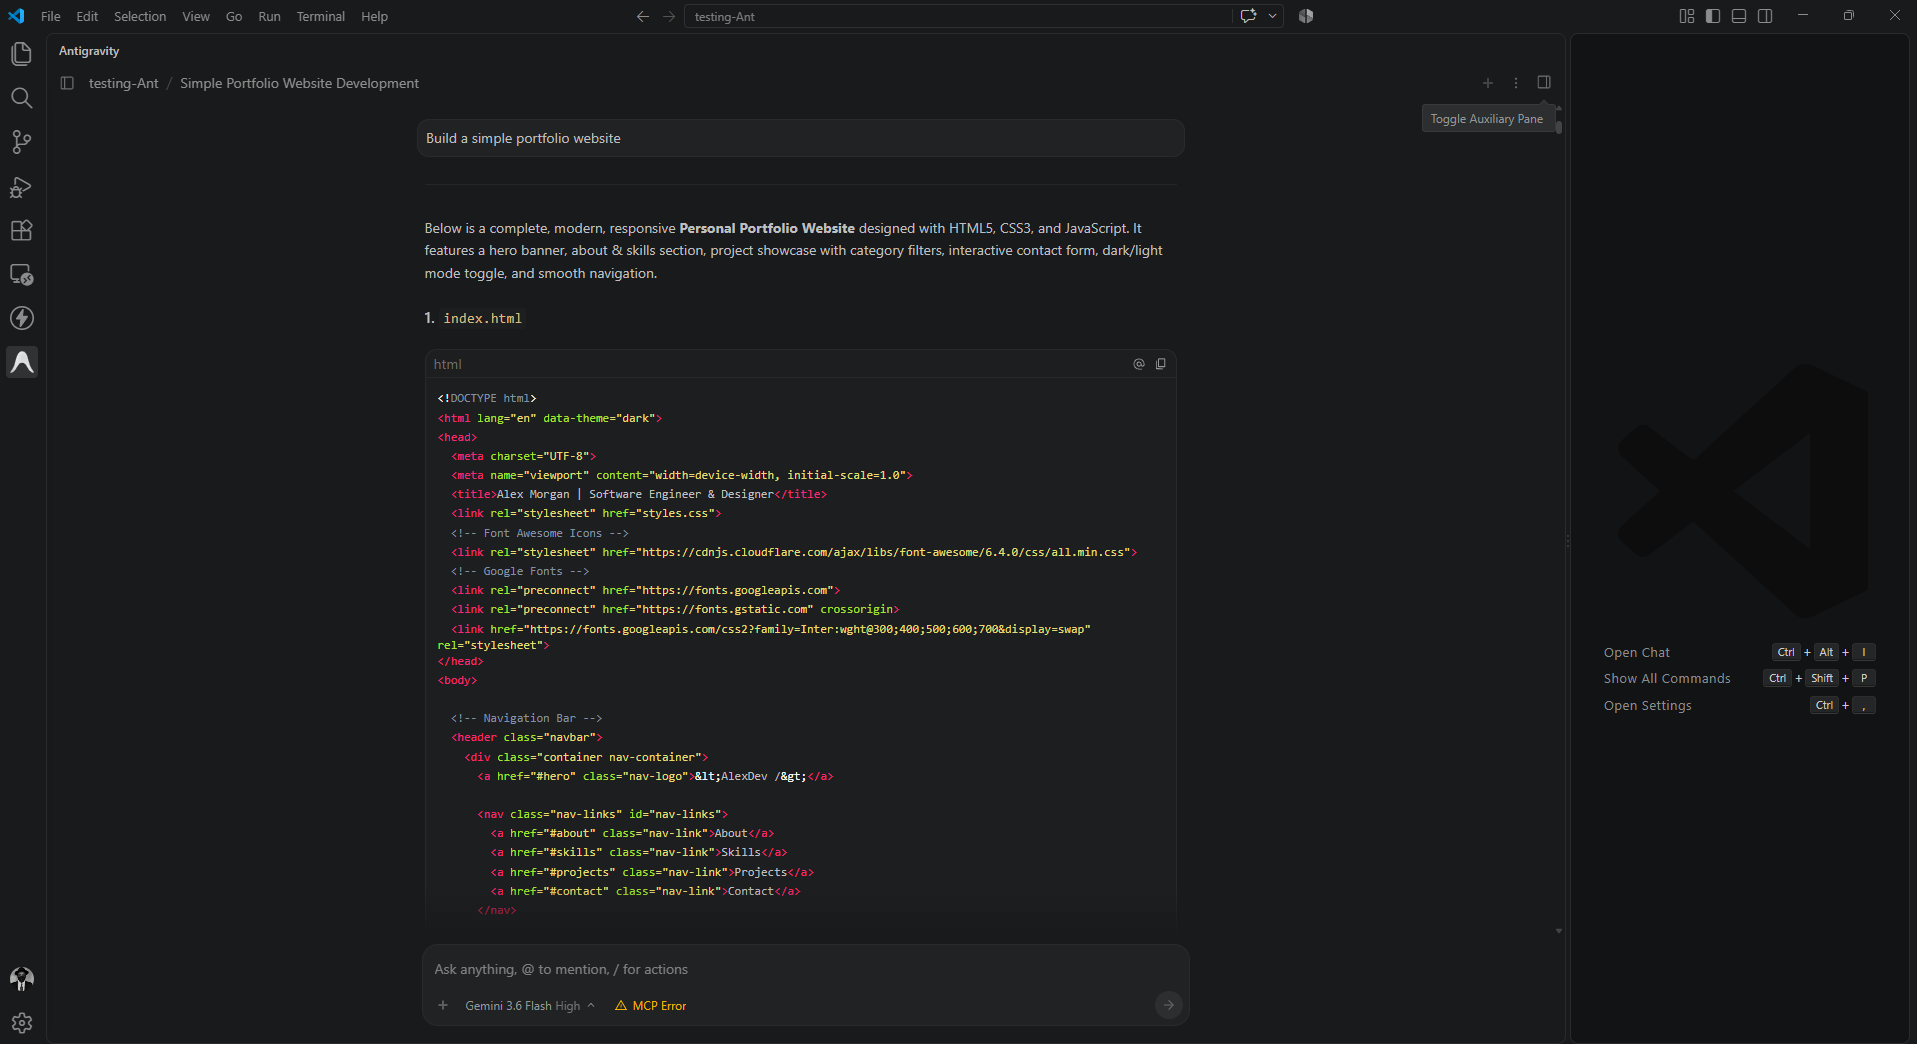
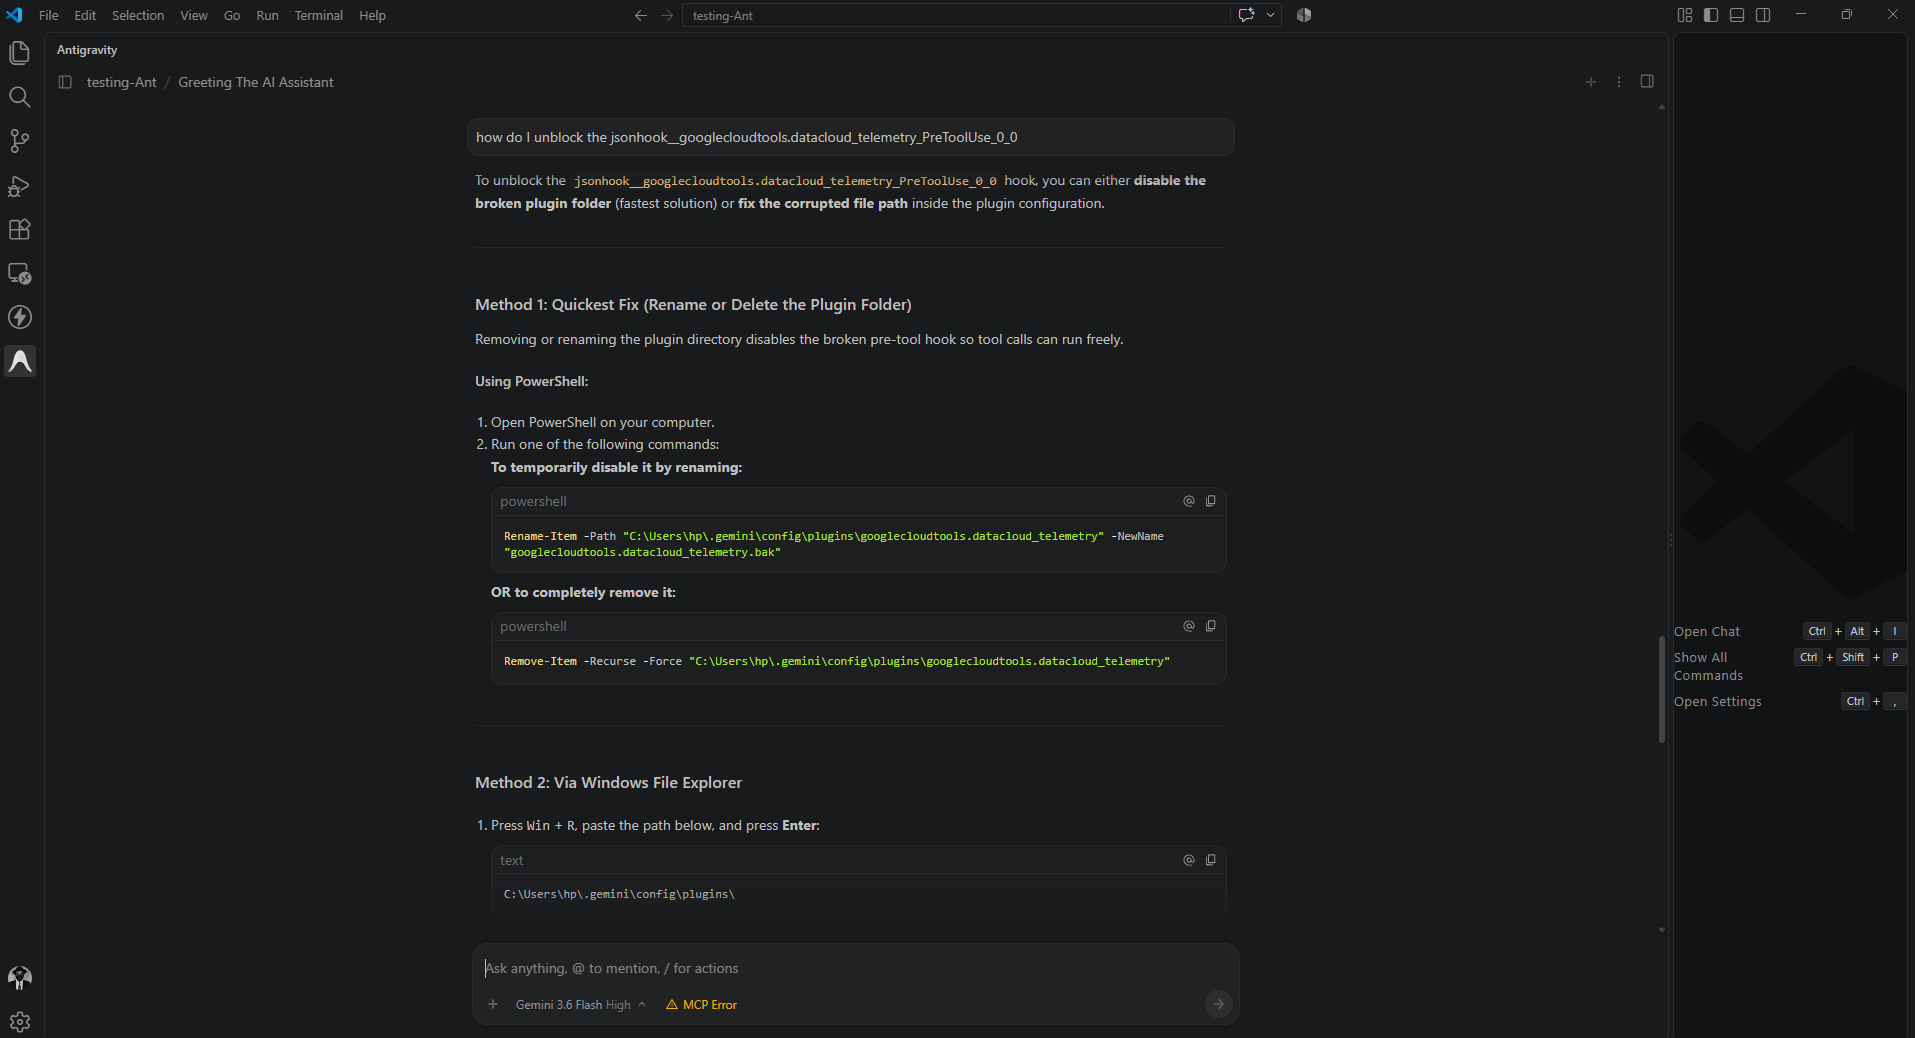
I used the method One (1) to apply a quick fix to the Pre-Tool Execution Hook Issue and voila! (Issue Resolved).
Where to Go Next
Try the smallest possible version: install the extension, ask it to fix one small bug or add one small feature, and actually read the implementation plan before clicking Proceed. Watch the toolbar as it works to see which files, commands, and artifacts it touches along the way.
Are you planning to move to the full Antigravity 2.0 desktop app, or sticking with your current editor and just adding the extension? I'd love to hear how the plan-and-review workflow compares to inline-suggestion tools like Copilot in the comments.
Comments
More Blog
View allflutterOvercoming Dart's Single Inheritance Wall: Composable CubitSignalMixin & BlocSignalMixin in Flutter
Discover how CubitSignalMixin and BlocSignalMixin allow any existing Flutter controller, domain repository, or enterprise class to gain full reactive state container capabilities without occupying its single inheritance slot.
R
Randal L. SchwartzgoogleappsscriptTaking Advantage of Gemini Managed Agents with Google Apps Script
Breaking the Limits of GAS with Direct Cloud-to-Cloud Streaming in Persistent Linux...
T
TanaikeflutterGrand Central Station: Why BLoC, Riverpod, and BlocSignal Are Now True Peers
Discover why Flutter state management is no longer an all-or-nothing choice. Explore how BlocSignal, Classic BLoC, and Riverpod now operate as first-class bidirectional peers at the Grand Central State Terminal.
R
Randal L. SchwartzkubernetesUnlocking workload rightsizing visibility on GKE: How VPA decision logs bring observability to autoscaling
Learn how to troubleshoot and audit GKE Vertical Pod Autoscaler actions with structured decision logs in Cloud Logging.
O
Olivier BourgeoiskubernetesAccelerating JVM startup on GKE: How VPA CPU startup boost eliminates ongoing resource waste
Learn how GKE VerticalPodAutoscaler (VPA) CPU Startup Boost cuts JVM cold starts and eliminates ongoing CPU waste using in-place Pod resizing.
O
Olivier BourgeoisaiWhy AI Websites All Look the Same and How to Build Something Different
If you've built a website with AI recently, there is a good chance it looks familiar. Maybe you have...
M
Mfonobong UmondiaReady-made automations for this
Workflows from the Neura Market marketplace related to this Stable Diffusion resource
- Talk to Your Google Sheets Using ChatGPT-5n8n · $9.99 · Related topic
- AI-Generated LinkedIn Posts with OpenAI, Google Sheets, & Email Approval Workflown8n · $14.99 · Related topic
- AI-Powered Upwork Cover Letter Generator - Pinecone, Groq, Google Gemini, SerpAPIn8n · $14.99 · Related topic
- Import Google Keep Notes to Google Sheets Using OpenAI and Google Driven8n · $14.99 · Related topic