Automate Invoice Data Extraction with ChatGPT Vision: A Step-by-Step Guide
Prerequisites
- ✓ ChatGPT account (free or paid)
- ✓ Sample invoice image or PDF
- ✓ Basic familiarity with ChatGPT interface
- ✓ Optional: OpenAI API key for automation
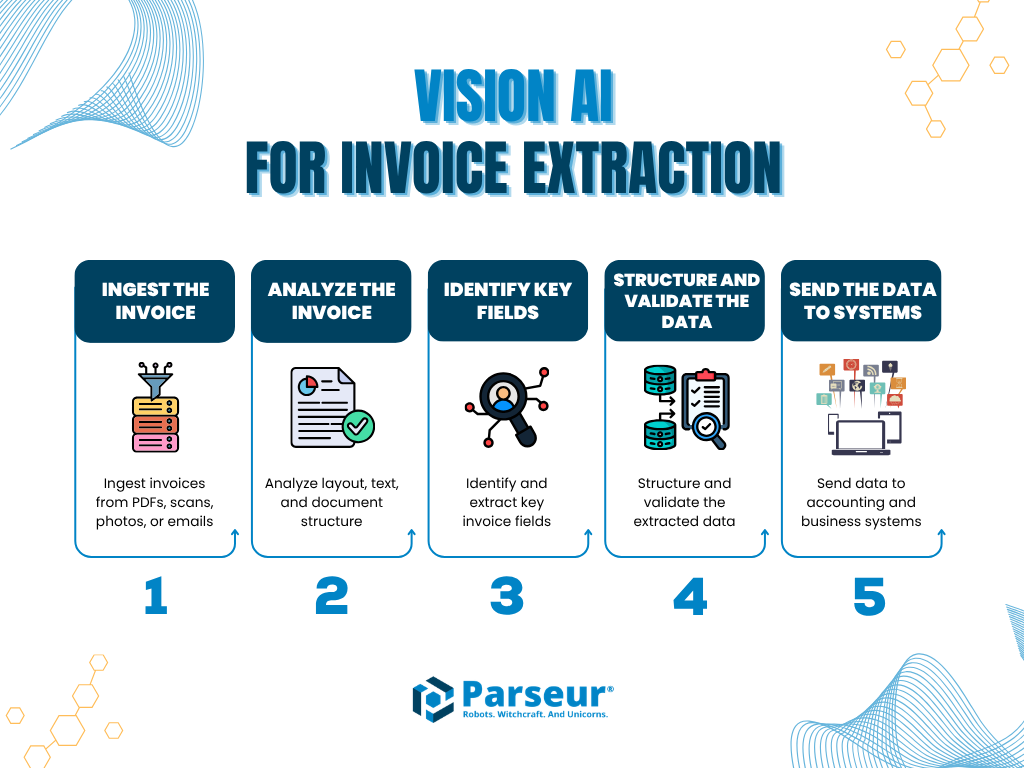
You will build a system that uses ChatGPT's vision capabilities to automatically extract key fields from invoice PDFs and images, such as invoice number, date, total amount, vendor name, and line items. The process involves uploading an invoice image to ChatGPT, crafting a structured prompt that instructs the model to return the data in a consistent format (like JSON), and then copying or piping that output into a spreadsheet or database. This tutorial covers the entire workflow from prompt design to handling edge cases, and it takes roughly 30 minutes to complete the first end-to-end extraction.
Prerequisites
- A ChatGPT account (free tier works, but Plus or Pro is recommended for higher usage limits and access to GPT-5.6 or GPT-4o models with vision).
- A sample invoice image or PDF (convert PDF to image if needed; ChatGPT accepts PNG, JPEG, WEBP, and non-animated GIF).
- Basic familiarity with ChatGPT's web interface or mobile app.
- Optional: A text editor or spreadsheet application to store extracted data.
- Optional: An OpenAI API key if you plan to automate via the API (covered in the advanced section).
Step 1: Prepare Your Invoice File
Before you can extract data, you need a clear, readable invoice image. ChatGPT's vision model works best with high-contrast, well-lit images where text is legible. The official OpenAI documentation states that input images must be "clear enough for a human to understand." Supported file types are PNG, JPEG, WEBP, and non-animated GIF. The maximum payload size per request is 512 MB, and you can include up to 1500 individual image inputs per request, though for a single invoice you will only need one.
If your invoice is a PDF, you must convert it to an image first. Most operating systems have built-in tools: on Windows, you can open the PDF and take a screenshot using the Snipping Tool; on macOS, use Preview to export a page as a PNG or JPEG. Online converters like Smallpdf or Adobe Acrobat online also work. The key is to ensure the entire invoice is visible in a single image, or if it is multi-page, you will need to upload each page as a separate image in the same conversation.
Avoid images with watermarks or logos that obscure text, as the documentation warns against "No watermarks or logos" for best results. Also, ensure the image does not contain NSFW content, as the model may refuse to process it.
Step 2: Open ChatGPT and Start a New Conversation
Navigate to chat.openai.com and log in to your account. Click on the "New Chat" button (usually a plus icon or a pencil icon in the sidebar) to start a fresh conversation. This is important because a clean context avoids confusion from previous messages. If you are using the mobile app, tap the new conversation icon.
ChatGPT's vision capability is available in the default chat interface. You do not need to switch to a special mode. As of the latest updates, the model automatically detects when you upload an image and will use its vision understanding to analyze it.
Step 3: Upload the Invoice Image
In the message input area, look for the paperclip icon or the plus icon (depending on your platform). Click it and select "Upload file" or "Choose file." Navigate to your invoice image and select it. ChatGPT will display a thumbnail of the image in the message area. You can upload multiple images if needed; the documentation confirms you can provide multiple images in a single request by including them in the content array.
If you are using the ChatGPT mobile app, you can also take a photo of a physical invoice using the camera icon. The macOS app has a screenshot tool that lets you capture a portion of your screen directly. The official help center notes that the macOS app supports "taking screenshots with the ChatGPT macOS app" via a dedicated tool.
Once the image is uploaded, you will see it attached to your message. Do not send the message yet; you need to add a prompt.
Step 4: Write an Extraction Prompt
The quality of your extracted data depends heavily on the prompt. The official OpenAI documentation on prompt engineering best practices for ChatGPT advises being specific and providing context. For invoice extraction, you want to instruct the model to return the data in a structured format, such as JSON, so you can easily parse it later.
Here is a sample prompt that works well:
Extract the following fields from this invoice image and return them as a JSON object. Do not include any other text.

Fields:
- invoice_number
- invoice_date
- due_date
- vendor_name
- vendor_address
- customer_name
- customer_address
- subtotal
- tax_amount
- total_amount
- currency
- line_items (an array of objects, each with description, quantity, unit_price, and line_total)

If a field is not present, set its value to null. Use the exact field names as keys.
This prompt works because it:
- Tells the model exactly what to do (extract fields).
- Specifies the output format (JSON).
- Lists all expected fields, reducing omissions.
- Handles missing data gracefully with null.
- Requests line items as an array, which is common in invoices.
You can customize the field list based on your specific invoice layout. For example, if you need purchase order numbers or payment terms, add them.
Step 5: Send the Message and Review the Output
After typing or pasting your prompt, press Enter or click the send button. ChatGPT will process the image and your prompt, then return a response. The response should be a JSON object. Here is an example of what you might see:
{
  "invoice_number": "INV-2024-001",
  "invoice_date": "2024-03-15",
  "due_date": "2024-04-14",
  "vendor_name": "Acme Supplies Inc.",
  "vendor_address": "123 Business Rd, Suite 200, Commerce City, CA 90210",
  "customer_name": "Widget Corp",
  "customer_address": "456 Industrial Ave, Metropolis, NY 10001",
  "subtotal": 1500.00,
  "tax_amount": 150.00,
  "total_amount": 1650.00,
  "currency": "USD",
  "line_items": [
    {
      "description": "Widget A",
      "quantity": 10,
      "unit_price": 100.00,
      "line_total": 1000.00
    },
    {
      "description": "Widget B",
      "quantity": 5,
      "unit_price": 100.00,
      "line_total": 500.00
    }
  ]
}
If the output is not perfect, you can refine the prompt. For instance, if the model includes extra text, add "Return ONLY the JSON object, no other text." If the model misreads a number, you can ask it to double-check: "Review the image carefully and correct any misread numbers."
Step 6: Handle Multi-Page Invoices
If your invoice spans multiple pages, you need to upload each page as a separate image. In a single ChatGPT conversation, you can upload multiple images in one message. The official documentation shows how to provide multiple images in the content array. In the chat interface, you can attach multiple files before sending. Then, modify your prompt to instruct the model to combine information from all images:
I am uploading two images that together form a single invoice. Extract all fields from both images and return a single JSON object as specified. If a field appears on multiple pages, use the most complete version.
Alternatively, you can process each page separately and then merge the results manually or with a script. The first approach is more efficient.
Step 7: Copy the Extracted Data to Your Destination
Once you have the JSON output, you can copy it and paste it into a spreadsheet, a database, or a file. For example, in Google Sheets or Excel, you can use the "Import JSON" feature or a simple script to parse the JSON and populate cells. If you are using a no-code platform like Power Automate, you can use the "Parse JSON" action to extract individual fields.
The official OpenAI documentation on file uploads FAQ confirms that you can upload files to ChatGPT and also download or copy the generated content. There is no built-in export to a spreadsheet, but the manual copy-paste is straightforward for a few invoices. For bulk processing, see the advanced section below.
Step 8: Automate with the OpenAI API (Advanced)
For processing many invoices, you can use the OpenAI API directly. This approach is covered in the official vision documentation. You will need an API key from platform.openai.com. The API allows you to send images as Base64-encoded strings, URLs, or file IDs.
Here is a Python script that extracts invoice data from a local image file using the Chat Completions API:
import base64
from openai import OpenAI

client = OpenAI()

def encode_image(image_path):
    with open(image_path, "rb") as image_file:
        return base64.b64encode(image_file.read()).decode("utf-8")

image_path = "invoice.jpg"
base64_image = encode_image(image_path)

response = client.chat.completions.create(
    model="gpt-5.6",
    messages=[
        {
            "role": "user",
            "content": [
                {
                    "type": "text",
                    "text": "Extract the following fields from this invoice image and return them as a JSON object. Do not include any other text.\n\nFields:\n- invoice_number\n- invoice_date\n- due_date\n- vendor_name\n- vendor_address\n- customer_name\n- customer_address\n- subtotal\n- tax_amount\n- total_amount\n- currency\n- line_items (an array of objects, each with description, quantity, unit_price, and line_total)\n\nIf a field is not present, set its value to null. Use the exact field names as keys."
                },
                {
                    "type": "image_url",
                    "image_url": {
                        "url": f"data:image/jpeg;base64,{base64_image}",
                        "detail": "high"
                    }
                }
            ]
        }
    ],
    max_tokens=1000
)

print(response.choices[0].message.content)
This script:
- Reads the image file and converts it to a Base64 string.
- Sends a request to the Chat Completions API with the same prompt used in the chat interface.
- Sets
detailtohighfor better accuracy on text-heavy images. The documentation explains thathighis best for "standard high-fidelity image understanding." - Prints the JSON response.
You can modify the script to loop over multiple files, save the output to a CSV file, or integrate with a database. The official documentation also shows how to use the Responses API, which is a newer endpoint. Here is the equivalent using the Responses API:
from openai import OpenAI
import base64

client = OpenAI()

def encode_image(image_path):
    with open(image_path, "rb") as image_file:
        return base64.b64encode(image_file.read()).decode("utf-8")

image_path = "invoice.jpg"
base64_image = encode_image(image_path)

response = client.responses.create(
    model="gpt-5.6",
    input=[
        {
            "role": "user",
            "content": [
                {
                    "type": "input_text",
                    "text": "Extract the following fields from this invoice image and return them as a JSON object. Do not include any other text.\n\nFields:\n- invoice_number\n- invoice_date\n- due_date\n- vendor_name\n- vendor_address\n- customer_name\n- customer_address\n- subtotal\n- tax_amount\n- total_amount\n- currency\n- line_items (an array of objects, each with description, quantity, unit_price, and line_total)\n\nIf a field is not present, set its value to null. Use the exact field names as keys."
                },
                {
                    "type": "input_image",
                    "image_url": f"data:image/jpeg;base64,{base64_image}",
                    "detail": "high"
                }
            ]
        }
    ]
)

print(response.output_text)
The Responses API uses input_text and input_image types instead of text and image_url. Both work, but the Responses API is the newer standard.
Step 9: Integrate with Power Automate (Alternative No-Code Approach)
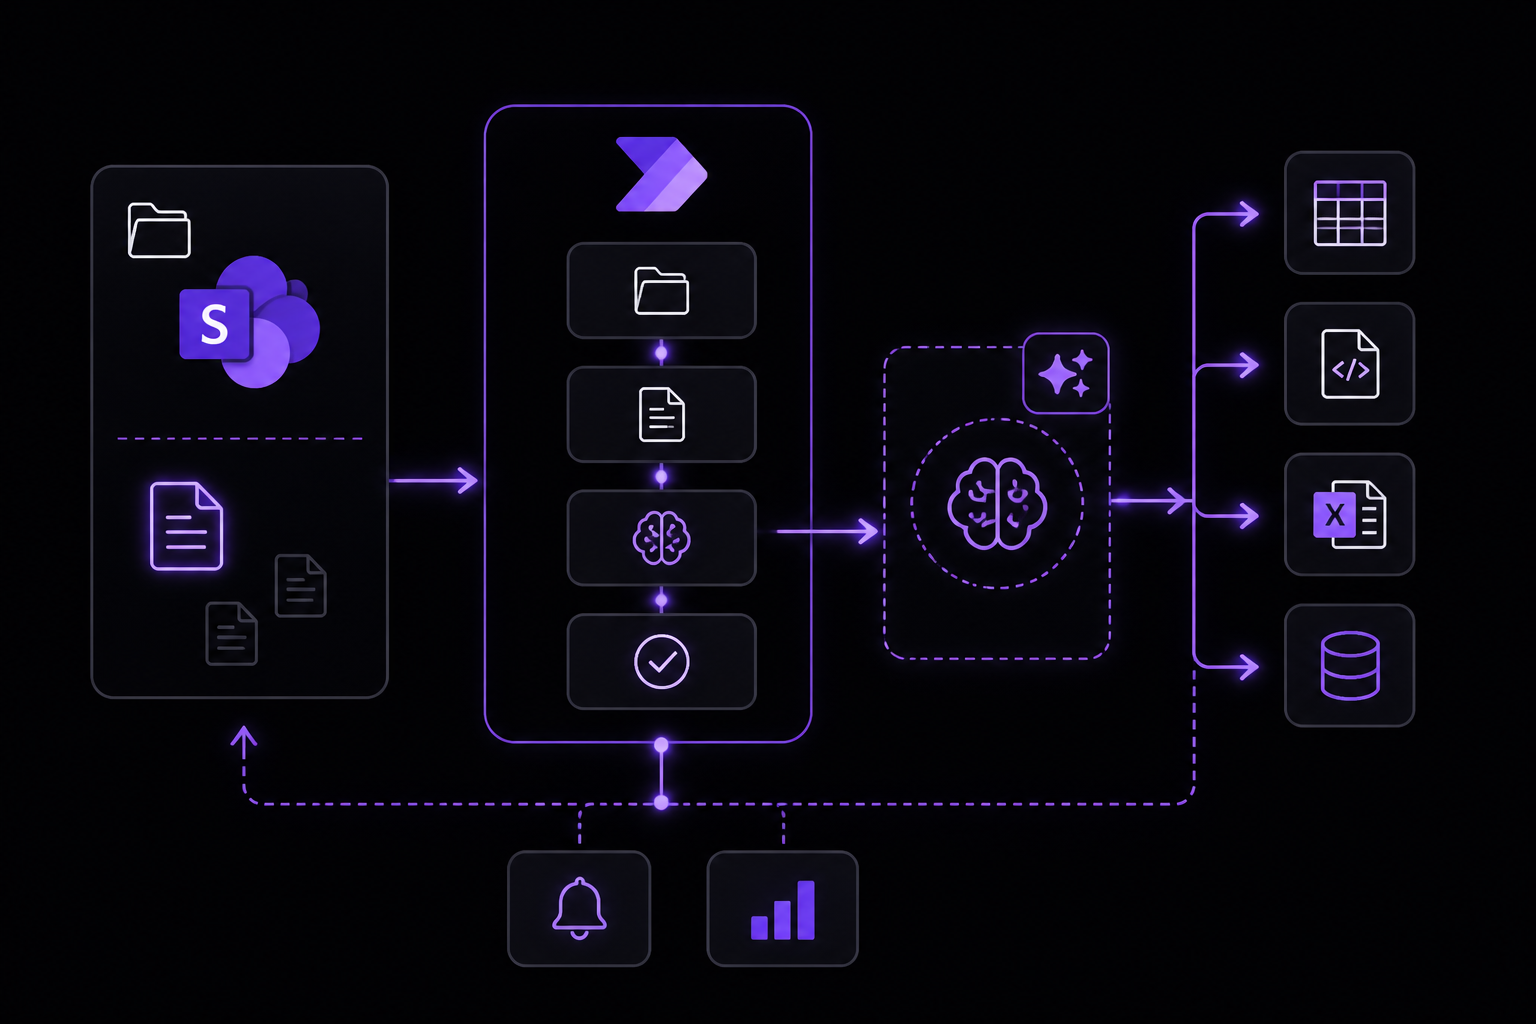
If you prefer a no-code solution, you can use Microsoft Power Automate with AI Builder, as demonstrated in a popular YouTube tutorial. This approach is ideal for users within the Microsoft 365 ecosystem who want to automate invoice extraction from SharePoint. The flow works as follows:
-
Trigger: When a new file is created or modified in a SharePoint document library. The tutorial recommends using the "When a file is created or modified" trigger. You must select the specific SharePoint site and library. The video creator advises switching to "Classic view" for enhanced configuration options.
-
Get file content: Use the "Get file content" action to retrieve the PDF from SharePoint.
-
Extract data with AI Builder: Use the "Extract data from invoices" action from AI Builder. This prebuilt AI model is trained specifically for invoice fields. It can extract invoice number, date, total, vendor, and line items. The tutorial shows that after testing, the model returns structured data like:
- Invoice ID
- Invoice date
- Vendor name
- Customer name
- Total amount
- Line items with description, quantity, and amount
-
Use the extracted data: You can then send an email with the extracted details, create a row in a database, or trigger another workflow. The tutorial demonstrates sending an email with a customized template using dynamic content from the AI Builder output. It also mentions troubleshooting duplicate currency symbols in the email output, which can be fixed by adjusting the email template formatting.
This Power Automate approach is a viable alternative if you already use Microsoft 365 and prefer a graphical interface over coding. However, it requires a Power Automate license that includes AI Builder credits. The ChatGPT vision approach is more flexible and works with any invoice format, while AI Builder is optimized for common invoice layouts.
Verifying It Works
To confirm your extraction is correct, compare the extracted data against the original invoice. Check these points:
- Invoice number: Should match exactly, including any prefixes or suffixes.
- Dates: Should be in a consistent format (e.g., YYYY-MM-DD). If the invoice uses a different format, the model may convert it. Verify the day and month are correct.
- Monetary amounts: The total should equal subtotal plus tax (if applicable). The model may sometimes misread a comma as a decimal separator or vice versa. For example, "1,500.00" might be read as "1500.00" (correct) or "1.500,00" (European format). Check your regional settings.
- Vendor and customer names: Should be spelled correctly. The model may hallucinate if the text is blurry.
- Line items: The sum of line totals should match the subtotal. If not, the model may have missed a line or misread a quantity.
If you are using the API, you can automate verification by writing a script that checks these conditions and flags discrepancies. For manual verification, a quick visual scan is sufficient for a few invoices.
Common Problems
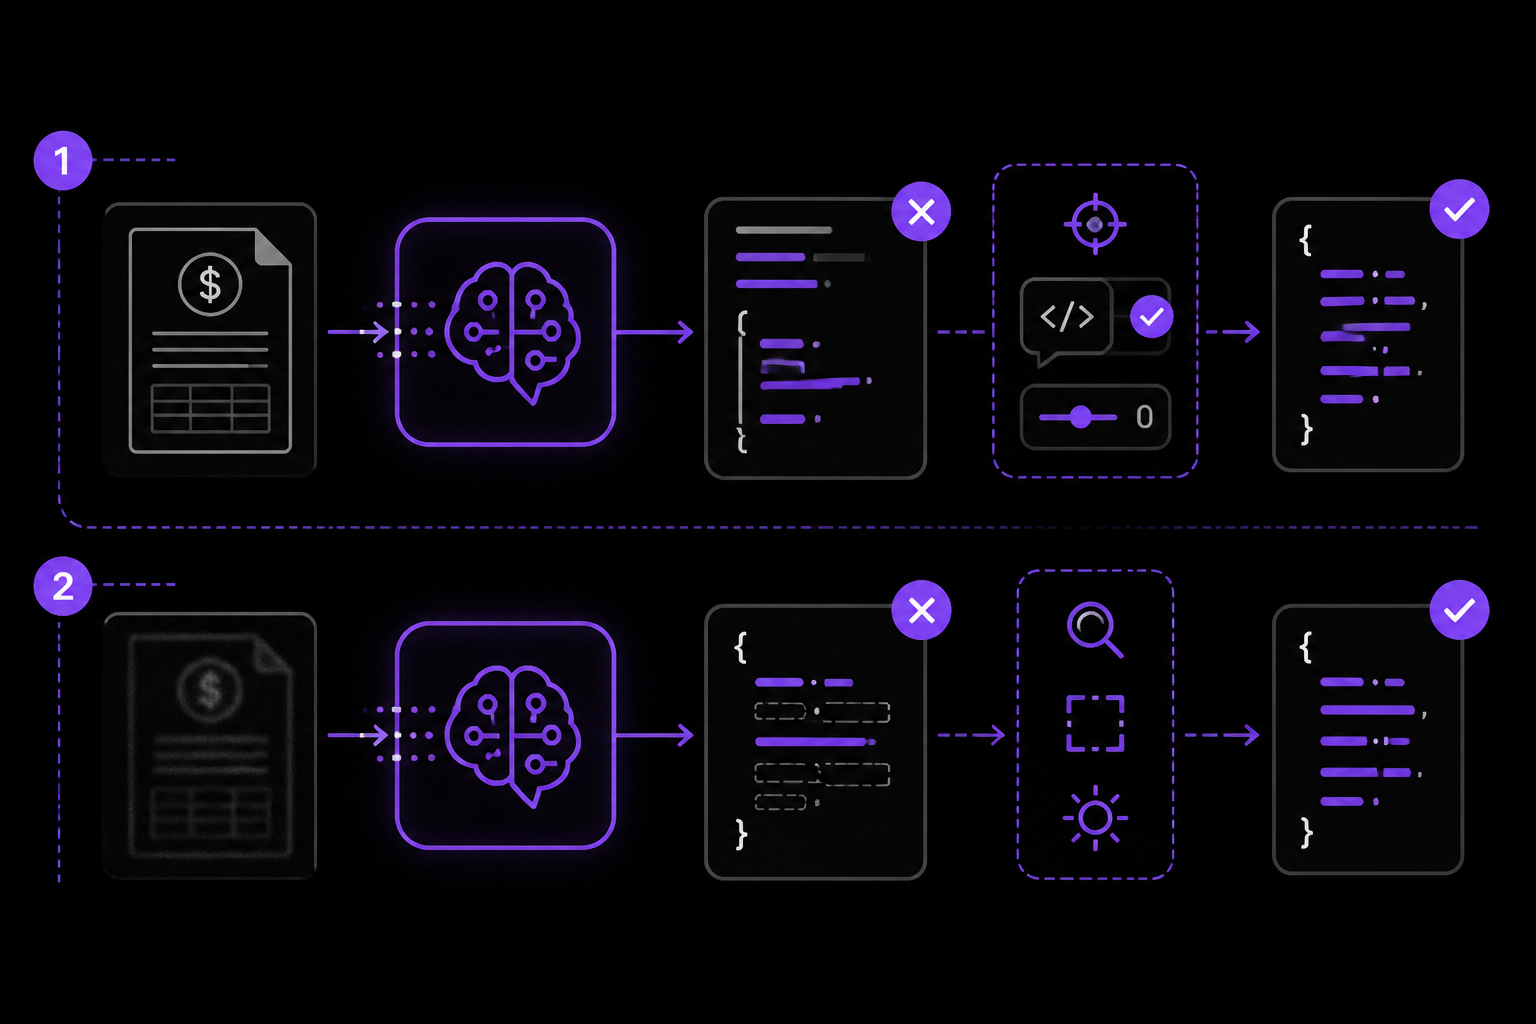
Problem 1: The model returns text instead of JSON
Cause: The prompt did not strictly instruct the model to return only JSON. The model may add explanatory text.
Fix: Add "Return ONLY the JSON object, no other text" to your prompt. You can also set temperature to 0 in the API to reduce randomness. In the chat interface, you can follow up with "Remove any extra text and return only the JSON."
Problem 2: Incorrect or missing fields
Cause: The image is low quality, the text is too small, or the field is in an unusual location. The official documentation notes that images must be "clear enough for a human to understand."
Fix: Use a higher resolution image. If the invoice is scanned at 72 DPI, rescan at 300 DPI. For screenshots, zoom in before capturing. You can also set the detail parameter to high or original for better accuracy. The documentation states that original preserves the input dimensions and does not resize, which is best for dense text.
Problem 3: The model hallucinates data (e.g., invents a total)
Cause: The model may guess if the text is ambiguous or if the prompt asks for a field that does not exist. This is a known limitation of language models.
Fix: Instruct the model to set missing fields to null rather than guessing. In your prompt, include: "If a field is not present, set its value to null." Also, ask the model to "only extract data that is explicitly visible in the image." Community members on Reddit report that adding "Do not infer or calculate any values" helps reduce hallucinations.
Problem 4: The model cannot read handwriting or stylized fonts
Cause: Vision models are less accurate with handwriting. The official documentation does not claim support for handwriting.
Fix: Use typed invoices. If you must process handwritten invoices, consider using a dedicated OCR service like Google Cloud Vision or Azure Form Recognizer, which are trained for handwriting. The ChatGPT vision model may still work for simple, clear handwriting, but results are not guaranteed.
Problem 5: Duplicate currency symbols in Power Automate email output
Cause: As noted in the YouTube tutorial, the AI Builder model may return the currency symbol as part of the amount field, and then the email template adds another symbol.
Fix: In Power Automate, use a "Compose" action to strip the currency symbol from the amount before inserting it into the email. For example, use the expression replace(outputs('Extract_data_from_invoices')?['body/totalAmount'], '$', '') to remove the dollar sign. The tutorial shows this adjustment resolves the issue.
Problem 6: API rate limits or token limits
Cause: The API has rate limits based on your tier. Also, large images consume many tokens. The documentation explains that images are metered in token units, and high-detail images cost more.
Fix: Use the low detail level for simple invoices to reduce token usage. The documentation says low is "fast, low-cost understanding when fine visual detail is not important." Resize images to 512x512 pixels before sending if you use low. For the API, monitor your usage in the OpenAI dashboard and upgrade your tier if needed.
Next Steps
-
Build a batch processing script: Extend the Python API script to process all invoices in a folder, extract the data, and save it to a CSV file. You can use the
osmodule to iterate over files and thecsvmodule to write the output. This turns the manual process into a fully automated pipeline. -
Create a web app for invoice upload: Build a simple web interface using Flask or Streamlit that lets users upload an invoice image and see the extracted data in a table. The backend calls the OpenAI API and returns the JSON. This makes the tool accessible to non-technical team members.
-
Integrate with accounting software: Use the extracted data to automatically create entries in QuickBooks, Xero, or other accounting platforms via their APIs. For example, after extracting the invoice total and vendor, you can call the QuickBooks API to create a bill. This eliminates manual data entry entirely.
-
Explore the Responses API for more complex workflows: The official documentation shows how to use the Responses API with tools like
image_generationandfile_search. You could build a system that not only extracts invoice data but also generates a summary report or searches for related purchase orders in a database. -
Use ChatGPT Scheduled Tasks for periodic processing: The ChatGPT help center mentions "Scheduled Tasks in ChatGPT" which can automate your work. You could set up a recurring task that checks a folder for new invoices and processes them, though this feature may require a Plus or Pro subscription.
By following this guide, you have learned how to use ChatGPT's vision capabilities to extract invoice data manually via the chat interface and programmatically via the API. You can now apply this technique to other document types, such as receipts, contracts, or forms, by adjusting the prompt and field list accordingly.
The #1 Chatgpt Newsletter
The most important chatgpt updates, guides, and fixes — one weekly email.
No spam, unsubscribe anytime. Privacy policy
Related Tutorials
Keep exploring ChatGPT
ChatGPT resources
Latest AI answers
Skip the manual work
Ready-made AI workflows and automation templates — import and run instead of building from scratch.